Wooden ceiling do it yourself
There are certain things that talk about high status or create comfort. One of the building materials that boasts such qualities is wood. A wooden ceiling with your own hands is not only an opportunity to create a unique interior, but also a chance to improve skills in decoration. There are some nuances in the installation, as well as the positive and negative sides, which should be weighed before proceeding with the installation work.
Main nuances
The ceiling should create a feeling of lightness, and not clutter the space. This effect can be achieved by correct selection of colors, textures, as well as shapes. Wood is a very flexible material in processing, it can be given any shape that the master wishes. Such solutions have many advantages:
- The natural basis is always highly ecological. You can not worry about allergic reactions or unpleasant odor. With the right approach, you can use water-based dyes.
- The durability of wood is difficult to overestimate. If you provide good care and stay on hardwood, the ceilings will last so long that they can get bored.
- Compatible with any interior. This type of material is suitable for both antique finish and modern style.
- Excellent insulating properties. This applies to both sound and heat loss. That tree was the main material for construction in ancient times, because People knew about such positive qualities.
- Creating a unique solution. You can order a ceiling project from an experienced joiner.

There are some dangers to consider:
- Love pests. If this is a solution of pure wood, and not of slabs, then it is imperative to ensure good treatment with antiseptic compounds.
- The need for proper storage. In the case when the wood was stored incorrectly, this may lead to the fact that the already finished structure will crack and lose its appearance.
- The possibility of ignition. It is important to think about this moment well in order to avoid accidents later.
- Relatively high cost.
Types of wood ceilings
It will be difficult within one article to list all possible solutions that exist. There are several main ones, but this does not mean that fantasy should be limited to any framework.
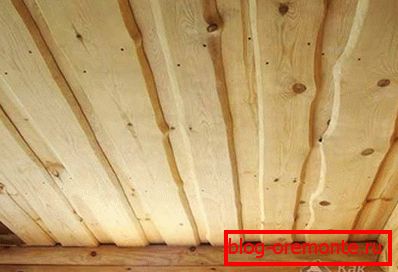
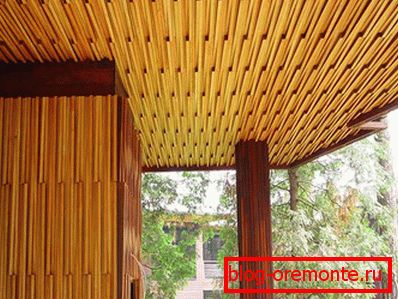
From edged board. In this case, the usual inexpensive building material is used. Appearance is given to it at the request of the customer. In some cases, the surface is burned with a gas burner, ground and varnished.
From chipped logs. Correct to say from the cut. They are based on rounded parts, which are fixed to the base with a flat side. In this case, only bark removal and polishing are carried out from the treatment, after which the elements are covered with stain or varnish.
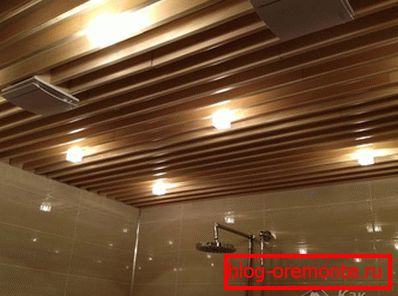
From lining. At its core, this is the same edged board, but well polished. It also made grooves that provide ease and convenience of the connection between them.
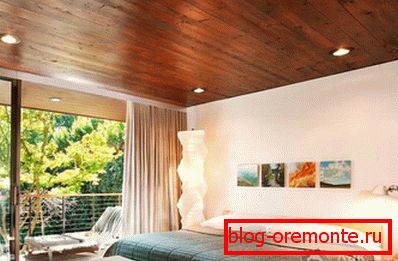
From eurolining. Equivalent to the previous solution, but the finish is much better. In addition, the wood has already given a certain shade. Also on the seamy side a special notch was made, which contributes to the ventilation of the whole structure. Sizes exactly match the stated. No need for additional impregnation.

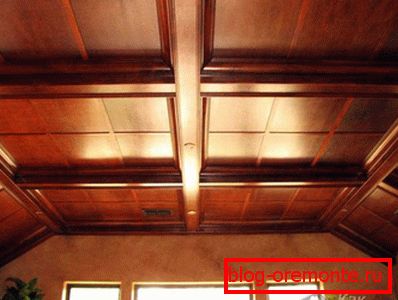
Caisson. The word came from French. In translation, it means "box". This solution was often used in ancient times. It was rather forced constructive than decorative. Such a decoration was obtained due to the crossing of the beams. Nowadays, this type of ceiling has received a new birth.


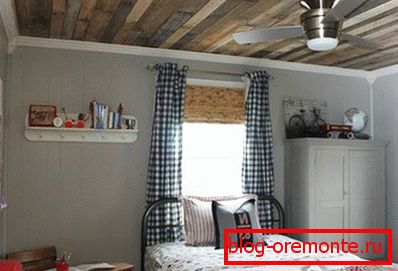
From the block house. If you combine chipped logs and lining technology, then just get a block house. On the front side, it has a convex semicircular structure that resembles a rounded log. The slats provide grooves and spikes that facilitate installation. After all the work is completed, a surface is obtained that resembles a good old log hut from a log house.
From plywood. In this case, the ceilings are quite smooth, but further painting and varnishing will be mandatory, since without such a finish, the appearance will not be attractive enough.

From MDF panels. The material is very similar to wooden wall paneling, but the front panel has a structure, as well as a special film that eliminates the likelihood of mechanical damage.
From decorative panels. In this case, an individual project is compiled. Next, the panels are made of the desired shape. This type of finish is one of the most expensive. In some cases, an array is used in which the patterns are cut out.

Of the fillets. These are wooden cornices of a small width. Unique patterns are made on them. You can arrange them in the correct geometric forms to create a solid appearance.

Wooden wallpaper. In fact, veneer is applied on a special base. After gluing such material, the impression of a monolithic ceiling, which is decorated with expensive material, is created. In addition, this view will be relevant if the surface of the ceiling is made in the form of an arch. The thin layer bends easily and takes the form of a structure.
In other ways of implementation, the plane itself can be from any material, for example, from drywall, but with wooden beams. In this case, it turns out to reduce costs and get the desired result.
Natural wood requires that at least once in 3–5 years the applied varnish or other coating be replaced. Due to this, inside it will not rot and dry.
Where the wooden ceiling is particularly appropriate
There are certain interior or exterior solutions where wood ceilings are not only desirable but necessary.
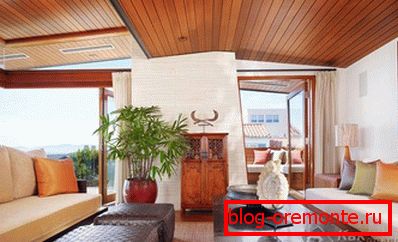
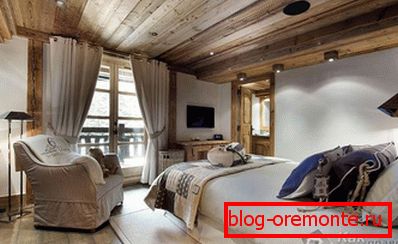
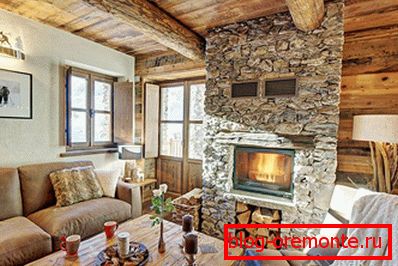
- Chalet. This concept is borrowed from the Swiss. In the original sense, this is a small rural house or a hunter's hut. For this style is characterized by a large number of beams.
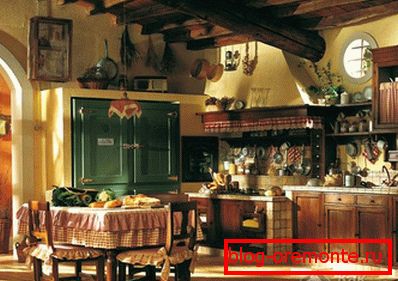
- Country When we hear this word, then, most likely, music with the characteristic sound of fiddle begins to play in the head immediately. In the interior design it is expressed in rounded ceiling beams, wooden walls. For such a solution is usually used a block house or a round log.
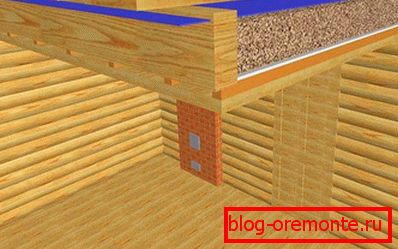
- House or bath from the log. In this case, there is not much to say. The building itself requires just such a finish.
To combine the wooden ceiling with other modern materials for wall and floor decoration, it is worth choosing solutions to match or provide some island wood inserts on these surfaces.
Preparatory work
- The first step is to calculate how much material will be needed for the surface. To do this, you need to multiply the width of the ceiling by its length and add another 10% to the result. This stock will be needed when performing trimming or damage to one of the blanks.
- When buying, ask the seller to show in what conditions the storage was carried out, this will avoid problems that may appear after installation.
- Assembly work должны происходить при температуре не ниже +15°. Также доска должна полежать несколько дней в помещении, чтобы приобрести внутреннюю влажность комнаты.
- If required, additional treatment with antiseptic and fire retardant coating is required.
- All layers of the old finish are completely removed to eliminate possible harmful interactions.
- If the surface is concrete, then it is covered with a primer in order to further strengthen it and eliminate sprinkling. It is useful to apply a layer of antiseptic composition.
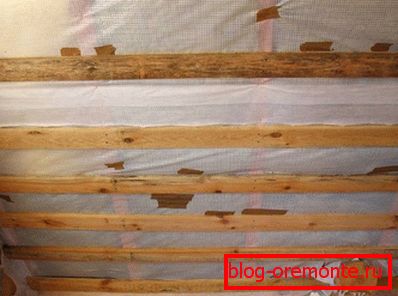
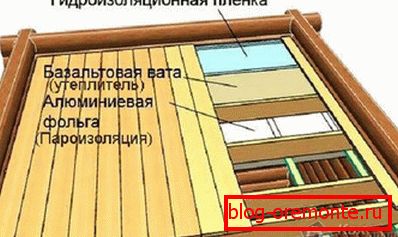
- Wood is very sensitive to moisture, so you need to stretch the waterproofing. This may be a special membrane that is used in construction. It is fastened to beams with a stapler, and to a concrete base with dowels and screws or umbrellas. Between the individual layers need to provide overlap of 10 cm and seams glue tape.
- At this stage it is also important to check the ceiling plane. This can be done with, for example, a water level. On one of the walls at an arbitrary height marked. Further it is necessary to transfer it to other planes. To do this, one part of the level is attached to the label, and the second to the required place, after which you need to wait a little for the liquid inside to even out. From each line you need to measure the distance to the ceiling. Thanks to this, it will be possible to find out the differences and take them into account when fastening the bars of the sheathing.
- For greater convenience, you can pre-mark up under the crate.
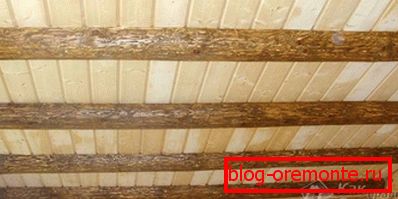
Making crates
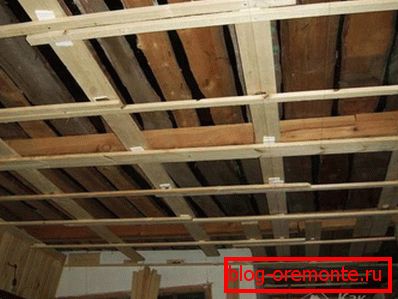
The basis for cladding is better to make of wood. The use of the metal version will be relevant in the event that the material you have left after previous work. You will need a board with a thickness of 25? 30 mm and a width of 50 mm (it will not be a problem if the width is larger, this, on the contrary, will provide better fit and fixation).
- Installation must begin at the angle where the deviation from the level is the smallest. Thus, it will be easier to set the crate in a horizontal plane.
- The lines should be located perpendicular to the joints of the material that will be attached later.
- The step between the individual elements may be within 30? 50 cm.
- It is possible to fix boards to a wooden surface simply with self-tapping screws, to concrete one with dowels and self-tapping screws. At the same time, in places where there will be an abutment, it is better to pre-drill a hole slightly smaller than the diameter of the fastening material. This eliminates the splitting of the bar, and also simplifies the twisting.
- During installation, it is important to use the building level to maintain the plane.
- To make the work go faster, you can fasten two strips in opposite parts of the ceiling, stretch the line between them and it will serve as the required level by which the rest of the strips will be exposed.
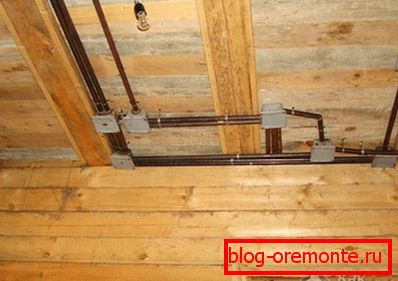
- At this stage, also laid all the necessary wiring. It is better if it is hidden in a metal corrugation, then even if a short circuit or other unpleasant situation occurs, the insulation will not cause a fire.
It is necessary to ensure that the crate boards are not infected with a pest. In any case, they should also be treated with antiseptic, so they will not cause damage to the entire structure.
Assembly work
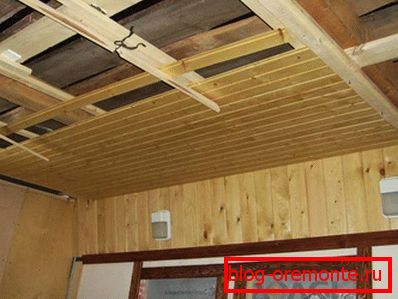
Installation of materials such as wall paneling, block house and MDF panels will be very similar in principle.
- A measurement is taken of the total width and is divided by the width of one slat. So it will be possible to know how many parts will go. In addition, it will make it possible to determine whether the first and last elements should be trimmed to maintain symmetry, and what size it should be done.
- From the wall is indented in 10 mm. He will perform the role of a thermosca. Thanks to him, the material will be where to move when expanding. If this is a house that is built from a log house, and its full shrinkage is not over yet, then this gap should be increased to 20 mm.
- The spike is trimmed on the first bar. This part of the element turns to the wall so that the groove is in the course of advancing the finish.
 In order to fix it to the crate, clamps with teeth are driven into the end, or the screw is twisted at an angle. It is better to first profit and put it on the level. If this is not done, then all subsequent elements will fall with an offset, which will lead to the fact that the joint lines will not be parallel to the walls.
- The next element is inserted into the groove of the previous one. To drown it well, use a rubber mallet or an ordinary hammer. But in the second case, the blows must be made through a wooden lining, in order not to damage the locking mechanism and not to leave dents.
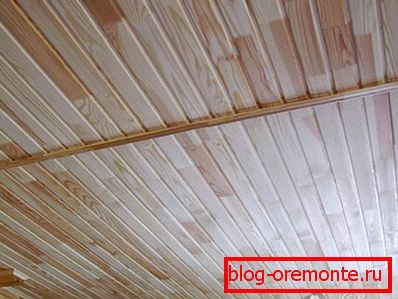
- The ceiling does not experience such a load as the floor, so the lining can be placed joint butt without the need for binding seams. But it is better to use the layout - this is a special docking plate, which will hide the shortcomings of the ends.
- In the course of installation, the cables are removed, which were previously laid.
- After the surface is ready. The facing material of wood is again covered with antiseptic composition. This indication does not apply to MDF panels.
- Next, apply a primer. After that, the surface is polished with fine sandpaper and varnished in 3 layers. One should go along the fibers, the second one perpendicularly, the third one again along the fibers. After the first two layers, it is also better to go through fine sandpaper to improve adhesion.
- All gaps that were left to the walls are covered with decorative plinths.
The plywood ceiling is laid on the same crate. Before this, it is necessary to cut the sheets into identical squares and then assemble them. All joints and places where the screws will enter are closed with putty on wood. The next step is to cover the entire surface with stain and varnish. This decision will come in handy when it is necessary to align the plane.
The following video shows how to clap the ceiling:
Warming and sound insulation
If there is a desire to provide additional sound and heat insulation, then for the batten one will need to pick up boards of greater thickness, for example, 5 cm. Expanded polystyrene is cut out by the size of the space between the battens. The width must be chosen so that it comes in tightly. It is necessary to insert it during the installation of the slats in order to immediately carry out its fixation. As an option, you can use mineral wool, but in this case, it will need to be closed with oilcloth on top of it, so that over time its fibers do not start to fall through the cracks.
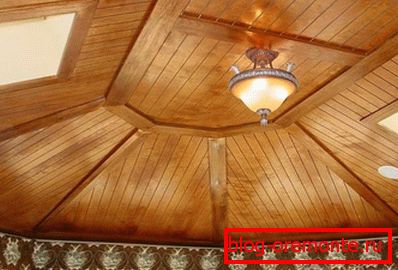
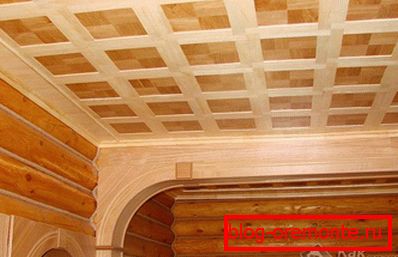
Coffered ceiling
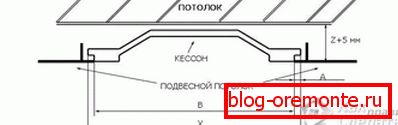
A project of this type will require you to sufficient mental effort, as well as exposure during installation. Regarding the conditions of its installation, there are restrictions on the height of the ceilings - they must be at least 2.5 m. Otherwise, their level will drop so much that it will be uncomfortable inside.
- On a sheet of paper you need to draw a rectangle in proportions that will correspond to the parameters of the ceiling.
- Inside the outline is a drawing of the desired design. All patterns, junction points and dimensions are thought out.
- Surface preparation is also performed as described above, but the lathing is not mounted. If the level drop is too large, then it is additionally necessary to perform leveling with a putty. After complete drying, it must be primed.
- The whole plane is covered with wallpaper. It is better if they are without a pattern, in one tone, a small structure is allowed. To make them well, you need to smooth them with a plastic spatula from the middle to the edges. If desired, you can provide the effect of confusion. You do not need to align the canvas too much.
- Using chokline and guided by the drawing, apply the markup under the future design.
- Falshbalki are made. They are a wooden chute. Usually for this are used such wood species as oak, larch, aspen, etc. Billets for them are selected in accordance with what height of elements you have chosen. Additionally, they can be aged with a special brush on wood, as well as coated with stain and varnish.
- Next, they are mounted to the ceiling. They can hold, for example, on brackets for metal profiles. They are bent and fastened to the wall. Curved ends are placed inside the false head. Next is a fixation with screws. At the same time, the head must be drowned flush and then closed with a putty on wood, which will be suitable in color.
- Initially, you can fix all the longitudinal elements and then jumpers.
The whole thing will be simplified if there are already beams on the ceiling, which are part of the structure. Then it is necessary to make jumpers from the same material or with the help of fals, so that squares or rectangles are formed. Next is the finish painting.
Polyurethane baseboards or fillets can be glued to the inside corners, which will give a special flavor to the whole project.
Wooden ceiling in the bath
Usually the ceiling in the bath is made by the method of filing. For it, you can use wooden wall paneling or block house. The main difference from the conventional design will be the presence of a barrier not in the form of a membrane, but in the form of a dense construction foil. It must also be attached overlap. Such a substrate is made so that the condensate formed can calmly drain without accumulating and not causing the wood to rot. Also in the steam rooms, it is desirable to use rock wool for insulation, it is well tolerated by high temperatures and does not burn.
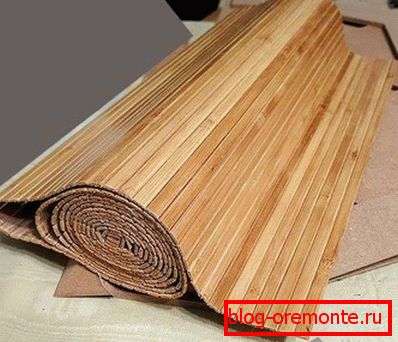
Wooden wallpaper

This is a very interesting new design. Such wallpapers can be both profiled and even. There are several main types:
- Plates. Planks from solid wood are interconnected in square or rectangular elements, which are then mounted on the surface. Their thickness, as a rule, does not exceed 2 cm. In appearance, such a product resembles clapboard, but the strips are much smaller.
- Thermally treated. The principle of manufacture resembles the production of chipboard. At the same time, wallpapers acquire greater rigidity and resistance to various influences, including moisture.
- Based on cork. Can be produced in rolls or as individual tiles. Represent a layer of cork, which is glued to the paper base. From above it is covered with a special varnish, which protects them from moisture, absorption of odors and other effects. Their thickness can reach 3 mm.
- Based on veneer. In this case, the thickness of the wallpaper can also reach 3 mm. Thin sheets of wood are applied on a paper base, and on top are covered with protective varnishes. Additionally, engraving may be applied.
Using this solution allows you to hide most of the flaws and irregularities that may have a ceiling. If you plan to use tile material, then it will be attached in the same way as the wall paneling.

For cork slats, as well as products in rolls, it is necessary to prepare the ceiling without installing the batten. Further, the sequence of actions is as follows:
- The marking and cutting into strips of the required size.
- After that, they must be left at least for one day in the room so that they acclimatize.
- When working, it is advisable to close all the doors so that there are no drafts, and also to prevent the ingress of direct sunlight.
- The surface of the ceiling is covered with an adhesive. They are also covered with wallpaper. Do it better with a roller.
- Next, the segments are applied to the ceiling and well pressed. This will be easier to accomplish with a second rubber roller, which will remove air residue.
- If the glue has penetrated through the seam, then it must be removed as quickly as possible with a damp cloth.
Cork plates are also glued to the ceiling. At the same time, work should be started from the middle and move to the edges, then the main territory will be filled with whole parts, and all the trimming will go to the edges.
Now you know how to make a wooden ceiling or imitate it yourself. Each of the methods can be combined with each other. For example, inside the niches of the coffered ceiling you can glue tiles from cork, which will look very attractive. Good luck in your endeavors!
Video
Below you can see step-by-step fabrication of the coffered ceiling:
A photo