Warming the basement at home with their own hands
It is not at all pleasant to live in a building where the floor remains very cold when the stove is well-melted. To correct this deficiency, you need to warm the basement of the house. But, in addition to such an unpleasant effect, there are other consequences of the lack of work in this direction. This article will reveal the nuances and suggest ways to eliminate problems.
Why do you need it
Basements or cellars are built on the basis that the temperature below ground is always lower than on the surface and maintained at the same level with proper thermal insulation. Warming is absolutely necessary, it allows you to exclude such troubles as:
- Swelling of the ground. If we allow such a course of events, then the entire foundation of the house can be ruined and large funds will be required for restoration.
- Great heat loss. Fuel consumption aimed at heating the floor and basement can be 20% of the total. Simple calculations will show the amount saved.
- The question of health. From childhood, parents teach children that their feet should be warm. According to accepted standards, the floor temperature should be no more than 3 ° C lower than the ambient temperature. This is an ideal indicator. But if the divergence reaches a much greater value, then you can be sure that the consequences will be frequent colds in the autumn and winter periods of time.
- Communications. Often in the house try to place the main water supply and heating pipes. If you do not take care of maintaining a constant positive air temperature, this can lead to damage to all systems and their failure.
- Increasingly, basements and attics are used for residential needs. In the second case, construct, for example, the attic. In the first - workshops, swimming pools, laundries, etc. This implies the constant or frequent presence of people in them. For the performance of the equipment and comfortable stay requires high-quality insulation.
- Humidity. Condensation may occur due to temperature differences inside and outside. And this concerns not only winter time. If the basement froze cold during the winter, then condensation is inevitable with warming. The consequence of this will be the growth of mold and disease-causing fungi. Over time, this will lead to the penetration of the dispute in the housing, damage to the floor covering and other interior elements. Moisture may leak from the soil through the concrete walls. This nuance is also solved at the stage of warming.
- The safety of food. Pickles and other preservation is usually stored in the basement. Too cold air will lead to freezing and damage.
Training
It is best to carry out work in the warm season, when it will be easy to restore order.
To prepare the basement you need:
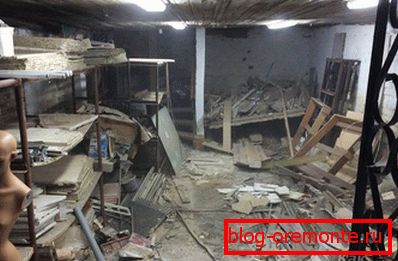
- Full cleaning. Get rid of all the rubbish and unnecessary things that are usually put off until later and never used.
- For a few days, ensure good ventilation, closing the room only for the night. This procedure will get rid of accumulated moisture. In some cases, you will need extras, such as heat guns, to help dry walls, floors and floors.
- Elimination of mold and mildew that may have appeared during operation.
- Treatment with antiseptic composition. It will prevent the spread of any pathogens.
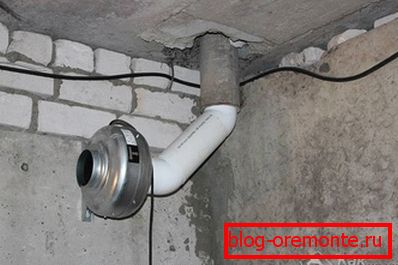
- Installation of the ventilation system. This step is very important, it will allow to organize good air exchange, excluding stagnation of air masses and moisture. How to properly organize the ventilation of the basement or cellar, read here.
Mold Removal
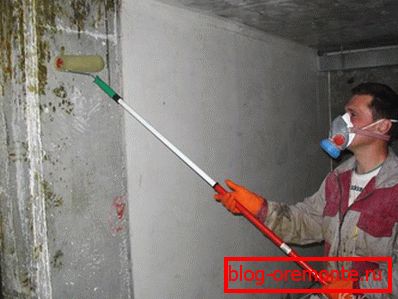
To remove mold and fungus is not a one-day task. The fact is that they multiply by spores. These tiny seeds can remain inactive for a long period of time. Therefore, processing may need to be carried out several times. If you do not do this, then all the finishing work will go down the drain, because in the end everything will have to be redone. There are several ways to remedy the situation. One of them involves the treatment of infected surfaces with whiteness.
For more effective struggle you need to prepare a mixture, which consists of the following components:
- 1 part vinegar;
- 1 part hydrogen peroxide;
- 2 parts of water;
- 0.5 parts of boric acid.

Liquids are mixed in a suitable container. Next, the resulting cocktail is heated to 60? 80 ° C. This is done to make the effect more obvious. The last step is to apply the tool on the damaged areas. To do this, you need a stiff brush with artificial bristles. It is important to take care of their own security. You will need a respirator with replaceable cartridges, rubber gloves, a house painter suit (usually sold in hardware stores), as well as good ventilation. At the end of the process, the walls will need to be dried well, so that no moisture is left, as it is the main cause of the development of mycelium.
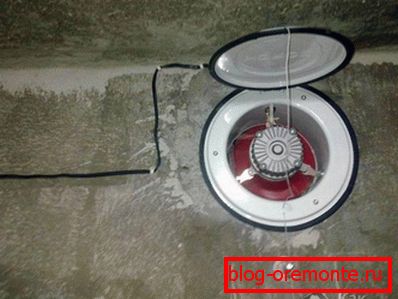
Ventilation installation
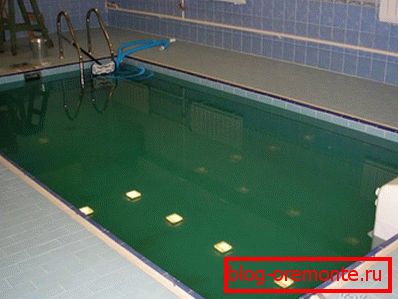
Human life is impossible without fresh air. But there is another reason for which you need to take care of ventilation. The moisture content in the air outside is usually lower than indoors. The humidity control will be solved by the ventilation system. It is especially important when there is a pool inside the basement. This will allow you to remove saturated masses and replace them with more dry ones.

It is necessary to choose from two systems: forced and natural. The first option implies the presence of a certain electric drive forcing air into the room and at the same time its surplus is removed through the outlet. Either the fan is mounted on the outlet pipe and after the release of a certain mass a pressure difference is created, which will be the reason for the arrival of a fresh batch. The natural principle of operation implies the presence of channels of inflow and outflow. This type of ventilation is suitable in cases where the ceiling height is less than 2 meters and the area does not exceed 50 m.2. In order to implement the whole scheme, you need to sketch a small drawing. It should be applied to the approximate plan of the house. The inlet pipe should be located as close as possible to the ground, and the outgoing pipe should be above the level of the ridge.
From the parts you will need:
- PVC pipe for ventilation with a diameter of 120 mm;
- corners and couplings depending on the drawn scheme;
- ventilation grilles and valves;
- perforator or drilling machine;
- clamps.
The sequence of actions will be as follows:
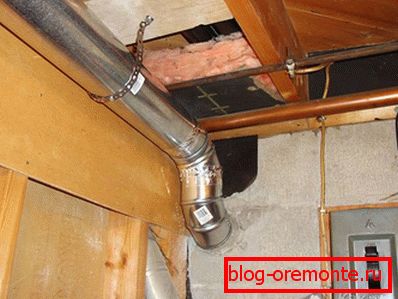
- Mounted outlet pipe. It can be located on the outside of the building or pass through the rooms. The second option is suitable if there is an additional utility room through which the duct can be passed. If there is no utility room, the pipe will have to be decorated. Strictly opposite each other, holes are drilled in the floor and on the ceiling (a laser plummet can be used for alignment). Segment, passing through the attic, it is important to warm well. This will avoid streaks on the ceiling and in the basement. Place exit through the roof carefully sealed. For this purpose, suitable bitumen mastic or a special rubber seal.
- To locate the duct on the outer wall, it will be necessary to drill a hole through the foundation and fasten the bore channel with clamps. The pipe on the outer part of the wall must be well insulated. This is to ensure that the warm air coming out does not condense and the water does not flow back to the basement. From above the butt is closed by a peak. For this you need an extra corner at 90 °.
- The hole for the outlet should be located as close as possible to the ceiling, as warm air rises.
- For the inflow another hole is made in the opposite part of the room. The pipe connected to this hole should be lowered as low as possible. From the floor you can make a gap of 5 cm.
- From the outside, it is covered with an overlay so that rainwater does not get inside.

For drilling holes do not necessarily have a special installation. You can use a hammer drill and a long drill. With the help of a compass or a specimen a circle is outlined. On the line drilling is carried out with a small step. The remaining partitions are removed by a chisel. The gap between the pipe and the stove is smeared with mortar.
It is important to ensure that the inlet and outlet pipes are of the same diameter, only this will result in the required air exchange. But the size should not be less than ∅ 120 mm or a square profile of equivalent volume. Otherwise, the system will not work properly.
Outdoor work
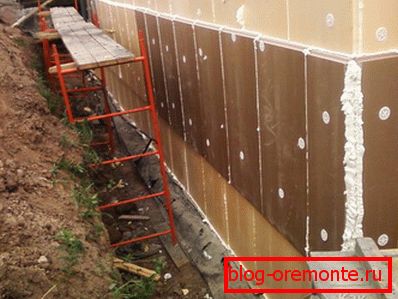
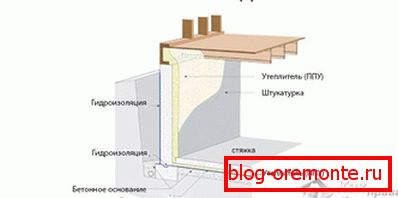
In order to achieve the best result, insulation work must be carried out from the outside. It is all connected with the same humidity. It is necessary to make a good hydro-barrier, preventing its penetration from the outside. From materials and tools you will need the following:
- foam plastics or foam;
- glue for insulation;
- waterproofing in the form of bitumen mastic, roofing felt or bikrost;
- perforator;
- umbrellas for fastening sheets;
- spade
Work is desirable to carry out when there is no rain. They are carried out as follows:
- If there is an installed blind area, it is dismantled. Parts of it can be used as a boot.
- A trench is dug up close to the wall to a depth of 60? 80 cm (well, if it reaches the lower level of the foundation). Its width should be such that it was convenient for the installer to fit there.
- The bare part of the basement will need to be well cleaned of dirt and possibly overgrown moss. This is done using a metal or other brushes.
- If there is a developing mold somewhere, it must be eliminated, as described above.
- In this state, the plot is left for a day or more so that everything is well dried out.
- Sheets of roofing material or bikrost are prepared. It is necessary to calculate everything so that the two neighboring elements fit with an overlap of 10 cm.
- Walls are coated with bitumen mastic and an insulator is glued to it (bikrost or roofing felt). You will need to wait for the surface to dry. It usually takes not too long.
- Sheets of expanded polystyrene are marked. You can take in advance those in which there is a groove for the connection between them.
- Insulation is applied and drilled through through a perforator so that the drill goes to the depth required for the mounting umbrella.
- The plane laid on the wall is coated with glue. Its layer must be such that no gaps remain.
- Umbrellas are clogged in the holes to press the heat insulator.
- If there is no selected quarter of the ends for joining in the sheets of insulation, then the ends (seams) are also coated with glue.
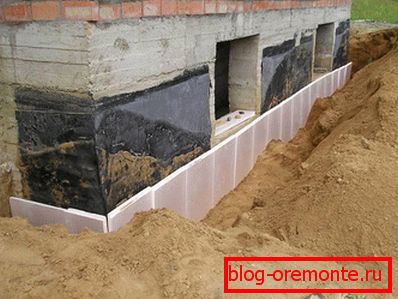
- After the entire perimeter is passed, the trench is covered with earth and well rammed. But this should not be done to the very top. Approximately 20 cm will be required. This gap is intended for future formwork.
- The bedding is made of sand with a layer of 10 cm and compacted well. This can be done with hand tools or special vibrating machines.
- Formwork is made of edged boards or other material. Its height above ground level should be about 10 cm.
- In the middle fit grille. Metal or fiberglass reinforcement with a diameter of 12 mm is suitable for its manufacture. You can not make it multi-tiered, it will be enough just perpendicularly located rods.
- Concrete is poured into the middle. A vibrating rail is used to seal it. If the upper part of the formwork is even, then it can serve as a beacon.
- In order that water did not flow under the walls of the house, drainage channels are installed.

Есть другой метод утепления, который одновременно будет служить и изолятором от влаги — нанесение вспененного полиуретана. Но, в этом случае используется не баллонная пена, т.к. это заняло бы много времени и средств, а специальный пневматический агрегат. Training осуществляется таким же способом, как описано. Покрытие напыляется в несколько слоев с небольшими промежутками для подсыхания. Преимуществом являются меньшие затраты по времени и очень плотное прилегание. Вещество полностью повторяет конфигурацию всех выступов и хорошо заполняет щели. Дополнительной финишной обработки не требуется. Все пространство засыпается грунтом. Каменную и стекловату применять не рекомендуется, т.к. эти материалы могут впитывать в себя воду, что снижает их теплоизоляционные свойства.
Internal work
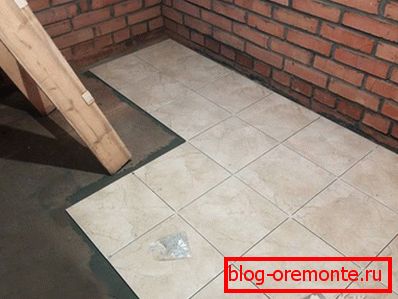
If the basement will be used not only for storing unnecessary things, then it is necessary to tidy up the floor. Often it is a rammed earth, because during construction there is no particular desire to incur additional costs. If this is the case in your case, you will have to fill the screed. This will require:
 If the ceiling is at a height of more than 2 m, you can immediately proceed to the following points. If this size is smaller, you will have to excavate. It is necessary to go deep by 10 cm: 5 cm - sand, 5 cm (minimum) - concrete. If you want to further increase the height of the ceiling should go deeper.
- The sand is well rammed. It is undesirable to spill it with water so that there is no excess moisture.
- The next step will be laying waterproofing. For these purposes, you can successfully use roofing material or bikrost. Insulating material overlaps at least 10 cm.
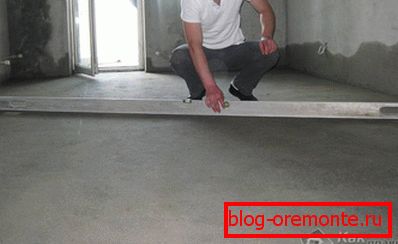
- Further exhibited beacons. The distance between them should be such that it is convenient to work with a rule or vibrolath. To keep them in the same plane, marks are made on the walls, which will be an indicator of the final level of the floor. To do this, use a laser level or water level. With the help of the first, a line is projected on all sides and marks are made, for example, with the help of choleline. You will have to tinker a little with the water level and apply at least 2 points to each wall, between which you can stretch the cord with the coloring powder.
 From bars of fittings the obreshetka keeps within. It is necessary for the whole space to be one monolithic slab. This will give greater rigidity and strength during shrinkage.
- Focusing on the markup, with the help of the usual construction level are exposed beacons. For them, you can use reinforcement rods, profile, pipe trimming, etc. In order to adjust their plane, laid out small columns from the solution.
- For some time, you need to leave the structure to dry.
- A damper tape is laid around the perimeter, which will serve as a compensation seam for temperature fluctuations.
- All space is filled with mortar and leveled with appropriate tools. Later, the beacons can be dismantled and the cavities filled with the same solution.
- Before all these actions, it is good if the ventilation is already installed. This will contribute to a faster set of strength and removal of excess moisture.
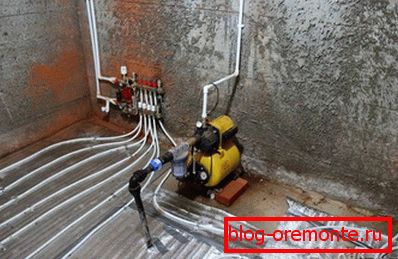
If you want to make a basement workshop where you plan to spend a large amount of time, if there is such an opportunity, you can organize a warm floor. If it is electric, then it can be laid under the tile already on the finished screed. In the case of water, the level will need to be further increased by the size of insulation and finishing screed.
The next step will be the insulation of floors. This is important to do before finishing the walls from the inside so as not to spoil the coating. Step-by-step actions will be as follows:
- The entire surface is well cleaned, all detached parts get off.
- Cracks and cracks are sealed with a prepared glue or mortar.
- As a material for insulation, you can choose foam, mineral wool or foam.
The sequence of work for the polymer insulator will be the same as described for the exterior walls. Finishing is to strengthen the entire plane of the reinforcing mesh, remove the glue and apply plaster or paint.
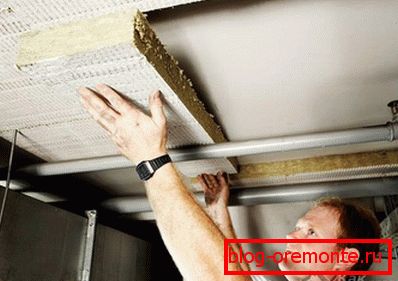
For mineral wool, it is desirable to make the crates. A bar with a size of 50 × 30 mm is used for these purposes. It is attached in 40–60 cm increments, everything will depend on the width of the insulation sheet. The mattresses fit into the voids formed and are fixed to the ceiling with umbrellas. Finishing will be the installation of edged boards or wooden wall paneling. It is possible and not to do it if the basement is not planned to be used constantly.
The walls on the inside can be glued with rolled polystyrene foam. This will eliminate the feeling of cold when touched. There is no point in installing a large layer of insulation, because it was made outside. Another point is the risk of mold due to moisture between the thick foam and the wall. It is also important to install good doors if the entrance is from the street. This will prevent the ingress of cold air, leading to weathering heat.
Warming cellars, standing apart from the house, is made in a similar way. This will ensure the safety of food stocks even in extreme cold. Share ways that you personally used, in the comments to this article.