Warm water floor do it yourself
Heating in the house is an integral engineering network. Of all the possible underfloor heating systems, warm water heating is most in demand, and this despite the complexity of its installation. Thanks to the warm floor in the room you can create a comfortable and cozy atmosphere. In this article we will consider the general recommendations for the installation of a warm water floor.
How does
Warm water floor when assembled is a layered structure also known as a “heating cake”. Its thickness depends on several factors:
- The thickness of the insulation used.
- The thickness of the draft and finishing leveling screed.
- The diameter of the heating circuit.
The underfloor heating device includes a boiler, sub-assembly, a collector, heating circuits and other auxiliary equipment.
Kinds
There are 3 types of floor heating systems:
- Concrete. Heating contours are filled with concrete screed, which, in addition to the protective and leveling function, serves as heat accumulation.
- Настильная. Mostly this system is implemented in wooden houses on logs. These are all cases where it is impossible to build a concrete tie or the total weight of the tie will not withstand the overlap. Also, this technique is used in panel houses, where floor slabs are unable to withstand heavy loads.
- Wooden. A similar system is used in the same place as the tabletop, with only one difference: heating circuits are mounted between the lags under the flooring, which is laid on top of the lag.
Flooring and wooden heating systems can be basic only if the room and the whole house are well insulated. That is, the total heat loss should not exceed 40 W / m2. Otherwise, when the heating is turned off, the room will cool down very quickly. In the case of a concrete screed, the situation is different; the screed itself is the heat accumulator, so a comfortable temperature will be maintained for a while. Thus, a flooring or wooden system with poor insulation can only serve as additional heating to the main radiator system.
Cake warm floor
Under the pie refers to all layers included in the design of floor heating. Depending on the selected system, its composition may vary slightly.
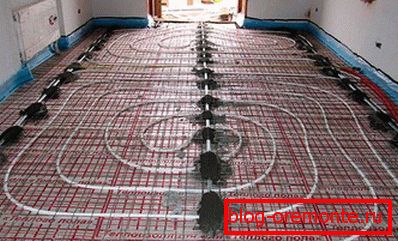
Pie Concrete System
The thickness of the cake warm concrete floor may vary. Below is a diagram of the pie with an approximate size of the thickness of each layer:

Consider the sequence of laying the cake heating the concrete system:
- Rough base. The screed is poured over a slab or primer. In the latter case, sand and crushed stone with a total thickness of up to 60 mm on average must be poured and rammed.
- Waterproofing. Required if groundwater is located nearby.
- Heat insulator. Its main task is to eliminate the bridge of cold and heat leakage. For example, you can use polystyrene foam with a thickness of 20–115 mm and a density of 30–40 kg / m3. Especially the thickness of the insulation should be large if there is an unheated basement or ground under the floor. If it is decided to use special mats (made of insulation) with lugs, then it is important to consider that their thickness is 30 mm. To give the insulation layer the required thickness, in addition, polystyrene foam is laid under the mats.
- Polyethylene film. Placed in two layers. Film thickness not less than 150 microns.
- Reinforcement Mesh. It is necessary for imparting a high-strength screed in cases where its thickness exceeds 60 mm and a high load on the base is expected. For example, the diameter of the grid bars can be from 3 to 5 mm, and the cell size is 100 × 100 or 150 × 150 mm.
- Trumpet. The pipe spacing is 100–300 mm. The pipe is fixed to the reinforcing mesh with special plastic clamps. Where the expansion joint will be arranged, a corrugation is put on the pipes.
- Finishing concrete screed.
- Pad. Under the laminate, parquet or other facing material.
- Cladding.
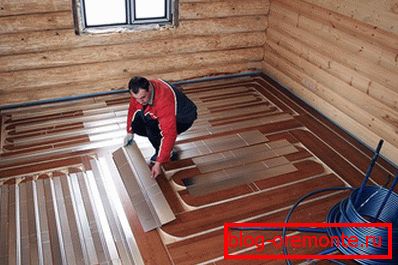
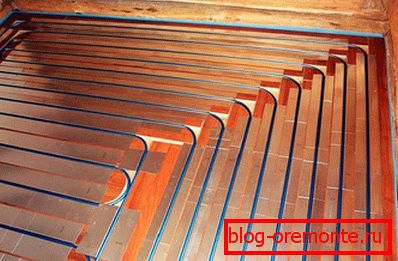
Pie Flooring System
The peculiarity of this method is that after the installation is completed, the floor heating system is immediately ready for operation.

Pie Flooring System состоит из таких компонентов:
- Rough floor.
- Mats with lugs. They are without insulation. In this case, the heat insulator is purchased additionally. The total thickness can be from 30 to 70 mm. Existing lugs allow secure fixing of pipes.
- Trumpet. Its installation is carried out in a special aluminum plate. It is important to note that not every pipe is suitable for a floor heating system. It should have a special coating that prevents squeaking.
- GVL or other flattening material.
- Pad.
- Facing layer.
It is worth mentioning separately the layer, which is located between the pipes and facing material. The type of substrate may vary, depending on the method of finishing. If it is planned to lay ceramic tile or linoleum on the floor, then a moisture-resistant drywall slab is put in two layers on top of the pipe. However, after a while, the drywall under the tile can crumble, so alternative substrates can be considered: moisture resistant plywood, glass-magnesium sheets or chipboard.
Cake wood system
Consider 6 ways of laying a warm floor on wooden lags, which are implemented without a screed:
1st method.
Boards 50–150 mm in steps of 600 mm are laid on the wooden floor. Mineral wool 100 mm thick is laid between the lags. From above unwinding heating pipes. Holes are made in the corresponding places in the logs for the passage of the pipe. From above the lag is laid plywood and finishing material. The disadvantage of this technique is that an airbag is formed between the plywood and the pipe. This has a negative effect on thermal conductivity.
2nd way.
A heat-insulating layer of expanded polystyrene, mineral wool, etc. creeps between the installed lags. Top mounted chipboard, OSB or plywood. After the plates are cut from chipboard with rounded corners. They will later form the heating circuit. The resulting plates are screwed to an existing base with a pitch greater than the diameter of the pipe by 4 mm. Next, put the foil as a reflective layer. Top mounted heating pipe. Finally, the surface is covered with laminate. This method is not suitable for flooring, as the base is quite mobile.
3rd way.
This method is quite time-consuming. Between the lags also fit the insulator. After the board is taken equal to the pitch of the pipes. In one corner a groove is made along the entire board for laying the pipe. At first, the foil flows into it, and then the pipe. Then mounted facing material.
4th way.
In this case, special aluminum plates with grooves for pipe laying are used. They are attached to the logs. But in this case, it is recommended to lay a thick material on top of the plates, for example, chipboard to prevent bursting. And only after that put the finish.
5th way.
Between the lags mounted raised floor. Between the beams laid out the insulating layer. On top of the sheets are placed with the bosses in one level with the top of the lag. At the intersections of the lag tube, small grooves are made, and a special corrugation is put on the pipe. This is important because, due to linear expansion, the pipe may rub against wood. The substrate and finishing material are laid on top.
6th way.
This method is one of the simplest. The pipes are laid directly into the insulation, namely polystyrene. The space between the top of the lag and the pipe can be filled with plaster, which will act as a heat accumulator. However, you can fall asleep and clean dry sand.
Video: making a wooden cake
Where to install
Underfloor heating can be installed in different rooms. However, in each case it is important to consider some features.
- In the apartment. In city apartments where a centralized heating system is used, install a warm water floor prohibited. Modern new buildings already have separate risers and outlets in each apartment for the implementation of such heating. On the other hand, some at their own risk introduce a similar system in their apartments. To do this, even developed a number of schemes, through which the connection to the central heating system. However, this causes a number of difficulties. Significantly increases the level of the floor. This can be a problem in apartments with low ceilings. In addition, there is a risk of flooding the neighbors. Therefore, all materials used must be reliable and of high quality. If the house has a panel overlap, then it may not withstand the additional load, so many have resorted to alternative heating - electric. Connection from the central system requires a significantly lower coolant temperature. In the heating system, on average, the coolant has a temperature of + 60 ° C. For floor heating it is too much, as usually + 30 ° С is enough. If you want to get official permission to install, then you should contact the utilities and solve issues on a personal level.
- In a private house. Что касается частных домов, то здесь ситуация намного проще. Осуществлять монтаж проще всего на стадии строительства дома, а вернее, перед заливкой стяжки. Важным требованием является обустройство качественной гидро- и теплоизоляции. Также отопительный пирог должен включать специальный отражающий материал. Если не выполнить эти требования, то будут существенные теплопотери. In a private house обустраивается смесительный узел, ставится дополнительный циркуляционный насос, который будет равномерно распределять тепловую энергию по всему полу. Однако при всех достоинствах важно учесть и минусы подобного решения. После изготовления напольного отопления и заливки финишной стяжки вводить в эксплуатацию обогрев нельзя в среднем на протяжении 4 недель. Хотя в стяжку добавляются пластификаторы для быстрого ее высыхания, все равно она должна высохнуть естественным путем. Этот минус незначительный и временный.
- In the garage. Engage in the arrangement of the garage should be at the stage of its construction. In the ready-made garage to perform these works will be problematic and at the same time expensive. The main condition for the floor in the garage - the ability to withstand high loads. The average weight of a passenger car is 3.5 tons. Given this, the screed must be made of durable concrete. Moreover, after pouring the concrete screed, it is impossible to turn on the heating. If suddenly the heating system fails, it will be problematic to fix the problem, in the worst case, the entire floor in the garage will have to be completely dismantled. After repairing the leak, re-install the floor covering.
- Bathroom. Bathroom, это место постоянного скопления влаги. По этой причине наличие такого обогрева будет отличным решением чтобы предотвратить образование сырости, плесени и грибка. Для обустройства обогрева требуется поднять уровень пола в среднем на 110–130 мм.
Payment
First of all it is necessary to decide whether the warm floor will be basic or additional to radiator heating. It is important to consider the nature of the floor. Ceramic tile has a high thermal conductivity. As for the tree, this figure is much lower. Therefore, the type of heating system will depend on the type of coating.
In addition, the area and configuration of the heated room is taken into account. One heating circuit should not exceed 120 meters. After that, possible heat losses are determined, which are calculated based on the following:
- what material the house is built from (blocks, wood, brick, etc.).
- glazing type (double-glazed windows or profile are used).
- average air temperature in your area.
- Are there any additional sources of heat?
Next, decide what level of temperature you want for each individual room. Here you can build on these indicators:
| The room | Maximum floor surface temperature |
| Living rooms | 29 ° С |
| Near exterior walls | 35 ° С |
| Bathroom, бассейн и т.п. | 33 ° С |
| Parquet floor | 27 ° С |
Video: calculating floor heating
Video: calculation of the temperature of the heated floor
Design
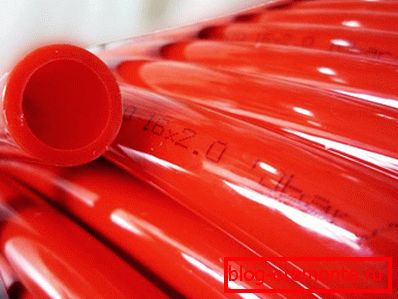
The key element of the underfloor heating system is pipes. The length of the contour is directly dependent on the diameter of the pipe. The following data is known:
- Trumpet O16 мм – до 90 м.
- Pipe O17 mm - up to 100 m.
- Pipe O20 mm - up to 120 mm.
The larger the pipe diameter, the smaller the hydraulic resistance in it. If the room has a small area, then usually one circuit is enough. However, if with a pipe diameter of 20 mm, the entire area of one room lacks 120 m, then it is better not to add length, but make 2 contours. It is better that their length was the same with a difference of up to 10 m.
An important role is played by the pipe pitch, which can be 15, 20, 25 and 30 cm. If we are talking about large rooms, such as a gym, then the pitch can be in the range of 35, 40 or 45 cm. However, there is a pipe pitch near large windows 10 cm is recommended.
Consider the separate zones in the table:
| Zones | Laying step |
| Near the exterior wall and large windows | 10–15 cm (6 рядов) |
| Middle of the room | 20–30 cm |
| Bathroom, shower, bathroom | 15 cm |
These numbers are recommended. The choice of a step also depends on the pipe used. If it is metal-based laminate, then it is extremely difficult to bend it without damage a step with a small radius. Therefore, if the layout is a snake, then the ideal pitch is 15–20 cm.
If the area of the heated room from 50 m2 и больше, то рекомендуемый диаметр трубы 16 мм. Даже при условии хорошо утепленного дома рекомендуется, чтобы шаг трубы не был больше 15 cm с трубой O16 мм. Чем толще труба, тем большие расходы вас ожидают. Особенно это отразится на покупке фитингов и других материалов большего диаметра. Проект следует составлять с трубой O16 мм.
In some cases, use pipes O20 mm. However, such costs are often unjustified. After all, the volume of water in the system increases significantly, which will require more thermal energy to heat. Plus, it is difficult to bend such a diameter.
When designing it is important to consider the following nuances:
- First, install partitions, and then determine the number of circuits. In the same room should be one circuit.
- The collector should be in the middle of the house. If this is not possible, the problem of the difference in the length of the contours is solved by installing flow meters. Due to this, the coolant flow will be uniform.
- If you need to install two collectors, then each must have a separate pump.
- Be sure to insulate the overlap between the first and second floor. This is necessary not to warm the overlap itself.
The process of designing a warm floor is complicated and responsible. Therefore, many use the services of specialists or special programs.
Laying heating circuits
There are several pipe layouts:
- Snake.
- Snail.
- Combined.
Each of them has its own technical features, which will be considered further:
- Snake. This scheme has several obvious disadvantages. When entering the room temperature of the heat carrier and the floor is high. The farther, the colder the floor. This is explained by the fact that the cooled coolant returns through the return line. When installing such a scheme requires special skills. If metal-based laminate is used, the laying step is often 20 cm or more, because bend the pipe at a smaller angle is difficult. However, the pitch can be reduced to 10 cm, but small rings should be made around the edges, which is a laborious process. Often, a similar stacking pattern is used when it is necessary to align adjacent contour zones. Also this method of pipe laying is acceptable if the area of the room is very small, up to 6 m2.
- Snail. Its principle is that, first of all, the contour is laid around the perimeter of the room with a gradual narrowing towards the center. Back contour returns to the starting point. In this case, if you have planned a step between a pipe of 20 cm, then the contour is first put in steps of 40 cm. On the return stroke, the pipe is laid between the already laid and thus forms a step of 20 cm. This laying pattern is one of the effective. This is explained by the uniform distribution of thermal energy over the entire area of the room. Moreover, it is possible to strengthen the zones near the outer wall or large windows by reducing the stride distance. For such a scheme there are practically no restrictions on the shape and size of the premises.
- Combined. This implies a combination of the two above-mentioned pipe laying systems. For example, one part of the room can be lined with a snake, and the other - a snail. There is also the practice of combining water floor heating with electric. However, in this case, electric heating will serve as an extra. This is especially effective in the period of early autumn and late spring, when it is not reasonable to turn on water heating.
Video: layout loop heating circuit
Heater
Heater для пола должен быть высокого качества и безопасен для окружающих во время эксплуатации. Выбранный теплоизолятор должен соответствовать таким требованиям:
- Fire Resistance.
- Low thermal conductivity.
- Moisture resistance.
- Strength.
Therefore, choosing insulation, it is important to consider its technical characteristics. Below are several types of insulation that are successfully used in the heating cake.
Styrofoam
If you have a concrete screed, then expanded polystyrene is ideal. It is of two types:
- Smooth.
- With bosses.

The second option greatly simplifies and accelerates the process of laying pipes. Also expanded polystyrene is divided into 2 types:
- Plain foam.
- Extruded polystyrene foam.
If we compare the heat-engineering properties, then they are higher in extruded polystyrene foam.
Bung
This material in all respects a suitable option. Among its positive properties are:
- With sharp temperature drops, the plug does not change in volume.
- Eco-friendly.
- Under the weight of the concrete screed almost deformed.
- Although the material has a small thickness, it is characterized by high-quality thermal insulation.
However, the obvious disadvantage of this heater is the price. Its cost is 3 times higher than other materials.
Penophole
Penofol or polyethylene foam is often used when installing underfloor heating. It is presented in the form of rolled foil material with a thickness of 3 to 10 mm. For the convenience of laying pipes, marking is applied to the foiled surface. If you live on the ground floor and beneath you ground or unheated basement, then this insulation will not be enough. It must be combined with polystyrene foam.
It is better to choose penofol with a metallized surface, only not from aluminum. This coating does not interact with the negative medium of the liquid solution, which is able to corrode the usual foil.
Mineral wool and ecowool
It is recommended to choose the density of the used insulation at least 80 kg / m3. Mostly used for laying wooden systems. In this case, the insulation is placed between the logs or wooden beams.
Collector
There are several types of collectors that are used for installation work:
- Collector with outputs under eurocones. One of the simplest types of collector. It is a pipe having internal and external threads for connecting heating circuits. However, to introduce it into the floor heating system will have to buy a large number of parts for a complete set.
- Manifold with outlets for connecting circuits and valves for adjustment. Often these are Chinese collectors that are sold in stores. They have one obvious disadvantage - after a while, water can flow from under the arms. This is due to the low quality of the coolant. They are amenable to repair, it is enough to replace the rubber gasket. Such collectors are not intended to be equipped with additional control automation. They will be ideal for homes with a small area where the contours are the same length.
- There is also a collector for connecting metal pipes. It has adjustment valves and fittings. Such valves can be equipped with a servo, whose work will be regulated by a thermostat installed in the room. The fittings themselves are also known as eurocones, which consist of 3 parts: an eurocone, a compression ring and a cap nut. Also eurocone has a sealing ring.
- In cases where the length of the circuits is different and manual adjustment is not possible, it is recommended to purchase a collector with flowmeters and sockets for servos. On some collectors they hide behind blue hats. Due to this, it is possible to regulate the temperature of the coolant in each individual circuit. However, you can combine - buy a collector for flow with flow meters, and the return pipe - with conventional valves for manual adjustment.
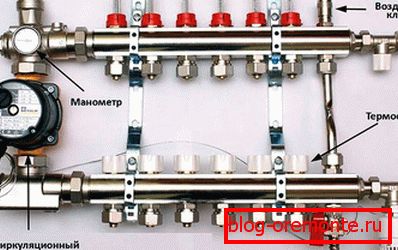
As for the mixing unit, then in its kit there are necessarily:
- Safety valve. It signals the mixing of the coolant at a very high temperature.
- Circulation pump. Thanks to this device, the system heats the room evenly.
- Bypass Prevents overloading.
- Trigger valves and air valves.
Particular attention should be paid to a special valve, which can be two-way and three-way. Each of them has its own differences and uses.
Two way valve. In his kit, he has a thermal head with a moisture sensor. If necessary, the supply of hot water is blocked. As a result, water is automatically mixed. Mostly such valves are introduced into the heating system, where the area of the residential zone does not exceed 200 m2.
Three-way valveA similar valve defines two indicators at once: balancing a bypass valve and characteristics of a check valve. It mixes hot and cooled coolant. Often, three-way valves are equipped with a servo controlled thermostatic and weather controllers. The mixing process is carried out due to the presence inside the valve of a special valve that regulates the flow of fluid. A similar valve is used in floor heating systems with a large number of circuits.
Also, the collector and mixing unit is equipped with outdoor temperature sensors. They allow you to adjust the temperature of the coolant, starting from the temperature of the street. Although such adjustment can be done independently, the presence of such sensors allows you to adjust the optimum temperature.
Installation of heated floor
The installation process consists of several successive stages. Acquaintance and observance of technology will allow you to independently perform all installation work.
Waterproofing and installation of damper tape
The first is the preparatory work. To do this, completely removed the old screed. If the differential in the room is more than 10 mm horizontally, then it should be leveled. To do this, you can fill the draft self-leveling screed with a thin layer.

Далее важно защитить теплоизоляционный слой от конденсата. Для этого на черновую стяжку кладется полиэтилен. Стыковка выполняется внахлест на 10–15 cm. Стык обязательно проклеивается скотчем.
The next stage of preparation is the installation of a damper belt. It is necessary to compensate for the linear expansion of the screed when it is heated. If you do not use it, then after a short time, the screed may crack. The damper tape is fixed along the perimeter of the whole room to the wall with the help of a self-adhesive layer or adhesive tape.
Laying insulation
The next stage is the installation of insulation. The choice of insulation and the method of its installation depends on the type of room and the purpose of using heating. If you have the first floor and there is no heated basement, then the insulation should be impressive. A layer of expanded clay is poured and expanded polystyrene with a thickness of up to 100 mm is used.
As for the method of laying insulation, then using a cork or penofola is quite simple. These are sheet materials that are glued together with tape. If polystyrene systems with grooves are used, their assembly is also not associated with special difficulties. Between themselves, the insulation is joined with the help of special slots.
However, it is not always possible to use such heaters. Often the most affordable - foam. In this case, its installation should be carried out butt joint. Between themselves, it is desirable to glue, for example, with foam. Upon completion of the insulation, the entire area should be covered with insulation.
Consider the sequence of floor heating using polystyrene:
- Step 1. The first sheet is placed in the corner of the room so that both sides are tight to the corners of the walls.
- Step 2. Further the sheet is put end to end, tightly fitted one to one.
- Step 3. If it is necessary to bypass a corner, a column or another obstacle, then polystyrene is easily cut with a sharp knife.
- Step 4. The next row must be laid with a small offset, exactly half a sheet.
If you have planned the insulation in two layers, then the second layer of insulation should be laid across from the first. Due to this, the joints will not coincide with each other. At the end of a special film is put with markup for mounting pipes.
If heating is installed on a wooden floor, then mineral wool is used as a heater. It is placed between the lags. When installing, the width of the mats should be slightly wider than the distance between the lags. This will allow to lay insulation tightly and prevent the appearance of cold bridges.
Video: preparing the base, laying insulation and reinforcing mesh
Installation of pipes
When the insulation is done, it is time to install the heating circuit. In this process, it is important to accurately calculate the laying step, the length of the contour and the number of outlets at the collector. However, before this is to discuss the choice of heating pipe.
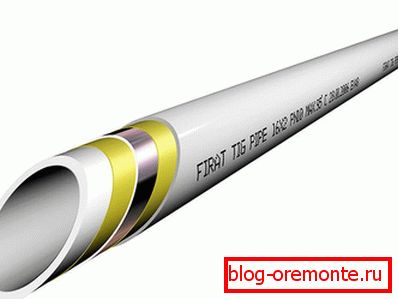
How to choose a pipe
There are several types of pipes used for a warm water floor, each of them is in a different price category. The cost of a pipe depends on the manufacturer.
| Trumpet | Special features | Approximate / average price per meter |
|
| The pipes are connected by special fittings, forming a strong and tight connection. However, it is easy to damage them during installation. Maintain water temperature up to 120 ° C. They are sold in coils, which greatly simplifies the process of installation and delivery. | 80 g. |
|
| При нагревании металлопластиковая труба не подвергается деформированию. Trumpet отличается гибкостью и сохраняет форму после сгибания. Маленький вес упрощает процесс монтажных работ. | 500 rub |
|
| These are expensive pipes that are rarely used. They have the lowest level of bending radius. The service life is 50 years. Operating pressure from 400 atm. | 500 rub |
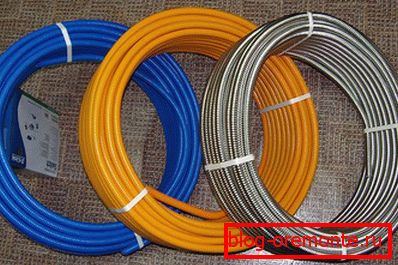
Pipe laying
At the stage of laying pipes without an assistant can not do. The pipe on the warm floor is sold in coils, so one will unwind and the other will hold the bay. Laying method depends on the chosen system. If the choice fell on special mats with bosses, then the work is greatly simplified, the main thing is to follow the styling step. If a film with markings is laid on top of the insulation, then special clips are used to fasten the pipe. What if there is no such markup? You can do it yourself. To do this, use a chopping cord with paint.
At installation of pipes it is inadmissible that they were interrupted. One circuit should consist of one whole piece of pipe. Begin laying with the farthest areas. It is very convenient when the insulation is made in two layers. In the first layer of insulation you can put the transit pipes and the necessary engineering communications.
The pipe installation process consists of several stages:
Stage 1 - you wind off from a bay of 10–15 m. At one end put on a fitting and connect it to the established collector.
Stage 2 - connects the pipe on the manifold to the flow.
Stage 3 - on the markup, the pipe is fixed to the harpoon warmer clamps. If the section is straight, an interval of 40 cm is sufficient. When cornering, the interval is reduced to 15 cm. When bending, be extremely careful not to twist the pipe.
Stage 4 - during installation, make sure that the pipe is not in tension. She should be free. Otherwise, the voltage will constantly pull out the brackets.
Stage 5 - if the bracket has flown, then retreat from the previous place by 5–10 cm and re-fix the pipe.
Stage 6 - when you have rounded the entire circuit, the pipe is fed back to the collector and is connected to the return pipe using a fitting.
For correct balancing it is important to have information on the length of each contour. Marks can be made on the collector itself, for example, assign a number or name of the room to which it is going to each contour. Appropriate notes can be made on a piece of paper. Don't keep everything in your head. The pipe section near the collector should be insulated, otherwise there will be a strong overheating of the floor. Moreover, it is recommended to warm the pipe through one, i.e. insulation is put on the flow, and the return pipe is left untouched. Thus, the return line will not heat up from the flow.
There are several methods of fastening pipes:
1 method: clamps.
2 method: mild steel wire.
3 method: special stapler and fixers.
4 method: фиксирующий трак.
5 method: mats with bosses.
6 method: distribution plate made of aluminum.
Video: laying of a heat-insulated floor
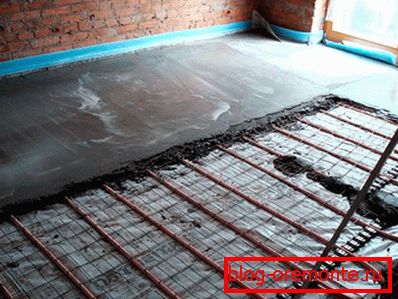
Reinforcement
Often the first layer of reinforcement is placed on top of the insulation. In this case, the fastening will be carried out with the help of nylon puffs. Separate parts of the mesh are tied together by knitting wire. The mesh size of the reinforcement mesh depends on the step you select. The mesh should have an O5 mm. In addition, a reinforcement layer is also laid on top of the pipes. This is explained by the fact that the grid lying below will not have any effect.
Pressure testing
By crimping is meant a process that allows you to make sure that all the mounting connections are tight and that the pipes have no defects. This process is performed immediately before pouring the screed.
Crimping can be done in two ways:
- Water
- By the air.
Water pressure testing
All circuits must be completely unwound and connected to the collector. The system is filled through the power supply, a pressure is created up to 2.8 atm., At least 2 atm. In this case, the coolant must first be down to the mixing unit.
Further process looks as follows:
- On the return pipe, all the caps are closed, often they are blue.
- After the supply valve opens.
- In the process of filling the pipes with water, a hissing sound can be observed, this is air coming out through a Mayevsky valve or an automatic air vent.
- Now the tap on the return line opens. So, it will be possible to bleed air through the drain valve on the return manifold.
- The filled circuit closes on the return line and the next one opens.
- Finally, the valve in front of the supply manifold closes and the valve in front of the return collector opens.
Having filled the system with water and bleeding, it is necessary to inspect the structure for leak detection.
Pressure testing воздухом
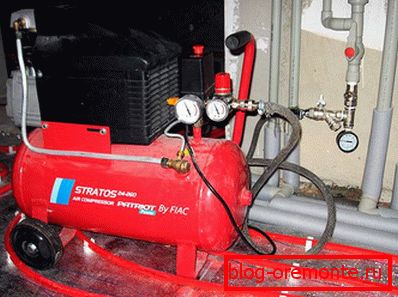
During the process of pressing the heated floor with air, the automatic air vent is removed and a cap is screwed in its place. A compressor or automobile pump with a pressure gauge is required for operation. Pressure at pressure testing with air should be three times more than the worker. Therefore, create air pressure up to 5 atm.
Such pressure should be created only in the floor heating system, and not in the highway connecting the boiler and the collector. This is explained by the fact that some boilers are designed only for pressures up to 3 atm. Therefore, this area is checked later separately.
So, when air is pumped into the system up to 4 atm., Leave the taps closed for a day. Pressure should not fall. Although the minimum deviation will be, as when pumping the compressor will slightly heat the air, which will cool down later. To make sure of tightness, you can walk through all the joints with soapy water.
Strainer
When it comes to finishing screed, it is important to provide some important conventions:
- Water should not be drained from the system, but kept at a predetermined pressure of 1.5 atm.
- Turn on the heating is prohibited.
- Make temperature seams.
The temperature joint completely eliminates the possibility of cracking the screed. As the temperature of the seam is used damper tape. The area of the room can be divided by 20 m2 (this is necessary if the area of one room significantly exceeds this figure). Pipe, in the area where it passes through the temperature of the seam, be sure to strengthen the corrugation.
To fill the screed is recommended to use special additives that will improve the technical characteristics of the screed. In addition, a plasticizer is added to the concrete, which prevents the screed from cracking when it is cooled / heated.
The composition of the concrete:
- Concrete and screenings - 1: 6.
- Concrete, sand and rubble - 1: 4: 3.5.
The plasticizer and other additives are poured during the mixing of the concrete mix. The proportion is determined on the basis of the manufacturer’s instructions on the label.
For a dwelling, a thickness of 50 mm finishing screed is sufficient, for factory premises up to 100 mm. It is important to consider the following property of the screed - heat accumulation. The thinner the screed, the less time it will retain heat. If it is too thick, it will take more heat to warm it up. Therefore, the optimal thickness of the screed is 70–80 mm.
Перед самой заливкой убедитесь, что в системе теплого пола есть давление 1,5–2 атм. Включать обогрев в процессе затвердевания бетона prohibited.
The process of manufacturing screed on beacons is as follows:
- By level metal beacons are set.
- Lighthouses are not installed on the pipes. You can lay out a thick solution in the form of mounds, on which beacons are installed.
- Smooth concrete is the rule. It is important to make sure that the air bubbles are completely out of the body of the screed.
- The next day, when the concrete had not yet seized, it is necessary to remove the beacons, clean up these places and fill them with mortar.
Video: Fill the screed
Commissioning
Enter the working temperature should be gradually. First, set the temperature to 25 ° C. After each day, raise it to 5 ° C. If antifreeze is used as a coolant, the increase is carried out by 5 ° С, and if it is water, then immediately by 10 ° С. This is an important requirement, since it is possible to avoid sharp and uneven overheating, as a result of which the screed cracks.
So, commissioning is performed as follows:
- Make sure that all the taps on the manifold are open and the coolant is circulating through all circuits.
- Thermal head mixing valve is set to the minimum temperature.
- The circulation pump is turned on when the boiler is turned off, as the pump on the boiler will interfere.
- Occasionally, it will be necessary to release accumulated air.
- Using flowmeters, check the circulation of coolant through all circuits.
- Then you can turn on the heating.
Video: filling system
Prices for water floor heating
The cost of work, depending on your place of residence, may vary slightly. On average, prices are true. Pricing can look at the table below:
| Name | Average cost per m2 |
| Installation of a heat-insulated floor without preparatory and concrete works | 400 p. |
| Collector installation | 1000–2500 rub |
| The hidden location of the collector cabinet | 2000 |
| Roughing screed | 60 р. |
| Installation of damping tape | 60 р. |
| Laying waterproofing | 60 р. |
| Crimping system | 20 p. |
| Laying the mounting grid | 150 р. |