Smoke-cold smoked do-it-yourself
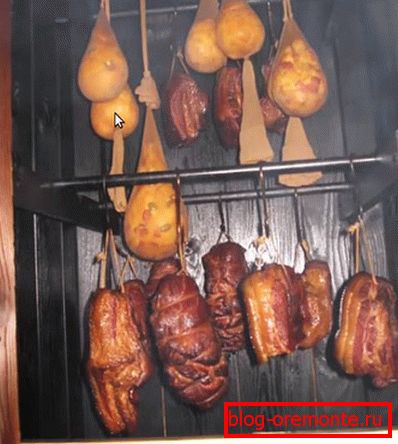
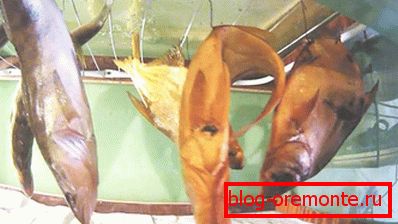
One has only to look at the image of smoked delicacies, and immediately there is a desire to eat all this, which is quite natural for a person. Your appetite is hot? What to do now? The first reaction is to go to the supermarket and buy everything that your heart desires (and the wallet allows). But, alas, smoked products from the store are only called, as they are treated with liquid smoke. Opinions about the benefits of such food diverge, but if there is a small plot of land, you can organize your production. In this article we will tell you how to make a cold-smoked smokehouse with your own hands from various materials.
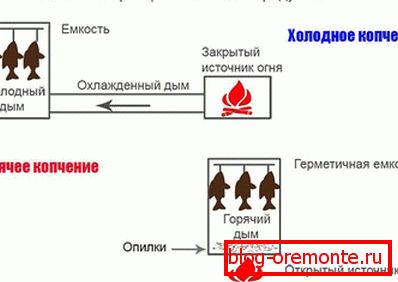
The principle of operation of cold smokehouse
Since the talk is about cold smoking, it is important to realize that it is not heat treatment of the product that is being performed, but its saturation with smoke, therefore smoking should occur at a temperature of 30? It is necessary to ensure that fumigation and heating are uniform - only in this case, smoked meats will turn out to be appetizing (meaning appearance) and tasty.
Many have heard the expression "light smoke", but did not understand what was going on, or thought that a thin smoke is meant, but in our case it is a question of smoke in which there is no carbon monoxide. It is quite possible to achieve this by making the chimney so that this gas (with other substances harmful to human health) precipitates before it reaches the smoke chamber. After mixing with the air and passing a long way through the pipeline at the exit, smoke is obtained that is suitable in composition for proper smoking. Once in the smoke chamber, the smoke must linger in it for some time and feed the products, otherwise it will be of little use.
Another important factor is the correct preparation of products. If someone thinks that it is enough to put meat or fish in the chamber, then melt the oven and wait a bit, then we will hurry to disappoint you. The procedure will be as follows:
- We will need a saturated solution of salt, commonly called tozhluk. Preparing it is not difficult: salt is poured into a container and stirred until it no longer dissolves. Salt is about 38-40 g per 1 liter of water. We do not need that salt that remained at the bottom - you can use it at your discretion.
- Now proceed to the salting of products. Small fish will need to keep in solution for 3 days. Larger fish or young pork - up to 4 days. More rigid beef meat (as well as wild boar or bear meat) must be salted for 5 days.
- After the process of salting proceed to the soaking of meat. The duration of soaking can reach up to 24 hours, but here again it is necessary to take into account the type and volume of the product being prepared for smoking. For example, to soak off an average-sized fish it will take about 6 hours, while the pork ham will soak 2 times longer. But this time is approximate, and in order not to soak the meat more than necessary, it needs to be checked. The method is very simple: to press on the soaked product with your finger, and as soon as it starts to be easily pressed into the pulp, the process of soaking should be immediately stopped.
- Now the product must be worn out. To do this, let the water drain from the meat, and if you do not have time to wait, you can wipe all the blanks with a towel. Paper towels for this purpose is best not to use.
- Products should be placed in a ventilated cage (or box) and protected from flies, wrapped with gauze with small cells. It is important to remember that there will be no heat treatment of the product, and a smokehouse for maggots is like a steam room for a person - in general, this crap is not destroyed during processing.
- It will take a few days for the meat to stumble. Many are well aware of what is dried fish (especially for beer), so it will not be difficult to determine when the product will be suitable for further processing.
- Now all blanks are hung on hangers inside the smoke chamber. Products are ready to be smoked.
What firewood can be used

You can use not all the wood. Firewood from such trees is best suited:
- plum;
- cherry (without bark);
- pear;
- Apple tree;
- kizil;
- apricot.
If smoked foods need to give a tart taste, then fit:
- elm;
- oak;
- nut;
- beech.
For smoking fish caught in heavily walled ponds, it is recommended to use such wood:
- Thickness
- wicker;
- iva.
In the absence of firewood from fruit trees or if the smokehouse is made in field conditions, the following trees can be used:
- linden;
- poplar;
- alder;
- aspen.
Softwood trees and those affected by the fungus are not suitable for smoking. In addition, since the pores of the fungus are easily carried by the wind, all trees within a radius of 50 m around the infected tree automatically become unsuitable.
Stationary smokehouse
A very good news is the fact that there will be no special expenses, and if the necessary materials are found in the economy of the careful owner, then it will only be necessary to make an effort.
Smokehouse device
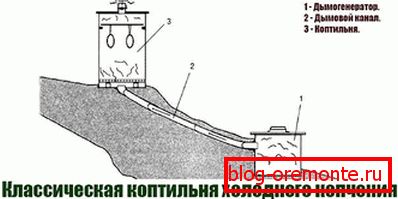
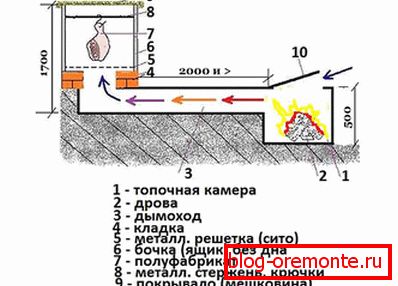
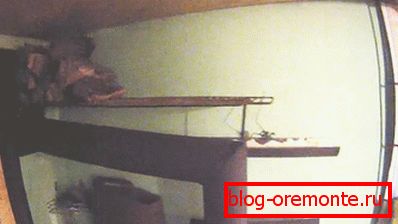
The diagram shows the device of a classical smokehouse, where:
- Smoke generator (stove).
- Chimney channel.
- Smokehouse.
Now we will start manufacturing using ready-made drawings or having developed our own scheme according to our recommendations.
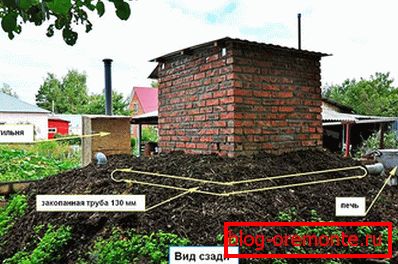
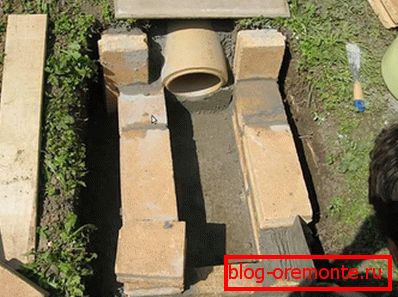
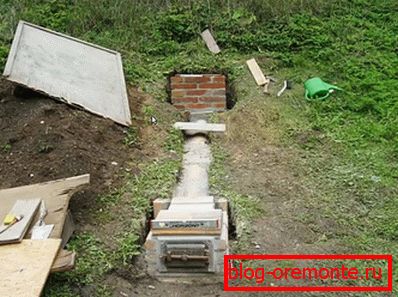
 | For the construction of such a smokehouse made of brick, we will use a small land plot 4 m long. |
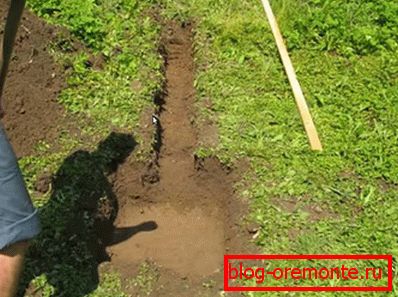
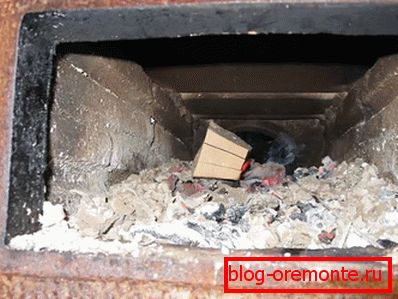
| | So, the site is selected (in our case on the slope), and now you can start the land works. Let's start with the fact that to create a chimney you need a pipe with a total length of about 3 m and Ø150? 200 mm. If so, what is its length? If 2.9 m, then do not worry. It’s just that the distance between the holes needs to be done so that the edge of the pipe does not reach the brickwork, but is inside it. Simply put - make the distance between the pits 25–30 centimeters less than the length of the existing pipe. The furnace should be at the bottom, so under it the foundation pit is made so that its width will be 50 cm, length 70 cm, and the depth - a pair of spade bayonets. |
 | On the higher part of the slope (well, if the difference in the location of the pipe is at least 50 cm), dig a hole 60 × 60 cm for the manufacture of the foundation for the smokehouse. Depth - a pair of bayonets below the location of the pipe. (It may be less - it all depends on the type and density of the soil, to which you have dug, but it is unnecessary to make a foundation on black soil). By the way, we still need clay, so we need to put it separately from the ground. |
 | Dug out the pit, check how the pipe goes down and if it has not progressed to its length. If everything is in order, then you can continue to work. |
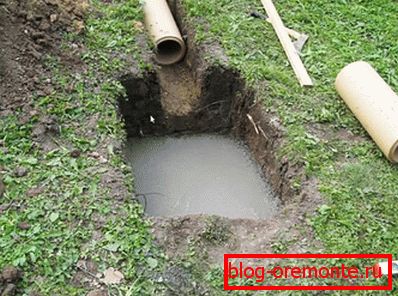 | Now we will fill in the dug pits with concrete. Under the smokehouse - flush with the pipe (or slightly lower). And for the firebox - 10 cm below the pipe. |
 | After the concrete grabs, proceed to the manufacture of the furnace. Knead low-fat solution of clay, lay it on the foundation. From above, along the length of the entire firebox, we will lay down the refractory brick, laying it flat on the clay mortar so that the base is under the pipe. This pillow will be the base of the firebox, so we will build a firebox on it, as shown in the photo. Some people prefer to use a cement-sand mortar for masonry, but this is not the best option, since the connection between the bricks will be broken if the heating is too high. |
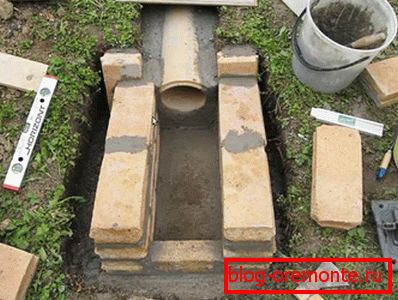 | Having laid the walls, we will provide good heat transfer from the pipe to the ground, sprinkling it with clay. By the way, if there is no suitable pipe, then the chimney can be laid out of red brick. |
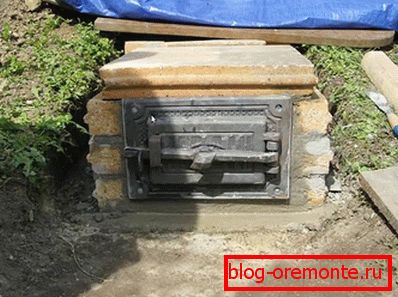 | Well, if the cast-iron door is in advance, then the size of the firebox is adjusted to it. After installing the door cover the oven. We had a plate of a suitable size, but if there is none, then you can lay down the armature and make a cover of refractory bricks. |
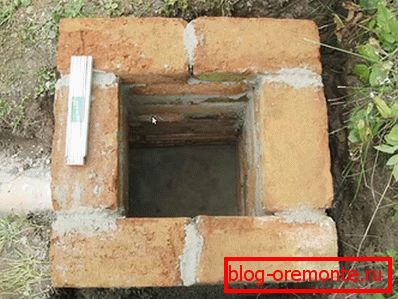 | Now we proceed to the manufacture of the tubular base under the smokehouse. Its size is 50 × 50 cm, and the laying will be done with a simple red brick on cement-sand mortar. |
 | Such a structure should work. The height of the base is slightly above ground level. |
 | Perform a trial kindling - everything works fine! |
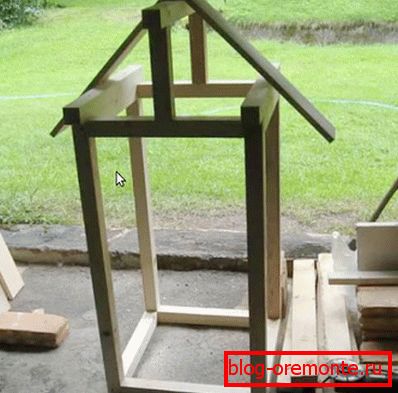 | Now we proceed to the manufacture of the smokehouse, the dimensions of which will be 60 × 60 cm. |
 | For the manufacture of the frame we will use 4 × 4 cm bars. On the finished frame in a vertical position, we will nail the first layer of the boards. Install a metal chimney on the roof. In this case, the tree does not need protection against fire, as the temperature of the smoke is very low. |
 | Since we have planned that the products will be suspended, then on the sides you will need to fix the boards with the cut-out slots for metal bars. |
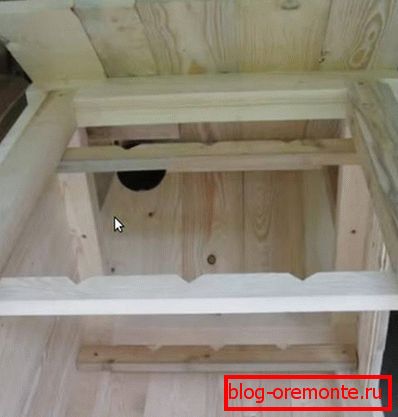
 | As a second layer, coniferous wood paneling will be used; we nail it in a horizontal position. The same goes for the door. Such a device will help minimize smoke losses. |
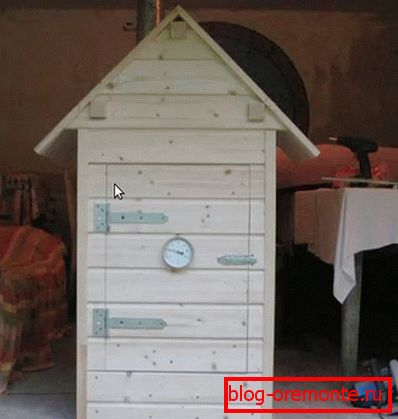 | Also, in the previous photo you saw a pin sticking out of the door - this is part of the thermometer. Its dial is located outside, so you can control the process of smoking. |
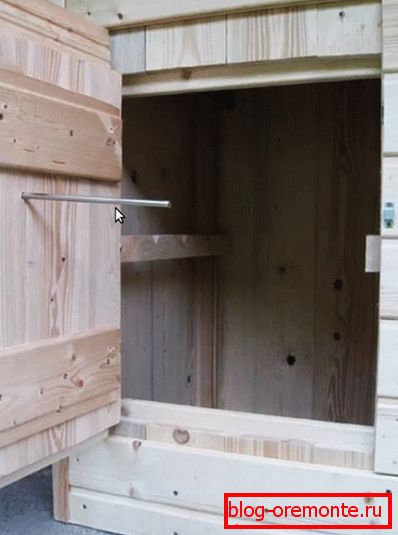
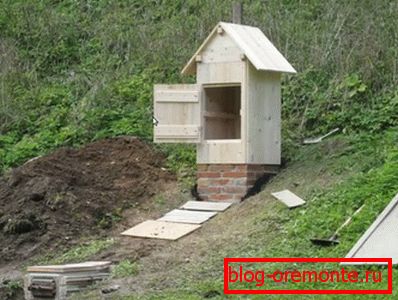 | It is time to put everything together, for which it is necessary to fix the smoking shed on the brick well. We remember that the base was made 50 × 50 cm, and the cabinet was 60 × 60 cm. This was done deliberately so that water does not get into the base of the base. For its fastening we will use metal dowels, fixing through the lower bar to the brick base. There is also an alternative option - to attach metal corners to the base, and a cabinet to them. All available slots are plastered with mortar. |
 | At the end of the work, it remains to open the wood with a protective agent and cover the roof with a professional sheet or metal tile. It remains to be tested. |
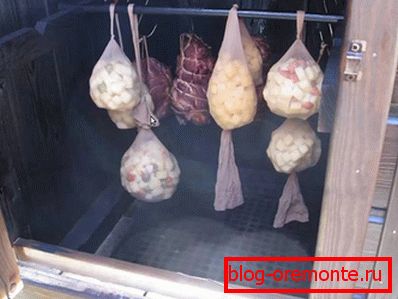 | Cases are different, so it is better to be safe, putting a metal grid on the base - even if some product falls off the hook, it will not fall to the bottom, and its smoking will continue on this protective device. |
 | We have already talked about which tree can be used for smoking. Do not neglect the advice of people who have been preparing food in this way for many years. Kindle stove. |
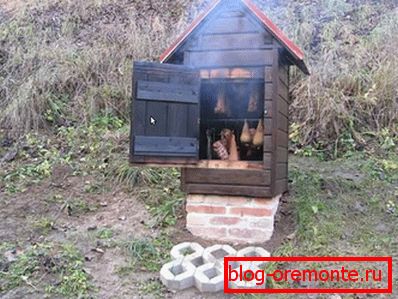 | The smoke goes well, so you can close the door, not forgetting to control the temperature inside the smokehouse. |
 | Do not forget to check the firebox and toss firewood. |
 | And so, the process of smoking is completed - the products are ready to eat. |
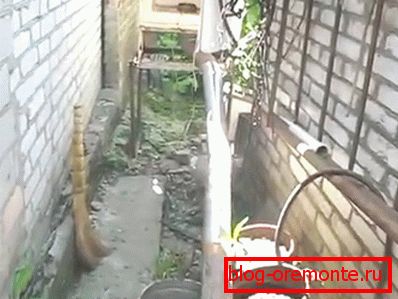
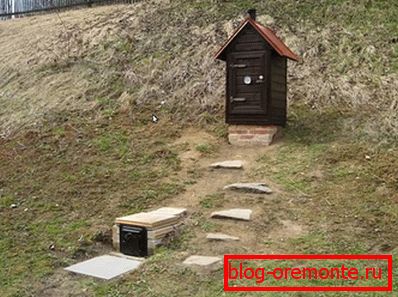 | The space around the smokehouse can be improved by making a path. |
Video: a simple smokehouse in the ground
Video: design for cold smoking
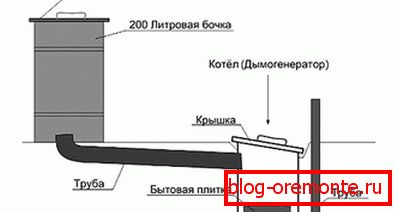
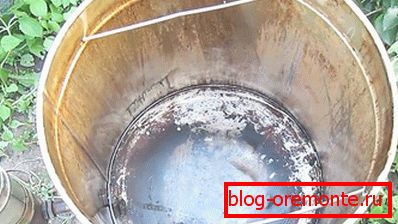
Smokehouse from the barrel
Of course, you can use any barrel for our design, instead of a wooden smoke chamber, but this would slightly simplify the design. You can make a smokehouse out of a barrel more compact, even portable, only in this case you have to make a smoke generator.
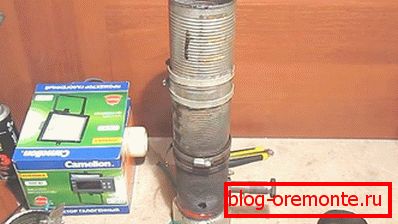
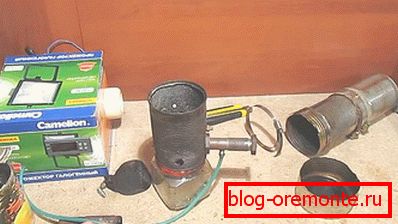
Making a simple smoke generator, working with a compressor
The described construction will be assembled from what is in the farm, but if the necessary parts are not available, they can be cheaply purchased.
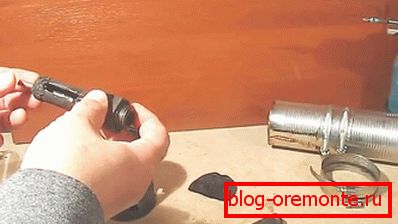
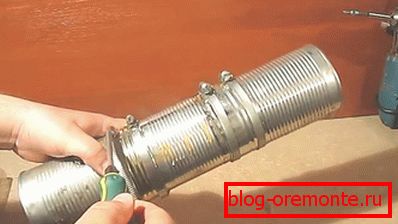
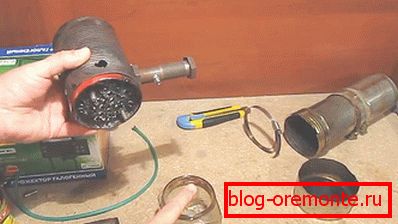
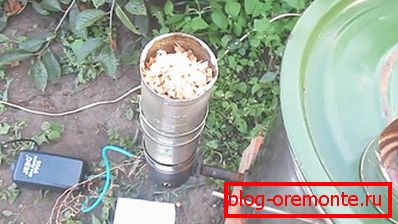
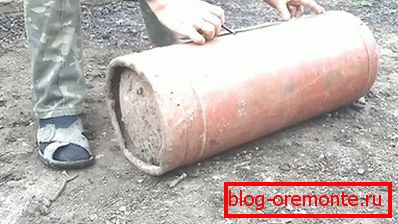
 | To assemble the smoke generator, we used 4 tin cans of pineapples and a piece of copper tube. Were also purchased 2 sgona on a quarter-inch with nuts and 4 metal straps on the size of the cans. |
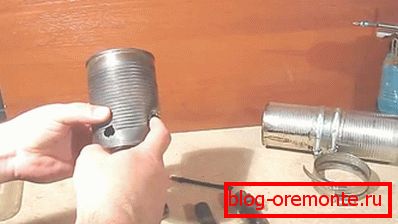 | In the bottom of the bank will make one hole for sgon. |
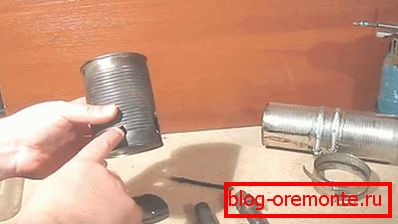 | The second hole of smaller diameter will serve as a igniter. |
 | The third hole is made by the size of the copper tube of small diameter opposite the first hole. A little later we will look at how to improve this design. If you choose the second option, this hole (and the copper tube itself) will not be needed. |
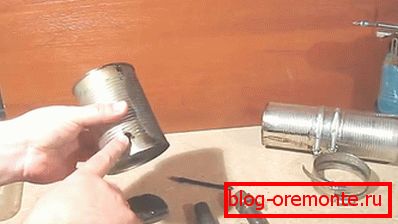
 | One of the sgonov will be inside the bank, reaching its edge. |
 | In it, the grinder will cut a groove 4 cm long and about 8 mm wide, as shown in the photo. |
 | The copper tube should not fit tightly in the drift. |
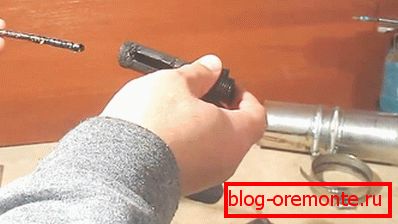 | And it should not be short. |
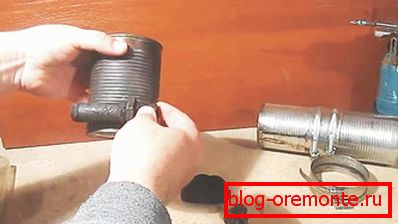
 | After fixing the first move, fasten the second one to it and insert the tube. |
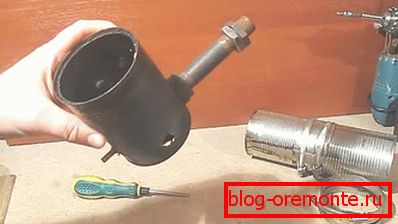
 | In order to prevent the groove from clogging with sawdust, we will install a metal shield of thick metal (from a pipe) from above. This protection must be above the rail, so its fixation can be ensured by bolting the support bolts to the bank in the right places. |
 | By placing inside the shield, you can move on. |
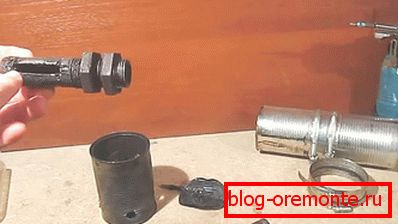
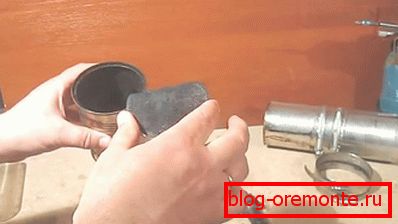
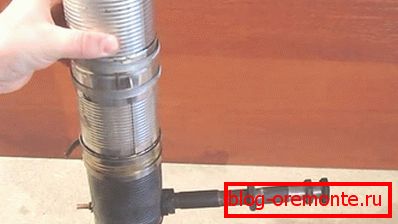
 | The generator itself will consist of three cans, and the fourth will be cut into strips, we will wrap the cans with them and fasten them with clamps. |
 | If the need arises, the tube can always be extended, but we advise you to use a coupling for the connection, and not a nut. |
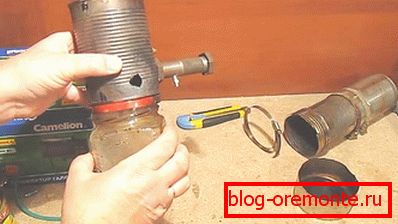
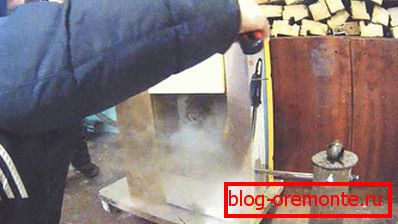
 | For our design, we will use an aquarium compressor with an adjustable amount of air supply. |
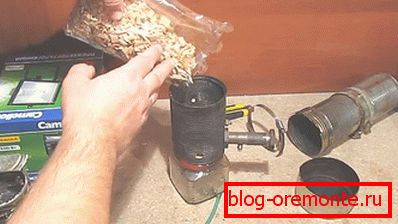
 | Now poured inside the chips. |
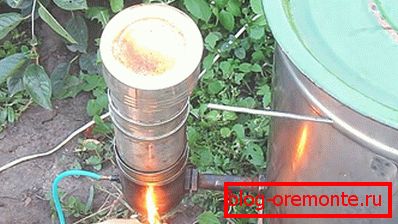
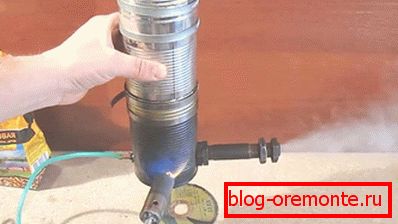 | Turn on the compressor and ignite the chips. |
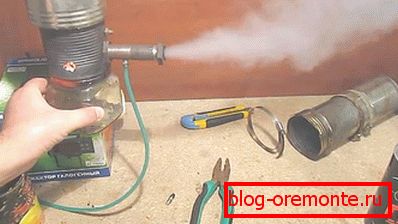
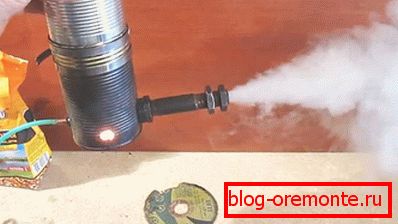 | By adjusting the depth of the copper tube, we perform the adjustment, ensuring that there is as much smoke as possible. Everything works perfectly! |
 | Now we will look at how this model can be improved, since this alteration will help reduce the temperature of the smoke. |
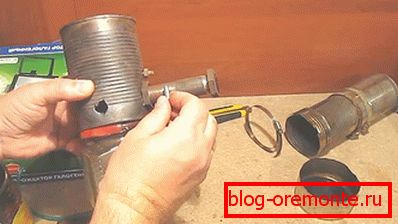
 | You can also take care of that the ash poured out of the generator, and not accumulated in it. In this construction there will be no inner tube - the thread is screwed to the edge of the jar, and in order to avoid sawdust, we will make a petal of tin from the inside, making many small holes in it. |
 | From the bottom to the jar, fasten the twisting lid from the glass jar with two bolts, and then we drill a number of holes. |
 | It will be enough to insert the jar, slightly turning it, and the hermetic ash collector is ready. |
 | As we have already warned, in this construction there will be no copper tube, air will be supplied through the external discharge. |
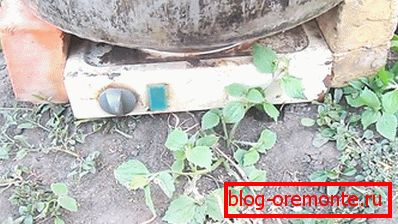
 | To do this, use the purchased (or used) fitting to release air from the brake system (preferably from a domestic car, since it is cheap). To do this, it is necessary to drill a hole in the sgon, and, having selected a suitable tap, cut the threads. In the upper part of the valve there is a side opening, if it is small, then it should be drilled to Ø2 mm. After screwing it in, the hole should be directed towards the smokehouse. |
 | This fitting is specially made so that during pumping the brakes on it you can pull the rubber tube, so there will be no problems with connecting the hose from the compressor. |
 | Now you can fall asleep chips and burn it. |
 | Tests have shown that the system runs smoothly, producing the right amount of smoke. |
Smoking process
So, the generator is assembled, it remains to connect it to a barrel (or other capacity), and you can smoke products.
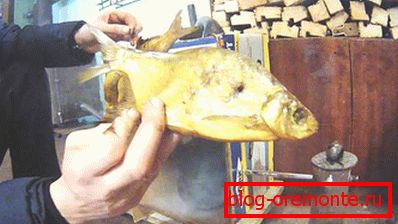
 | The fish is macerated and ready to smoke. In order for the brining and soaking process to occur evenly, the products must be completely immersed in the liquid. In our case, we achieved this by flattening the fish with a plate. |
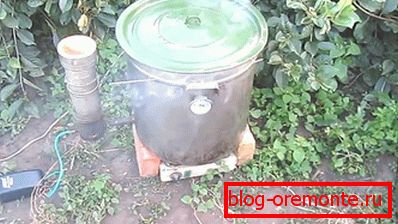
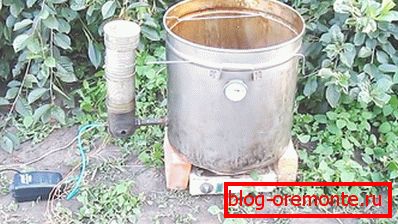 | The gas generator is connected to our small barrel (or large saucepan) and ready to run. |
 | Although cold smoking produces little fat, it is better to install a suitable container at the bottom to collect it. In order to be able to hang the products, we drilled 4 holes in our tank and inserted thin fittings into them. |
 | If it is cool outside, then the tank can be slightly heated by an electric stove so that the temperature inside the smokehouse becomes acceptable. |
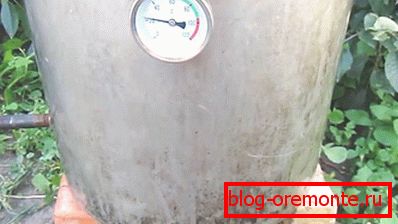 | A thermometer installed in the tank will help control the smoking process by adjusting the temperature inside it. |
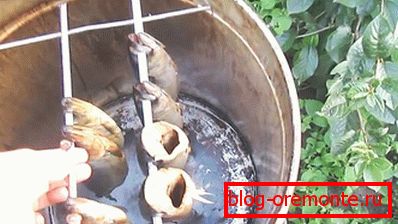 | The fish was put on old skewers, from which plastic handles were removed. |
 | Now we fill in our gas generator chips. |
 | Cover with a lid, turn on the compressor and ignite the chips. |
 | From under the unsealed lid, thick smoke appeared. |
 | Through the window, intended for ignition, it is clearly seen that there is a good heat in the gas generator. |
 | Now you just have to wait, periodically adding chips and monitoring the temperature inside the tank. |
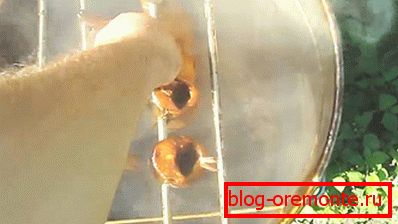 | Smoking is done, and now the fish is ready to eat. |
Depending on the volume of products that you intend to smoke regularly, a suitable container is chosen - a pan or a barrel of 100? 200 l.
Smoke generator operating without compressor
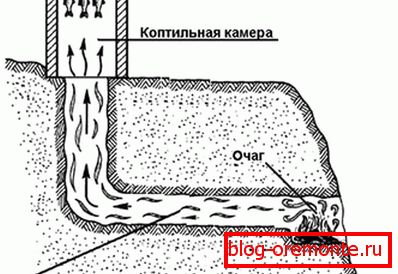
The design of this smoke generator will only work in conjunction with a smoke chamber equipped with a chimney.
 | As a smoke chamber, we will use an ordinary packing box of a chainsaw, carefully wrapped with tape. |
 | Inside we will fix the frame of the bars, and we will stretch the rows of wire on it so that the fish can be hung. |
 | It looks like a gas generator. |
 | It is loaded with wood chips and set on fire. |
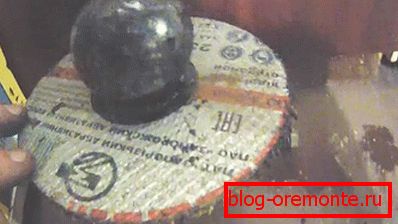 | Instead of a lid, we use a trimmed disc from the grinder, and close the hole in it with a metal ball, which will also serve as a weight. In order for smoke to not enter the room through such a cover, the edge of the pipe must be cut off very precisely. |
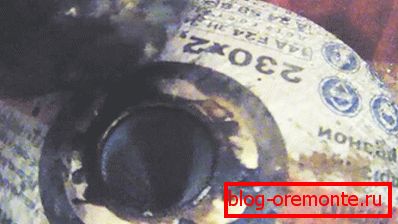 | To check whether there are chips and smoke in the gas generator, it is enough to remove the ball and look inside. |
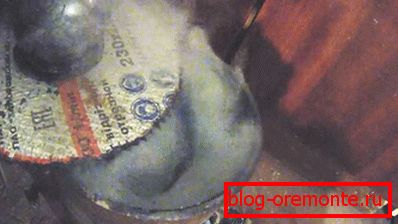 | Well, if you move the cover, you can see that there is plenty of smoke. |
 | The author of the project installed a viewing window in the smokehouse to monitor the process. |
 | The idea turned out to be empty, because of the thick smoke inside the box, it is impossible to see anything, even highlighting a flashlight. |
 | A pipe from a vacuum cleaner is used as a chimney. |
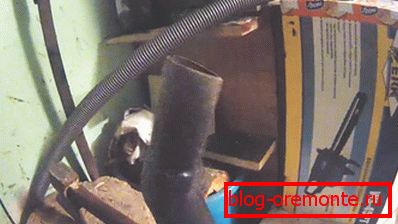 | The chimney turned out to be long and curved, but this did not affect the operation of the gas generator. |
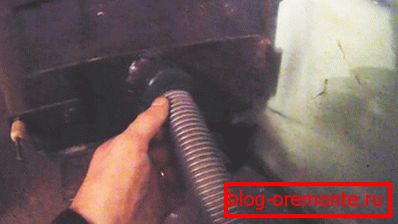 | The second end of the pipe is inserted into the furnace. |
 | It is necessary to check that all the oven doors are tightly closed and there is no air leaks, otherwise the gas generator will not work. |
 | The traction is ensured by the fact that the chimney of the stove significantly rises above the room. |
 | At the end of the smoking process, the tape is cut, and the casement flaps open. |
 | Low cost, and we have delicious food. |
Video: cold smoked smokehouse from the barrel
Smokehouse from the refrigerator
If there is an old refrigerator with a whole body, then it can also be used by connecting a smoke generator to it or by supplying smoke from a makeshift stove.
 | For the manufacture of the furnace was used old household gas from liquefied gas. |
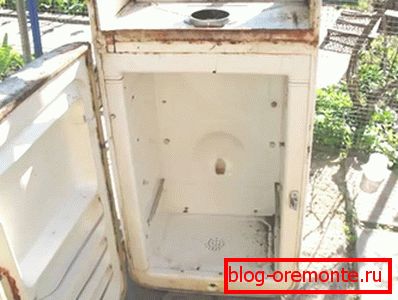
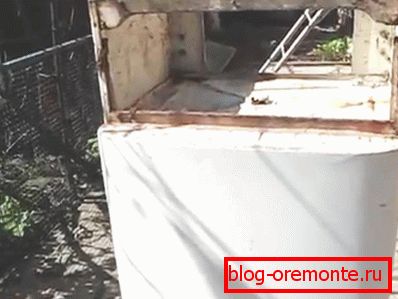 | Found and the old refrigerator. We turned it upside down, removed the compressor and set to work. |
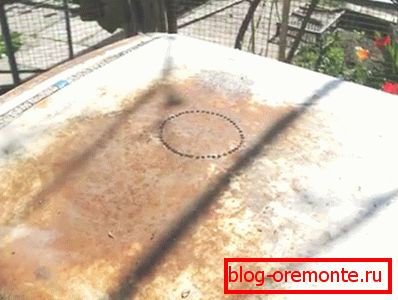
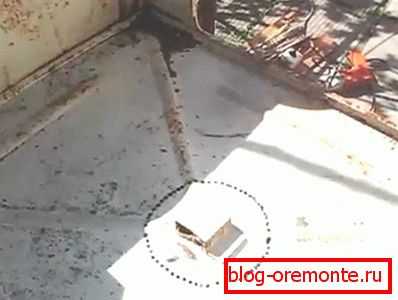 | In the bottom of the cooling chamber it is necessary to make a hole for connecting the chimney. To do this, they outlined a circle of the required diameter and drilled a number of holes in the line with a Ø4 mm drill. |
 | Then make a hole in the inner lining. |
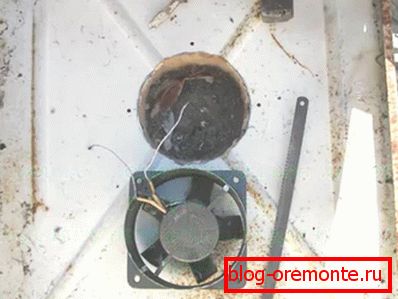 | If the thrust is weak (and this can also happen because the chamber is leaking), a fan can be inserted in the bottom that pulls smoke from the firebox, feeding it to the smokehouse. |
 | In order to be able to regulate the force of thrust, and the temperature inside the chamber, you can connect the fan through the voltage regulator. |
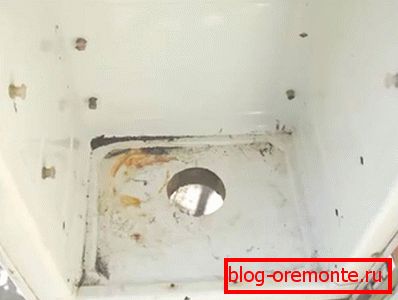
 | In the upper part (in the photo it is from the bottom), we will drill a lot of holes so that smoke can escape through them. |
 | Outside, too, make a hole for mounting the exhaust pipe. |
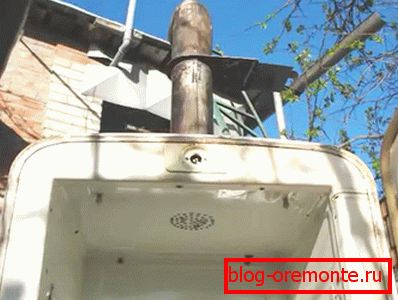 | Fix the tube. |
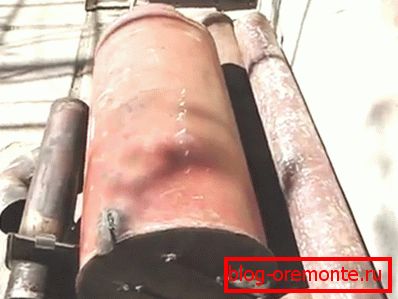
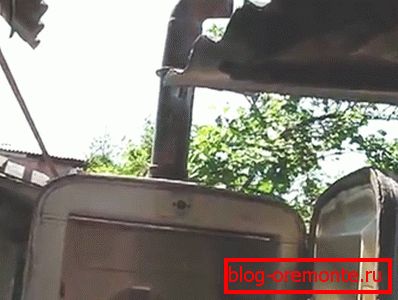
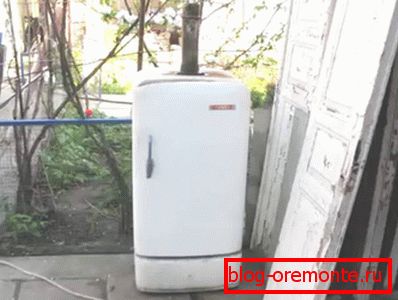 | That turned out to be a smokehouse. Now you need to install the structure higher and connect with the furnace. |
 | The length of the pipe turned out considerable. |
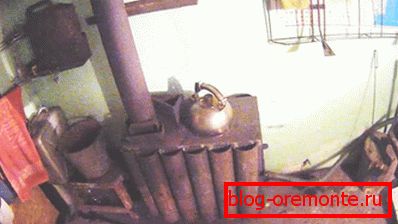
 | Now we will put firewood and melt the firebox. |
 | Smoke goes well, so you can smoke. |
 | Having suspended the products, we will install a tray or bowl into which the fat will drain. We close the door and wait for the allotted time. |
Video: cold smoking in the refrigerator with a smoke generator
Video: cold smoking in the smokehouse from the refrigerator
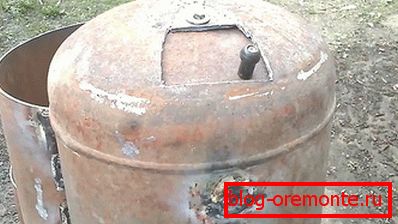
Smokehouse gas cylinder
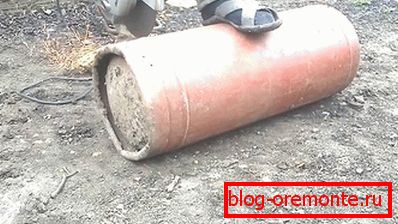
First of all, let's talk about safety, as cutting a gas cylinder without first preparing it is very dangerous. Watch the tutorial on this topic.
Video: how to safely cut the gas cylinder
 | As already mentioned, the balloon needs to be properly prepared. |
 | Now you can start applying the markup. |
 | It is convenient to mark round details, having attached the metal meter. |
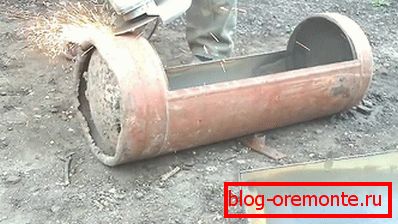
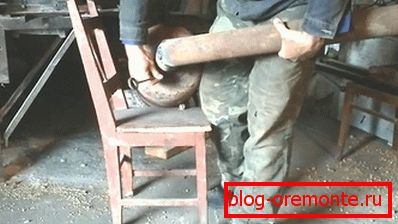
 | Now you can begin to cut in the cylinder hatch using grinders. |
 | It is advisable not to go beyond the markup, but in this case it is necessary to pry the cut-out part with a crowbar in order to extract it. |
 | This is what should happen. As can be seen in the photo, the cut was performed near the welds - where the metal is thinner. |
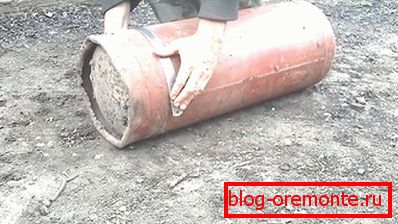
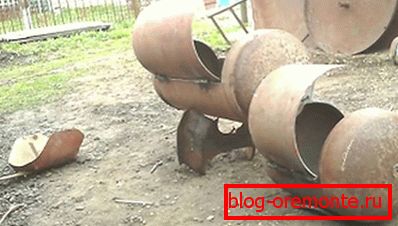
 | A “sole” is welded at the bottom of the container, thanks to which it becomes stable. Since we do not need it, we will cut off this part. |
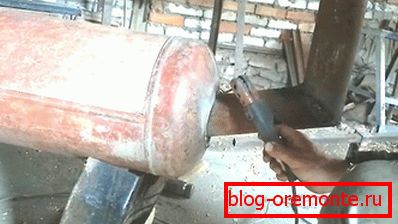
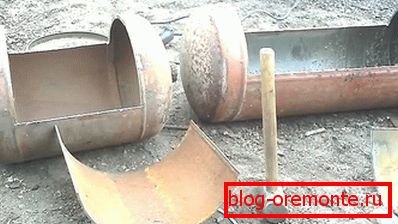 | We will use the receiver from the truck as a smoke generator. It does not contain explosive vapors, so you can cut the door without preparation. |
 | On the same side where the door is cut, on both cylinders we cut openings, the radius of which should be as close as possible to the diameter of the other cylinder. |
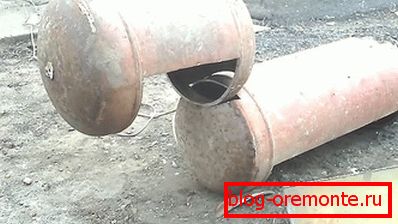 | We check how tightly they fit together, and if necessary we adjust. |
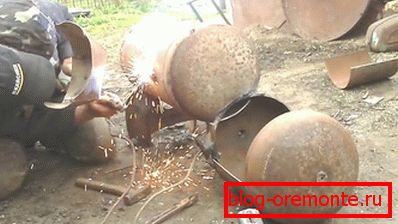 | Now all the seams need to thoroughly boil. |
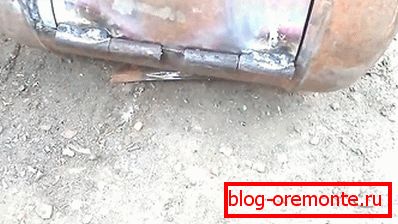 | Welded hinges. |
 | Doors should open without sticking, and when closing tightly enter the opening. By the way, from the inside you can weld a stop, if the door falls inside. |
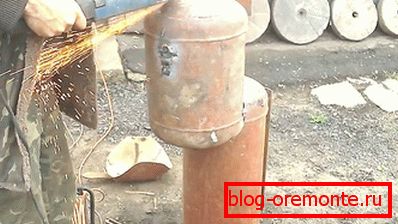 | From the end of the receiver make a hole for the valve. |
| | It will be small, as it is needed in order to regulate the flow of air into the smoke generator. |
 | Then we take a larger piece of metal and make a valve out of it, fixing it in the upper part with a bolt and nut. It is not necessary to tighten the fasteners, since the valve needs to be moved from time to time, changing its position, therefore, tighten the locknut over the first nut. |
 | The flap should move to the side with some force. As you can see, a plastic handle is screwed to it, but practice shows that it is also very hot, so you can weld a piece of bar. |
 | We are engaged in the manufacture of the chimney, welding it at an angle of two pipes. As for the corner, it does not need to do 90? ? it must be deployed. |
 | Apply the markings on the balloon, outlining the pipe scriber or marker. |
 | Drilling such a hole is very tedious and expensive, so it is better to do this with a cutter. If there is none, then many people cut a hole with an electrode, setting the welding machine to the maximum current. |
 | After the pipe is inserted, its position must be adjusted and then welded. |
 | It is very convenient if the covers are fixed handles on a wooden base, because when you touch them you will not get burned. |
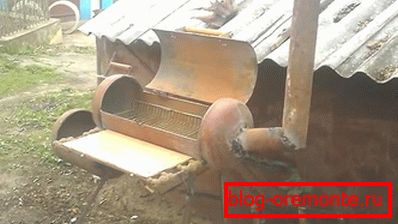 | Legs and a table were welded to the smokehouse, on which it would be possible to put dishes with products prepared for smoking. Inside, we will install the grate from the old refrigerator, bending it to the size of the bottle. |
 | It remains to charge the smoke generator, put food on the grid, and you can smoke. It is important to monitor the smoke generator - firewood or wood chips should smolder and not burn. |
The considered methods of smoking products allow you to prepare high-quality food that is not harmful to the body. We do not claim that smoked meat is good for the human body. However, products prepared in some ways are obtained in such a way that the experts of this business will not even touch them. Watch a video on this topic.
Video: how to make a smokehouse wrong
Schemes and drawings