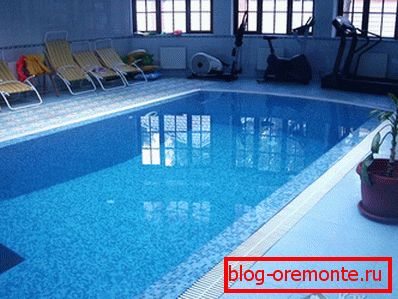
Small pool do it yourself
It's nice to get out of the hot steam and dive into the cold water. To make this a reality, you can make a small pool with your own hands. Certain types of construction are easy to assemble yourself in the yard at the cottage or at home. This article will help the owner to please his family, you just need to make the most of those materials that are already in stock.
Types of pools
In order to have something to choose from, it is necessary to know about the features of various solutions and their relevance for specific conditions.

Inflatable pools. Such products are installed in less than an hour. The pool usually represents capacity which is made of PVC a film. In order to avoid breakthroughs and the pool served for a long time, it is strengthened with additional polyester fibers. Inflatable is only one part - the upper edge. The whole scheme operates on the float principle. Water starts to dial inside, the side pops up. As the level of the wall increases, a full bowl is formed. Included are usually a pump, filter, ladder and assembly instructions. Of the positive qualities can be identified:
- high assembly speed;
- relatively light weight;
- reasonable price;
- possibility of unfolding in any conditions (the requirement is only sufficient rigidity of the base and its evenness).
An inflatable pool usually meets all intended requirements. But you should be aware of certain shortcomings: a high probability of water pollution, the relative fragility of the material (a fallen heavy branch or a sharp object can damage so much that you have to make a full replacement). The price of such products can not be called low, for some samples it will be necessary to lay out 30 thousand rubles and more.
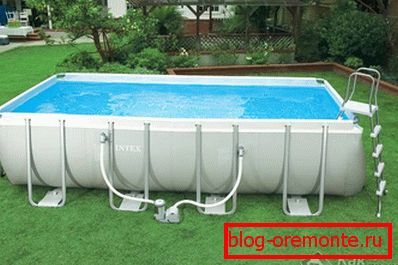
Frame. Among the pools of this type there are a large number of different solutions. In the role of support can be metal tubes that are assembled into a closed structure, and a PVC bag is placed inside. When it is filled with water, the walls rest against the racks and their expansion is limited. Shield skeletons are assembled from individual sheets of metal, which has an anti-corrosion coating, which prevents its damage. The interior space is organized in the same way as in the previous version.
Installation of a frame pool usually takes a whole day. At the same time, he also needs a good foundation so as not to deform it with the weight of the water poured. Seasonal containers will have to disassemble the fall and re-install closer to the summer. There are those who can safely spend the winter. Usually they have additional stiffeners, and the main racks are large. This is necessary to resist the action that will occur when water freezes. Such pleasure will cost more than inflatable counterparts.
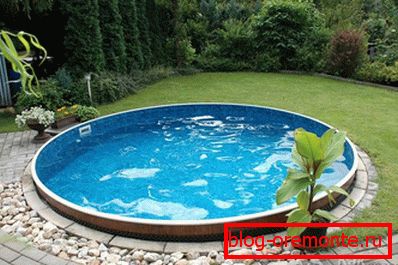
Fiberglass. In most cases, this design is a finished cast container. It has specified parameters: depth and capacity. Nothing to invent. It will only be necessary to dig out the corresponding trench, install the capacity and bring the required communications. One of the advantages is the high strength of the product. By some indicators, it even surpasses the concrete. Due to the properties of the components, the bowl is not exposed to linear expansion due to temperature fluctuations. This means that the service life can be very long with proper maintenance. Fiberglass is perfectly repairable. The walls are so smooth that the garbage simply cannot linger on them, which means that they are very easy and simple to clean. Available a large number of additional equipment, for example, you can buy a variety of slides or jumps for jumping. This will please not only children, but also adults. The low level of thermal conductivity prevents the rapid cooling of the heated liquid.
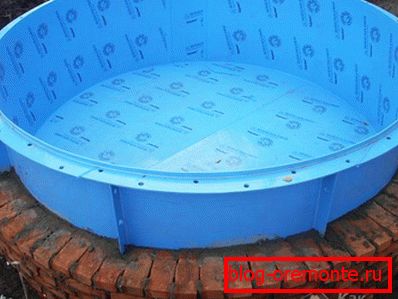
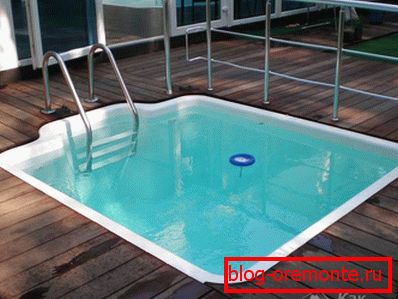
With a bowl of polypropylene. By itself, this polymeric material has sufficient strength. He does not need an additional layer of waterproofing, which will prevent the outflow of fluid. Most often for the manufacture of such options are used blanks in sheets. They are blue or cyan. The assembly can be done by yourself, but for this you will need certain tools. Most often this is entrusted to professionals. The erection of the whole structure can take from several days to weeks. Such pools have a recessed structure, so large scale excavation is required, as well as the laying of a concrete base plate. The material is resistant to ultraviolet and chemically active substances. Because of this, it can be easily located in the open.
With a concrete base. Simply put, this is the pit of arbitrary length, width and depth that the user has chosen. It is filled with a solution. Walls and bottom can be lined with special ceramic tiles or mosaics. To implement such a project can almost everyone in any suitable place. For such a pool, it is important to think over all the required communications so that it serves as long as possible.
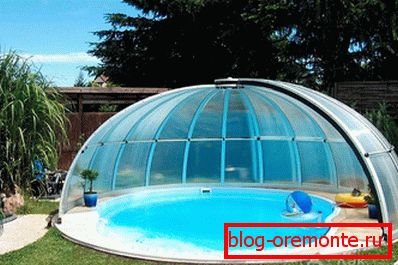
Domed. This can be any of the listed options. A special feature is that they all have a roof. It can be made from various materials. The main zest is that the bowl is closed on all sides, which prevents wind from blowing, and also contributes to the rapid heating of the water inside.
In addition to differences in the method of construction, also distinguish subspecies for filtering. It can be:
- Skimmer. In this case, water is withdrawn from the pool through technological openings that are located on the side walls. Moving through the channels, it gets into the filtering device. It is cleaned, disinfected and partially heated. Return to the tank is through nozzles.
- Overflow. This method is more spectacular, but it also costs a little more in construction. A mirror of water comes to the top of the pool. Water flows through the drain hole or the upper side and enters a special chute, and from it into the tank. In the latter there is a pump with a water sensor, which pumps the fluid into the filter, where it is being cleaned. Back the liquid flows through the holes that are located at the bottom of the pool.

Choice of place
In addition to choosing a pool and even before creating its drawing, it is important to think about where to place it on your land plot. To make it easier to determine this, here are a few rules to consider:
 Large vegetation. Greens and trees are always good. But for their life requires moisture, which they absorb through the leaves and root system. In the period when the water will not be enough, they will try by all means to move to its source. As it grows, the bottom or walls of the pool can be damaged, which will cause the outflow of fluid. Therefore, it is very important that such vegetation is not close. In addition, in the autumn, the foliage will fall to the bottom and promote the formation of algae and silt.
- Direction of the wind. If the pool is rectangular, then its position should be such that the long side is along the direction of the average annual wind movement. This is done in order to properly install the filtering system, the fence for which will be carried out at the far edge, where all the garbage will be collected.
- The proximity of communications. If you plan to install a stationary version, then it is very important to consider this factor. This will avoid digging a large number of trenches and laying pipelines.
- Relief. The most convenient way will be to work on a relatively flat area. Thus, it is easier to sustain the required level, and you can also be sure that soil will not be sprinkled from the walls. The sides of the future structure will also be uniform. But a small bias will still help in the organization of drainage.
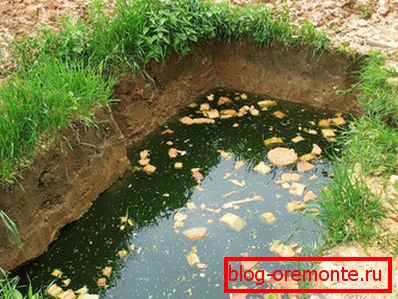
- The need for draining. In some areas, groundwater is very close. When installing a submerged pool during construction, liquid may accumulate in the pit, which will impede rapid progress. Therefore, it is worth picking up a site where there is no difficulty.
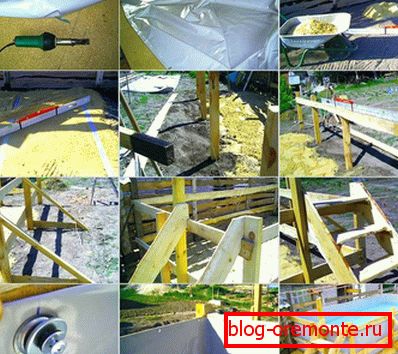
Assembly of frame option
This option can be very cheap to manufacture. In order to implement it, you will need a bar of 100? 100 mm, edged board 100? 30 mm or 50? 30 mm. You will also need a material that has good waterproofing and is able to withstand high tensile pressure.
- Plot is selected, as described above.
- A pit is dug 40 cm deep. Its dimensions must be 20 cm larger than the size of the planned basin.
- The bottom is well compacted.
- It creates a small bias towards the middle, where a small pit is dug out with dimensions of 50–50 cm and a depth of 20 cm. It will serve to collect water, which may overflow.
- All space is filled with rubble of medium or small fraction. The layer should be 20 cm.
- Another 20 cm fit sand. It is very important to tamp it well, so that the pillow is tough enough.
- The plane is displayed with the help of lighthouses. This will allow the pool not to twist. In the role of guides can be metal pipes or wooden beams, which are laid using the building level.
- Racks are made of a wooden bar about which it was told hardly above. Their number should be such as to install through each meter. The total length equals the height of the pool plus 50 cm, which must be immersed in the ground.
- The part that will be in the ground is processed using bitumen mastic or wrapped in roofing material. In addition, it is necessary to cover the tree with an antiseptic composition so that rot from constant exposure to moisture does not appear.
- At the place of installation of each column a hole is dug to a depth of 50 cm.
- Mounted corner racks. They are aligned with the construction level in the horizontal and vertical plane.
- The space around them is filled with sand and soil, which are well tamped to securely fix the element.
- Diagonals are checked to make the design symmetrical.
- Between the columns are stretched fishing line. One should be at the bottom, the second at the top. They are necessary in order to facilitate the installation of the remaining reference points.
- The remaining parts are mounted with the specified step.
- With the help of a cut board, the supporting walls are packed. Elements are better positioned closely to create a uniform plane.
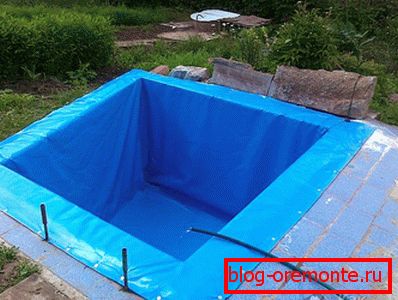
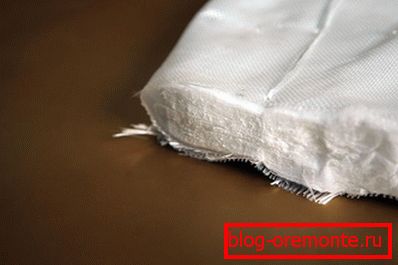
- After the frame is manufactured, a material is placed inside that will serve as a receiver for water. This may be a dense plastic film. It is important that it be one piece, because at the site of the seam there will be a leak, and water will seep into the ground. The edges must be wrapped over the top edge so that the material does not crawl during operation.
- If you wish, you can make a more durable option. To do this, you will need a PVC base, which is used for sewing awnings for trailers, eyelets, riveters, construction hair dryer and rubber roller. The blanks are placed inside the frame and the markings are made, what bends will need to be made in the corners, how much should be left for turning, exactly where the seam soldering will be made. Separate sheets are interconnected with hot air. They are stacked with a small overlap. By means of the hair dryer the warming up is carried out to almost full softening. Rolling roller formed spike. This should be done on a flat surface without debris and dust. The top edge is bent by 5 cm. The grommets are installed with the help of a riveter. The distance between them should be 15 cm. Fixing the awning can be carried out to the inside. To do this, he simply presses a screw with a washer to a wooden base. Either the edge is bent over the top level, then a rope is pulled through the grommets and it clings to the prepared elements.
- The ready pool is filled with water.

To make the design easier to fit into the surrounding exterior, it can be partially or completely immersed in the pit. In this case, the bottom is organized in the same way as described. Drainage system can be improved. To do this, a sewer pipe is fed to the pit, which is in the middle, the second end of which goes into the water collector or canal. Thus, water will be drained much faster.
Concrete pool making
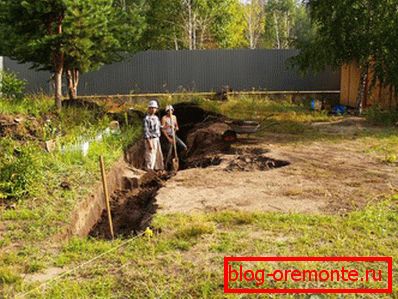
The main task for this option will be the excavation work. Having defined the place and having marked the territory, a hole of the required depth is dug out. The bottom is formed in accordance with the recommendations listed above.
- The next step is to dig a trench. It should connect the pit to the groundwater drainage site.
 Inside the recess, which is made in the middle of the pit, the pipe is laid. It is discharged through a trench to the place of collection of liquid.
- The surface is covered with a layer of gravel.
- In place of the planned location of the drain holes are installed ladders. To them the eyeliner from polypropylene or other pipes becomes. They are wrapped in oilcloth to prevent concrete from falling into the middle.
- At the bottom is laid reinforcing mesh. It is made of reinforcement with a diameter of 12 mm. It is necessary to slightly raise it so that all the rods are subsequently completely immersed in the solution. To do this, you can score posts from scrap materials.
- Additionally, it is necessary to install vertical bars, which will later ensure a good connection of the bottom with the walls.
- Mortgages are made - these are wooden boxes, thanks to which technological holes can be left.
- Concrete solution is better to order ready from the manufacturer. This is necessary in order to simultaneously fill the entire space. If the preparation will be carried out manually, then you will need several large concrete mixers. Cement must not be used below grade M350.
- The territory is carefully filled. After that it is necessary to make consolidation by the vibrator. The final touch will be the alignment using the vibrating rail or rule.
- In this state, the resulting plate must be left for 2 weeks.
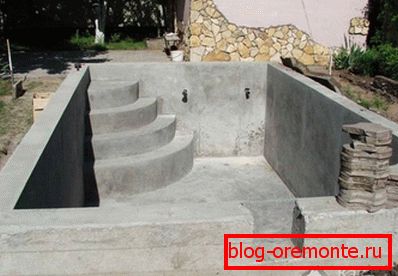
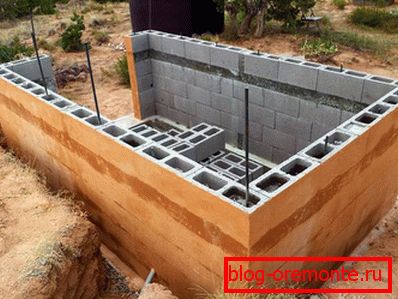 You can proceed to the construction of walls. They can be cast as monolithic, but it will have to make a lot of effort to exhibit formwork. Another option would be the use of hollow polystyrene blocks or foam blocks. They must be laid in such a way that the fittings, which were installed vertically, pass through the holes of the stone. Subsequently, the concrete solution is poured inside. In the course of laying it is necessary to provide for the presence of technological holes for lighting devices, as well as for the skimmer.
- Next, apply the plaster layer of 1 cm.
- After drying, all planes are carefully rubbed over. At the same time, care must be taken to avoid large scratches that could later damage the waterproofing.
- In the case when the walls were made of stone, their outer side must be glued with foam, and also tightened with waterproofing. The latter will not allow moisture from the outside to destroy the material, and the insulation will serve as a compensator for thermal expansions.
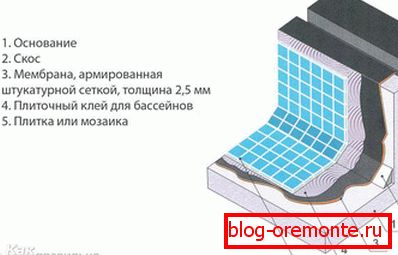 All internal space is covered with a special waterproofing compound. Next, apply the polymer composition, which will provide full tightness. It needs to be cleaned as soon as he grabs, because then it will be much harder to do.
- The mosaic or tile is being laid. It should be glued on a special polymer mixture, and not on ordinary tile glue.
- The pool is being filled. In this state, he should stand for 2 weeks. If the water level is kept, then it can be cleaned, connect all the required elements, add an antiseptic and use.
Installation of the pool of polypropylene

With certain skills, installing such a pool does not take too much time. We will need sheet polypropylene (wall thickness from 8 mm), material for joining, a technical dryer, a plane.
- The first step is the preparation of the bottom. For this, the sheets are laid out on a flat surface.
- With the help of a plane, the chamfer is removed at an angle of 45 ° at the end, which will be glued.
 The two elements fit closely together.
- A special nozzle, which has a narrow nozzle, as well as a special paddle for feeding the PP tape, is put on the hair dryer.
- Gradually warming, the cord is placed in the prepared groove between the two sheets.
- After cooling the seam protruding part can be removed with a chisel.
- The finished bottom can be put aside. The next step is to install stiffeners for the walls of the pool. For this, strips are cut. Their length should be 20 cm less than the height of the pool, width - 15? 20 cm. They are glued butt to the outer part of the wall by the same method as described, but without chamfering.
- The final step will be gluing the walls to the bottom.
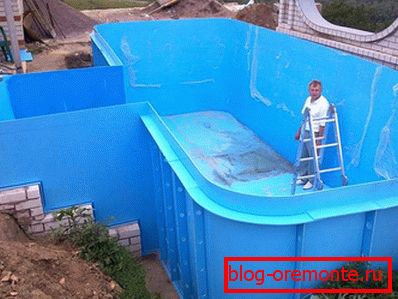
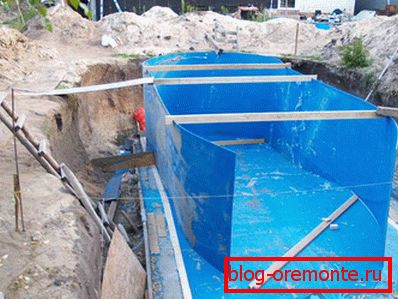
For the installation of such a structure, a foundation pit is being prepared; its dimensions must be 10 cm larger than the product itself on each side. The bottom has to be filled in with solution and constantly. The vessel is immersed in the middle. Gravel is poured into the space between the walls of the vessel and the pit and is well rammed.
The technology of making a pool of polypropylene is shown below:
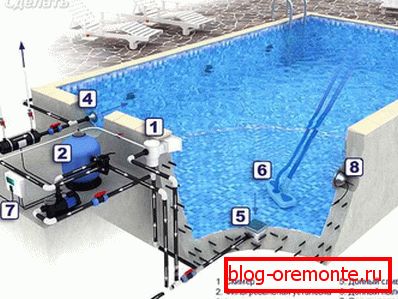
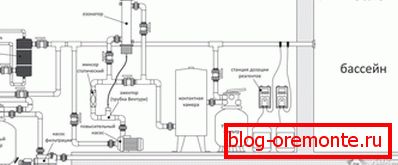
Filtering system
Filter for the pool is an integral device that must be present. Without it, it will not be possible to use water for a long period of time. It will require frequent replacement. The device can be installed near the pool itself, as well as in a specially prepared place. There are a large number of ready-made options. For a small pool there is no need to take too powerful filter. If desired, you can collect it yourself. To do this, you need a plastic barrel of 100 liters. The main condition is the presence of a cover that can be closed tightly. A centrifugal or drainage pump, plastic pipes, fittings and a filter cartridge will be required.
- A hole is drilled below the container throat.
- A threaded nipple is inserted into the hole. Sealing rubber bands are put on both sides and lock nuts are screwed on.
- The same output is made 5 cm above the bottom diagonally.
- To the upper adapter is connecting the pipe, which will carry out water intake from the pool.
- At the bottom of the inner side is put on the filter cartridge. From the external pump is connected. From the pump is the conclusion to the pool.
- Half sifted sand is poured into the barrel.
- The installation must be below the pool water level. Liquid will flow into the tank by gravity. Passing through the sand, cleaned and fed back into the bowl with the help of a pump.
With the right approach to the business pool will serve more than one year. Concrete or polypropylene construction can be easily made in the bath or basement of the house. But this should be planned at the construction stage in order to avoid unpleasant consequences from uneven load.
Video
Below you will see a video instruction on the construction of a concrete pool:
A photo