Sewage in the apartment with their own hands
All household drains of numerous sanitary appliances of the apartment are discharged through sewer pipes. The developers undertake their installation, but homeowners have to deal with the repair and replacement of utilities. Sometimes a new building requires laying sewers from scratch. Installation work can be entrusted to plumbers, but if there is free time and a desire to save money, then the sewage system in the apartment is also mounted on its own. The main thing is to know how to carry out the pipe installation and connect the plumbing.
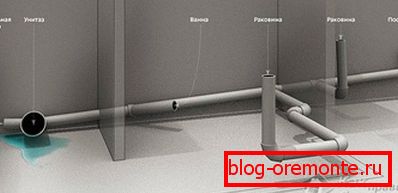
The first stage is planning
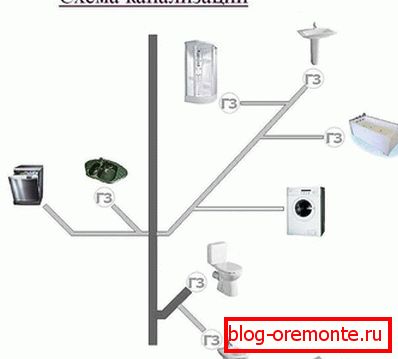
Before you install pipes and install plumbing, you must perform the planning of the sewer system. The scheme includes the following elements:
- plumbing fixtures: toilet, sink, shower, bath, dishwasher, bidet;
- pipe length and diameter;
- distance from walls to plumbing and pipes;
- the location of the riser;
- the diameter of the siphon to connect the sink and bath;
- the number of connecting elements (fittings);
- system tilt angle;
- location of audit points.
If you are not planning to connect new points, then you can not change the existing layout of the sewer. This will simplify the calculation of the required material. The length of all pipes is measured on site, if they pass through a wall, then the size of each section will be required.
The diameter of the sewer pipes is not chosen arbitrarily, there are recommendations for their size:
- for the riser cross section - 110 mm;
- for the toilet - 110 mm;
- for bath, sink and other appliances - 50 mm.
To connect some devices sometimes use a pipe of 32 mm.
The bias also does not have to be chosen independently, pipes with a diameter of up to 50 mm are arranged at an angle of 3 ?, and 110 mm - 2 ?. This means that on a plot of 1 meter the slope changes by 3 and 2 cm, respectively. The correct location of the line ensures the movement of water in the self-flowing system.
Material selection
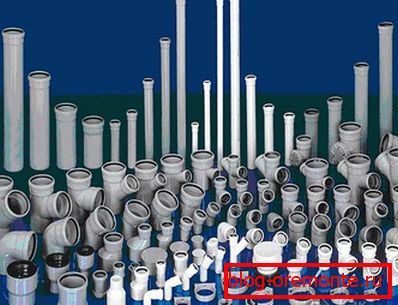
Sewerage in the apartment is made of plastic, with cast iron pipes work harder. Polymeric pipes of three types are used: polyvinyl chloride, propylene and polyethylene. These products are similar in appearance and properties:
- smooth surface on which deposits do not accumulate;
- strength, corrosion resistance;
- a light weight;
- durability;
- installation does not require welding.

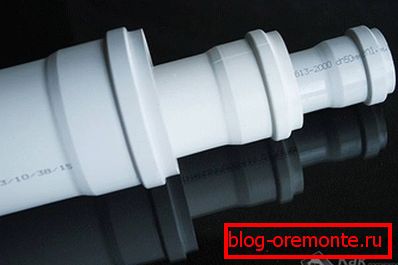
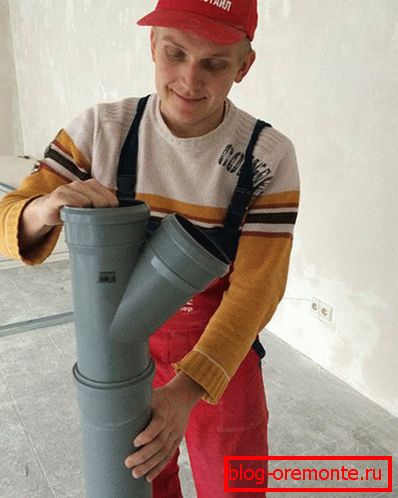
To connect the pipes, special elements are necessary: bends, tees, transitions from metal, cuffs. It is better to purchase all the necessary material from one manufacturer, it guarantees the accuracy of coincidence of all diameters. Sealing the joints will require silicone grease, it is also bought in advance. So, for work we will need:
- plastic pipes with a diameter of 50 and 110 mm;
- fitting;
- sealing cuffs;
- clamps made of plastic, selected over the cross section of pipes;
- audit hatch, which is installed on a common riser;
- silicone sealant.
Instruments:
- perforator;
- Bulgarian;
- hammer;
- hacksaw;
- zubilo;
- adjustable wrenches of various sizes.
Dismantling the old system
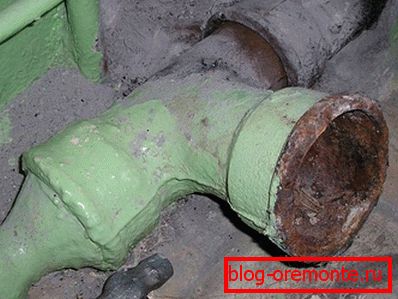
Replacement of sewers start from the riser. This is the most difficult section, it runs through drains from neighboring apartments, so for the period of pipe replacement, neighbors should be asked not to use sewage for some time. Dismantling is as follows:
- Access to the place of docking of the riser with the adjacent site. This may require breaking a portion of the slab.
- The part of a pig-iron pipe is cut out by the grinder. If you can not completely cut through, then it can be broken with a hammer. Work must be carried out carefully, as a broken-off piece of pipe may remain inside and block the entire pipe.
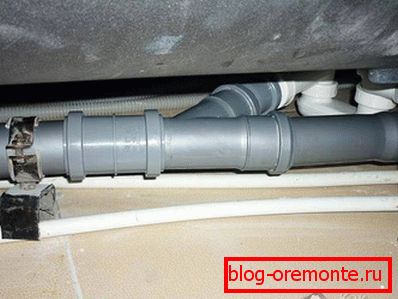
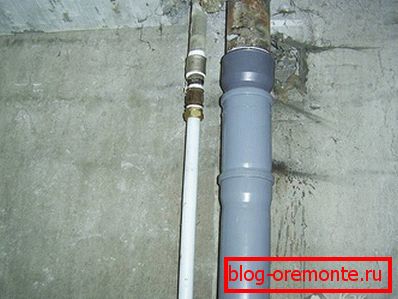
- A tee is installed at the bottom of the riser near the floor. The straight plastic pipe chosen for the riser is connected at the top with the remainder of the cast-iron pipe using a transition sleeve. Fastening with tee is carried out by the socket The tightness of the joint provides a rubber ring and silicone sealant.
- The pipe is attached to the wall clamps. In the area of the sockets, the pipe is rigidly fixed, in other places the fixation is floating.
Having completed the installation of the riser, proceed to the layout.
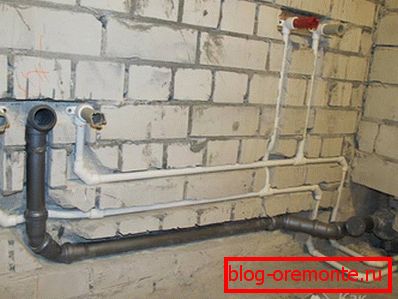
Installation of sewer system
All plumbing fixtures are disconnected from pipes that must be dismantled. After removing the old system, the layout of the new highway is marked. When installing the pipeline, preferably straight sections, bends and turns, which provoke blockages, should be the minimum number. Proper installation of sewers with a small number of connections and sustained tilt angle ensures self-cleaning of the system. With each flush, the stream carries the remainder of the previous stream.
To organize the marking of the slope of the pipes, you can use a line on the wall or a cord attached to the highest and lowest point of the sewer system. According to this marking, the installation location of the fastener is determined, for pipes O 50 mm, the clamps are put through 50 cm. To relieve tension in the pipes, it is necessary to combine two types of fastening:
- rigid - the pipe is fixed with a rubber gasket;
- floating - fasteners allow the pipe to move, runs without a rubber insert.
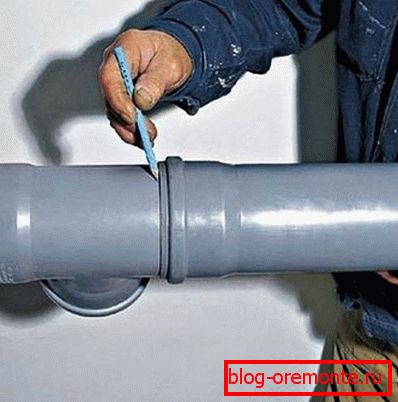
Before installing the pipes, they should be chamfered and cleaned the edges so that there are no burrs. The inner surface of the pipe and fitting should be clean and dry. When performing the connection, the end of the pipe is inserted into the socket until tight. To enhance the tightness of the rubber ring is applied silicone grease. Beaters should be located on the flow of water. During operation of the sewage system, temperature deformation of the plastic occurs. So that the seam does not lose tightness when expanding the material, a gap of 1 cm is left. This is done like this: the pipe is inserted into the socket to the stop, then a 10 mm mark is made and the part moves back to this mark.
In order not to have to redo the finished system, it is necessary to make a trial installation without sealed connections. Once you are sure that the installation is correct and that all parts are present, you can complete the assembly.
Installation recommendations:
- Only straight plastic pipes can be cut. Most often at home, the incision is made with a hacksaw, necessarily at an angle of 90 ?.
- If necessary, perform a turn, it is better to use two taps of 45 ?. They do not drastically break moving drains, so they are less likely to clog.
- The first to join the system toilet, then the remaining plumbing fixtures.
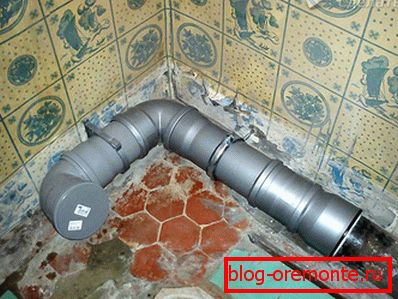
- On difficult areas establish a segment called revision. It has a hole covered with a rubber cap through which you can inspect the inner surface of the pipe.
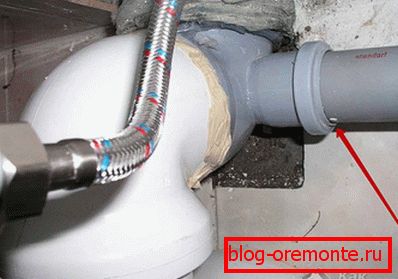
- Part of the plumbing is connected to the sewer directly, but there are appliances that require the installation of a siphon. This is a device with a bend in the form of a knee, inside of which there is always water for a hydraulic seal. Siphon does not allow unpleasant odors from the sewer system to spread indoors.
- Sewage distribution is carried out not only along the walls, but also in the gates. Before being placed in the wall, the pipes are wrapped in a soft material to reduce noise. To prevent cement from entering the joints, they are stuck with tape. In the grooves, the pipes are fixed in a floating way.
- The ends of the horizontal branches are closed with plugs.
After installation, it is necessary to check the tightness of the assembled system in all parts of the wiring in the apartment and at the junction with the riser. The reliability of the docking of the new riser with the neighbor pipe is checked after the water is drained in the upper apartment. To check, water is drawn into the bathroom, and then the stopper is removed, both taps in the kitchen are opened, and the toilet is drained. Reliability of joints is easy to assess - they should all be dry.
Video
This video shows how to replace the residential cast-iron sewage in Stalinka on plastic:
A photo