Seam sealing in wooden houses
Wood has long been used as a building material. Not a single development has been able to surpass it in environmental performance and quality of thermal insulation. But it is impossible to perfectly choose the form of the components, if the building is erected from a log house. In addition, the material shrinks and shrinks, which leads to a change in its configuration. At a certain stage, the need to seal the seams in wooden houses.
Why is it necessary

Late treatment of cracks can be a big problem for those who live in the house. Due to leaks, drafts arise that inevitably lead to a deterioration of health. In addition, the accumulated heat is weathered. With current prices for coolants, this will translate into a good penny. It is also harmful for the logs themselves. With the constant penetration of moisture, the wood may begin to rot, which will lead to the formation of fungus and then large-scale repairs will be required. There is a lot of talk about what is the best way to seal the seams: with natural materials or synthetic sealant.
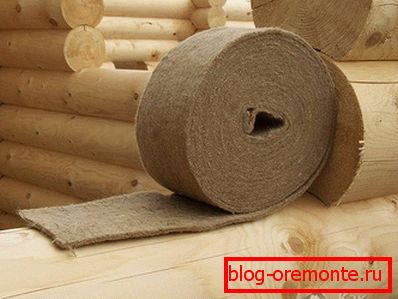
In fact, one does not exclude the other. At the stage of construction of the house from the bar is the primary caulker. Traditional materials are used for it: tow, moss or modern tape materials on a natural basis. It improves the docking of logs, and also speeds up the construction process. After half a year of operation or a little more, a re-caulking iron will be required (some builders instead will immediately apply sealant treatment), which is carried out using the same materials. It will already serve as a basis for complete sealing of the seams.
Why sealant

Modern does not mean bad. Sometimes poorly performed work is explained by the fact that there is not enough knowledge about how to properly use certain materials. The advantages of the sealant are:
- High elasticity. Logs - a living building material. In the process of changing temperature and weather conditions, both expansion and contraction of the bars can occur. Sealant can compensate for these fluctuations. On stretching it can withstand 200% of the original size.
- Good adhesion. This material is water based. It interacts well with the tree, penetrating into the pores and associating with it. This ensures excellent tightness.
- Ease of application. To use this method, there is no need for special training. There will be enough skill that is acquired in the process.
- No need for complex tools. Most of what you need is already at home for everyone, and extras are sold at any hardware store.
- Easy color matching. Even if your blockhouse was painted, it would not be a problem to choose a sealant to match.
- Relevance for different climatic zones. Does the range of temperature tolerance range from -50? C to +70? WITH.
- High speed of work. If you use a pneumatic gun, then the end result for a large building can be achieved in one or two weeks.
- Seal protection. Natural fibers are the favorite building material of birds, which they apply to their nests. Sealant simply closes their access.
- Vapor permeability High quality blends do not prevent the removal of moisture, which is necessary to preserve the microclimate.
- Antiseptic properties and protection against insects. The compactor simply prevents pests from entering the crevices.
- The possibility of repair work if the seam was damaged.
It may be tempting to seal the inter-event space with polyurethane foam or ordinary silicone. It is absolutely not recommended to do this. Under the influence of various weather conditions in a few months this material will fall out by itself, and everything will have to be started over. The funds will go down the drain.
Required Tools

In order to realize a warm seam in a wooden house, we will need the following components:
- Sealant. To calculate its quantity, it is necessary to approximately imagine how thick and wide the seam will be. Next, calculate the area of its cross section, for this width is multiplied by the length. After the volume of one tube is divided into this area. So we will know how many meters it will be enough. We change the length of all seams and divide by the number of meters from one tube.
- Electric, pneumatic or manual gun for applying sealant.
- Putty knife. In this case, a small tool is used, which is similar to the one that is used when laying bricks for jointing.
- Bucket with water. Since Since most sealants are water based, they can be easily washed off with it.
- Rags. Rags will be necessary for us to clean the spatula and remove stains.
- Spray bottle.
There are some types of sealing material, which are immediately available in blanks for seams. For their application does not need a gun. They are laid in the slots, rolled by a narrow roller, after which the film is removed.
Stages of work
To perform sealing tasks, it is better to choose calm and dry weather. The procedure will be as follows:
- If the house or bath has not yet been treated with an antiseptic, then it should start with that.
- Select the side of the building, which is in the shade in the first half of the day. This is very important because during application it is undesirable to fall in direct sunlight. If you do not comply with this requirement, the moisture will evaporate too quickly and cracks will form in the form of a cobweb, which not only spoils the appearance, but also worsens the result.
- With the help of a soft brush, dust is removed from the inter-event space. If there is a worn natural insulation, then it should also be eliminated.
- With a spray bottle, ordinary water is sprayed onto the treatment area. This is necessary to increase the adhesion of the applied mastic and wood. It also compensates for the lack of moisture. When the logs are too dry, they will pull the liquid out of the sealant, which will cause cracking.
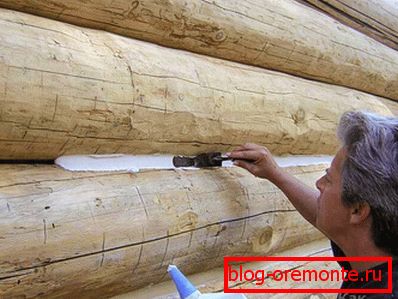
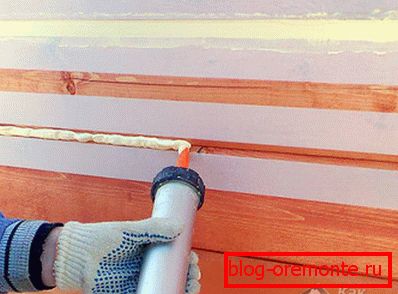
- The gun is filled with material for sealing. The tool nose is cut at an angle of 45 ?. It will be easier to create a seam of the correct form.
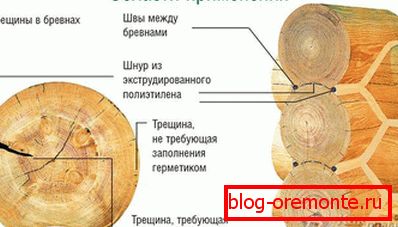
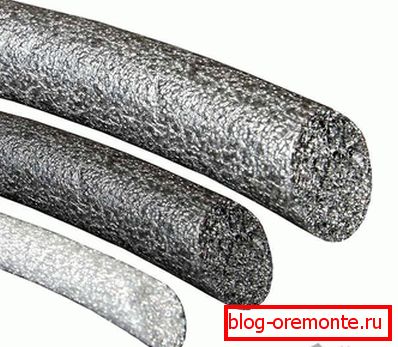
- Applied sealant. It is necessary to move the gun with the same speed so that the thickness of the material at all points is the same. When applying, you must follow the rule? seam thickness must be no less than? its height. It is this proportion that will allow it to be strong enough and not to tear when further shrinkage occurs. In the case when the gap is large enough, inside you need to put a special cord of polyethylene foam.
- The next step is to align the line with a spatula. To do this, it needs to be wetted in water and with gentle movements without much effort to bring out a beautiful plane.
- All drips are gently removed with a damp cloth.
- In order to quickly fill your hand, you need to start with straight sections and at the end make cuts.
- In the first few hours it is necessary to protect the surface from precipitation, since the rain will simply wash away everything that has been done.
- After complete drying of the mastic, it can be coated on top with a clear acrylic varnish. It will serve as additional protection and will not affect the selected color.
- It is better to start outside, and then repeat the same actions inside.
- Indoors it is possible to decorate embedded slots with a rope.
In order to facilitate the job of applying mastic, some masters recommend using masking tape. It is glued to the upper and lower timber so as to limit the space of the sealant. After the completion of the work, it can be removed and the surface will remain without drips.
In such a simple way, the seams in the wooden house are sealed. If you have enough time, then you can easily handle all the work yourself.
Video
How to seal the seams using the “warm seam” technology, see below:
See also:
Caulking log