Roof of metal tiles do it yourself
The metal tile is an easy-to-use material that can be mounted by yourself. Some beginners believe that working with metal tiles is available only to highly qualified professionals. In fact, there is nothing difficult in the installation. It is only necessary to understand some of the details on working with this material. In this article we will describe how to make a roof of a metal tile with your own hands, give step by step instructions for installing the roof of the roof, and also give you visual photos and video materials.
Types of coatings
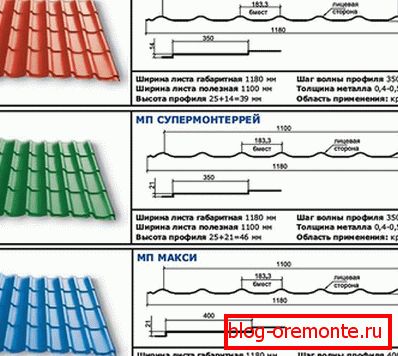
 Before roofing a metal tile, it is necessary to understand the varieties of this material. The main differences are contained in the coating plates.
- Plastisol coating. This metal is very resistant to all types of influences. She serves a very long time. True, metal coated with plastisol, is quite expensive. It is much more expensive than other varieties of material. But the roof will be very durable and will not flow.
- Matte polyester coating. The most accessible type of metal tile. This material is resistant to moisture and frost. You can make such a roof, even with a modest budget.
- Polyester coating is another type of tile. A good choice for roofing. Such metal tile combines quality and low cost.
A significant difference between the materials is the nature of the locks on the plates. Fasteners can be open or hidden. In addition, the castle itself often has various forms. Profile sizes are different, respectively, and different pitch when mounting plates. All this suggests that before buying it is necessary to take measurements and select the desired material.
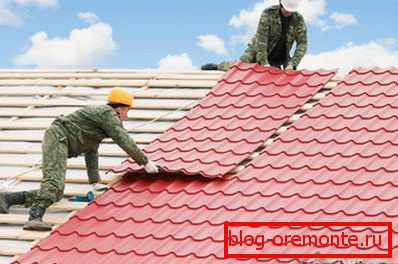
Roofing
When the material is purchased, you can begin to cover the roof. The roof of the metal is stacked in several stages.
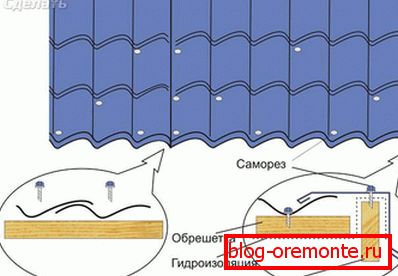
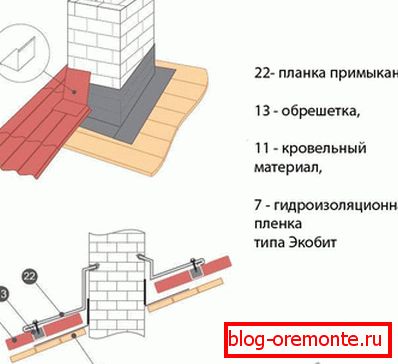
- The first stage is the installation of waterproofing. Usually it is done according to the standard scheme. On the waterproofing layer is attached crate, which will become the basis for the installation of metal. When installing waterproofing, one should not forget to leave a slack, otherwise it will work poorly.
- Mounting crates - quite a simple step. We must take the bars and nailed to the roof frame. Bars need to be treated before installing a special antiseptic composition, otherwise they may collapse. Instead of wood, you can use a perforated profile.
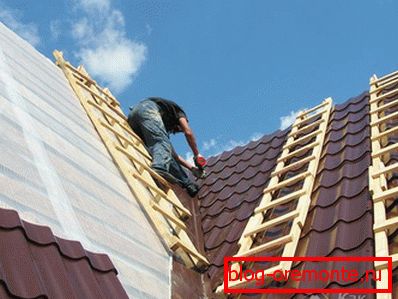
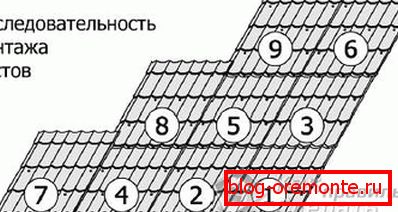 When laying metal tiles should observe one rule. Regardless of the type of roof material is placed from the highest point to the lowest. If the roof is shed, then you need to start work from its top. If the roof is duo-pitch, then it is necessary to choose the left or right part and lay the metal tile first on one half (from the ridge down), and then on the other.
- When laying metal tiles, each next layer should be put under the top one. Independent roofing of the roof with a metal tile begins with fastening several tiles on the very top with galvanized self-tapping screws.
- Between a horizontal row of tiles, too, is overlapped.
- To cover the ridge of the roof it is necessary to use special elements of the metal tile.
Any crate is placed on the waterproofing through the counter rail. This device will allow the roof to "breathe."
There is nothing difficult in this work. It is only necessary to lay out the first row and align it, and then the process will go easy. The roof of the metal is very aesthetic and will delight its owner for many years. To understand how to lay the material correctly, you need to find out the structure of the roof of the metal tile.
Device
Metal roof is difficult to confuse with any other. It has its own characteristic pattern. Before starting work with the material, it is necessary to make a drawing and determine the required amount of metal tile.
If you look at the metal tile roof, you can see that it has “waves” and rows. Professionals have a special concept associated with this material. It is called "metal tile pitch" and represents the distance between two rows. Six steps of such a roof of 35 cm each constitute a module. Metal tile is measured by modules.
However, the master can order your own set of metal tiles. It will be a bit more expensive than buying a complete set, however, this approach will pay off in that the waste will be significantly less. When ordering it should be remembered that the metal has dimensional limits. For example, it can not be longer than 45 cm.
Payment
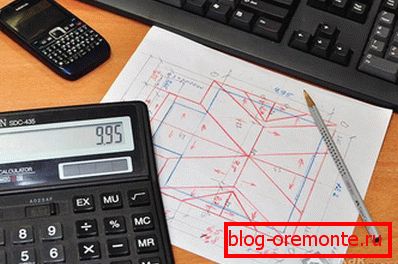
The calculation of the roof of the metal should be carried out very carefully.
- To calculate the required amount of material, you must first make a drawing of the roof. Of course, the roof must first be measured.
- Then, take the dimensions of the metal-tiled sheets and lay them on the roof surface in the drawing.
- When calculating it is important to remember that the sheets also overlap each other.
The metal tile is cut if necessary. But this is not a reason to take the first set of modules.
Details

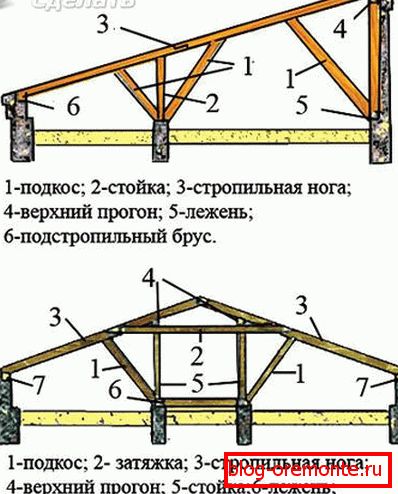
 Metal does not fit any roof. The roof must necessarily have a slope of at least 11 degrees.
It is important to remember that under the screws when installing metal, it is necessary to make rubber linings. This is a technological requirement.
Metal tile requires special handling. Work with it begins with the display of material from the package. This must be done with gloves on. It is generally better to work with a metal tile in gloves. Raising sheets to the roof is carried out with the help of a special system of guide boards.
Installation tools
To work the master will need a number of tools that are best prepared in advance. It:
- screwdriver;
- ruler or rake;
- hammer;
- tool for cutting metal.

For cutting will require:
- scissors for metal;
- Circular Saw;
- jigsaw;
- slotted electric shears;
- knife.
Tools with abrasives used when cutting material is strictly prohibited.
It is necessary to carefully pay attention to the filings that remain on the metal tile after cutting. They need to be removed.
Difficult moments
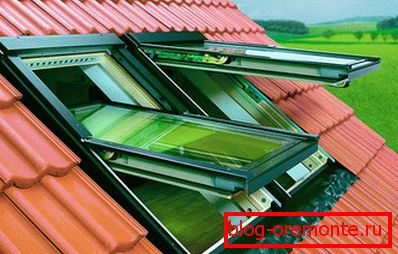
Make the roof of metal will be more difficult if the house has dormer windows. When installing the roof will have to cut pieces of metal or order the material of a certain size. Usually the size of such windows is 10 times smaller than the area of the roof itself.
Roof fence
 Roof fence устанавливают для безопасности. Оно монтируется в нижних точках "волны" металлочерепичного покрытия. Монтаж производится строго с помощью оцинкованных саморезов через резиновую подкладку. Сначала монтируются опоры, а потом ограждение.
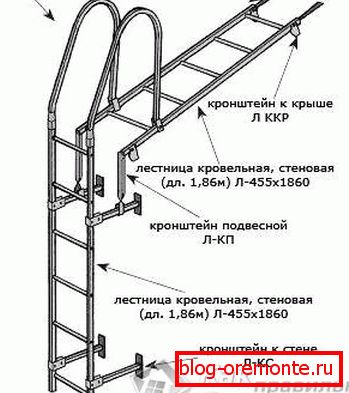
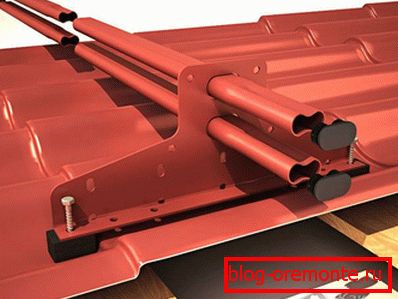
Stairs
Stairs устанавливается также на кронштейны. Они монтируются в прогиб волны металлочерепицы. Потом на кронштейны крепится сама конструкция. При установке кронштейнов на стену не требуется прокладок, а вот при монтаже к металлочерепице надо сделать прорезиненную основу.
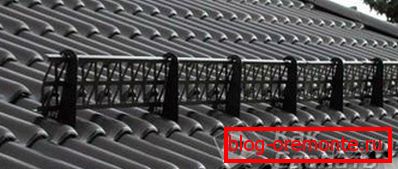
Snow shields
Snegozaderzhateli protect from snow avalanche falling from the roof. Installation should begin in the place where the continuous crate is located. This place should be removed from the edge of the roof by 35 - 40 cm. By the way, such structures should be installed above the roof windows.
In addition to snow holders and ladders, installation of various ventilation elements, transition bridges and other things may also be required on the roof. Such work is done simply, the main thing is to follow the instructions for installing additional elements on the metal tile.
If you want to make a hole for ventilation, then the edges of the tile after cutting should be treated with sealant.
Grounding
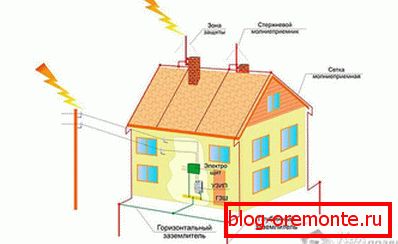
 Metal requires mandatory grounding. It can be of three types:
- cable;
- pivotal;
- net.
The choice of the type of ground depends on how generally the threat of a lightning strike is real in a particular case. Grounding in this case is mandatory, but in one case it is possible to get along with a simpler device, while in the other you will need a complex structure.
Usually for installation of any kind of grounding attract experts. But if you wish, you can do it yourself.
Any grounding consists of the following elements:
- grounding circuits;
- tokovody;
- interception rods;
- omissions
When struck, the lightning strikes the lightning rod, then it dissipates when it enters the circuit. It is easy to install the contour, only a number of earthworks will be required. If you have free time, you can do everything yourself.
Video
We also recommend that you familiarize yourself with the following video of the installation of metal:
Additional video you can find in our video section: Video about the installation of metal tiles.