Potbelly stove for garage do it yourself
The stove-stove for space heating began to be widely used a hundred years ago. After central heating appeared, metal stoves moved from apartments and houses to summer cottages and garages.
One of the most significant drawbacks of the stove can be considered the conditions of its heat transfer. Its heat is not accumulated by anything and almost everything goes out through the pipe. Such a furnace is effective only near the installation site and only during the burning of the fuel.
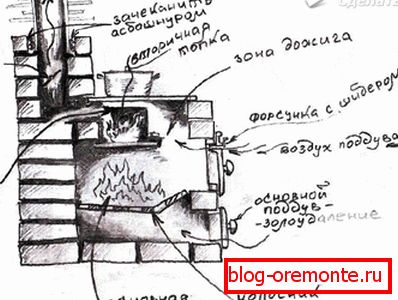
In order to improve the efficiency of the stove, you need to use the lost heat. Maximum losses occur through the chimney, which is heated when the stove is working.
The chimney can be turned into a heating element by changing its direct form to a stepped one, due to which the heat transfer area increases.
In this article we will explain how to make a pot stove for the garage with your own hands from various materials. The easiest way out is to take the old gas cylinder (in which propane gas was transported) as a basis. In the absence of a cylinder, you can use a 40-liter milk flask or any other metal billet.
From gas cylinder
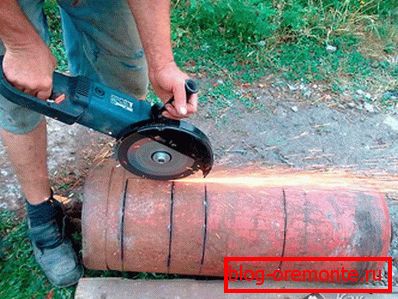
It is necessary to begin works from the drawing, but not on paper, and on the cylinder. Marker marks the future door of the furnace and blew. The door should be located in the center of the cylinder, and the blower - in its lower part. The distance between them is kept no more than 10 cm, and a closed line is drawn in the middle. On it the Bulgarian the cylinder is cut on two parts.
From the 16-millimeter reinforcement bars are welded lattice, which is welded to the lower half, after which both parts of the cylinder are joined again.
In the places intended for loops, cuts are made. Then hinges are welded there and the door is cut. The same operation is carried out with a blower.
It remains to equip the chimney. To do this, the grinder cuts off the valve, and in its place a metal pipe is welded, the diameter of which should be 80-90 mm. The chimney cuts into the garage exhaust system or is led through the wall to the outside.

From the milk flask
A metal can is a great thing on the farm, suitable for storing paints, motor oils, and fuel. The design of the flask is ideal for the manufacture of a stove, from the stove, but as a heating device, it will not be as durable as we would like, the walls are not thick enough. With confidence we can say that it will be enough for 2-3 seasons.
As an independent production of the stove you need to perform several operations.
First you need to mark, and then cut in the bottom of the can, almost at the very bottom, the hole for the chimney. In the final stage of work, the pipe is seized by welding. The diameter of the chimney is selected from 8 to 12 cm. The chimney is extended after the stove has been manufactured and installed.
The lid of the can is the finished oven door with a successful latch, it only remains to drill a few blower holes, the diameter of which can be 15-18 mm. This is done at the bottom of the cover.
Four legs of equal length are made from the corner or scraps of pipes, which are then symmetrically welded to the bottom of the can. A metal sheet can be laid in front of the door, so that a randomly fallen ember does not get on the inflammable material.
Handles flasks - a handy thing to carry the stove from place to place, holding them, you can easily shake the ash accumulated in the oven. It is for this operation that the chimney is best made detachable.
Well, that's all, it remains only to experience a new stove.
Installation
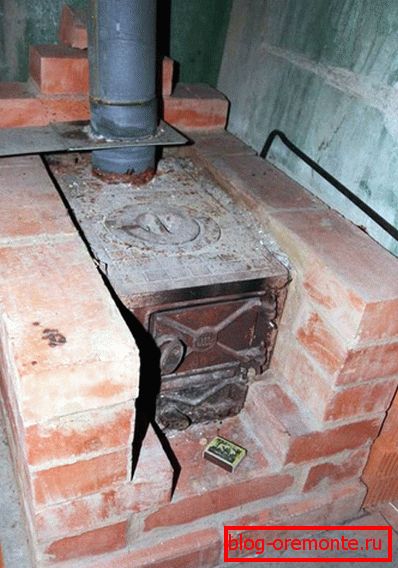
The use of potholes made in the home, as well as any other heating systems, requires strict adherence to safety regulations. Initially, you should choose the place to install the stove. This unit, as practice shows, it is better to install in the corner, namely, near the walls, opposite in location to the garage door.
Do not install the stove closer than 1.5 m to the location of the car. It should be noted that all flammable materials and products should be located at a distance of at least 1.5 m from the stove.
The stove is better to impose on all sides brick walls. Thus, the probability of touching the hot furnace will be excluded, and the heat generated from its furnace will also be accumulated. Thus, you will increase the efficiency of the device several times.
If the walls of the garage are made of wood, then there must be a certain distance between them and the stove, namely, not less than 100 cm. In addition, in order to avoid building ignition, the walls near the stove should be lined with asbestos sheets / brick or other refractory materials.
As a base for the stove, you can use a sheet of steel having a thickness of 1-2 cm. Another option is to fill the concrete screed. Thanks to these actions you can prevent the spread of fire, if suddenly coals / sparks, etc., fall out of the firebox.
To use the stove in the garage, you must first make it high-quality ventilation. Fresh air should come in here in sufficient volume, which will ensure the normal burning of the fire. A small gap between the ground and the garage door may well serve as ventilation. Otherwise, you have to make a special channel for the timely flow of air into the garage, which is not very profitable from an economic point of view.
The stove burns very hot when burning in its firebox, so it is impossible to leave flammable materials, such as wood, oils and greases, gasoline, etc., near it. This can cause a catastrophe.
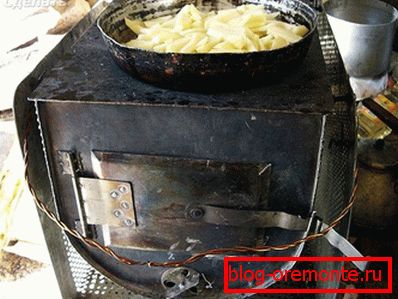
If you equip the stove with a water tank, the stove can be used to heat it. Having installed on it rings, you will have an opportunity to carry out also heating of food.
For all the work on the manufacture of the stove, the stove will take no more than 2 hours, and you will be able to enjoy the results of your work for several seasons.
Video
A good example of creating a stove made from handy tools in a video format:
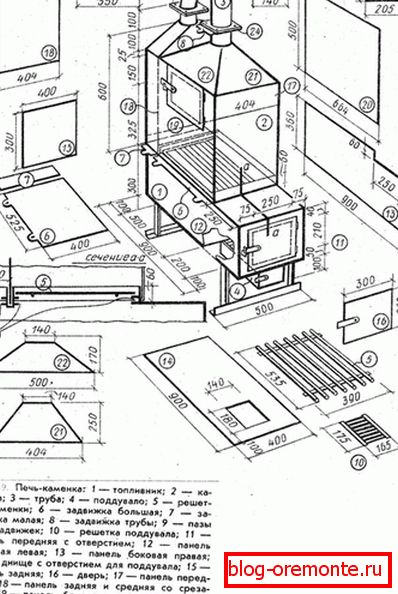
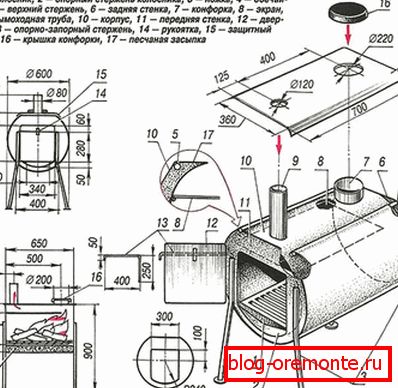
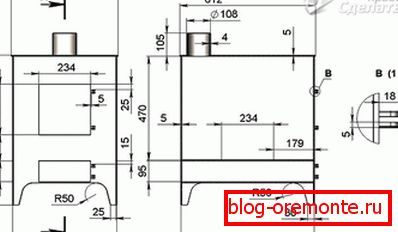
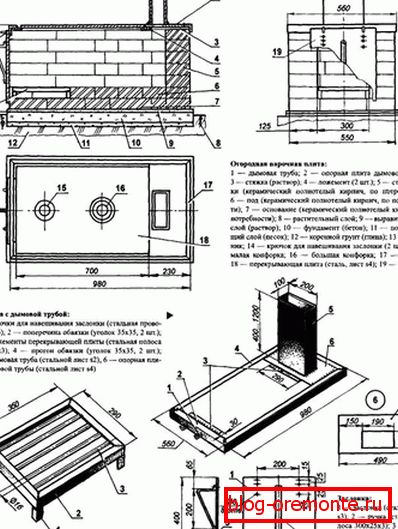
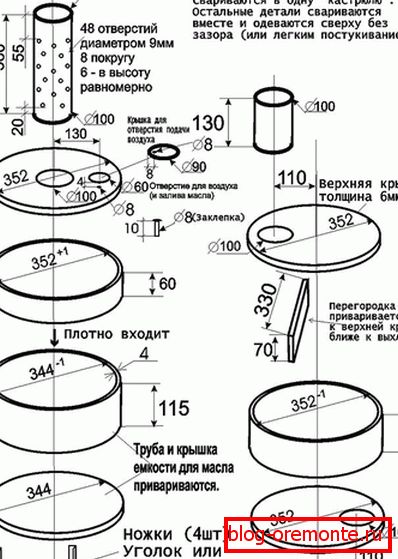
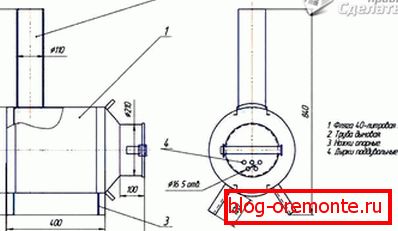
Blueprints
Our proposed drawings and diagrams will help you understand the principle of making a stove for heating a garage: