Polycarbonate greenhouse: self-build
To get a high yield and protect your vegetables from the negative effects of fog and high humidity, you need to take care of the installation of the greenhouse. Often in the manufacture of greenhouses gardeners use plastic wrap, but it needs annual replacement, which entails financial costs. We will tell you how to make a greenhouse from polycarbonate - a very practical material.
Cellular Polycarbonate
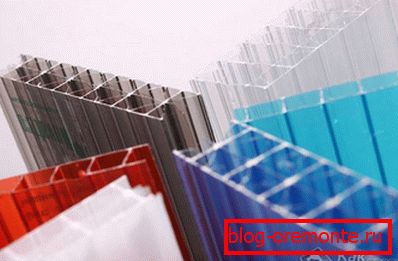
This material is made in the form of two-layer sheets of plastic with different thickness. As a rule, sheets with a size of 6 × 2.1 m and a thickness of 4.5 mm are used.
Polycarbonate has a number of significant advantages in comparison with glass and plastic wrap:
- Differs in high durability and remains intact at insignificant blows (its durability is approximately 200 times higher in comparison with usual glass).
- It completely protects the plant in the greenhouse from the adverse effects of ultraviolet rays.
- Resistant to temperature drops from -40 to +60? С.
- The material is able to disperse the incoming sunlight, and, accordingly, the combustion of plants is excluded.
- Two-layer plastic has high thermal insulation properties.
- The material is easy to machine and easy to cut and drill. As fasteners for the design can be used as screws, and an electric screwdriver.
- The mass of polycarbonate is less glass, which greatly facilitates its installation and transportation.
- The surface of the material has a dust-repellent quality, and the contaminants that appear are removed with ordinary water.
- Polycarbonate is not flammable, but when interacting with fire, it begins to melt.
- Its cost is similar to the cost of ordinary glass.
Tips по уходу
To make the polycarbonate construction durable, you need to follow some requirements:
- clean the surface of the greenhouse from dirt, dust, use detergents without alkali, ether and chlorine, and also do not use abrasive pastes for these purposes;
- in order to prevent the formation of mold and mildew, it is necessary to ensure that the end part of the greenhouse is always closed from insects and moisture;
- in winter, make sure that ice does not form on the surface of the greenhouse, which can further lead to deformation and even destruction of the structure.
Device
It is best to carry out the drawing of the greenhouse, as well as mark the place where it will be installed on the garden plot. Under the greenhouse you need a lot of free space away from trees and structures to ensure good ventilation and plenty of light and heat.
In the drawing, you must display what form the greenhouse will be. Here are several options:
- to save materials and save heat, sometimes they install a wall greenhouse with reference to an existing building;
- in the form of greenhouses come with single or gable roof;
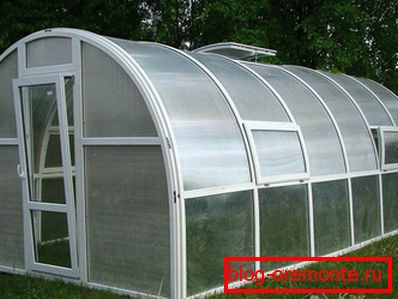
- The most common is the arched roof, especially if it is polycarbonate, but there are also difficulties in making the arched roof. The arch is made of metal corners and pipes, and for this you will need a special pipe bender or you will have to purchase ready-made arched structures.
If you choose a place, size, shape, and there are the necessary drawings, you can begin the arrangement of the foundation. For the greenhouse, the foundation is very important, and the strength of the structure depends on what quality it will be.
Construction technology
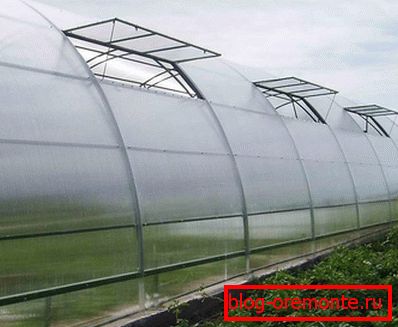
There must be holes for ventilation in the form of window and door openings. The roof should be made in the form of an arch, thereby increasing the volume of air in the structure. The built-in leverage system will allow you to open vents embedded in such a roof.
The size of the window must be at least? the entire surface of the roof. Additional air circulation will provide the doors located in the end or side walls of the structure.
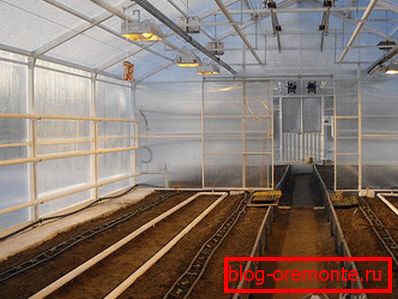
To pave the paths, choose paving slabs, and the ridges enclose high curbs that will greatly facilitate the process of caring for plantings. Secure the rods under the ceiling space, which will be needed to secure some plants.
Foundation work
The first step is to lay the foundation, in parallel with which fences for ridges are poured. For the frame it is better to use square pipes or metal corners. At first make a binding, and then fix it on the base.
The metal structure must be carefully painted before installation, otherwise it will succumb to corrosion.
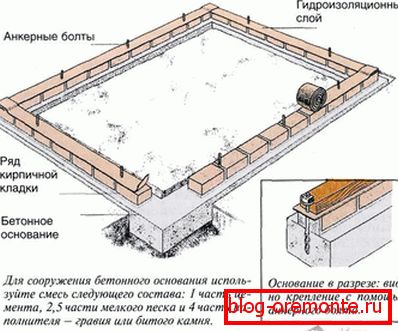
The harness is fixed on the foundation with anchor bolts.
Device и виды фундамента
- bar-shaped;
- brick;
- stone;
- tape
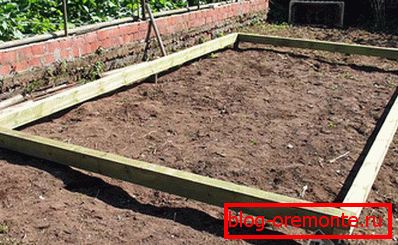
The bar base is made of wooden bars. It is financially inexpensive, but it will not last long, up to a maximum of 5 years, despite being treated with an antiseptic. In time, the tree will start to rot. Installation of log basement is as follows:
- steel corners are driven in around the perimeter;
- wooden supports are attached to the corners and driven into the ground;
- Pre-prepared wooden bars measuring 10 by 10 cm are laid around the perimeter of the greenhouse base.
The brick foundation is characterized by quality and service life. If it is right to build such a foundation, then it can serve for a long time, but it will take a lot of brick to make it to support the weight of the greenhouse. First, a cushion is made with waterproofing to protect against the destructive effect of moisture from the soil. During the construction of a brick foundation, an ordinary cement-sand mortar is used.
In order to make the foundation of brick more sustainable, it needs to be plastered.
Also suitable stone foundation, as such a foundation is durable and designed for any load.
It should be borne in mind that laying natural stone of unequal shape requires certain skills, and making a stone foundation on your own is not an easy task. It is best to use the mud mixture in a ratio of 1? 1 for the solution. Such a solution will contribute to heat saving. So that the clay is not washed out with water, the foundation should be plastered, and if it turned out too uneven, then put the formwork and pour concrete on the edges.
The advantages of the strip foundation are that the funds, as well as the time and effort spent, are relatively small, but the result is excellent. This type of foundation is different from other durability and reliability. In its manufacture will need:
- cement mortar;
- timber formwork;
- pillow, protecting the foundation from subsidence.
The device tape strip is as follows:
- Pillow made of gravel or sand.
- Then laying the formwork in the form of greenhouses.
- Poured the solution to a width of 30-40 cm, depth - about 0.5 m.
Such technology will provide high durability of this foundation.
Any of these grounds must be equipped at a distance of 25–30 cm from the ground level. This will protect the foundation from destruction, and the construction will last a long time.
Assembly work

- First you need to build a frame. Plastic, aluminum and galvanized profiles are used for the frame. But given the seasonal load, for example, the heaviness of a large amount of snow on the roof of the greenhouse, it is better to use wooden blocks for the framework, since by its properties the tree can withstand heavy loads.
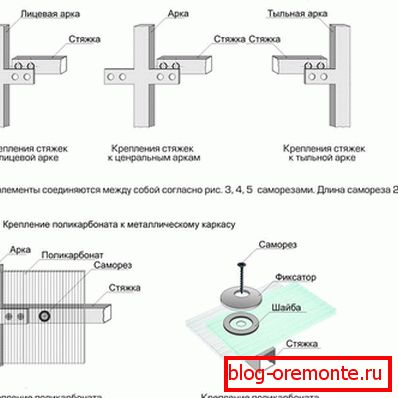
- Once the frame is ready, the arched elements are fastened together.
- Then the frontal parts of the greenhouse are mounted - a door and a window leaf for sure that the room is well ventilated.
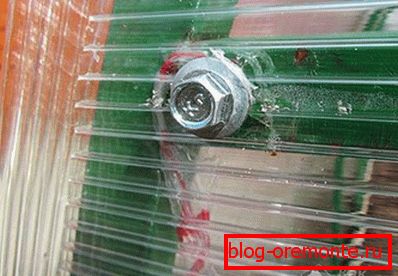
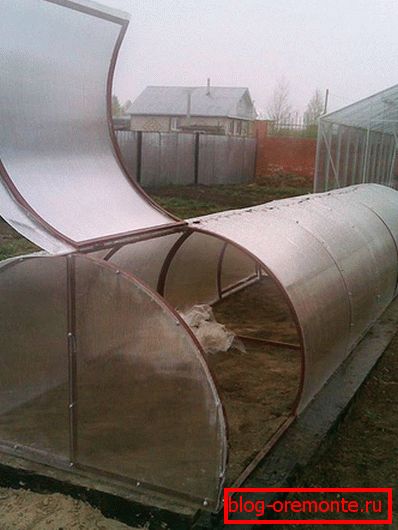
- At the end of the frame is covered with polycarbonate sheets. They are stacked end to end and are connected using a connecting profile using rubberized thermo washers to protect fasteners from dirt and moisture.
From profile and polycarbonate
An important role is played by properly assembled frame made of reliable materials, one of which is the profile. We will not elaborate on the factory constructions from the profile, as in the purchased kit you will find detailed assembly instructions. Let us dwell on a more economical option - the frame of the profile for drywall. The design with rounded shapes will not work, but the frame will be strong enough to withstand snow and wind loads.
Consider the advantages of the use of such material for the manufacture of the frame:
- Low cost profile.
- Galvanized profile, so it is not afraid of moisture.
- Ability to assemble the frame without attracting assistants.
- The design is quite light.
- Convenient to fasten sheets of polycarbonate.
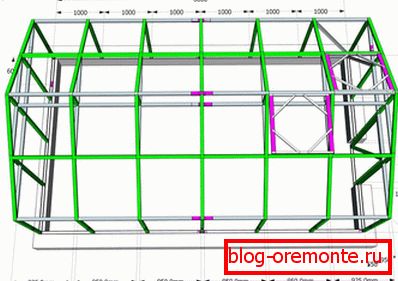
First you need to make a drawing or at least draw a sketch of the future greenhouse with an indication of the size. After that, using the resulting data, cut the workpiece. Now to the foundation with anchors you need to fix the profile, which will serve as the basis of the whole structure. After that, you can begin to install the frame.
As for the frame assembly, everyone decides to do it in the way that suits him. We recommend that you assemble the arches on a horizontal flat surface, and then mount and trim. How to fix the sheets already written in the article.
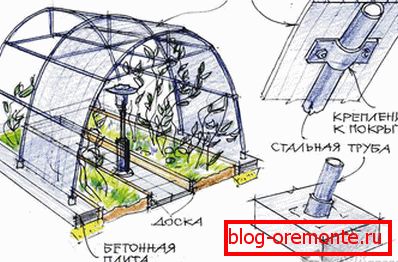
From pipes and polycarbonate
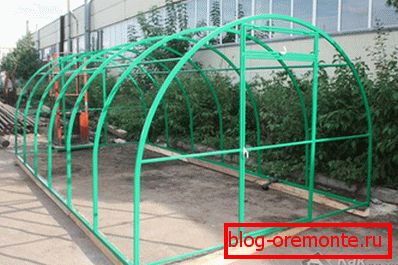
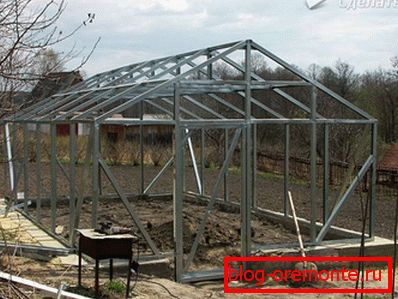
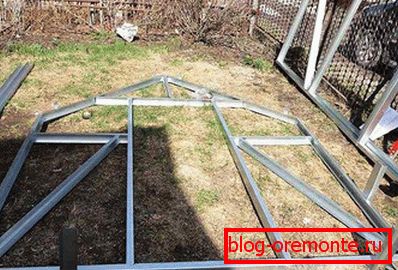
The framework for the greenhouse can be made of several types of pipes. If the frame is metal, it is better to use shaped pipes, welding them with electric welding. The arched structure suffers less snow loads, but in order to give the pipe a shape, you need to use a pipe bender. If there is no desire to bend pipes or buy ready-made arches, then you can make the shape of a greenhouse the same as that of a metal profile - with a sloping roof.
Racks are attached to corners and walls of the strapping by welding. At the same time, mounted doorways. On top of the pillars and door designs made the upper trim, which are attached to the arch. After this, proceed to the installation of arched window vents on the roof and fixing the hinges to the ridge. Build a lever system for lifting the vents, then proceed to painting the frame.
It is undesirable to make the frame of the greenhouse from round pipes, because when screwing the polycarbonate, the screw can slip to the side and spoil the sheet.
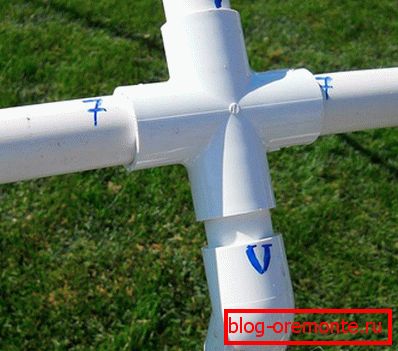
Faster and easier, you can assemble a simple frame of polypropylene pipes. Again, you need to make a drawing and cut the workpiece. To assemble the frame, you will need a soldering iron, and a certain number of pipes and fittings will need to be purchased in accordance with the chosen shape of the greenhouse.
One of the advantages of a polypropylene tube frame is the perfect combination of strength and flexibility of this material. Flexibility allows you to give the frame the desired shape, and, strength allows you to withstand considerable loads.

For convenience, you can make a ventilation window in the door. After the frame is assembled and fixed, it can be sheathed with polycarbonate.
Heating greenhouses
Now it is important to take care of the insulation and the heating system of the greenhouse. Modern technologies include the use of transparent or bubble plastic for warming the greenhouse inside and out. The advantage of this solution is that this material does not absorb sunlight and looks decent.
Heating methods:
- Oven heating - for this, a stove or a brazier is built, and ventilation is installed to ventilate the room. The disadvantage of this method is that heat is distributed unevenly over the area of the greenhouse.
- Electric heating is carried out using a convector and heating elements. In this case, ventilation is not needed.
- Water heating is performed by installing pipes to which hot water is pumped from a boiler using a pump, which is heated by electricity, gas or coal. When using gas and solid fuel, ventilation is necessary. Also, this method is time consuming and costly.
- gas heating is made using catalytic burners. This requires constant ventilation and ventilation throughout the greenhouse.
Heating in the greenhouse may not be entirely cost-effective, but, as they say, the goal, and in our case to collect a rich harvest, justifies the means.
Tips
Sheets of material are stacked strictly along the length, fixed them with screws, or special thermo washers. They securely fasten the polycarbonate to the arch of the frame and save it from deformation during expansion in the winter. The role of the pressure plate will play corners for plastic arch, which you can buy in the store building materials.
Before starting the installation, it is necessary to rid the polycarbonate of the packaging film, smear the edges with glue and fix the plastic corner. The open edges of the material are treated with scotch tape or sealed tape, and the bottom edge with perforation will provide the necessary drainage effect.
To connect two sheets of polycarbonate with each other, use the intended connecting strip. Then you can begin to mount sheets of polycarbonate on the frame of the greenhouse.
Initially, the roof is sheathed with sheets of polycarbonate, and only then the remaining part of the arch from the ends. Further, the walls and doors of the structure are made of material. Connections at the corners are closed with metal or plastic corners. After that, remove the remains of the protective film.
The finishing touches can be considered the installation of fittings, handles, latches and fixing hooks on the door, as well as a rubber seal on the vents for complete sealing.
Even if you have no experience, you will be forced to entrust some of the work to professionals, a greater amount will fall on your shoulders. Therefore, try to approach the process with full responsibility to continue to enjoy natural products grown in the greenhouse.
Video: tips on choosing the greenhouse design and materials for its production
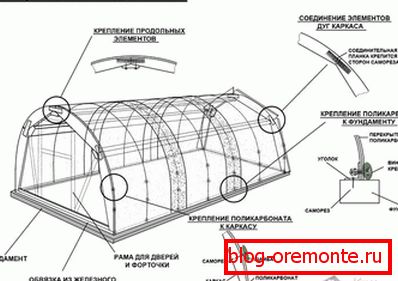
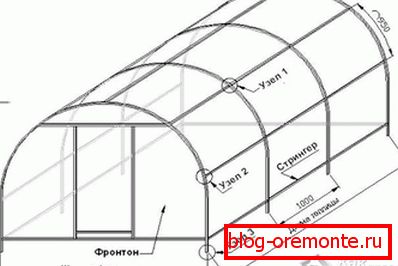
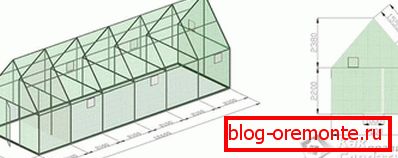
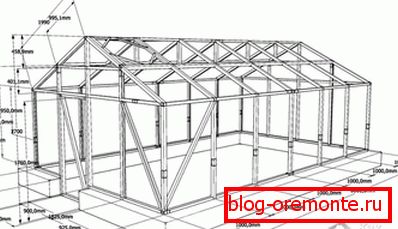
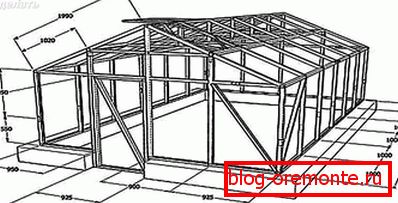
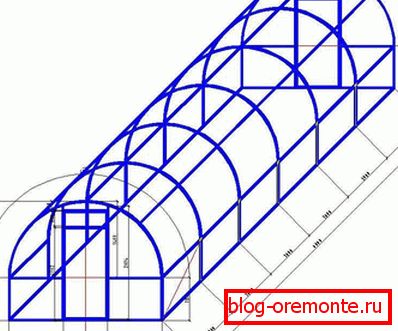
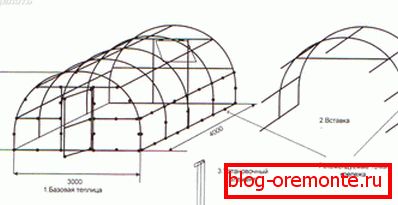
Drawings and diagrams


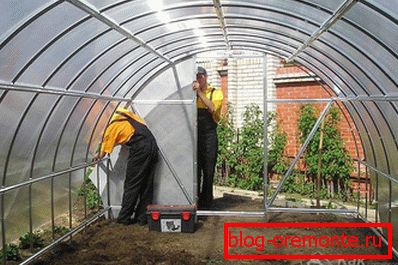
A photo

If finance allows, then you can buy a finished greenhouse. You can find out the prices for polycarbonate garden greenhouses on the websites of companies in your region.