Plastic cellar to give
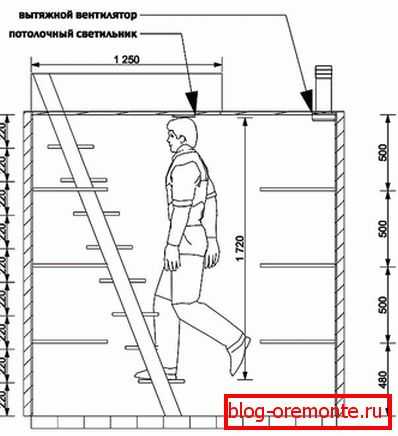
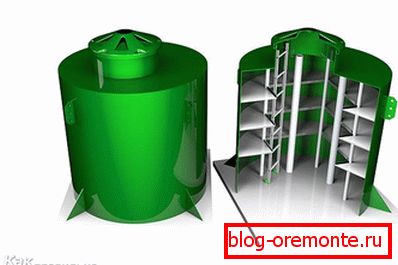
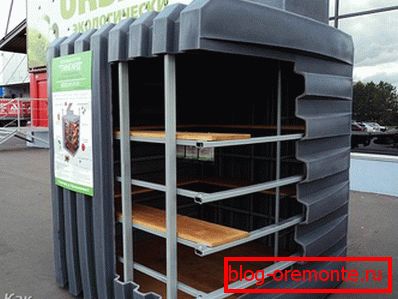
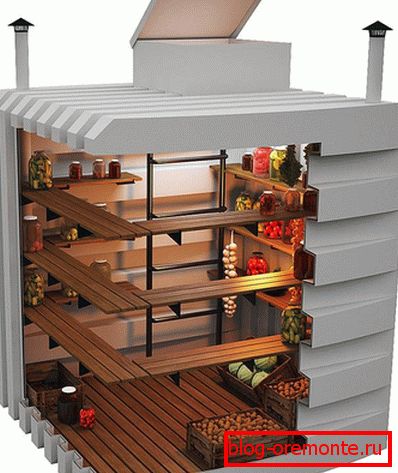
Storing food is a hot issue for all homeowners. As an alternative to the storage of vegetables and conservation built from concrete or brick, it is worth considering a plastic cellar. This design is presented in the form of a small box, equipped with stiffening ribs, a ladder, shelving and an airtight lid. In this article you will learn how to choose a plastic cellar to give and how to install it.
Benefits

Below are the main advantages of the plastic cellar:
- There is no need to carry out construction work, because the structure is ready for operation. All you need is to install it correctly.
- It is possible to place a cellar on any land plot, regardless of the type of soil and the level of groundwater. These factors usually prevent the construction of cellars of brick or concrete.
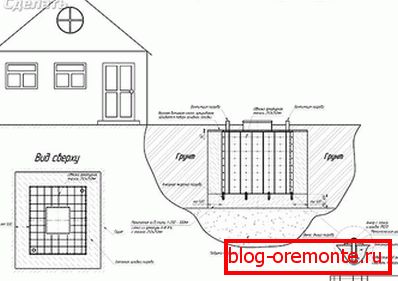
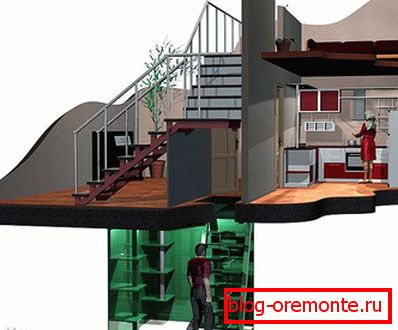
- Installation can be done both in an open area and under construction, for example, under a house, garage or shed. Of course, if we are talking about installing a caisson in a constructed building, then we will have to carry out some earthworks.
- Plastic cellar is not afraid of high humidity and temperature changes. If you install it correctly and make good ventilation, then the quality of vegetable storage and preservation in it will be much higher than in a traditional cellar.
- The walls of the cellar are very well protected from insects and rodents, so they have no chance of destroying your supplies. Plastic does not absorb odors. It is easy to clean and even disinfect.
- In accordance with manufacturers' statements, such plastic structures have been serving for at least 50 years under any operating conditions.

Plastic construction has many advantages. But if you have enough money, then you can purchase a more technological analogue of fiberglass.
How to choose

Since the market offers a variety of companies to buy a plastic cellar, you have the opportunity to consider all the offers. You should pay attention not only to prices and delivery, but also to the production itself, the warranty and drawbacks, and they exist in any case. Given all this, you will know how to choose a plastic cellar.
For example, consider the company "Triton". It is known for its high quality products, 100% tightness and a guarantee of over 50 years. If we talk about quality, the thickness of the walls of the cellar of this company is 15 mm and stiffening ribs retain the entire structure longer than other analogues. Also, the approach to the formation of the caisson allows to obtain a solid cast capacity. This method of manufacturing is good because this cellar does not burst at the seams and will last much longer than the metal one.
The service sector provides a certificate and the possibility of cooperation for two years. That is, this warranty will allow you in the event of a breakdown or other failure to contact a specialist for help.
Now consider the Tingard cellar. Positive customer reviews indicate that this cellar is no worse than the previous one. This option includes a reasonable layout. Namely, shelves for conservation, a place for boxes or bags, as well as shelves for wine or other alcoholic beverages. This arrangement will help maintain order in the cellar and easily find the right products. Another company "Tingard" provides, together with the caisson, a consecration cover and a metal staircase. Both options are good in their own right, otherwise the choice is yours.
Install Storage

Starting installation, pay attention to the following nuances:
- Choose a place for a cellar and dig a pit, wider by half a meter than a caisson. But before that, explore the ground. If there is high humidity, then it is worth digging in the middle of a small hole for the sump.
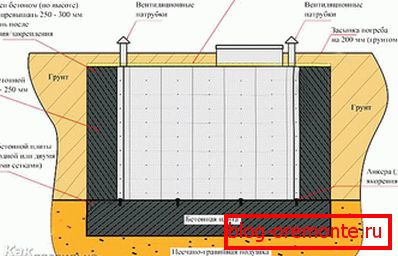
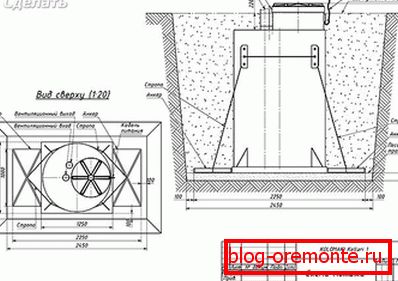
- Install the container in the pit. Thermal insulation and waterproofing will create an extra pillow. We make it from a clay mixture, with which we pour the bottom of the pit, and then we sprinkle the surface with sand (8–10 cm). Further, the resulting mass ram. On the formed pillow you install the logs in order to install the cellar evenly. It is also possible to mount the platform from reinforcement and pour it with concrete solution. The fill layer should be no more than 20 cm.
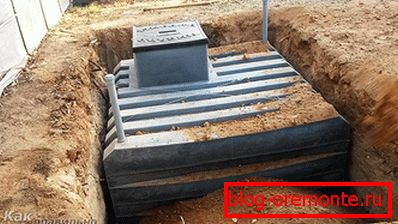
- When the platform is ready for the cellar, proceed to the immersion of the caisson in the pit. Secure the entire structure is strong cables from both sides. This will not allow her to maneuver. After, we fill up the gaps near the walls with sand, and then level everything with soil (with the top layer of earth, which we took away while digging the pit).

All work can be completed in 1 day. Of course, it is better to hire a tractor to immerse a caisson, and in other works, 3-4 people will cope perfectly.
Apparently the installation consists of a few simple steps. For this process, you will need cables and a stove, which will serve as a platform for the cellar. With the help of the sling should be strengthened cellar. After that, carefully and hermetically fill the void between the walls.
Of course, such a plastic caisson is an order of magnitude more expensive than a regular cellar and standard sizes do not allow it to be used for your own needs (for example, you need more space for some special tasks), but you save on construction and ensure high quality of product safety .

If you have a cottage in the process of construction, the installation will be easier. As for the built-up area, then more time is needed for preparatory work. Therefore, first of all, it is recommended to make calculations.
Ventilation
Although plastic cellars have built-in ventilation, it is worth checking it for serviceability. But it so happens that it does not cope properly with its function. What to do then? Do not worry, you can independently resolve this issue.
To organize the cellar's natural ventilation, it is necessary to install two air ducts:
- Inlet
- Exhaust.
You can make the duct of metal or plastic. The ratio of the pipe must match the size of the cellar.
For example: 1 m2 need to arrange 26 cm2 duct area. Due to this, the room will be sufficiently well ventilated.
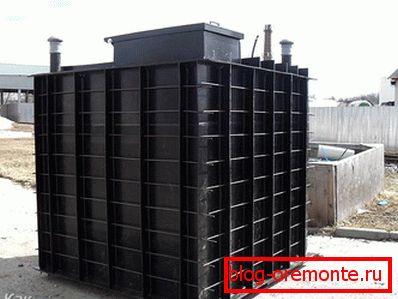
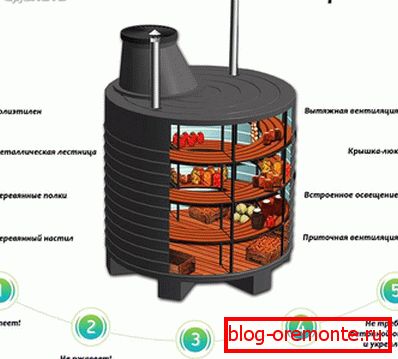
The exhaust pipe removes the musty smell from the caisson. It is installed in one of the corners of the cellar. The duct runs vertically through all the rooms and the roof. And towers over the ridge about 50 cm.
To reduce the accumulation of condensate inside the pipe (and in winter the amount of frost), it is necessary to heat the exhaust duct according to the sandwich principle - laying one pipe to another and filling the gap between pipes with insulation (for example, mineral wool 50 mm thick).
As for the inlet pipe, it allows clean air to enter the room. It is installed in the opposite corner (from the chimney). The open end of the pipe is at a height of 40–60 cm from the floor of the cellar. The air duct penetrates the ceiling and ends 80 cm above the floor.
To prevent insects or rodents from appearing in the cellar, close the end of the pipe with a special nozzle or install a net.
At the end of the work proceed to its verification. To do this you will need several sheets of paper. You attach them to the pipes, and the air must sway them. Others use smoke. Take the hot embers and install them in the cellar, and the air will chase it. Ventilation is needed for long-term storage of products, so its installation is not a necessity, but a rule.
Conclusion
Do not pursue trends, but independently check all the pros and cons. You can purchase this capacity in special stores or through an online store. However, do not rush to hire workers. You can do this work yourself or invite friends to help. You can write on a piece of paper a sequence of work, so as not to stray in case of awkwardness of the moment.
As you can see, the purchase and installation of a plastic cellar is a serious and time-consuming business, but feasible. Modern technologies help to achieve results independently, without the help of specialists. After reviewing the video and installation diagrams, you can proceed to installing the caisson.
Video
In the provided video materials, you can get acquainted visually with the subtleties of the installation work of the plastic cellar:
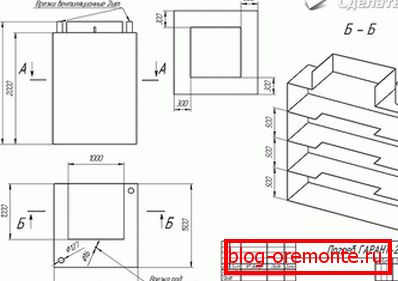
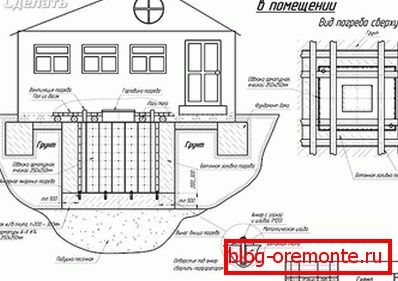
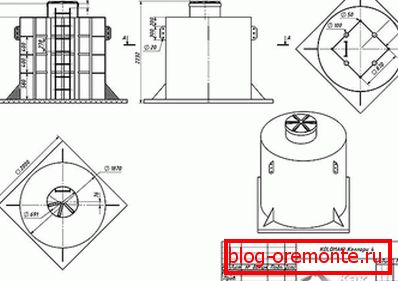
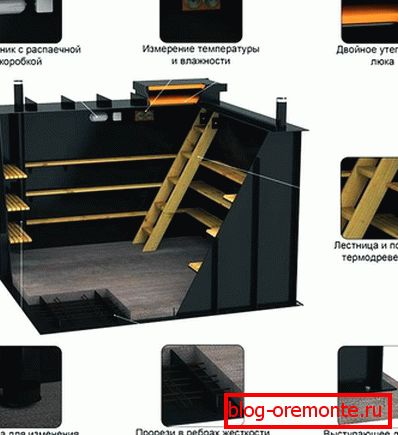
Scheme
In the diagrams, you can see some details of the plastic cellars, as well as mounting features: