Laying the floor on the logs do it yourself: installation
When the walls are ready and the roofing works are finished, the question arises, it is often necessary to lay the floor on the logs with your own hands in the living room. This simple technical process consists of several stages.
- Mounting lag.
- Laying insulation (this stage is necessary if the room will be used in the cold season).
- Fastening finish boards.
How lags are attached
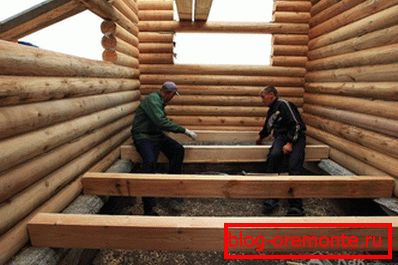
The lags are the bars to which the material of the clean finished floor is fixed. What should these bars be? It will depend on what is under the lags. The base can be a different type of soil, concrete and wooden beams. The design is influenced by the fact whether the heater and vapor barrier will be used.
Regardless of the base, lags should always be treated with an antiseptic, that is, a solution that protects against insect pests and rot.
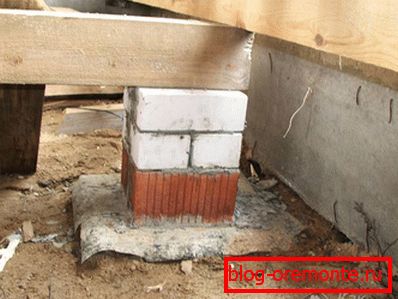
If the installation of the log will be performed on the ground, it is necessary to create concrete posts for fastening. For this purpose, pits of 50–60 cm depth are dug in the ground, at a distance of 80 cm from each other. For convenience, the markup can be done using a stretched fishing line or a nylon cord in places where logs will form.
Here's how to make the pillars:
- At the bottom of the hole, which has a square appearance of 50 by 50 cm, pour a cushion of sand with a thickness of 10 cm, and then 10 cm of rubble.
- Then a wooden formwork of the required height is made, usually not less than 20 cm above the ground level. If the soil is loose, it is better to additionally use reinforcement for strength.
- Finished formwork with grooves can be poured with concrete solution with a ratio of cement, sand and crushed stone 1: 3: 5 or 1: 2: 4. In the upper part of the columns after pouring the concrete before it sets, be sure to implant studs with thread for fixing the log.
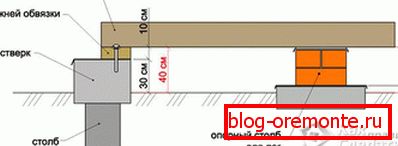
The support upper part of the posts should coincide with the horizontal line of the measuring level.
After the concrete has set, a layer of roofing felt is placed on top of each column for waterproofing. Making sure that the studs are firmly frozen in the concrete, you can use them to fix the logs that will be put on these studs through the holes made beforehand. The diameter of the holes should be such that the studs are freely passed into it, but do not dangle. You also need to do in the upper part of the lag "sweat" for the nut with the washer. Then on the logs, worn on the studs, you can tighten the nuts and washers, while simultaneously pressing the logs to the upper plane of the posts.

If you need to do the insulation and vapor barrier, then to the lower side of the lag is attached to the support bar. It is mounted on a draft board for laying a vapor barrier and insulation.
For vapor barrier, you must use a special material, not a simple film. This should be a diffuse membrane that removes accumulated condensate, or another similar building material.
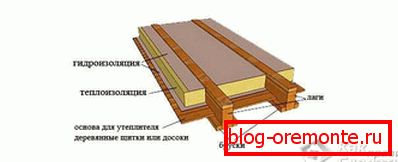
Thermal insulation is placed on top of the vapor barrier. This may be mineral wool, basalt wool or something similar in property (Rockwool building materials and others). From the upper level of insulation to a clean floor there should be an air gap of 1-2 cm for ventilation.
Clean flooring
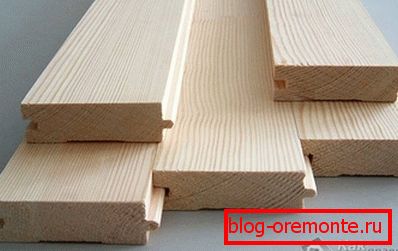
For a clean floor, you must use a tongue-and-groove board that has a thorn-groove system, that is, on one side of it there is a thorn, and on the other a narrow recess or groove in which the thorn of the next board will fit tightly.
All wooden flooring materials must be thoroughly dried beforehand.
Wood flooring always starts from the far side of the room. After the board was laid across the log, it is necessary to move it almost closely to the wall. Then it is necessary to place a gasket 2 cm thick between the wall and the board, and then fix the board with screws. One screw is screwed into the wall edge at the top of the board, which will hide under the baseboard. From the side of the open side of the board it should be screwed directly into the groove at an angle of 45 ?.

Then the spike of the next board is inserted into this groove. Having knocked down the board with the mallet (the mallet is a hammer with a rubber or wooden knob), you can continue to tighten the screws in the groove, observing the step between them. Then the gaskets between the wall and the board are removed. As a result, a gap of about 2 cm between the plane of the floor and the adjacent wall remains around the perimeter - it is necessary so that the tree can breathe freely. During the year, the humidity will change, and the gap will prevent deformation of the floor plane.
An alternative to a grooved board can be chipboard, plywood and OSB. Their advantage is greater speed of work due to the area of overlap. In addition, the result is less joints. Therefore, these materials are good if you later plan to lay laminate or linoleum.
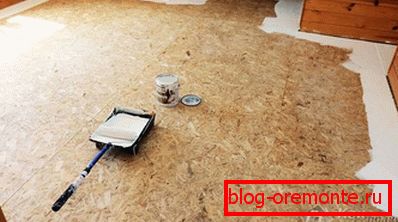
Such chipboards are screwed to the lags on top. A groove is made for the screw, “sweat” so that the screw head does not protrude above the plane of the finished floor. Then all these notches need to be puttied. You should also do with the joints of the plates. However, the joints must be putty with acrylic sealant, otherwise, if non-plastic putty compounds are used, they will subsequently crack and crumble. And over time, all these grooves and seams will appear as scuffs on linoleum, because of which the decorative appearance of the general form will be broken.
Choosing the material for the floor, do not forget about one important aspect: the thinner it is, the longer should be the span between the lags. For example, if the thickness of the laying material is 20 mm, then the space between the lags should be no more than 30 cm. The strength of the floor will depend on this.
Using these tips, you can confidently take up work on laying the floor. Successful work!
Video: installing a log on a concrete floor
Below is how to install logs on a concrete floor and make a wooden floor:
And in this video you can see how to install wooden logs in the house:
See also:
- Laying tiles on wooden floor.
- Technology dry screed floor.
- How to make a self-leveling floor.
- How to make the floor in the bath.
- Installation of adjustable floors on logs.