Laying laminate without thresholds 2
Today laminate is the most common flooring. The ease of installation, reasonable price, aesthetics of the laminate made this type of finishing material one of the most popular. Laying laminate without thresholds is another new trend in flooring. With this method of laying the room looks more spacious and monolithic, completely eliminating the risk of tripping over the threshold.
The disadvantages of threshold-free styling
- Without thresholds it is possible to lay a room with an area of no more than 50 m with a laminate board.2, from 8 to 10 m long. In a larger room, the laminate flooring may swell, especially in the places of doorways.
- The way of laying without thresholds will require certain skills, skills and takes more time.
- If you need to replace just one laminate panel, you will have to disassemble the entire floor covering in order to get to one damaged board.
The greater the area of seamless laminate laying, the greater the likelihood of deformation of the floor and its swelling.
Despite the warnings, thousands of ordinary people are willing to take the risk and make a seamless laminate flooring in their apartment to achieve visual space.
Before you start besporonovoy laying laminate panels with your own hands, it is advisable to get acquainted with the theoretical nuances of seamless installation, as well as to determine the method of mounting panels.
Methods of mounting laminate panels

Glue mount. This type of panel connection involves gluing laminate boards together.
Advantages:
- This method is ideal for rooms heavily polluted and with high humidity;
- the joints are securely sealed, no dirt or debris enters them.
Disadvantages:
- Errors are not allowed, because all flooring will have to be dismantled.

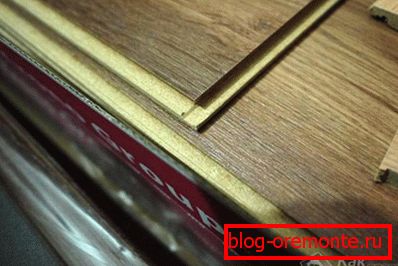
Castle method of attachment. It assumes the presence of panels with special locks-latches.
Advantages:
- lock mounts allow you to more accurately fit the board;
- it is possible to put laminate panels in different directions, which is very convenient when installing the flooring;
- the possibility of dismantling a small area of the coating, if necessary, replace several boards;
- simplicity and ease of installation;
- saving time.
Disadvantages:
- high cost of laminate panels with a lock profile.
Essential tool for seamless laminate installation

Before laying laminate panels you need to prepare a tool:
- electric jigsaw, if not, you can use a hacksaw, however, high accuracy can not be achieved;
- roulette;
- laser level;
- perforator;
- pencil;
- glue (if an adhesive method of mounting was chosen);
- square;
- stuslo;
- restrictive wedges;
- rubber hammer;
- lining bar.
This set of tools and devices is enough to carry out non-threshold laminate installation.
Laminate class selection
The choice of laminate panels will depend on the degree of load on the flooring. In order to figure out which class of laminate should be used as a floor covering, you need to familiarize yourself with the classification of the room (table 1).
Table 1 - The choice of class of laminate, depending on the load on the flooring
| Type of floor load | Laminated panel class |
| Living spaces: a) low load | 21 |
| b) average load | 22 |
| c) high load | 23 |
| Public premises: a) low load | 31 |
| b) average load | 32 |
| c) high load | 33 |
| d) very high load | 34 |
| Industrial premises: a) low load | 41 |
| b) average load | 42 |
| c) high load | 43 |
As can be seen from the table, the greater the load on the floor, the higher the class of laminate must be used. The choice of class of floor material is determined by the total degree of load throughout the residential area. For non-threshold laminated board installation, experienced specialists advise to choose panels of class 33 or 34. This class of panels has a high degree of wear resistance. With the right installation technology, the floor material will not bulge, but will last for more than 20 years without the need for a complete replacement.
Subtleties of thresholdless styling
- In the room in which the laminate is laid, should be normal humidity. Otherwise, laminate panels may swell and deform.
- The basis on which the laminate is laid should be perfectly flat. Surface height differences should not exceed 3–5 mm.
- If the laminate panels are laid on a wooden base, then fragments of the floor that have deformation or rotted areas should be replaced.
- As a substrate for a laminate coating, you can use cork and polyethylene, as well as sheets of cardboard, connected by adhesive tape. It is not recommended to use carpet because of its high softness.
- Since the laminate belongs to the "floating" floor coverings, when laying it is necessary to leave gaps along the walls. The width of the gaps is 1 cm. For uniform installation and accuracy of the location of the panels, it is necessary to install special plugs between the laminate and the wall, which are removed after work.
Stages non-threshold laying laminate coating
The process of laying laminate is simple, if you know the technology and take into account the features of a seamless coating. The algorithm of seamless styling is presented below.
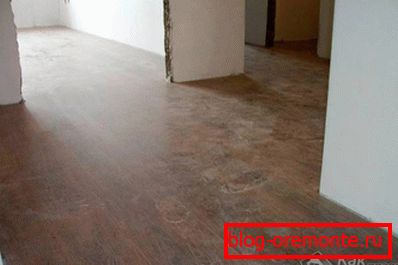
Preparatory stage

Dismantling the old coating and leveling the subfloor. If the surface of the base has slight drops, then it is enough just to remove the roughness and level the floor by stripping. If the base is badly damaged, then a concrete screed is required. The concrete screed must dry for three months. The surface of the base must be flat, clean and dry.
Installation of the insulation layer

- The insulation layer (mineral wool) is immediately placed over the entire area of the room;
- The apartment uses only the substrate (cardboard, polyethylene or cork), which prolongs the life of the laminate and serves as a shock absorber.
Laying laminate panels
- The installation of the cover should begin from the window, gently connecting the laminate boards with the help of locks.
- When laying it is necessary to pay attention to the first three rows, as they will be fundamental in the further installation of panels.
- Be sure to leave a gap between the wall and the panels (approximately 1 cm). Then the gaps are closed with baseboards that are attached to the wall.
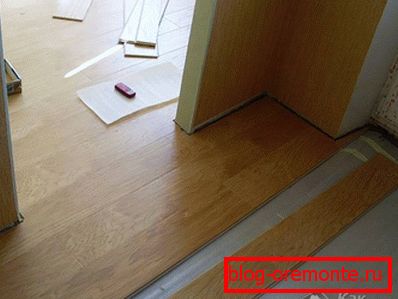
- Laminate should be laid under the door frame so that it “breathes”. To do this, at the bottom of the door frame should make a small cut. Slats in the combined rooms should be laid in one direction. Interior doors during installation, it is desirable to remove.
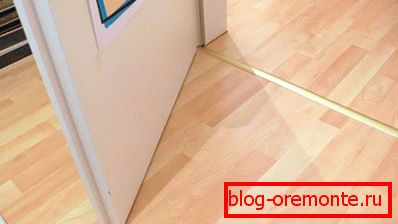
In order for the room to appear visually spacious and monolithic, the laying of laminate panels should be done only in one direction.
Make the floor beautiful, durable and reliable quite easily, with the knowledge and respect for all the features and nuances of seamless installation of laminate. Watching a video will help avoid mistakes and undesirable consequences.
Video
Features laying laminate in the doorway with besporogovoy laying: