Kitchen table do it yourself
Regardless of the size of the kitchen, whether it is a spacious kitchen in a new building, a country house or a small one in a small family, the most important piece of furniture is the kitchen table. For the production of tables today, various construction materials are used, for example, glass, metal, stone, plastic, wood. But of all these materials, wood is used more often. If you want to save, the kitchen table can be done independently. In this scenario, you can save up to 70% of the cost of the table. But first you should work hard and take into account a large number of factors that we will consider with you in this article.
We make important measurements and calculations.
Before starting work on the production of the kitchen table, it is important to make some calculations. Typically, these tables are calculated on a specific number of people. Typically, this number ranges from three to nine. But it is best to take into account when calculating a couple of extra places, in case of the arrival of guests. If you are a hospitable host, then, most likely, you will need a large table that can accommodate up to fifteen people.
Important calculations:
- The working segment for one person should be 60 cm. This figure is multiplied by the number of persons. The resulting figure will be the perimeter of the future table.
- How exactly the table will be set: in the middle of the kitchen, near the wall. In the first embodiment, the table can accommodate a larger number of guests.
- Will the desk have drawers or other accessories.
Should determine the size and location. The optimal width of the table is 80-110 cm. If a narrower table is planned, then you will have difficulties in serving. In the case of choosing the oval-shaped table, it is necessary to calculate the length of the circle. To do this, multiply the square of the radius by Pi (3.14).
Round or oval kitchen tables are necessarily located only in the center of the kitchen.
Tips and recommendations on the location of the table in the kitchen:
- Do not place the table near the stove.
- Do not set the table under the air conditioner.
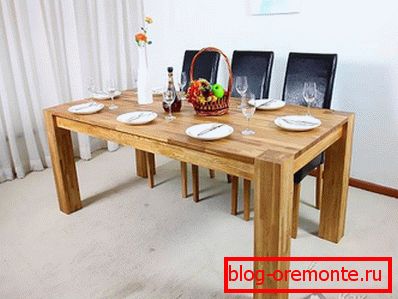
It is equally important to determine the shape of the table. The surface geometry can dramatically change the look of the entire space. It depends on the form whether it will be convenient to eat or not. Most in demand is a rectangular shape with right angles. These countertops are great for square or rectangular kitchens. At the same time it can be placed near the wall or in the center of the room.
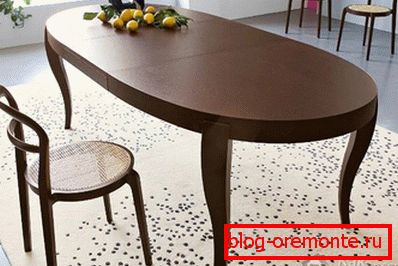
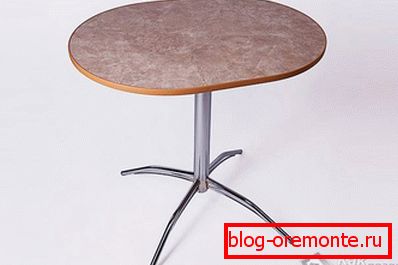
Oval-shaped tables are also very popular. There are several valid reasons:
- The oval table has an attractive appearance.
- There is no need to bypass the corners. This is especially convenient when there are small children in the house.
- The oval table is better suited for a solemn meal.
There are many advantages in favor of the oval-shaped kitchen table. But in the presence of a large family, it is inferior to a rectangular shape. There are also round forms, but with this option it will be inconvenient to take certain dishes. As for the oval table top, the ideal diameter is 140 cm.
So, when choosing the shape of the table, push off, mainly, from your own taste. Moreover, remember that for the kitchen area of 8 m2 and a smaller oval table would be impractical, as it would require a lot of free space.
Preparing drawings and tools
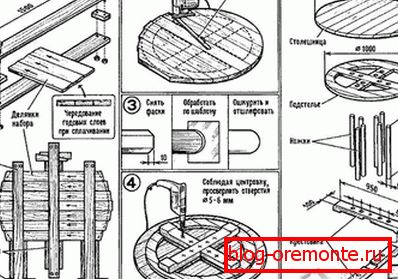
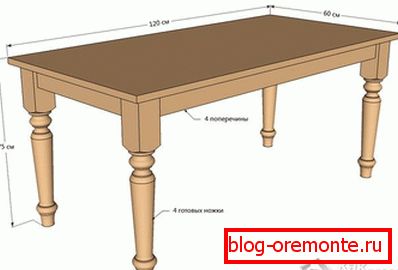
If you have decided on the size and shape of the kitchen table, then you can proceed to the next step - drawing up a drawing. It should display the required dimensions of the surface, legs and other elements. It should consider the method of attachment of various nodes. Consider, for example, a kitchen table, which will have the following dimensions: 120? 60? 75.
Although such a table will be small, in his example one can easily understand the principle of making such furniture. In your drawing you can resize the table according to your needs.

You will need:
- Tabletop 1.2? 0.6 m - 1 piece.
- Cross bridges 40? 2.5 cm - 2 pieces.
- Longitudinal jumpers 100? 2.5 cm - 2 pieces.
- Table legs with a height of 70 cm - 4 pieces.
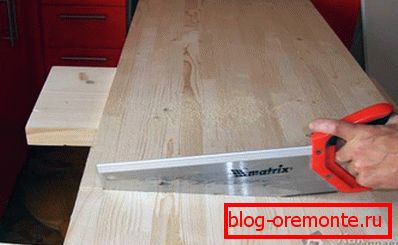
To build a worktop, you must prepare boards of the appropriate size. Before you begin, you need to think about the method of attachment of important components.
First of all, you will need to collect all the necessary tools and materials:
- plane,
- hacksaw,
- electric jigsaw,
- drill,
- screwdriver
- sandpaper,
- ruler or tape measure
- square,
- pencil,
- circular saw,
- milling machine,
- file,
- clamps
- paint brush,
- wood glue,
- polyurethane varnish: matte or glossy,
- solvent.
When everything is ready, you can get to work.
Assembly Guide: Worktop Requirements
As for the tabletop, it is important to determine whether it will be sliding or not. For example, the assembled table can be used for cooking, and in the sliding state as a means for eating.
The tabletop should not absorb odors and grease. Consider and practicality.
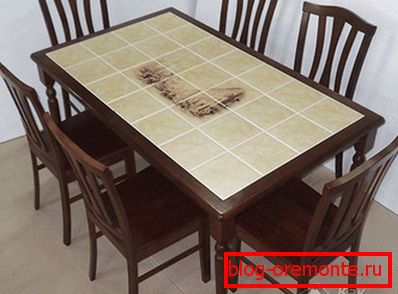
A good tabletop should not absorb moisture, withstand strong blows. The surface of the table should not be afraid of steam, condensate and heat. All these requirements correspond to the table top, made of natural and artificial stone or covered with ceramic tiles. But it should be noted that such a table will only look in the interior of modern style.
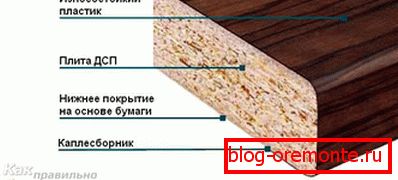
One of the most common types of worktops is a laminated chipboard or plastic coated chipboard. For the price of chipboard available to many. Moreover, it is easiest to work with such material. Some may deny that the chipboard worktop is practical. This is partly true, but if properly processed, it will last more than one year. Here are some recommendations and tips for working with chipboard worktops:
- The film or plastic should be rounded at the ends of the chipboard.
- Each 90 ° rounded end is treated with silicone.
- However, in this position, the butt is vulnerable to moisture ingress, so it is better to turn the butt through 180 °.
It should be objective and mention the shortcomings of such a tabletop. If the chipboard swells, then fix this problem will not work. As a result, you have to make a new table, or at least a tabletop. But, on the other hand, this surface is resistant to aggressive detergents and mechanical effects.
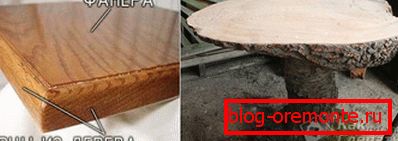
Of course, if we talk about the most ideal and environmentally friendly version, here on the right in the first place is a tree. But in the care of such a surface is more capricious. Do not allow moisture to penetrate the tree, allow scratches and other damage. Inside of them, microbes can settle and multiply, which negatively affect the mechanical strength of the wood. Therefore, from time to time wood tabletops must be varnished, cleaned, opened with a layer of wax.
Leg requirements
The number of legs will vary depending on the shape and size of the table. For example, if you make a table made of laminated chipboard, then 4 legs, which are mounted on the corners of the tabletop, will suffice. If you make strong wooden legs, then this design will be durable and sturdy.
Legs can be made personally. To do this, you can purchase a finished sketch. The complexity of this work will depend entirely on the shape of the legs. If you think that you can’t do it, then get ready-made metal legs or choose wooden carved. Everything will depend on your financial capabilities.
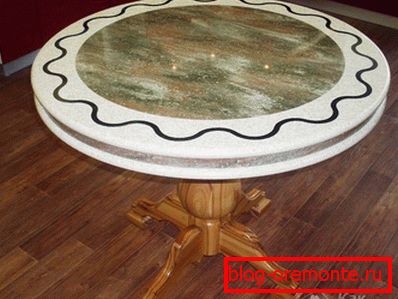
The table can be on one leg. As mentioned above, this will depend directly on the weight, shape and configuration of the table top and the table as a whole.
A table with one massive leg looks spectacular and beautiful from the side. For its installation is performed high-quality cross-tying.
Two massive legs are located at a certain distance from each other. In most cases, a table with two legs, is rectangular or oval. The advantage of such structures is that the legs will not interfere with any of the people sitting. As for the design of such legs, they expand at the bottom to increase the footprint. Between themselves, they are connected by a jumper board.

But ordinary tables on four legs are simple in design and do not need accurate and complex calculations. This table is stable and durable. Here the most important thing is to choose the correct size of the legs and mount them at the correct distance. In this case, the tables on four legs can be very different in shape: oval, round, square, rectangular.
So, regardless of the number of feet in your design, the most important thing is their aesthetics. The aesthetic appeal of table legs is even more important than the beauty of the tabletop. After all, the table top is always covered with a tablecloth or oilcloth, and the legs are always visible.
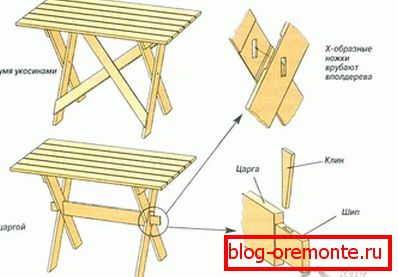
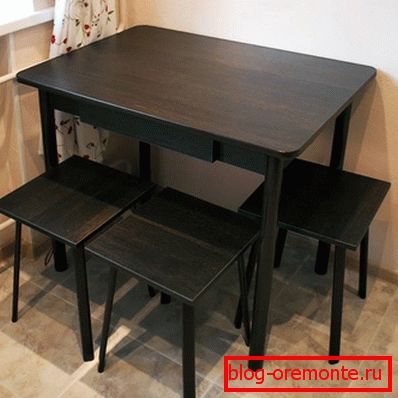
We build a folding table

One of the simple shapes of the kitchen table is rectangular. This design consists of four legs and six sides of the box. The table top and sides can be made of chipboard 18 mm, and the legs of a bar 40? 40 mm. First you need to make the backs of plywood, 2 cm thick (table legs will be attached to them), as well as two horizontal planks. The removable part of the table will be placed on them. In our case, for the manufacture will need to purchase the following material:
- Self tapping screws 4–16.
- 4x50 self tapping screws.
- Furniture corners 30? 30.
- Laminated edges in laminated chipboard color.
- Wooden dowels 8? 40.
To move the table, you can use standard guides. They provide smooth movement of the table top. So, pre-made all the necessary details of the following sizes:
- Leg 710 mm.
- Two fixed parts of 450? 700 mm.
- Removable part 400 × 700 mm.
- For the box of the non-removable part, four sides are 420 × 120 mm.
- For boxes for fixed parts, two end 600 × 120 mm.
- Plywood has two lateral crutches of 830 × 120 mm.
- Out of plywood are two end dorsals of 498 × 120 mm.
- To accommodate a removable countertop two strips 498? 120 mm.
With such blanks you get a sliding table size:
- In the expanded form of 1300? 700 mm.
- When assembled, 900 × 700 mm.
It is best to cut all the blanks on special equipment. It is important to precisely withstand all sizes. All blanks of plywood and wood should be carefully cleaned and varnished in two layers.
So, step by step instructions:
- First of all, the lateral and longitudinal tsargs on the outside of the legs are flush with the ends. After, with the help of screws 4? 50 mm from the outside and from the inside 4? 16 mm corners are attached. The corners are attached to the longitudinal sides through horizontal planks.
- Further, a wide guideline is fixed on the inside of the lateral dorsal side.
- Under the dowels, you will need to drill two holes on the inner ends of the tabletop. They are attached for collapsible connection, that is, one half will be free, and the second - mounted on glue. From the dowel to the edge of the tabletop the distance should be equal, but not exceed 10 cm.
- On the removable countertop mounted two dowels. For this, two holes are drilled from the back side.
- At the next stage, it is time to assemble U-shaped parts of the box from laminated chipboard. In this case, the end elements 600 × 120 should be located between the sides of 420 × 120 mm.
- Now fasten the narrow guides. This is necessary in order for the chipboard box to move an average of 2 mm above the plywood collet.
- After, the guides snap into place and are checked for movement along the bar.
- Attach the fixed part of the tabletop with the help of the angles and screws 4 × 16 mm. Both parts must match perfectly. Therefore, immediately prior to their fastening, slide both parts and check their coincidence. After that, gently push apart the side bars and secure the countertops.
- On the shelf inside the table, place the removable part of the tabletop.
Folding table - the original solution for a small kitchen!

If your kitchen has miniature sizes, then choosing the appropriate shape of the kitchen table can be difficult. However, there is always a way out. For example, you can build a homemade folding table. In the folded state, it will serve as a decorative frame, and in the unfolded - a full table for lunch. Although in each individual case the size of such a table will be different, we will take our dimensions as a basis. This will allow you to visualize what your drawing will look like.
For work are required:
- MDF board 180 mm thick - 5 pieces,
- 150 × 90 cm
- 130 × 10 cm - 2 pieces,
- 90–20 cm
- 70 × 20 cm
- holdfast,
- wood glue,
- acrylic filler,
- electric drill,
- wood drill 3 mm and metal 8-10 mm,
- sandpaper,
- acrylic paint for wood
- roller,
- masking adhesive tape
- screws 3,5? 30 and 3,5? 16 mm,
- hinges
- screwdriver,
- two furniture latches.
The whole process of work will not take you much time, if you precisely follow the below step by step instructions.
- Based on the set of material, the table will be made of MDF. Pre-make the drawings.
- First of all, the frame is constructed. To do this, four smaller elements are attached to the bottom board with the help of a joiner's vice. Every 250 mm in the frame, holes are drilled with an O3 drill bit, up to 3 cm deep.
- After that, a hole is drilled to a depth of 3 mm with an O8-10 mm metal drill. In this way, it will be possible to deepen the caps of the fastened screws.
- Дальше на нижнюю поверхность четырех элементов рамы наносится wood glue, а после, каждый элемент прикладывается на свое место. Каждый из них необходимо хорошо прижать столярными тисками.
- Attaching the frame to the glue is not enough, so you should additionally fasten it to the screws.
- At the same time, mask the screw caps so that they do not spoil the overall look. To do this, you need an acrylic putty.
- When the putty has dried, you can sand the surface of the decorative frame with sandpaper.
- The ends of the table top should be glued with masking tape.
- Paint the surface of the frame with acrylic paint using a roller, and paint the corners and edges with a brush.
- On the short edge of the tabletop then tighten the hinges. From the edge should be at least 150 mm. Mark holes on the wall and drill under the dowel. Thus, the hinges will be bolted to the wall.
- When the table is in an upright position, it will be held on top of it with latch bolts. They should be fixed so that they do not catch the eye, for example, at the edges of the wall shelves.
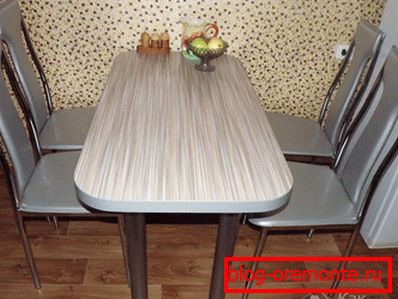
Table from postforming-tabletops in 5 stages
Such a table can be performed in the shortest possible time. To do this, you will need to pre-assemble all the necessary material and tools. You will need:
- pencil,
- postforming-chair,
- jigsaw,
- saw for a jig saw
- Sander,
- edging,
- milling machine,
- silicone sealant,
- rubber kyivanka
- sharp knife
- clamps
- metal legs with a holder,
- hex key.

All work can be done in 5 consecutive stages.
Stage 1
On the front side of the tabletop, mark up with a pencil. The markup will match your drawing. Each rounding is performed with a radius of at least 60 mm. This will prevent the pant from changing color in sharp places of bending.
Stage 2
Now you need to shape the countertop. To do this, use the jigsaw. When cutting, it is recommended to leave a small margin of 2-3 mm. Pay attention to the direction of the jigsaw. It should have a reverse tooth direction. This will avoid chipping on the plastic coating. Although in part they can be hidden by edging. In order to accurately bring the dimensions and outlines of the table top, it is necessary to work the ends with a belt-type grinding machine.
Stage 3

At the third stage, it is time to mill the groove. Milling is always done strictly in the center of the end. And this is even regardless of whether the edge exactly matches the thickness of the tabletop or will be large. If you do not have a mill with the exact dimensions of the groove of the edging, then you can walk several times with a mill that has a smaller tooth height.
Stage 4
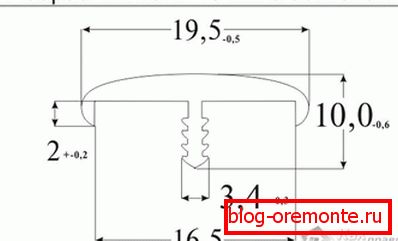
When the groove is ready, you can start packing Kant. To do this, the pre-end is covered with silicone sealant. This will prevent the ingress of water. Sealant is applied to the upper edge of the edge. The edge itself is stuffed with a rubber mallet. The joint should be formed in the most inconspicuous place. When the packing is complete, it is important to make an exact edging. It can not do without a sharp knife. After that, you will need to remove excess sealant around the perimeter of the tabletop, which was formed when driving in the edge.
When fixing the table tops using clamps, it is important to use special pads. They are installed on the protruding edges of the edge and prevent their damage.
Stage 5
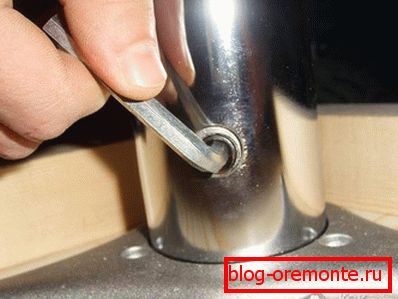
At the final stage legs are fixed. To do this, you should fix the cast holders on the bottom side of the table top. So that they are at the same distance, make the markup with a pencil. From the edge of the leg should be at a distance of 10 cm. This holder is fixed with 2.5 cm self-tapping screws with countersunk head. Now it remains to make the final touch: fix the legs in the holder with an Allen key. Dining table for the kitchen is ready!
As you can see, the table from postforming-tabletops is very simple and, most importantly, is available for home-made production at home. To do this, you must have basic carpentry tools. But here it is necessary to remember the dangers. With careless handling, there is a risk of breaking the holder, which is made of brittle material. But if you carefully operate such a table, it will last for many years.
The choice is yours
We considered with you several options how to make a kitchen table. There are other technologies for its manufacture. In most cases, everything will depend only on your financial capabilities and ingenuity.
Video
This video shows an example of making a rectangular kitchen table with rounded corners. Balusters are skillfully used as legs: