Installation of shingles do it yourself
Reliable, but at the same time inexpensive roofing is a dream, perhaps, of every home owner. Such characteristics has shingles. In order to end up with a high-quality coating, we suggest you to get acquainted with the technology of its installation. By doing the installation of shingles with your own hands, you will significantly save costs. High-quality styling - a pledge of durability of the coating.
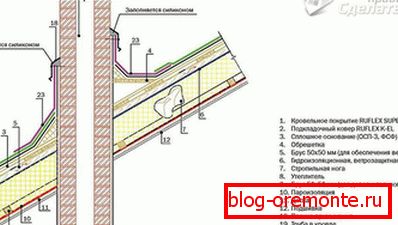
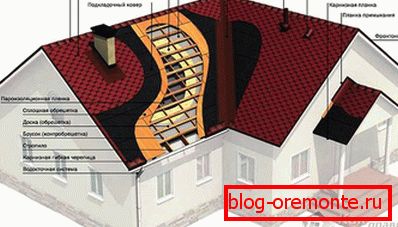
The assembly steps consist of several stages. These include the installation of the base under the roof, then the lining layer is laid, eaves, endovy and end parts are installed, the device of adjacencies is carried out. At the final stage, the installation of shingles on the ridge. In more detail all these points will be described in this article.
Material advantages
The bituminous tile has rather small weight and is available at the price. Due to the ease of tile, you will have the opportunity to make a lightweight version of the foundation. It will turn out not very massive house, and this in turn will allow you to save on building materials and payment for work.
Among the main advantages of this roofing material is also worth noting the following:
- High rates of heat resistance, frost resistance and resistance to strong wind.
- High tolerance to sudden changes in temperature.
- Resistance to precipitation.
- Color does not change over time.
Manufacturing basis
Before laying the tiles should prepare a basis for it. It is placed on top of the frame, which is solid or lattice. As a rule, the basis for shingles is made of wood. The lattice frame is best made from planed coniferous boards of 20-25 mm. To make a solid basis will fit moisture-resistant chipboard or plywood, sheet and edged boards. They are attached to the rafters with screws / nails.
Between the individual elements should be left a few millimeters in the process of flooring crates. This is due to the fact that when drying wood it will be necessary to compensate for its expansion. This point can be missed only if the material was previously subjected to technical drying.
To increase the life of all wood elements, prior to installation, they must be soaked in an antiseptic. To perform the installation of the roof as accurately as possible, it is necessary to pre-calculate the installation distance of the rafters and the thickness of the board used for the frame. For example, if the spacing of the installation is 60 cm, then you need to take a board having a thickness of 20 mm. Accordingly, if 90 cm, the thickness increases by 3 mm, etc.
Ventilation organization
Ventilation soft roof is settled usually at the expense of the ridge. It fits on a ribbed profile. If the capacity of the ridge is not enough, then the installation of ventilation elements on the roof surface should be carried out. This is a kind of profile with edges that are located at a distance of 2 cm from each other. Ventilation elements are fixed with nails to the base of the roof after fixing the tiles.
Waterproofing installation

Waterproofing is designed to protect the house during the flow of tiles. Subject to the slope of the slope 18? and more, the insulation material must be located parallel to the eaves and the ends of the roof. Why? The fact is that in these places there is a high risk of leakage. In view of this, it is important to carry out the installation of waterproofing no less than 40 cm from the edge. In addition, you should conduct waterproofing ridge. Installation of insulating material should be 25 cm on each side of the ridge.
If the slope of the roof is 12-18? then another lining layer should be laid over its entire surface. In this case, the work must start from the bottom up. The layers of the ring are overlapped. Waterproofing is fastened with nails, which should have a cap size larger than usual with a galvanized surface. The frequency of nailing - every 20 cm.
Installation of the eaves, end parts and end

To reinforce the edges of the roof, take the metal strips. They are stuffed on top of the lining layer on the eaves and ends. At the same time roofing nails should be used (nail spacing 12 cm). Then the self-adhesive tile is laid. The protective film before gluing it must be removed. Then, glued to each other, it is glued along the eaves, and then fixed with nails.
In the valley is laid specially designed for this carpet. It must be secured on both sides. Then you need to miss it on the edge of bitumen mastic.
Mastic grades
To install the top layer of bitumen tiles should be applied bitumen-polymer material. With it, it creates a continuous coating with high elasticity. It withstands mechanical and thermal deformations of the roof base. In accordance with the regulations, hot and cold mastics should be used for laying soft roofs.
Cold mastic used to process the inner layers of the roof. Their hot counterparts are used as an outer coating. Among the cold mastic is bitumen and roofing material, and the hot - toli and tar. The composition of the mastic should be powdered mixture. It may be ash, gypsum or lime.
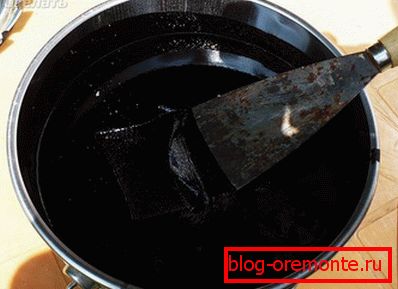
Mastic making

This material can be made independently or purchase its ready-made analogue. For making mastic you need bitumen and filler. In the percentage ratio of bitumen should be about 80%, and accordingly the filler - 20%. To get cold buteprol need 2 parts of bitumen to take 1 part diesel fuel. At the same time, bitumen warms up to 180 ?, while the filler and diesel fuel settle in a different place. After evaporation of water in the bitumen, both compounds are interconnected. This instruction will help you to make cold mastic with your own hands.
For cooking hot mastic you will need a hot plate. Bitumen needs to be brought to a temperature of 200 ?, slowly adding filler to it. It is important that the composition does not cool down more than 160 ?.
To check the quality of the mastic, it should be laid at an angle of 45 ?. To do this, it must be preheated to 60 ?. So, if the coating drains, then it is of poor quality. If it does not drain, then still need to let it dry. If the cracks do not appear, then you managed to make a high-quality mastic.
Installation of soft roof

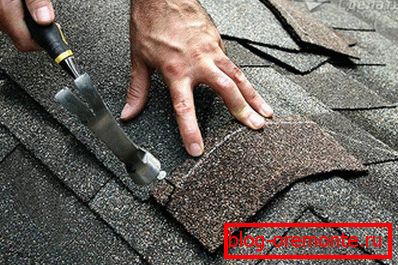
To the roof was not raznoottenochnoy, you need to use several packages of tiles. The color, of course, will not be the same, but at least it will be uniform. Work begins in the middle of the ramp. Tiled tiles should be laid in vertical rows. Move from the center to the front. It is important to monitor the gap, which should be 2–3 cm between the edge of the tile and the eaves tile. This point is important to align when laying the first row. For the formation of an attractive pattern, the last part of the second-row tile should be trimmed. This is usually done in the center. If necessary, the elements of shingles can be cut along the edge of the cornice. It is also important that these edges, prone to cutting, are subsequently treated with bituminous glue. Coat the strip with glue, about 100 mm wide.
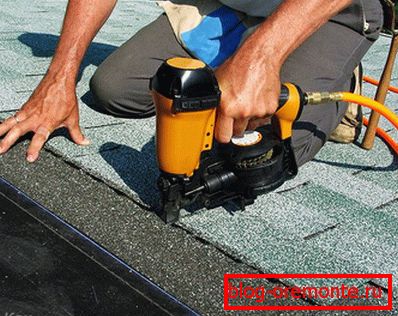
For bituminous tiles, alternative fasteners should be provided. To crate it must be attached with nails. This is done when laying adjacent to each other rows. About five nails are nailed on one shingle. This is due to the fact that, over time, the bitumen tile adheres to the crate over time due to solar heat.
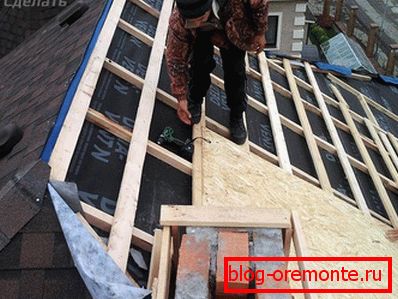
Adjoining
The roof usually has connections to, for example, the furnace heating pipe. In this place there will be a gap, as a result of which moisture will penetrate inside the roof. In order to avoid this disadvantage, you should properly attach the shingles. First, drive the rail to the junction of the pipe and the roof. Then wind up the tiles on the rail and partially on the pipe. Next to it, starting with the pipe, you need to lay the valley of the valley so that it blocks the pipe 300 mm higher from the surface of the roof. At the end of the lower part of the pipe with a carpet and tiles covered with painted tin on all sides.
In order to avoid snow accumulation behind the pipe during operation, it is necessary to install a chamfer. So, melting snow / rainwater, when hit by gutters, will flow around the pipe, flowing down the roof.
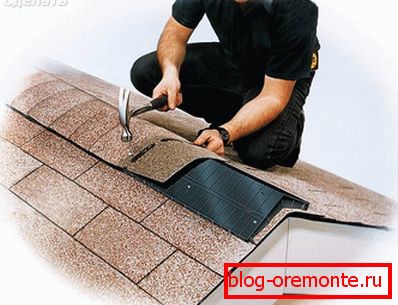
Mount on the horse
At installation of a tile tile on the ridge the ridge tile is necessary. It is made with perforation, dividing each element into 3 conditional parts. It should be laid with an overlap of 5–6 cm. This process should be performed so that the tiles are parallel to the ramp line. The short side of the tile is parallel to the ramp lines. It needs to be fixed with nails.

The roof of the shingles can be laid only at positive temperatures, when the thermometer shows at least +5? С. This is due to the characteristics of the shingle (a sheet consisting of three to four tile elements). It is attached to the crate with nails or on a special self-adhesive layer. The fact is that the tightness of the soft roof is ensured by the heat of the sun. Under its influence, the sheets are glued together with the base and among themselves. In the cold, this can hardly be achieved, and this means that the isolation will leave the best. On the skate it is necessary to do overlap, and in cold weather the shingle becomes especially fragile.
It also happens that the roof of the shingles forced to be installed in the winter. In such cases, the roofing material must be kept in a room with room temperature. If you still have questions on the topic, then you can get additional advice from our specialist.
Video
In the lesson provided you will receive information on how to make a soft roof: