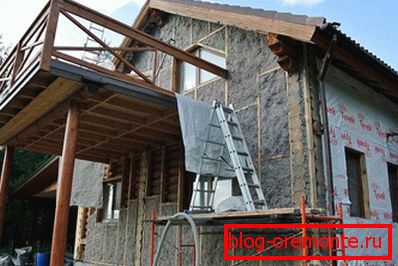
How to warm a log house
The warmest and ecological houses are wooden buildings, namely, log houses. As you know, wood saves well and accumulates heat, so the walls of the house are also endowed with these important properties. There are many statements that the thermal conductivity of a wooden wall, which is only 24 cm thick, is equal to the thermal conductivity of a brick wall with a thickness of about 1 m. And this is really impressive. Nevertheless, it happens that during the operation you notice that in the winter period in your house is not as warm as you would like, and sometimes it happens, even drafts are walking. In this case, you need to think about how to warm your home and remove all cold bridges, so that the heat is kept inside and the house is well insulated. We can say that in the harsh regions every room needs warming. Therefore, we will further consider with you how to insulate a log house, what exactly it is necessary to insulate, what materials are better suited for this purpose, and also consider in detail the steps for performing insulation work.
Why is it cold in a log house
Before you start to deal with the cold, you need to determine its source. Although the tree is warm enough and accumulating material, in the winter in such a house can be cold. Why? The owners of log buildings often face such problems:
- Frequent drafts in the rooms.
- Cold in the legs due to the blow of the wind over the legs.
- After turning off the heating system, the house begins to cool rapidly.
- Cold walls.
There are some more different nuances that we will not mention. Yet this is enough to think about the urgent warming of the house. Let's take a look at what happens in the house when it is heated. For example, you have a log house, which you heat with any heat source, whether it is gas heating or electric. In the heat exchange at home are involved:
- heat source;
- indoor air;
- ceilings;
- walls;
- floor.
How does everything work? From the school course of physics, we know that the air heated by the heat source begins to rise up to the ceiling. When it rests against its surface, heat transfer occurs, in which air is cooled. What is the result? The most heated and warm part of the house is the ceiling. Now the air is directed to the walls, going down on their surface. Please note that the walls are much colder than the ceiling due to the external influence of frost, so the air begins to cool faster, increasing its speed of movement. Further, the air flow goes to the floor, while gaining sufficient acceleration, moves along its surface with such speed that it seems to you that there is such a draft on the legs that there are no walls at all. Moreover, if a heat source, such as a portable radiator or a fireplace, is installed directly near the interior walls, as is often done, the speed of the flow will increase even more. It turns out that there is a constant draft in the rooms, which is caused by the owners themselves.
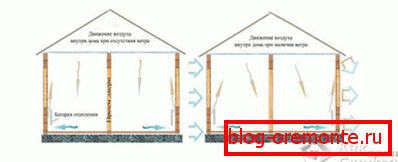
Чтобы избежать этого, были созданы специальные строительные нормы, по которым радиаторы отопления следует размещать под окнами. Понятно, что самими холодными являются наружные стены, в то время как стены внутри вполне удовлетворительные. Floorучается, что при расположении источника тепла под батареей теплый воздух препятствует проникновению холода, а также, поднимаясь и опускаясь по стенам, не будет так быстро охлаждаться и быстро двигаться. Почему? Поток воздуха будет спускаться вниз по внутренним стенам, которые значительно теплее, а когда он будет опускаться по внешней стене, он обратно столкнется с источником тепла, который будет его нагревать, повторяя весь цикл. При таком раскладе получается следующее: дом значительно быстрее прогревается, а вся конструкция качественнее держит тепло, ведь оно не растрачивается, а накапливается.
But this is not the only reason why the house can be cold. Often heat loss occurs due to poor insulation and cold bridges. To eliminate heat loss, you need to check:
- Ceiling. Первым делом нужно проверить именно его, ведь именно через потолок уходит до 70% всего тепла. Вам важно задержать тепло в доме и утеплить чердак или мансарду.
- Walls. All external walls and the elements in them, such as windows and doors, account for the lion's share of heat loss. Incorrectly installed doors or windows are the first reason why the house can be cold. Warm air will simply leave the room, and cold air will fill it. Heating the room will be very difficult. Moreover, the cracks in the walls also lead to this effect.
- Floor. Это последний источник холода в вашем доме. Он должен быть исправен и утеплен. Зимой следует уменьшать вентиляцию подпола.

Дальше мы рассмотрим, как избавиться от этих проблем и свести к минимуму потери тепла через потолок, стены и floor. Давайте узнаем, чем и как правильно утеплить бревенчатый дом.
Insulation Requirements
Thanks to the warming of the house, you can reduce heat loss, while the cost of heating the room will be significantly reduced. This will make your stay much more comfortable. We offer you to remember what and how our grandfathers and great-grandfathers insulated a log cabin. In their arsenal there were various materials that allowed to insulate the walls of the building. It was also the so-called “dauber”, consisting of straw mixed with clay, and also shingles made of wood with which to plaster the walls. This simple way helped residents solve the problem of drafts, moreover, the walls could still "breathe". It is worth noting that this did not spoil the appearance of the building, it seemed more well-groomed and neat.
But, as time goes on, the construction industry is developing, and the use of such ancestral methods is irrelevant. Today we have a lot of insulation materials, which are much more efficient, and working with them is much easier. Therefore, before you engage in insulation, you need to familiarize yourself with the properties that such materials should possess. This will help insulate your home properly and 100% efficiently. What qualities should have insulating material? These are the basic properties:
- good vapor permeability. It is important that it be the same as that of wood;
- high moisture resistance. As you know, wood and moisture are incompatible concepts, so insulation should not accumulate condensate so that the wood does not rot;
- the material must breathe easily passing air;
- high fire resistance to protect the house from fire;
- it should fit closely to the rounded structure of the wall and fill the gaps.
Given all these recommendations, you can choose the insulation that will perform its functions qualitatively. But the question arises, how to insulate a log house? Now we consider the ideal options for warming the house of wood.
What to use
As mentioned earlier, the whole process of insulation is reduced to the insulation of the attic or ceiling, caulking of walls, insulation of door and window frames and the floor. If you perform all these procedures correctly, no additional work will be required.
It is worth noting that most often the reason for building a house made of wood is that it is a natural and environmentally friendly material, so it’s foolish to say to use foam plastic for its insulation, because then all the meaning will be lost. Moreover, it does not fit in its properties with those that are recommended. What then to use?
To insulate the attic, experts recommend the use of such materials:
- sawdust;
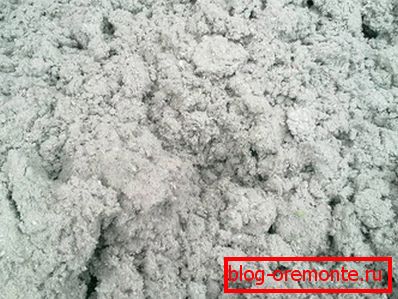
- cellulose cotton wool (ecowool);
- Straw;
- seaweed;
- mineral wool.
If we talk about cauldron walls, then it should be done only from natural materials:
- moss;
- I put;
- hemp;
- jute;
- insulation based on jute and flax.
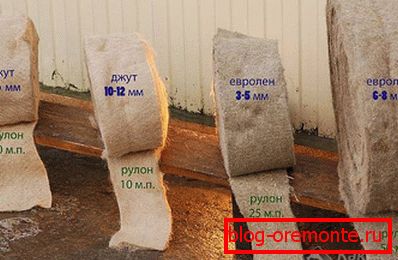
The main requirement for materials is the similarity of their properties with the properties of wood.
To warm the wooden floor on the logs, use of mineral wool rolls or natural zasypny materials. As for the floor of concrete, then it requires a more dense material. It may be:
- bung;
- basalt wool in slabs whose density should exceed 160 kg / m3;
- polystyrene foam;
- extruded polystyrene foam.
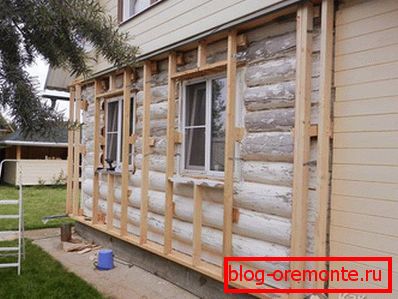
It happens that even after performing all these basic procedures, the room can be cold. Why and what to do? The reason may be that during the construction the thickness of the logs was incorrectly chosen. It is also not necessary to exclude the fact that the house is already old or incorrectly calculated the heating. In any case, you have to warm the walls. Considering all the requirements for home insulation, for wall insulation outside you can use:
- Ecowool
- Sawdust or sawdust pellets (backfill material).
- Mineral wool.
- Керамзит (засыпной).
Древесина – непростой строительный материал, ведь она не просто способна «дышать», но и считается своего рода рекуператором воздуха. Когда воздух попадает в толщу дерева поперек волокон, дальше он распределяется вдоль этих волокон, выходя через торец. Floorучается, что дерево «дышит» через торцы. Именно поэтому для таких «живых» стен нельзя использовать:
- Styrofoam.
- Polyurethane foam.
- Extruded polystyrene foam.
- Foam for the elimination of gaps.
- Various sealants.
If you ignore this advice, such vapor-proof materials will contribute to the fact that during the operation of the tree simply rot. And if you protect the wood from the inside with a vapor-proof film, the whole chopped house will turn into a thermos.
Ceiling
To start, it is important to do everything to insulate your home from the inside. We found out that the lion’s share of all the heat goes through the ceiling, so the first thing to do is to warm the house with it. Many are not quite responsible attitude to this event, and do not always want to warm the ceiling. Nevertheless, the fact that warm air always rises upwards is undeniable, and if the top is not insulated, then it (the air) will simply go outside. Believe me, all the money spent on insulation will pay off completely, since you will save a lot on heating.
So, what do you need to insulate the ceiling? These are the following tools:
- knife;
- hammer;
- hacksaw;
- electric jigsaw;
- screwdriver;
- tile adhesive.
In order to build the casing and frame, prepare:
- nails or screws;
- glue;
- edged board;
- foam;
- plasterboard.
As for the material for insulation, it is better to use ecowool or mineral wool. If we talk about mineral wool, it is a relatively inexpensive material, which is distinguished by its positive qualities. Mineral wool does not burn, is tearproof, has soundproofing properties and is easy to work with, so even a beginner will be able to complete the installation on his own, without any help. And in order to ensure good waterproofing, we recommend to use asphalt.
Having prepared all the necessary tools and materials, you can start work. The whole process can be divided into the following steps:
- The first thing you need to make a frame of edged boards. Please note that this will affect the height of the ceilings. For those who are high, it will even benefit. Boards need to be fixed in increments of no more than 1 m from each other.
- To ensure a good waterproofing, the space between the boards must be filled with glassine so as not to leave empty seats. The material should hold well, for this a little grease it with tile glue.
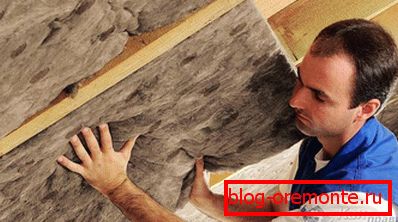
- Теперь сверху на пергамин уложите mineral wool. Следите за тем, чтобы утеплитель хорошо прилегал друг к другу, не оставляя просветов и дыр. В случае когда минеральная вата не хочет держаться, нанесите на нее небольшое количество плиточного клея.
- After the entire ceiling is insulated, it must be sheathed with plasterboard to give a complete look. Using self-tapping screws and a screwdriver, drywall sheets are screwed to the frame.
That's all, your ceiling is insulated. It remains only to trim the ceiling and make the lining. Now the precious heat will remain in your room, which will reduce your heating bills.
To work on the insulation did not go to ashes and were performed correctly, it is important to perform them in a warm period. Moreover, it is impossible to carry out warming of a log house immediately after its construction. The structure needs about a year to shrink. Given this, the work should be carried out not earlier than 1 year after its construction.

Do not do without roof insulation, so if you have an attic, it should also be insulated.
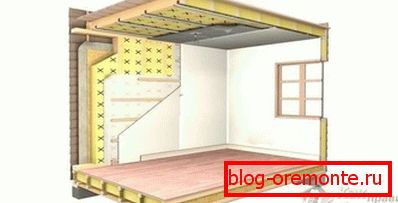
Walls
When you decide to insulate the walls inside the house, it is necessary to take into account that condensation will form on the walls. This will be especially a problem for those who live in northern places where winters are very cold. Condensate arises due to a sharp temperature difference: it is very cold outside the house and warm inside. It turns out that the dew point will move to the layer of insulation. But this is not a problem, since everything can be fixed with a simple vapor barrier film, which is often used with insulation. Another option is to perform good ventilation.
To perform the work you will need:
- roulette;
- plumb;
- screwdriver;
- level;
- stameska;
- hammer drill;
- electric jigsaw;
- mallet;
- hammer;
- dowels and screws;
- screwdriver;
- felt, tow or foam;
- wooden bars;
- insulation, drywall and putty.
We recommend using ecowool as a heater for walls (mineral wool can be used instead). The advantage of the material is that it fills all the cracks and voids in the walls, preventing them from blowing. It is worth noting that the moisture does not penetrate inside, so the fungus you are not afraid. Among other things, it is a breathable material.
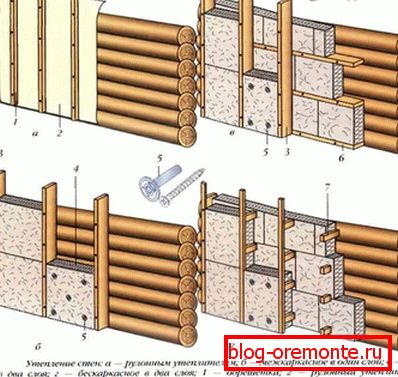
Now we will start the technology of wall insulation.
- If there are cracks or gaps in the wall, they should be sealed with foam, tow or linen felt. Choose what you like and what is easier to work with.
- Make a crate of wooden beam. Mark the place where the extreme elements of the batten will be installed. Pay special attention to this work, since the fixing of the following elements will depend on the correct installation of the first bars. That's why you need to use plumb lines and level.
- If you have located the first beam, it must be fixed with dowels and screws. To secure the timber to the wall, fix it in steps of 25-30 cm.
- The following bars should be placed indented 1 m from the previous one, parallel to it. Thus, you will make a frame around the perimeter of the wall. When on the way there is a window opening, it should be upholstered with bars in a circle.
- Now you need to mount intermediate bars. On top of the first vertical bars screw the intermediate bars, which will be in a horizontal position. Your wall should be divided into squares. To prevent fungus and decay, treat wood with antiseptic.
- Your crate is ready, it remains to lay a layer of insulation between the bars. In this case, no need to use glue. Ecowool will keep well between the wall and the crate, the main thing is to place it tightly.
- At this stage, you should make a vapor barrier using plastic wrap. Lay it on top of the insulation with a small overlap of 5–10 cm.
- And in the end you need to do the finishing. Wall sheathe drywall, screwing it to the crate. Plates should fit snugly together. All cracks are required to be puttied.
Floor
The last thing that should be insulated in your log house is the floor. To work you need such tools and materials:
- drill;
- hammer;
- electric jigsaw;
- file or hacksaw;
- knife, pencil and nails;
- roulette and level;
- plane;
- insulating material (mineral wool).
When you have a concrete floor in your house, its warming is simply necessary. Work, of course, is not easy, but following the instructions, spending a little time and effort, you can do it.

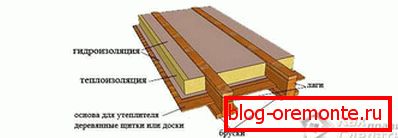
One of the methods of floor insulation is called “raised floor”. Works are reduced to raising the floor by 6 cm and warming it. The stages of work are as follows:
- Concrete pavement should be leveled and eliminated various defects.
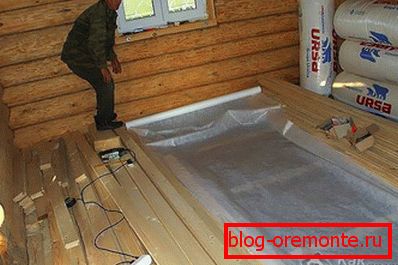
- On the surface of the concrete lay a waterproofing membrane that will not pass moisture to the insulation.
- Теперь нужно уложить лаги из брусьев. Расстояние между ними не должно превышать 50 см. Рекомендуемый размер лаг – 50?100 мм, с толщиной не меньше 50 мм. Не стоит прикладывать лаги больше чем 30 см к стене. Floorучается, ваш пол должен быть поделен на ровные линии из брусьев, которые служат в роли лаг.
- В промежутки между лагами проложите mineral wool. Опять же плотно заполняйте пустое пространство, чтобы не оставлять пропусков.
- Place PVC membrane on the insulation.
- It remains only to lay the flooring, and your heated floor is ready. The material is good to use chipboard or waterproof plywood.
That's all, your house is well insulated from the inside, and you can enjoy comfortable living in a warm room. As you can see, there is nothing complicated, but what is the result. But besides all this, you can warm your home outside. How to do it? Let's find out.
The cord wall
Caulking is one of the most important activities that every log house owner must perform. Because of this, you can seal all the cracks and cold air will not penetrate the house. This is the process by which the frame is compacted with fibrous materials. All work must be done in warm and dry weather. What to do?
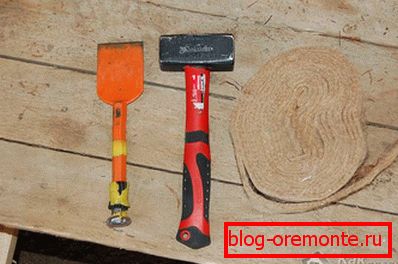
To work you need to prepare:
- hammer;
- scissors;
- stamesku;
- gouging scapula;
- mallet.
Work on the cauldron must be performed first of all, before any stages of insulation. In addition, the caulker can be performed only after the building has shrunk. All work begins with the lower rims and as you need to move up. It is important to caulk the seams both outside and inside, and one wall cannot be completely processed, then the second. Everything should be evenly and go around the perimeter, otherwise the building may skew.
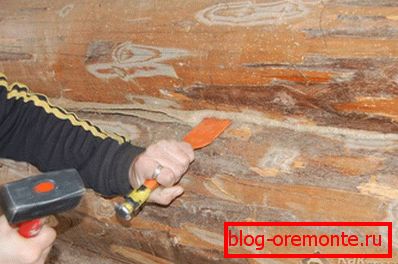
For example, let's consider a caulk with tape insulation or jute. It can be called the simplest. Cutting the tape is unnecessary, which facilitates all the work. So, the work process is as follows:
- Start with the first lower crown. Put the end of the tape on the ground and unwind it, gradually moving to the other end. Cut the tape is not necessary, the main thing is to ensure that it goes in a strip and does not turn over. Please note that the material should not be tightly stretched.
- Go to the beginning of the ribbon, lift it and start pushing it between the rims from the butt. As soon as you have finished the first crown to the opposite end, cut the ribbon with a margin of 10–20 cm. Use well-ground scissors.
- Now everything can be caulked securely using a hammer and a caulker. Do this gradually so that no wrinkles form. In one stage, you will not be able to do everything, so push it in until it is hidden in the log. Need to push through the tape at a slight angle, as if on a diagonal.
- Как ни странно, все нужно повторить снова, между теми же бревнами. Туда могут вместиться еще 1 или 2 ленты, в зависимости от щелей и плотности ленты. Floorучается, что на конопатку уходит больше материала, чем на первоначальное утепление венцов, и учтите, что это только снаружи. Вам необходимо повторить всю процедуру внутри и продвигаться по всему периметру вверх.
This is a rather scrupulous and long work, but having done it, you will compact your structure, and the air will not walk inside the room.
How to caulk a log house, you can see in the video:
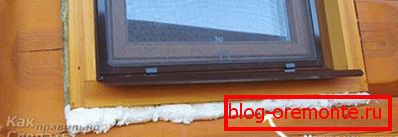
Insulation of windows and doors
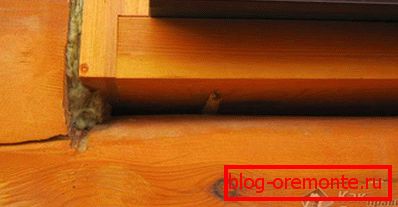
This is another important stage in the insulation of the house outside, without which it is simply impossible to do. You will be pleased that it will be very easy to seal all the cracks and holes in the window and door frames. For work you need only an aluminum ruler and polyurethane foam, which you need to blow all the gaps.
The first thing you need to determine the tightness of windows and doors. An aluminum ruler can define slots, pushing it into different parts near the window frame. In those places where she walks freely, cold air enters the house. All such slots should be blown out with assembly foam. In the same way, check the door frames and take all necessary measures.
When you find a gap under the window sill, you need to eliminate them both outside and inside. In windy weather, just take a candle or matches and spend near the window sill. Purging can be noticed by the flame. Eliminate all slots with foam.
Take a look at your windows. If they are old and have lost their original properties, it is worth thinking about putting new ones that will keep the heat in the house much better.
By completing all these activities, or at least some of them, you can solve the problem of heat loss. Your wooden house will keep you warm, thanks to which your stay will be more comfortable. It is also important that your heating costs are reduced. It is not so difficult to do the work, so even without outside help you can cope with the task.
Video
For warming houses from a log house, the “warm seam” technology is sometimes used. How is the insulation, see below: