How to strengthen the bath so as not to stagger
When carrying out repairs in an apartment with full replacement of plumbing, its owners quite often have to face the problem of securing the equipment installed in the bathroom. This is particularly true of the working procedures for installing a new bathroom, the specificity of which is determined by many factors, including the material of the product and its texture. So, the traditional cast-iron bath, which is distinguished by its considerable weight, is best to be installed according to a long-established method, which assumes its reliable support on the included and adjustable feet.
For lighter acrylic baths, for example, additional fastening is required, ensuring its reliable fixation and even distribution of loads throughout the body. In our article we will consider in detail the installation features of each of the samples of this sanitary ware.
Bath fixing methods
Anyone who wants to figure out how to strengthen the bath so as not to falter - we advise, first of all, to decide on the material from which it is made, since this is largely the decisive way to install it.
When choosing a product, one often comes across the following options:
- classic cast iron bath;
- acrylic bath;
- steel bath.
For each of the samples of these products, a special method of fastening must be applied, only for it, which takes into account the particular features of the wall relief of the bathroom itself.
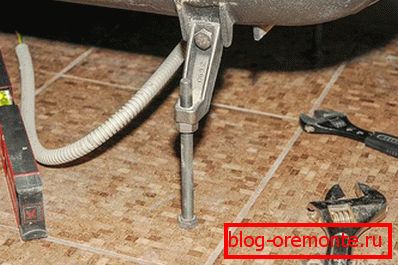
Cast iron baths are sufficiently stable due to their considerable mass, so that their installation is permissible anywhere in the room. Usually such baths are installed on standard legs, which are supplied with the product and securely fixed on its body with the help of special steel wedges or bolts. As an additional fastener, a pre-laid base of brick can be used, or corners fixed on a wall (in the case of a base of brick, its body can be located not close to the walls).
The steel bath is best placed at several points of support, so that it should be located directly against the wall. Since the legs included in her set do not provide the required fixation reliability, a special brick podium is often used to increase the stability of the product.
To fix the steel bath can be used the following techniques:
- the use of foam, sealing the junction with the wall and at the same time strengthens the contact area;
- installation on the walls of special metal profiles, providing additional support;
- and, finally, the usual sidebar in the wall.
To securely secure and ensure uniform distribution of loads, it is best to install an acrylic bath on the same brick podium or use a special metal frame for this purpose.
Consider each of the methods of fixing baths discussed in this chapter in more detail.
Polyurethane foam
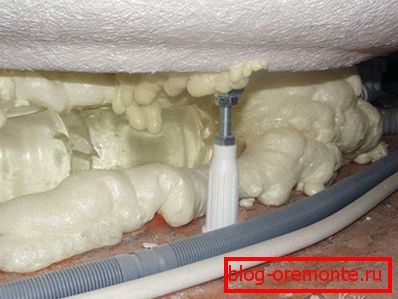
The use of polyurethane foam for fixing the bath is the simplest and most accessible method of simultaneously fixing it on the floor and walls. When implementing this method, the bath product is first set up in place and in height with the help of adjustable legs so that there is a gap of about 0.75–1.5 cm near the walls, and then filled to the brim with water.
After that, it will be possible to begin sealing the gaps between the body of the bath and the adjacent walls of the room, as well as between its legs and the floor with the help of foam.
Sealing foam tends to expand when dried, so its use must be strictly metered. Otherwise, there may be undesirable deformations of the structure, reducing the reliability of its fixation. In spite of the fact that the time of “setting” of the assembly foam is about 12–35 hours, it will be possible to start the work on wall finishing in about 6 hours.
Brick frame application

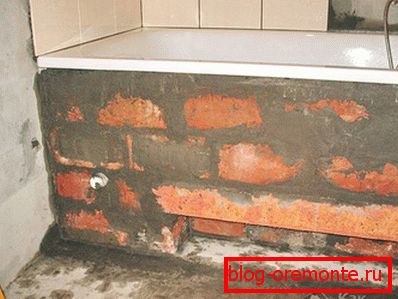
The brick frame is most often used in cases where you decide to fix the bath without the aid of the legs and to ensure an even distribution of loads along the entire perimeter of the support. With this method of installation, the options for laying out the frame are possible both along the bathroom and across it.
In the case of a transverse arrangement, the bath must rest directly on the brick, which will require additional attachment of the framework to the walls using metal angles (steel or aluminum). At the same time, the prepared corners are fixed with dowels on the wall so that the free edges of the bath have additional support, and it does not sway when pressed.
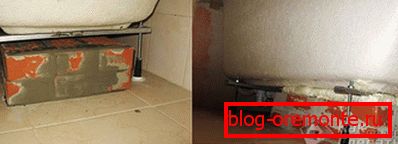
With longitudinal stacking, something like a trough is formed in which the bathing product is placed. The gap or cavity formed between the walls of such a base and the bathroom itself must be sealed with foam, which also contributes to increasing the reliability of its mounting. In the case of laying out the front wall to the very top, it is possible to completely hide the body of the bath, thus preparing the base for the subsequent lining with ceramic tiles.
When performing these works, it is imperative to provide a small observation hole, which is necessary to provide access to the siphon. When finishing this hole can be closed with a piece of drywall or by installing a small plastic door. In the case when you are planning to finish the walls with ceramic tiles - a finished screen can be used as the front panel of such a base.
Installation on a metal frame

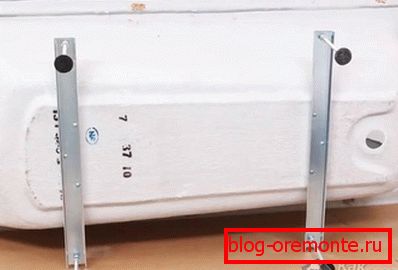
This method of fixing the baths is mainly used for the installation of acrylic products, the complete set of which, as a rule, provides for a ready-made steel frame (in its absence, this accessory can always be purchased separately or made independently). In the process of installing such a bath, the mounting or guiding rails of the frame are first attached to its bottom with self-tapping screws (note that they are mounted in specially designated areas with thickening). And then the supplied feet are mounted on bolts fixed in this way.
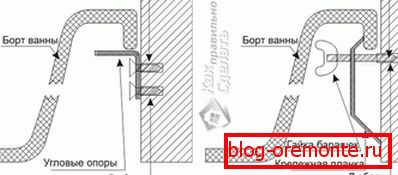
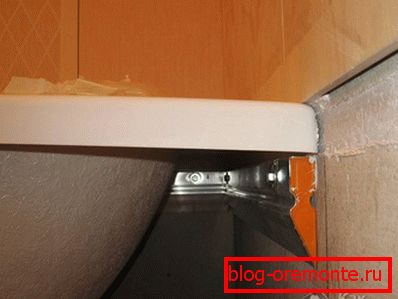
After fixing the legs of the bath, it will be necessary to put in place and mark the points of contact with its case against the walls of the room, after which special strips are mounted at these points, providing additional support.
It is necessary to leave a small gap between the bar and the side (no more than 2-4 mm), taking into account the expansion of the bath after filling it with water.
Inset tub in a niche
In small apartments, very often a situation arises when a bath is placed with great difficulty in the space reserved for it, which, on the one hand, considerably complicates its installation and, on the other hand, makes it possible to firmly and firmly fix it in a bathroom niche.
For inset and rigid fixation of the bath, you will need to prepare slots along the thickness of the product's edge on each side of the bath (you can use a perforator or a grinder for this purpose). The grooves of the edges or cups of the bathtub prepared with their help should be inserted with a slight “tightness”, which guarantees maximum rigidity due to the complete absence of backlash.
With insufficient stiffness of the supplied legs, you can further strengthen the fixing of the bath by using special transverse profiles that serve as supports for its cuffs.
Video
How can you install a bath in the strobe, see below: