How to replace the window sill
Most often, window sills are mounted when they install windows. Therefore, a separate installation of window sills is extremely rare, only in special cases. But it also happens that during repair work or redevelopment of an apartment, inappropriate coverage needs to be replaced (usually a wider windowsill is installed). Then you will have to dismantle the old window sill to install a new one. In this article, we will look at some of the reasons why window sills need to be changed from time to time, which material to choose for the future window sill, and how to replace the window sill. If you need to replace the window sill, you can do it, despite the lack of experience. And now about everything in more detail.
When you need to replace the old window sill
Nothing lasts forever, we all know that, so from time to time, any thing needs to be either repaired or replaced. There are many reasons for this. What are the reasons for replacing the window sill? Here are a few of them:
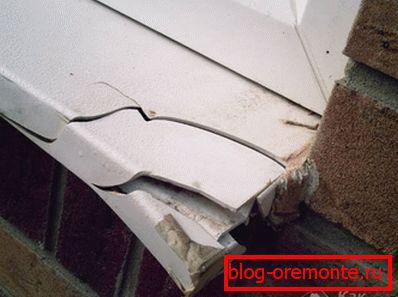
- On the surface of the coating formed damage, reducing the overall attractiveness of the sill. The aesthetic appearance is lost in the presence of small scratches, cracks, chips and various kinds of deformations, when the window sills are made of wood.
- There are violations of the integrity of the product - deep chips, large cracks, due to which the window sill can collapse at any time. Often the window sill serves as an extra shelf, where we usually put our pot, seedlings or other things. Therefore, when such deep damage is formed, its replacement is required.
- The crumbling of the wall adjacent to the window sill or the complete destruction of the coating itself. Often this leads to the fact that the window sill can fall at the most inopportune moment. Moreover, the quality of sealing in this case is significantly degraded, which allows cold air outside to freely penetrate into the interior. This is especially unpleasant in the winter time.
- The final reason is the reorganization of the entire space and the change in the overall design of your room, in which the old window sill may not fit. It may be that you just need a larger window sill - for various purposes.

Whatever the reason, the window sill needs to be changed, even if you just got tired of it. Is it possible, if desired, to perform all the work on the dismantling and installation of the sill yourself? You will learn the answer further, having familiarized with the installation technology of the window sill. But before you install it, you should decide what material the future window sill will be from. Let's look at some of them.
What will it be
We live in a time of technological progress. Nowadays there are so many materials for construction, and all of them are so diverse and universal that our ancestors would envy us. And this concerns not only durability and quality. This is a beautiful, aesthetic appearance, which is important.
If we talk about window sills, then on the market modern models are presented in various versions. The range of products is so great that you can choose a model that would fit perfectly into the interior design, fully perform its functions, have various design features, cope with various kinds of load and have a very reasonable price.
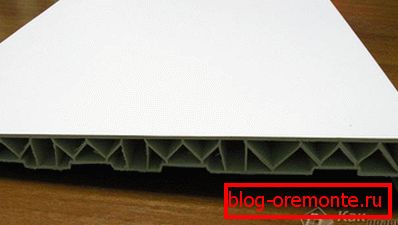
Plastic products. They are among the most sought-after materials on the market, as they are available to most. Despite the low price, the plastic window sill can be called practical and reliable, resistant to the effects of light and heat, which can serve you a long time because it does not rot. However, with a strong mechanical effect, it can break. Given the fact that the material has a synthetic origin, such a window sill has a good environmental friendliness, which is very important, especially for those families that have small children. And of course one of the important advantages of plastic products can be called a wide range of colors and configurations of the goods, as well as their low weight. This fact will allow you to choose exactly the window sill, which will be in harmony with the overall interior of your home. It should also be noted that such a window sill can be replaced by a simplified scheme.

Wooden crafts. The tree will always be in trend. Naturalness is always fascinating and gives nobility to the product. This material was used even by our distant ancestors, but remained relevant to our time and does not lose its popularity. Wooden window sills will give a feeling of warmth and comfort in the house, especially since they have a beautiful natural pattern and a pleasing eye texture. If you are a connoisseur of environmentally friendly and natural materials, you should give preference to just such an option. Thanks to modern technology, pre-processing of raw materials contributes to the fact that finished products during the operation will not rot, deform or break. But, of course, you need to pay for all this, and quite a lot. The price of wood products is much more expensive than plastic, so not everyone is able to afford them. If you are a connoisseur of the highest-grade breed, the expensive solid wood window sills are suitable for you.
There are low-budget options made from materials such as MDF and particleboard.

Acrylic products. Very durable and reliable window sills, which are gaining increasing popularity due to their qualities. Yes, they cost 2-3 times more than PVC products (plastic), but you pay for good reason. After all, such window sills are able to withstand the weight not only of the items that will be installed on them, but also the weight of a person. Often with the help of such window sills they set up a recreation area, expanding the canvas and adding pillows for comfort, here you can sit with a cup of tea, watching what is happening outside from the window. They have many advantages: do not scratch, are not afraid of a lot of weight, spilled liquid or a fallen cigarette. They are easy to clean and easy to clean. They do not lose their original appearance, despite the long life. And not least, such products can be of any color and shape. This is the case when the price is fully consistent with the quality, and even more.

Products from natural and artificial stone. As before, and now, stone also remains a popular material in construction. But such window sills can not fit into the interior of your room. Only when everything is chosen correctly, marble and granite pavements add solidity and sophistication to the decorative design of the house or apartment. Their main advantage is durability and reliability. Nevertheless, stone window sills can not always be called safe, because they have a sufficiently large weight and are radioactive.
This is not all the materials from which window sills can be made, but they are the main and most popular. The decision on which material to choose is yours. You start from your means, the purposes for which the window sill will serve, and the interior design. Agree, a stone window sill by a plastic window is most often inappropriate, especially when there are no stone decorative elements in the room. Given all the factors, you can purchase the perfect option. Do not save on quality, as this may affect the future.
An important nuance when choosing a suitable design are its parameters and dimensions. When choosing a product, note that its length should exceed the width of the window by a few centimeters (10–20), but the width is chosen based on personal preferences, but only so that it does not close the heating radiator. Only it is important not to overdo it so that the installed window sill does not break in a place where there is no support.
With the window sill decided, let's consider the detailed instructions on how to install it correctly with your own hands.
Sequence of work

To complete the installation of a new window sill, you will have to carry out a full range of activities. As you know, planning leads to success. Therefore, it is important to prepare everything in advance, familiarize yourself with the work ahead and have an idea of what needs to be done. Let's look at the work that will need to be done in several stages:
- preparation of tools for work;
- dismantling of unsuitable window sill;
- installation of a new window sill.
As mentioned earlier, the easiest way is to replace plastic products, this applies not only to window sills, but also to windows. If they are made of other materials, the sequence of the installation process will be the same, except that you need to pay more attention to accuracy in the work. So, let's find out what materials you will need in the process.
Preparation of tools

If you want to install a new window sill quickly, efficiently and without hitches, prepare these tools in advance:
- roulette;
- level;
- hammer;
- zubilo;
- hacksaw;
- lom;
- drill or hammer drill;
- polyurethane foam;
- jigsaw;
- silicone sealant;
- sandpaper;
- cement mortar;
- putty knife;
- respirator;
- assembly knife;
- boards with a small section;
- paint for slopes.
If you do not have something from this list, do not rush to run to the store. When you are not sure that you will need these tools in the future, you can borrow them from good friends or acquaintances, and even better from relatives. Having collected all the necessary equipment, you can proceed to the dismantling of the window sill.
Dismantling the old window sill
In fact, remove the old window sill is not so difficult as it may seem at first glance. The main thing is a clear adherence to the manual. It is also important that when working should be careful, careful and careful not to damage anything extra. Cracks and chips at the window you do not need. Consider how you can remove the window sills of various kinds.
In order to protect your hands from injury, use gloves.
If the window sill is wooden, a hacksaw and crowbar will come to the rescue. First you need to check how the window sill is attached. When it is attached to the wall, strike the window sill with a hammer several times to loosen the fastener. Scrap try to lift it. Then try to just get it. Was your attempt unsuccessful? Use the chisel and hammer. Otherwise, use a hacksaw. Make cuts in different places and remove pieces with scrap. It happens that under a wooden window sill there is glass wool, which can damage your airways. To avoid injury, proceed to work in a respirator.
With a concrete window sill, things are more complicated, as efforts will have to be made more. During such work, you can not do without dust and debris, so it is important to protect your respiratory organs and eyesight. For its removal you will need a hammer drill or grinder. If there are none, you can use a hammer and a chisel, but this will significantly slow down.

It is quite easy to remove the plastic window sill, as it is fixed mainly due to the mounting foam. To remove the plastic sill can be two methods. The first is simple, but with great destruction. The essence of the work is to carefully remove the slopes and repel the plaster. Then it remains to cut the mounting foam with a sharp knife. After that, the plastic window sill is easy to remove by a sharp movement upwards and towards yourself. The second option is more gentle, thanks to which you can save the plaster and slopes. First of all, file the mounting foam, due to which the window sill is fixed, with a hacksaw. Similarly, you need to remove the liquid plastic, remaining at the junction of the slopes of the sill. When you cut off this layer, gently pull the product towards you. If all else fails, saw through the mounting foam again under the window sill and repeat all over again.
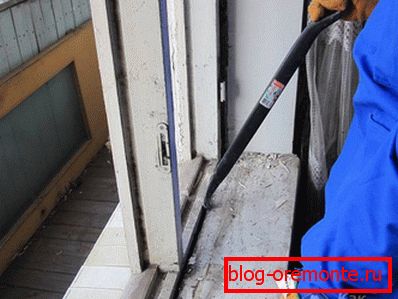
After the window sill is removed, the surface must be prepared for the installation of a new one. Remove all debris, dust, residual mortar and foam. Now the surface is ready for the installation of a new coating.
Installation of a window sill

You should not assume that to replace the window sill it is enough just to remove the old window sill and insert a new one in its place. There are some rules for the preparation of this niche and the product itself. These rules are mandatory, so their compliance is very important.

So, to install a new window sill, you need to follow this sequence:
- To fit the window sill in the window opening was as accurate as possible, you need to cut out the extra parts in the place where the window sill will be installed, considering its size. Also check the groove itself where the blade will be installed. Measure out all sizes to prepare a new canvas. On how well the measurements are performed, not only the overall appearance but also the strength of the structure, as well as the functionality of the sill, depend. If the old window sill remains whole, you can use it as a template-template to make a new canvas, if you are satisfied with the dimensions of the past window sill. You can cut a new blade with an electric jigsaw or a saw. It is important that when cutting do not form defects and cracks, so do not strongly rest on the window sill.
- When installing a window sill made of wood, all cut edges from the ends should be treated with an antiseptic to protect the material from mold and reduce moisture permeability.
- Prepare the doorway itself, on which the window sill will be installed. If the height of the purchased window sill is less than that of the old one, a cement screed must be made on a horizontal base. If the window sill is thicker, the niche needs to be deepened.
- If in the course of the work, gaps and cracks in the walls that are adjacent to the installation site have been formed, they must be repaired. To do this, use the usual putty or cement mortar.
 In the place where the window sill will abut the frame, silicone sealant should be applied over the entire width of the window opening. Thus, you can achieve tightness and eliminate the formation of voids that contribute to the penetration of cold into your home or apartment.
- In the opening you need to put the harvested boards. They will serve as a support for the new sill and take on the main load.
- Using a level, check the horizontal structure of the whole structure. Defects need to be corrected, making everything perfectly smooth.
- Now install the sill plate on the prepared boards.
 Use the level again to make sure the installation is correct.
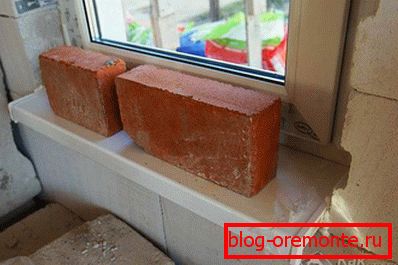
- Put some load on the windowsill. It could be books, a heavy box, bottles of water, or something that would be on hand.
- Take the mounting foam and blow it all the side and rear grooves. If a plastic construction is installed, some manufacturers add special profiles to the kit, thanks to which the installation of a new window sill will be even easier.
 The edge under the window sill, which stands, you need to seal up the cement mortar or foam to fix it.
- Now take a technical break, 24 hours long, so that the foam or solution will completely freeze.
- If the gaps were treated with cement mortar, the surface should be sanded with a grater or fine sandpaper.
- Now it remains only to protect the ends of the window sill with a cap and remove the protective coating from the canvas.
- To give the window a natural and aesthetic look, the slope should be plastered or painted.
It should also be noted that the window sill should not prevent the heat from the radiator from rising upwards and spreading around the apartment, therefore the projection is recommended to be 6 to 8 cm. Now your window sill is ready!
Let's sum up
You could be sure that you can replace the window sill yourself. This procedure is simple and does not require professional skills, you can do everything in 2 days, taking into account the interruption of drying. Replacing one window sill, you can easily do it with other windows. Especially because with self-installation, you can save money on hiring workers.

To increase the life of the new fabric, during installation you need:
- correctly select the width and length of the future sill;
- correctly measure and cut the canvas;
- use high-quality consumables;
- follow all installation rules;
- be careful and careful when working;
- after installation regularly care for the surface.
We hope that our advice will help you competently and quickly replace the old window sill. If you succeeded, write to us in the comments, it will inspire not only us, but also those who will read this article!
Video
Watch the following footage, here are a lot of useful tips for dismantling and installing a plastic window sill:
This video clearly shows the dismantling of the plastic window sill:
See also:
- How to install a wooden window sill.
- How to install a plastic window sill.