How to plaster slopes on the windows
In the case of replacement of windows in the apartment you will certainly have to face the problem of the subsequent finishing of the window slopes. Usually, when dismantling old window blocks, the layer of old plaster is completely removed, revealing all the chips and cracks formed during many years of operation. That is why when installing new windows in order to give them a “civilized” look, their slopes should be plastered. But before plastering the slopes on the windows you should carefully study all the subtleties of the procedures for the finishing of window openings, the development of which will also make it possible to save considerably on current expenses.
In addition to achieving purely decorative purposes, the plastering of slopes also makes it possible to improve the thermal insulation properties of the entire window block (experts call this a “dew point” transfer outside the room).

Immediately, we note that an effective solution to the problem of thermal insulation is possible only in the case of an integrated approach to the installation of the entire window structure, which includes the following elements:
- window sill;
- window block;
- ebb;
- proper slopes.
Preparatory work
 First of all, you will need to decide on the mortar used to finish the window slopes. The fact is that depending on the humidity characteristics of the room, as well as on the installation site of the slopes themselves (outside or inside the building), these or other types of solution can be used to prepare them. So, in rooms with high levels of humidity it is necessary to use a conventional mortar, prepared on a cement base or a special cement mixture (facade plaster). In the production of interior work, you should use solutions prepared on a cement, plaster or lime-plaster basis.
Before finishing, it is necessary to ensure that the window is exposed using a level and located exactly in the center of the window opening.
Further your actions should be performed in the following sequence:
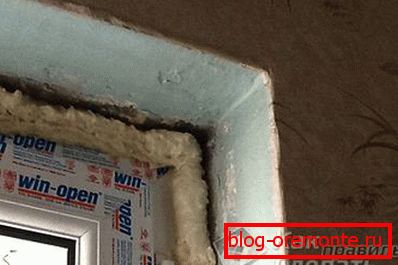
 First of all, you will need to remove from the window opening the remnants of knocked plaster and polyurethane foam and treat its surface with a deep-impregnated primer.
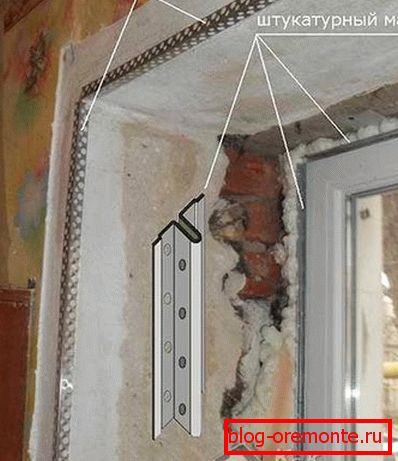
- After that you can proceed to the installation of special angular profiles of galvanized metal, intended for the reinforcement of plaster. The position of the profiles to be mounted on the gypsum mortar is set using the same level. The functional purpose of these elements is not limited to reinforcement, since they are also used as beacons and to protect the corners of the structure from mechanical damage.
- At the next stage of work on the window frame, a special bar with two grooves in the form of shelves should be fixed (glued). One of them in the process of finishing will keep the bar on the slope, the other will be the guide that sets the plane of plastering. To protect the window glass from dirt during the plastering of slopes, it should be sealed with a protective film.
- During this type of work, it is desirable to use a special template that can be made independently. For its manufacture, you can use a piece of old plastic window sill, which you first need to cut at an angle so that you can get a hard, sharp and even edge. Its width should slightly exceed the corresponding size of the slopes themselves.
Plastering slopes
Before you plaster slopes on the windows you should prepare a tool, which should include the following items:
- spatulas in two sizes;
- device for smoothing the solution (the so-called “smoothing”);
- комплект затирок;
- rule and set of sponges.
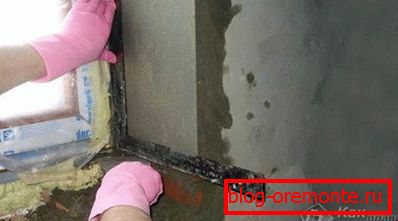
Finishing begins with a spatula prepared in the right consistency of the solution directly on the slope. Upon completion of this operation, it is possible to proceed to its alignment, carried out so that the template is located at the level of the cut of the previously established angular profile and the guide window. If necessary, you can always add the missing solution to the right place and re-level the surface.
After a short soak, remove the excess cement mortar, and then follow the rule to level the slope vertically.

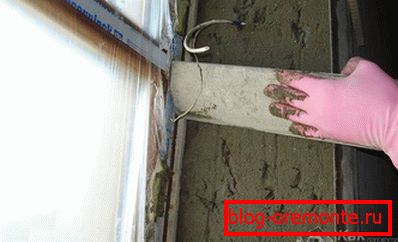
For editing small irregularities, you can use a special grout (a grater with a sponge glued on it). During the grouting, the liquid cement composition is leveled on the surface of the slope with smooth circular motions produced with a slight pressure on the tool. After a short soak, it will be necessary to once again smooth down the prepared surface with a wide trowel.
After the slope is completely dry, you can break off the protruding part of the window strip and remove the protective film from the glass.
Video
This is how plaster slopes can be made: