How to make armopoyas
Armopoyas called reinforced concrete structure, which is designed to strengthen the walls of the house. This is necessary to protect the walls from the stresses caused by external / internal factors. Exposure to wind is external, slope / hilly, floating ground and earth seismic activity. The list of internal factors include all household building fixtures used in the interior decoration of the house. If it is wrong to make an armopoyas, then because of these phenomena, the walls simply crack, and even worse, they will disperse. Because of this, it is very important to be aware of how to make armopoyas. The types, purpose and method of installing arm-belt will be discussed in this article.
Kinds

There are 4 types of armopoyas:
- grillage;
- ground floor;
- interfloor;
- under the mauerlat.
Tools and materials
Before starting work, you should prepare the tools / materials:
- Fittings.
- Cement.
- Sand.
- Crushed stone
- Wire for ligation of fittings.
- Boards.
- Screws.
- Brick.
- Shovel.
- Concrete mixer.
- Fake / Lomic.
- Welding machine.
In order for all the work you have done to be done with high quality, we suggest that you familiarize yourself with the technique of making the armo mesh / frame and formwork.
Reinforcement mesh / frame fabrication
In order for the armopoyas to be of high quality and, accordingly, the house is reliable, you need to know how to make an armature / frame correctly. The connection of the bars of the reinforcement between them is carried out by knitting wire, and not by the welding seam. This is due to the fact that during welding the place near the weld being made is overheated, which leads to a weakening of the reinforcement strength. But without welding seams in the manufacture of the grid is not enough. The middle and ends of the frame are welded, the rest of the connecting nodes are connected.
The rods are held together to fix the reinforcement in the desired position when pouring concrete. For these purposes, a thin wire is used, the strength of the mesh / frame does not depend on it.
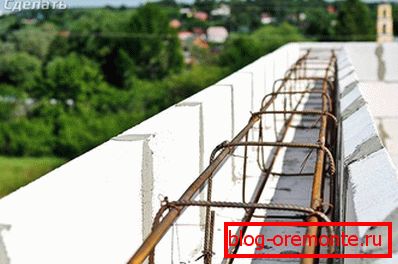
For the manufacture of armored belt only ribbed rods are used. Concrete clings to the edges, which contributes to an increase in the bearing capacity of the structure. Such a belt can work in tension.
To make the frame, take 2 cores 12 mm thick and 6 m long, while for transverse reinforcement you will need bars of 10 mm thickness. In the center and edges of the transverse reinforcement should be welded. The rest of the rods just fit. After making two grids, hang them so that a gap is formed. Cook them from the edges and in the center. Thus, you get a frame. For the manufacture of belts, frames, there is no need to weld. They are overlapped by 0.2–0.3 m.
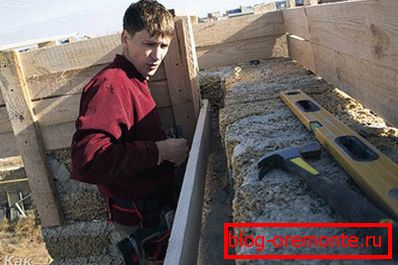
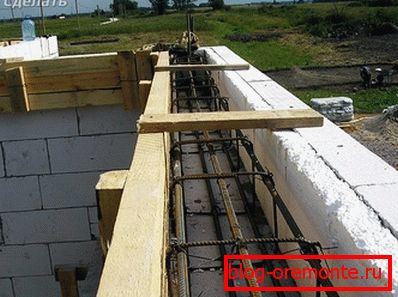
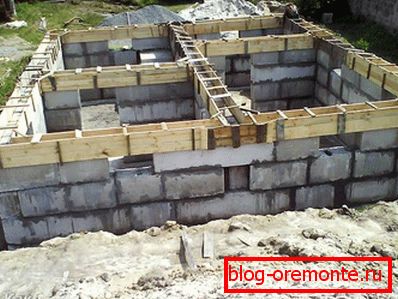
Formwork
Installation and fixing of formwork is carried out by several methods. To install wooden shields, it is necessary to pass an anchor through them, to mount stubs on them using electric welding. The purpose of these actions is to fix the formwork so that under the weight of concrete it is not squeezed out.
For fixing the formwork when pouring interfloor armopoyas often use a simpler method. At the bottom of the shield, fasten a screw with a diameter of 6 mm and a length of 10 cm. The distance between them is 0.7 m. So, attach the wooden shield to the wall, drill a hole through it, insert a fungus into it and drive a screw.
The hole in the shield should be a diameter of just over 6 mm. This is necessary in order to freely install the fungus.
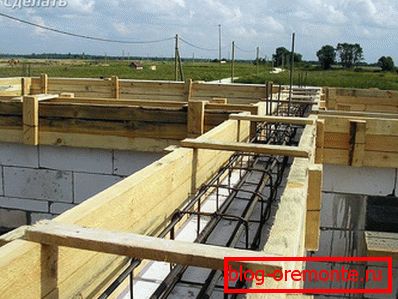
The upper part of the formwork is also fixed by quick installation. But in this case it is necessary to screw the screw, but not a screw. So, make a hole in the brick masonry. Then hammer the armature into it. If the brick is corpulent, then the situation is simpler - just drive the nail / reinforcement into the vertical seam. Self-tapping screw and fittings tie a wire. The distance between fasteners is 1–1.2 m. Such fastening is able to withstand the loads ahead.
After the armored belt has hardened, the formwork can be removed using a crowbar / nail puller. In the warm season, the concrete sets in a day. In this case, the dismantling of the formwork can be carried out the next day. In the cold season, this procedure is carried out after a few days.
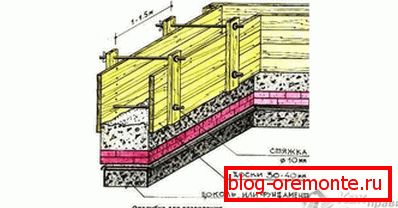
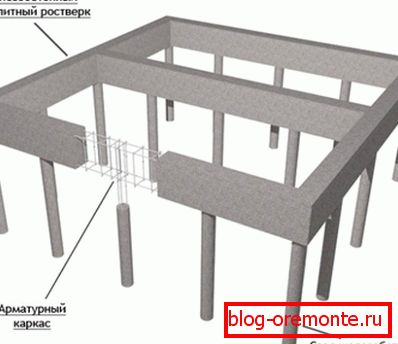
Grillage
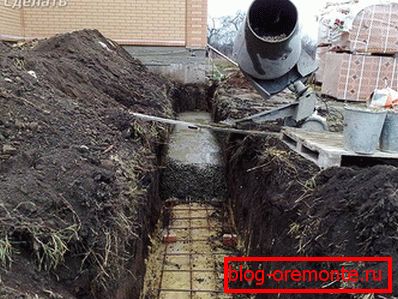
Initially, it is necessary to determine the depth of the foundation. This parameter depends on the type of soil, the depth of its freezing, as well as the depth of the groundwater. Then you should dig a trench around the perimeter of the future house. This can be done manually, which is long and tedious or with the help of an excavator, which is quick and efficient, but entails additional costs.
After special equipment should align the bottom and walls of the trench to solid soil. The surface should be as solid and smooth as possible.
Now you need to form a sand pillow, the height of which should be 50-100 mm. If necessary, backfilling sand more than 100 mm, it must be mixed with rubble. This event may be needed to level the bottom of the trench. Another way to level the bottom - pouring concrete.
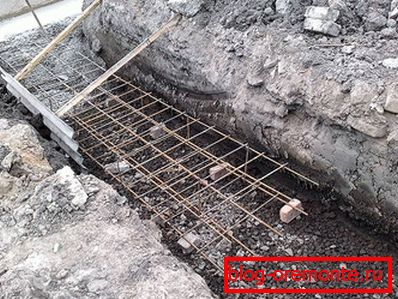
After backfilling sand pillows, it must be tamped. To cope with the task faster, sand water.
Then the reinforcement should be laid. In the process of construction in normal conditions it is necessary to use reinforcement from 4–5 cores, the diameter of each rod should be 10–12 mm. It is important that when pouring the grillage for the foundation, the reinforcement does not touch the base. It should be sunk in concrete. Thus, the metal will be protected from corrosion. To achieve this, the reinforcement mesh should be raised above the sand pillow, laying half the bricks under it.
If you build a house on heaving soil or where there is a high level of groundwater, the grillage should be made more durable. To do this, instead of reinforcing mesh should use reinforcing cage. He imagines 2 grids consisting of 4 strands with a diameter of 12 mm. They should be laid below and above the armored belt. Instead of a sand cushion, granulated slag is used as a base. Its advantage over sand is that over time granulated slag turns into concrete.
For the manufacture of mesh used knitting wire, not the welding seam.
For grillage, use concrete M200. To match the height of the fill set, install in the trench beacon - a metal peg equal to the height of the grillage in length. He will serve as your guide.
Pedestal Armopoyas
Перед возведением стен на фундамент следует залить цокольный армопояс. Его необходимо залить по периметру постройки вдоль внешних стен, но нельзя этого делать вдоль внутренних несущих стен. Pedestal Armopoyas служит в качестве дополнительного укрепления конструкции. Если вы качественно залили ростверк, то цокольный пояс можно сделать менее прочным. Высота армопояса – 20–40 см, используется бетон М200 и выше. Толщина двухжильных арматурных прутьев – 10–12 мм. Укладка арматуры осуществляется в один слой.
If you need to strengthen the base belt, then use reinforcement of greater thickness or install more wires. Another option is to lay the armature in 2 layers.
The thickness of the basement and exterior walls is the same. It ranges from 510 to 610 mm. In the implementation of the pouring basement armored belt, you can do without the formwork, replacing it with brickwork. For this, it is necessary to make laying on a half brick from both sides of the wall. You will be able to fill the resulting void with concrete, having previously placed reinforcement in it.
In the absence of a grillage, it is useless to make a basement arm-belt. Some craftsmen, deciding to save on the grillage, reinforce the base belt, while using reinforcement of larger diameter, which allegedly improves the carrying capacity of the house. In fact, such a decision is unwise.
Rostverk is the basis of the house, and the base belt is the addition or strengthening of the bearing abilities of the armored belt for the foundation. The joint operation of the grillage and the basement belt serves as a guarantee of a reliable foundation even on heaving soils and with a high level of ground water.
Interfloor
Between the wall and the floor slabs also need to make armopoyas. It is poured along the outer walls with a height of 0.2 to 0.4 m. Interstate armored belt allows you to save on door / window lintels. They can be made small and with a minimum of reinforcement. Thus, the load on the structure will be evenly distributed.
If armopoyas are installed on walls of poorly absorbing material, the load from the floor slabs will be distributed evenly along the entire length of the walls, which will have a beneficial effect on their strength characteristics.
The reinforcement of the interfloor belt is performed by a grid of 10–12 mm thick ribbed reinforcing bars with 2 cores. If the wall thickness varies between 510–610 mm, then double-sided brickwork can be used as a formwork, as well as for the base belt. But at the same time for the internal masonry should be applied zabutovochny brick, and for the outer face. In this case, the armored belt will have a width equal to 260 mm. With a smaller wall thickness, the backing brick should be laid on the edge or a wooden formwork should be used instead, and the front brick should be laid on the outside as in the previous case.
Under mauerlat
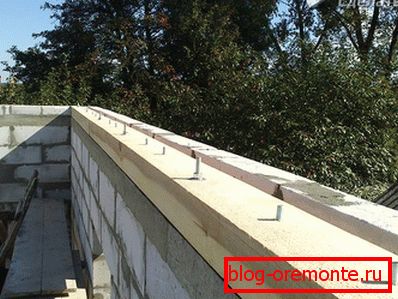
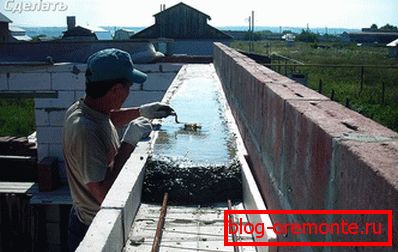
It is possible to fill in an armopoyas under a mauerlat only after curing of glue / solution for a laying of walls. The technology on which the armored belt for aerated concrete is put is different with formwork, but we'll talk about this a little later. The manufacture of wooden formwork is carried out according to the scheme already familiar to you. Concrete is prepared according to the following formula: 2.8 parts of sand for 1 part of cement and 4.8 parts of crushed stone. Thus, you get concrete M400.
After pouring, eliminate residual air bubbles in the mass. To perform these tasks, use a building vibrator or poke the fluid mass with a rod.
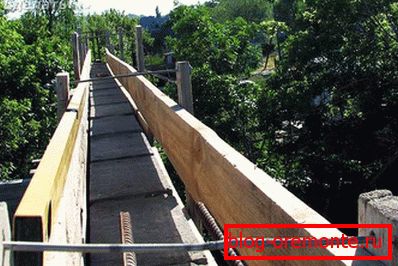
Mount mount
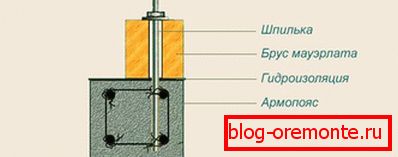
In the case of a monolithic device of an armopoyas, the rules for fastening the power plate should be observed. During the installation of the frame from the reinforcement it is necessary to withdraw from it the vertical segments to the height determined in the project. The bars of the reinforcement should rise above the armored belt by a thickness of + 4 cm. In the bar it is necessary to make through holes equal to the diameter of the reinforcement, and thread the threads at its ends. So, you will get a reliable mount that will give you the opportunity to carry out high-quality installation of the roof of any configuration.
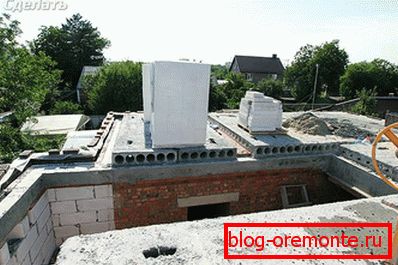
Armopoyas for aerated concrete

Aerated concrete is an alternative to bricks, which has high thermal insulation qualities along with low cost. Aerated concrete blocks inferior brick strength. If it is not necessary to pour concrete on the brick walls when installing the armored belt, as the reinforcement is laid in the process of laying, then things are different with aerated concrete. How to make an armored belt on wooden formwork has already been mentioned above, so in this section we will look at how to make a reinforced belt from U-shaped concrete blocks D500. Although it should be noted immediately that this technology is more expensive.
In this case, everything is extremely simple. Install the blocks on the wall in the usual manner. Then reinforce the central part of them, and then fill with concrete. Thus, the walls of your home will be more durable and reliable.
If you still have questions on the topic, then ask them to the specialist working on the site. If necessary, you can consult about pouring armored belt with our expert. Have a personal experience? Share it with us and our readers, write comments on the article.
Video
You can find out how to make an armopoyas for a house of aerated concrete from the video: