How to make an infrared floor with your own hands
Thanks to the development of production technologies, new materials constantly appear on the construction market. The choice is expanding all the time, and the same task can sometimes be solved in several ways. So, for example, when there is a need for warming the room, heated floor technologies will come to the rescue. Among them the increasing popularity is gaining infrared floor. How to make such a floor, will be discussed further.
general description
To begin with, we will define what it is and what its main operational characteristics are. An infra-red floor is a type of electric floor, which is heated by the action of an electric current on carbon emitting elements. In the modern building materials market one can find several varieties of such floors.
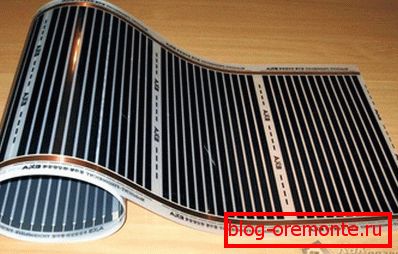
- Film Perhaps the most common option is a film, inside which the active elements are located. Control and control of the intensity of heating is carried out using a special temperature controller, which is part of the system.
- Stem. Another type of warm floors, which is supplied to the market in the form of core elements, inside of which there is a heating part.

Fundamental differences in the operation of infrared floors do not have, but to some extent will vary the technology of their installation and some performance characteristics. By the way, we note the most important characteristic qualities:
- First of all, it should be noted that the system is extremely easy to install. With basic skills and a minimum set of tools, almost anyone can do the job.
- Efficiency system. Thanks to the use of advanced technologies, the efficiency of the entire system is very high and allows you to get maximum results with minimum energy consumption.
- Another quality that can be noted is the versatility of the application. In general, infrared heating elements are designed to be installed under the floor covering, but can also be used as additional measures for heating the room, in the form of mounting them on walls or even the ceiling.
- Reliability also characterizes the system from the positive side. With proper installation, such a floor will perform its functions for many years.
- Among other things, the system is devoid of open heating elements and even in the event of a failure it remains as safe as possible for humans.
But, as it was said above, in order for the listed qualities to manifest themselves fully, the installation of the system must be carried out with the highest quality possible.
Definitely say which infrared floor is better, perhaps not. Both the pivot and the roll version have their pros and cons.
Laying tape type in a room with a lot of heavy furniture, such as cabinets, beds and other things, is undesirable, since a large mechanical load can damage the heaters.
Mounting technology

Speaking about the technology of mounting the infrared floor, it is worth noting that regardless of the production version, the main stages of work will differ minimally, therefore, the question of how to lay out the tape production version will be discussed below. Immediately it should be said that the work is better divided into several stages and carry out them consistently.
Training
As in all other cases, work should begin with preparation. Here, special attention should be paid to the quality of the foundation. The fact is that in accordance with the rules for the installation of film (and the rod also) floor, the maximum height difference of the base should be no more than 3–5 mm per m2. If necessary, it is necessary to level the surface with a leveling compound or a concrete screed in especially critical cases. Among other things, the base must be clean.
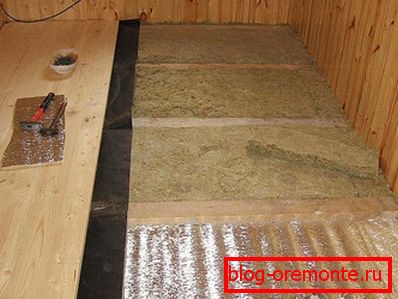
Thermal insulation

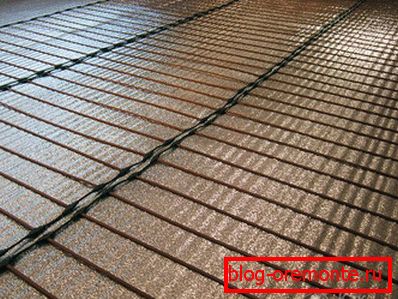
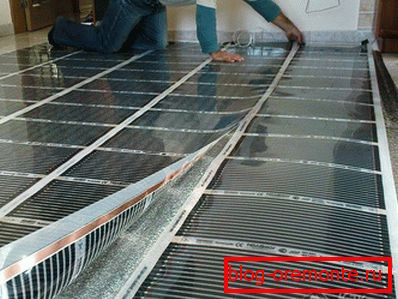
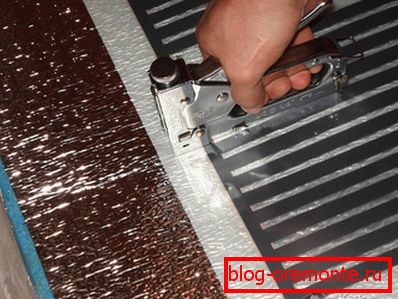
After the base is ready, you need to lay a layer of insulation. As this, it is best to use foil rolled material. Bands of the required length are laid on the surface and fixed with a stapler.
You need to constantly monitor the lack of gaps between the sheets of insulation, and the joints must be taped.
Installation of film floor
The film floor can be laid on the thermal insulation layer. For this, strips of required length are cut off from the material roll and are laid similarly to heat insulation material. The task is not difficult, but it is impossible to prevent damage to the contacts or the active element, so all work should be carried out in strict accordance with the attached instructions.

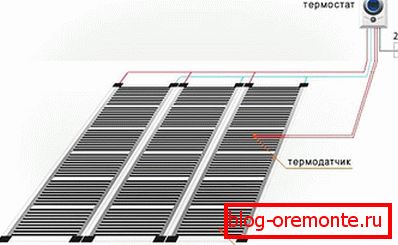
After laying the heating film itself on the surface, you need to make the initial connection of the system, that is, connect the wires to the terminals on the film. For this design provides special clips. It should be added that in order to follow the results of the work the wires do not protrude above the common surface of the floor, before they are laid in a heater, special grooves are cut, along which wires are laid.
All connection points must be insulated.
Then you can conduct a trial connection of the system to the network.
It is necessary to make connection of a heat-insulated floor through a special temperature regulator.
As a rule, the work does not cause difficulties. It is necessary in accordance with the instructions to attach the wires to the contact points on the regulator. If done correctly, the heating will be smooth and uniform.
Laying the topcoat
The final stage of the work is the installation of a finishing floor covering. It should be careful not to damage the connection points or active heating elements. This work will be completed, and the film warm floor can be considered ready.
In conclusion, you can add that installing a warm infrared floor system will make your stay in the house more comfortable and safe, which is especially important if there are young children in the house who spend a lot of time on the floor. Yes, and adult comfort will also appeal.
Video
This video shows how to install a film infrared floor:
And this is a detailed instruction for laying a rod infrared floor: