How to make a horse on the roof 2
From time immemorial, dacha and suburban construction has attracted not only the opportunity to have a good rest away from the bustle of the city, but also an independent arrangement of its housing. Of course, in some moments during the construction of the cottage and the garden plot there are certain difficulties that need to be solved with the help of craftsmen; Having finished with the foundation and walls, each owner is faced with the questions of how to properly equip the roofing system.
In this article we will explain how to make a horse on the roof with your own hands, consider the options of the roof of slate, corrugated metal, metal.
Principal differences and ways of implementation

Starting to study the procedure for the erection of these elements, it is necessary to understand the difference between such concepts as "ridge of the roof" and "ridge of the roof." The first is formed at the intersection of two roof slopes, and the second is a separate element, which is selected depending on the type of roofing material.
The main purpose of the ridge of the roof - providing ventilation and removal of moisture generated on the inner sides of the slopes. The functioning of this element is achieved by laying roofing materials, so that there is a small gap between them at the top closing point.
To date, the device skate can be done through ready-made kits, and with your own hands, having prepared the necessary materials. In the first case, the owner saves himself from taking measurements and preparing the metal for installation. If you have everything chosen, it remains only to choose a shape that is represented by figured, relief, conical, semicircular, and other types. Self-production of the skate involves cutting the metal on your own and making a smooth fold, which in most cases is difficult to accomplish at home.
There are many ready-made solutions for roofs made of metal, and for other roofing materials. As a rule, manufacturers of one or another product suggest using their material prepared specifically for their coverage. It should be said that the acquisition of ready-made elements of the skate is the optimal solution, providing an accurate fit of every detail and that will help create an excellent aesthetic appearance. In this case, the owner is required only to raise the cut blanks on the roof and, in accordance with the instructions, install them.
The construction of the roof ridge should be started only after the completion of all roofing work. Its fixation is carried out on the prepared coating, which requires, in the variant of the insulated roof, to perform insulation before the process of placing the ridge.
Design features
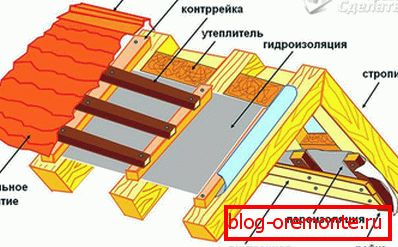
If you are going to equip the ridge, first of all you should understand what this element represents and how to install it correctly. Roofing ridge includes the following parts:
- timber - ensures the retention of the external coating that protects against the harmful effects of environmental factors;
- wooden or metal racks.
As mentioned above, the ridge provides roof ventilation. However, we should not forget the fact that small gaps between this element and roof slopes can cause birds, rodents and insects to appear in the attic of the house, therefore protection against them should be provided.

To solve this problem, it is more rational to use special grids with small cells. As a basis for it, you should choose a sufficiently durable material, for example, aluminum, because It has sufficient strength and flexibility.
Having finished with the arrangement of the skate, we should not forget about the plugs that are installed in the end part of the structure. Their fastening is carried out by means of self-tapping openings between the slopes.
Variety of ridge elements

The modern range of products in stores in this area is large. In some versions, the ridge is placed on racks of timber, located on the ceiling or screeds. In another case, it is formed by covering the boards at a certain inclination, which are placed close to each other. To date, there are the following types of skate:
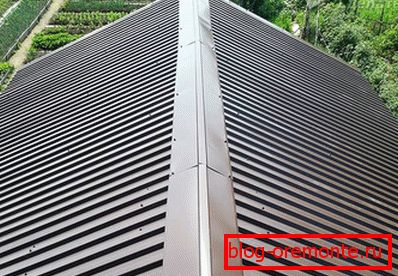
- Ridge (profile horse). Its main purpose is the combination of two roof slopes and protection from moisture and dirt. The abundance of colors allows you to pick up the ridge in tune to the roof and provide a unified harmony of the overall color. During the installation work, one should not forget about the installation of a special seal.
- Mortise and crossed. These types of skates are often used in the construction of a hip truss system. Fixation of elements is carried out by inserting into the roof slopes or installing intersections.
- Semicircular. Not much different from the first type, but has a more aesthetic appearance. In addition, special end caps are installed at the ends to prevent the entry of debris and precipitation.
Tips
In the course of the work it is necessary to take into account that the provision of ventilation of the space under the roof covering is achieved due to the gap left. Having finished with facing of slopes, it is necessary to start laying of the ventilating material providing reliable protection of a basic bar of the future fad against penetration of an atmospheric precipitation.
At the same time, the intermediate layer also solves another important task - it eliminates the penetration of insects and birds into the attic room. As a basis for this element, it is more expedient to use special seals, mineral glass wool, etc.
When installing the ridge, the use of assembly foam and sealants is prohibited, as they prevent air circulation under the roof.
Preparation and collection of consumables

After weighing all the features of the material and determine its choice, you should purchase the necessary amount of the ridge, as well as its components and fasteners. As a rule, the ridge element includes a ventilation partition and a belt, fasteners for lightning rod and gasket.
To eliminate differences in size when docking, as well as to ensure quality connections, it is necessary to purchase all the materials for the roofing from one supplier.
To successfully complete the task and reduce the time for preparation, it will be necessary to assemble the required tools and accessories in advance, namely:
- sliding construction ladder;
- construction level and roulette;
- a screwdriver or drill with a set of drills and bits for working with roofing screws;
- nylon cord;
- scissors for metal or Bulgarian.
The use of an electric tool greatly simplifies any installation, however, in the absence of appropriate equipment, it is easy to find an alternative to it from the tool used in everyday life.
Height calculation

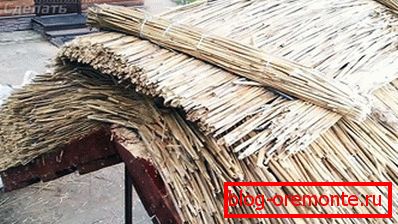
Getting to the arrangement of the roof, a necessary measure is the calculation of the height of the ridge. This will allow you to make all subsequent calculations of consumables that will be required during the construction of rafters and roofing. This indicator is determined using geometric parameters and is calculated based on the angle of inclination of the cladding roofing material and its type. So, in the production version of reed or other type of soft roof, such materials are stacked with a slope in the range from 12 to 85 °. However, slate and other materials are fixed with a slope of 15–60 °.
At the same time, the general aesthetics of the building should also be taken into account - the height of the roof should be optimally coordinated with the proportions of the house. Too high or prohibitively flat roof can spoil the whole look. For our strip, it is more rational to use the slope of the roofing material at 30–45 °, otherwise the lining will be subject to increased wind or snow loads.
To perform the necessary calculations, you will need to refer to the geometry and calculate the values using a simple formula. So, it is necessary to take a right triangle and calculate the index of the length of the leg, which is equal to the length of his second fellow multiplied by the tangent of the angle at the base. Having a house with a width of 6 m and a tilt angle of 40 °, we find tangent values in school tables - in this case it will be 0.83. As a result, we obtain the formula: 6/2? 0.83 = 2.49 m - the optimal height of the ridge element.
Mounting technology
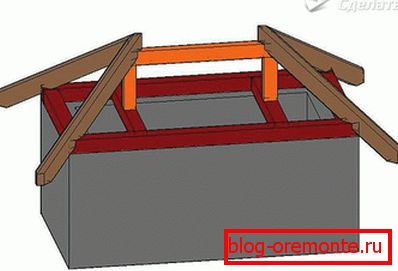
To start the construction of the ridge after completing the procedure of fixing the roof on the slopes. Decorative components to the place of placement are delivered by means of a winch mechanism or rope. To fix the ridge element, it is necessary to install from the outside between the slopes a timber with a cross section of at least 80 × 100 mm. Further, to each of its sides, the crate bars are fastened and the ridge bar is installed.
To simplify the subsequent process of laying the parts, it will not be superfluous to attach special brackets to the central support bar and place the bridges on them. In addition, for the most snug fit of the roofing material, it is best to use a ridge beam with a rounded edge.
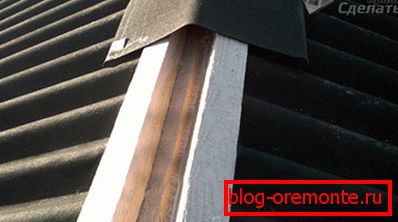
Protection from rotting, development of mold and fungal formations is an integral process during installation, which provides for upholstery of the ridge bar along its entire length with roofing material or a special sealant. This practice can significantly extend the life of not only the ridge, but also the entire roofing system.
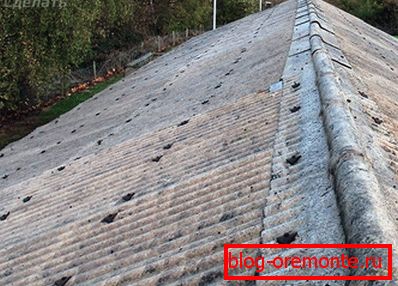
In the option of making a roof made of slate, it is more rational to pick up the ridge from a similar material - asbestos cement, or use galvanization.
Fastening is carried out directly to the ridge beam through slate nails or screws, so that the imposition of parts went from the gable of the house.
Installation
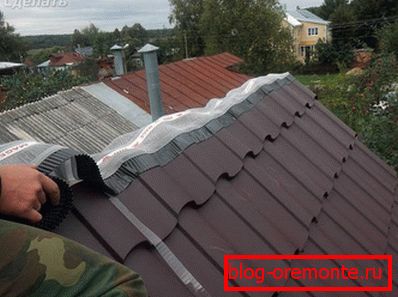
For example, take the placement of the ridge element on the roof of metal. To perform quality work to ensure reliable operation is performed in the following sequence:
- make sure that the ridge axis is even - the point where the edges of the skates are closing (the allowable discrepancies are up to 2–3 cm);
- installing additional roofing parts, it is worth remembering about the need for laying in the ridge grooves of a small layer of insulation material;
- to lay the first and last ridge element on the prepared beam flush with the outer edges of the roofing (it is more rational to carry out all roofing work with a partner, which will significantly speed up the entire installation process);
- tighten the nylon cord between them;
- to fix the compound ridge elements using self-tapping screws (the twisting step should be moderate about 40–50 cm).
Ridge elements should be chosen with a shelf width of 15 cm, since parts with smaller edges will not be able to reliably protect your attic room in the winter season from the ingress of snow.
In conclusion, I would like to note that the process of installing the skate on the equipped roofing is not as complicated as it seems at first glance. Taking into account the fact that all work is being carried out at a substantial height, then, having no installation experience in such conditions, it is best to seek the help of specialists.
We recommend to read:
- filing a roof overhang with your own hands;
- how to install solar panels.
Video
In the provided video material, you can learn about the intricacies of mounting a roof ridge:
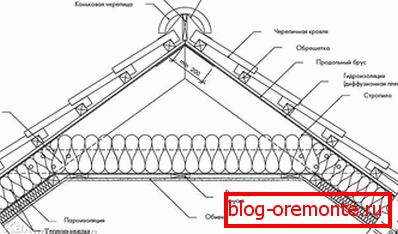
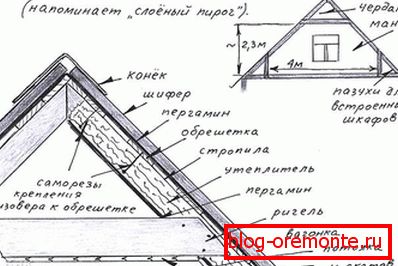
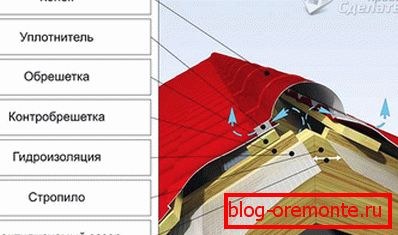
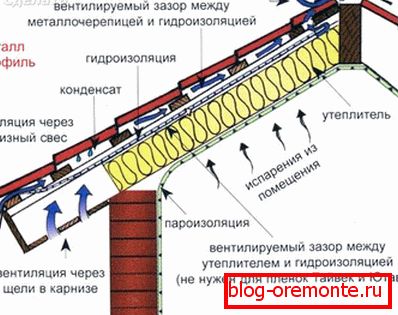
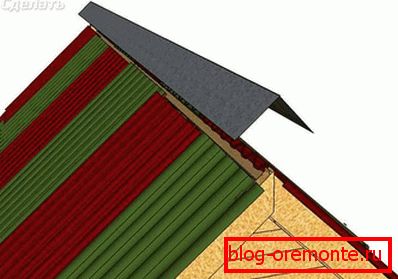
Scheme
The diagrams show the details of the installation of the roof ridge: