How to make a hatch in the attic
If you have a cottage or a private house, then you most likely have already thought about the possibility of using an attic. Most often in the households of the old model access to the attic is made from the street. Surely you will agree that in winter it is inconvenient to call on him in this case. In view of this, our article will discuss how to make a hatch to the attic.
Highlights

The arrangement of the hatch will cost relatively inexpensive. If the attic is used infrequently, then the hatch with a ladder will be quite enough to ensure free access to the attic.
If there is no heating in the attic, then the hatch must be insulated.
The end of the business is better than its beginning, so before embarking on the work process, it would be wise to think through all the possible nuances and difficulties on the way to achieving the goal, in our case of making the hatch. So, it is important to consider the slope of the roof, as well as the location of concrete slabs or wooden beams in the ceiling. Ultimately, the hatch should be as functional as possible. The staircase should not block the space of the room, thereby interfering with the free movement.
Before you make the hatch, it is important to make drawings. They take into account the following measurements:
- The thickness of the overlap.
- The size of the opening.
- Dimensions of the cover.
Someone decides to draw a diagram / drawing of the hatch by hand, and someone is drawing a drawing in DWG format. Here, as the soul desires, it is only important that the parameters and dimensions of the hatch are taken into account in the process of drawing a diagram or drawing up a drawing.
The standard size of the hole under the hatch is 60? 120 cm.
Varieties
Depending on the design features of the hatch and the choice of the place of its installation, it can be:
- vertical;
- horizontal;
- angular.
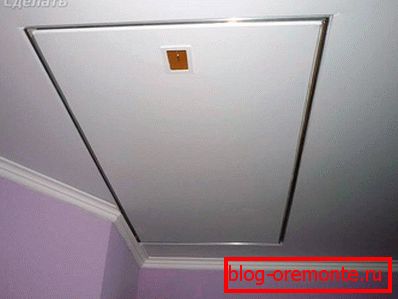
Horizontal hatch mounted on the surface of the ceiling. Its easiest to do, and in terms of functionality it is considered the most convenient. Angle view is usually installed in a sloping roof on the attic room. The vertical hatch is made as a manhole.

The hatch in the ceiling can be made of metal, wood, plastic or other alternative material. As a rule, wood is used for self-manufacturing of the hatch.
The process of making a horizontal hatch

Before starting work, materials and tools should be prepared. The action algorithm looks like this:
- Making the opening.
- Frame assembly.
- Cover making.
- Warming.
- Finishing work.
Now we will consider each stage in more detail, which will allow you to make an attic door with your own hands.
Opening

In the process of making the opening, it is important to take into account the type of overlap that can be made of wood or reinforced concrete. Consider the features of the work in the manufacture of the opening for each type of overlap.
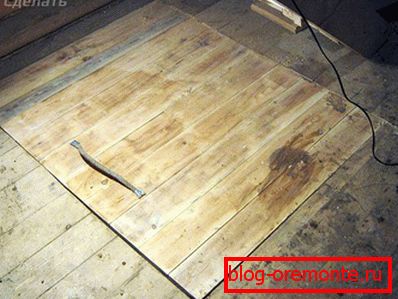
Hardwood floor

If the installation site of the hatch is chosen and all the criteria for its location are taken into account, then it’s time to start cutting out the opening. To start, make a markup.
The dimensions of the opening should be 5–6 cm or more larger than the finished hatch, taking into account the thickness of the boards from which the frame will be made.
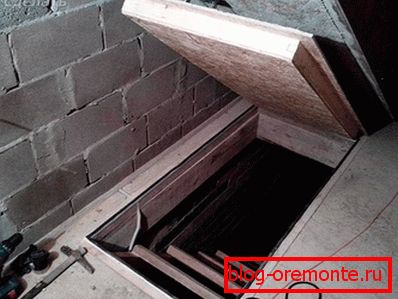
The sawn-off part of the ceiling covering can be used as a finish for the hatch cover. The resulting opening should be reinforced beams.
Concrete plates

It should immediately be said that it is much more difficult to make an opening in a concrete ceiling than in a wooden one. If you make an opening not at the junction of reinforced concrete slabs, the overlap will lose its strength. In addition, if you make an opening at the junction of the plates, it will contribute to your own safety. As is known, concrete is a durable material in which it is not so easy to make an opening. However, as practice shows, it is possible to cope with this task in 1–1.5 hours, provided that you have a Bulgarian with discs for concrete (diamond-coated) and metal. The disc diameter must be at least 220 mm. You will also need a sledgehammer, scrap.
To make even corners, you will need a drill with a drill, the length of which must exceed the thickness of the slab. So, you should install a punch vertically and drill through holes in the corners of the future opening.
The perimeter of the hole must be marked, for example, with chalk or construction pencil. Then cut the grinder disc on the concrete line around the perimeter. This should be done at the top and bottom of the slab, not reaching the reinforcement. Otherwise, the diamond coating will simply burn. Then, using a perforator, find in the slots of the void, for this, drill through the overlap. The weakest points need to be smashed with a sledgehammer. Places that hold on the fixture should be broken with a crowbar.
After you need to cut off the valve. You can do this with the help of the grinder, cutting the disc into the plate. This will be needed so that in the next stage of the hatch, it was possible to insert the frame into the opening. All irregularities on the faces can be eliminated with a diamond disc.
The hole under the hatch in the concrete ceiling should be strengthened with iron corners.
Frame assembly
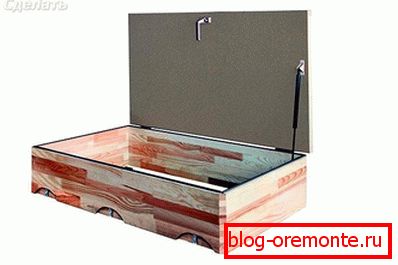
For the manufacture of the frame will need boards having a thickness of 2-3 cm. Thus, the additional strength of the base is provided. The frame must match the size of the opening. It can be rectangular or square. It is important to strictly observe the straightness of the corners. After assembly, the frame must be installed in the opening.
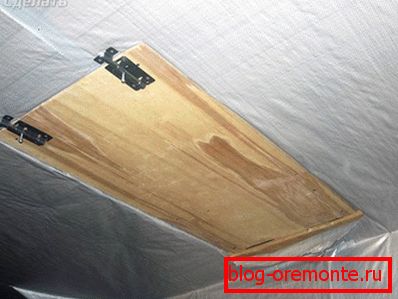
Cap

The simplest cover option is to make a frame and attach the remains of the ceiling covering to it, if it has retained its integrity. If the ceiling covering is crushed, for example, when making an opening in reinforced concrete, the cover can be made of wood. In any case, it must be reinforced cross. The cover is attached to the frame with hinges. It is important to consider where it will open - inside the room or in the direction of the attic. To open and close the lid was smooth, you should equip it with closers.
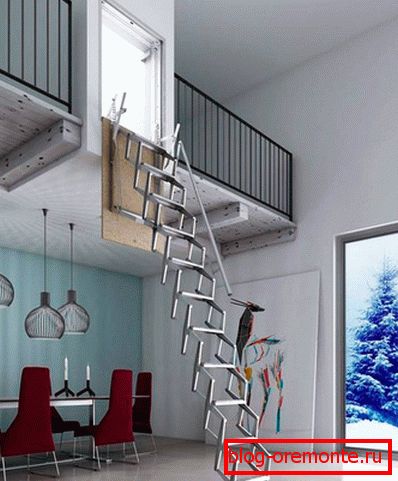
You can purchase a folding attic ladder mounted on the hatch cover. Very convenient if the attic is used regularly.
In this case, it is not necessary to assemble the frame and the cover, since all this is already pre-assembled by the manufacturer. Folding garret ladder with a lid is equipped with mechanisms for smooth opening and closing. After making the opening, you will need to install the ladder according to the instructions.
A lid with a built-in ladder will open downwards, so it is important to install it flush with the finishing of the ceiling.
Warming
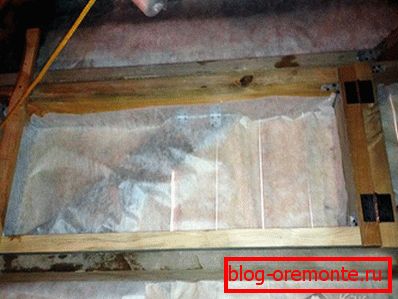
With self-made cover you will have to warm it. Thermal insulation should be invisible for viewing from the room, so it should be installed on the inside of the cover.
The warmed hatch will allow to save heat indoors. This is especially true if the attic is unheated.

Extruded polystyrene foam plates of the desired thickness are best suited as a thermal insulation material. Insulation can be closed with plastic or chipboard. If the attic is warm, the insulation plays a smaller role than sound insulation. At the final stage you need to finish the cover.
Of course, this article does not describe all the nuances of making a hatch in the attic. But, if you decide to do this work yourself, then surely you have the skills to perform such tasks. Otherwise, it is better to purchase a finished cover with a ladder, to which is attached detailed installation instructions. Also to help you attached video on the topic. All your questions, you can always ask the expert of our site.
Video
In the provided videos describes the process of manufacturing the hatch in the attic: