How to make a ground floor at home
The basement is a fully or partially recessed floor of the building below ground level. As a rule, household premises or a garage for a car are equipped in such a room. However, individual projects of houses provide for a bath, sauna, gym, swimming pool, etc. in the basement. In some cases, the construction of the basement is an excellent solution, especially if the house is located on a slope. Due to this, it is possible to effectively increase the living space of the entire building. Therefore, if you have not started building a house, it will be useful for you to familiarize yourself with the provided article, from which you will learn how to make and build a basement, and for what purposes it can be used.
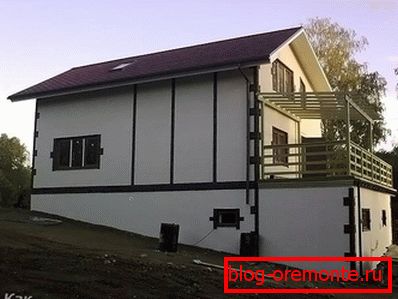
Ground floor - usable area

The basement at the same time can serve as the foundation of the entire building and the living space. The main feature in its arrangement is to fulfill the requirements for size, strength and internal space. Thus, the regulated ceiling height should not be less than 2.5 m. However, in some cases, the depth is limited by the presence of high groundwater. Therefore, the basement can be above ground level. In cases where groundwater is deep, this room is completely hidden in the ground.
You should not assume that the basement is a basement. In fact, it can be fully considered a full-fledged floor, but only if it is properly arranged.

For example, if the groundwater is located not less than 1 m from the ground, then you should not dig a foundation pit under the building. At the same time, the above-ground part of the basement should be filled with soil. In this case, you can artificially deepen the ground floor. However, such a decision would entail large labor costs. In addition, it is also necessary to organize high-quality drainage around the building.
So, the basement can be used for the location of such premises:
- pantry;
- garage;
- wine Vault;
- game room;
- living room;
- bedroom;
- utility room;
- kitchen;
- living room;
- gym;
- home theater and more.
As you can see, there are almost no restrictions on how to use this living space. Another of the positive aspects of this room is that the insulating qualities of the whole house increase.
Types of socles
The basement differs in its design and can be of 3 types:
- bulging out;
- recessed;
- flush with the walls.
If the walls are too thin and the rooms of the basement are below the ground level, then the first option is used, since it is possible to make it warmer. Recessed base is one of the most common. In appearance, it looks quite beautiful. Drainage of water that drains from the facade prevents the presence of high humidity. As for the recessed option, many construction experts do not recommend building it. In this case, the effect of the presence of the basement is completely lost, and on the walls you will need to make a strong waterproofing.

There are some features on the choice of wall thickness. Mainly it will depend on several factors, namely:
- thickness and material of the upper walls;
- soil characteristics;
- climatic conditions in your area.
So, having decided on how the construction will be carried out and what type of base you want, you can proceed to the preparatory and construction processes.
Calculations

The stage of work related to markup implies the following actions:
- Designing the basement, as well as determining the purpose of a room.
- Calculations on the bearing capacity of the foundation and walls of the underground floor. It is recommended to lay the foundation at 30% greater strength. Thus, it will be possible to have greater confidence in the strength of the whole structure.
- Clearing and marking of the construction site. This stage of work is quite responsible, so it is often better to contact qualified specialists.
- Carrying out the contour of partitions and load-bearing walls.
How carefully to approach each preparatory stage will directly affect the strength of the structure.
Foundation types

Not in all cases it is possible to make a foundation that you really want. The reason lies in the particular soil of a particular region. In some climatic zones, the arrangement of some types of foundation is generally impossible. Therefore, we consider several options for the foundation, which can be erected for the basement.
- Pile foundation. This type of construction is relevant on heaving soil with high groundwater storage. As for the basement, in this case, the operation of the ground floor does not constitute any problems and fear of any impact on the foundation. The only disadvantage of this method is the particular specificity of the house structure.
- Slab foundation. This type of foundation is suitable for swampy soil with weak soil, as well as with water-saturated sand. With this design, the ground floor will look like a box, on top of which the main part of the house will be built. In conditions of weak soil, slab foundation will prevent subsidence, since the weight of the building will be evenly distributed over the entire surface of the slab.
- Ribbon Foundation. If the soil on your site is not a problem, then this type of foundation is optimal.
Basement base width
The width of the basement of the zero floor depends entirely on the nature of the walls of the main building. Let's take as an example the frame house. In this case, the width of the foundation can be:
- When pile foundation - 300-500 mm. Accordingly, the thickness of the walls can be equal to the foundation. In this case, under the facade decoration, ventilation gap and exterior trim to build the foundation is not necessary.
- In the case of a monolithic slab, the width of the foundation should correspond to the width of the walls of the basement part of the building.
- With a shallow strip foundation, the width is equal to the walls of the ground floor. But this is the case when there is no concrete screed on the ground floor.
Be sure to think over the places of the holes for the arrangement of ventilation ducts. They must be indicated on the overall design of the foundation. According to the standards and regulated norms of SNiP, they should be from 12 to 24.
Waterproofing
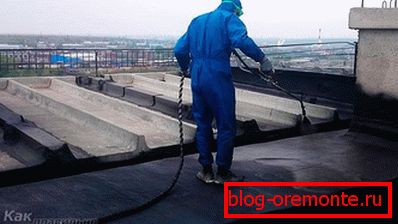
Waterproofing for the zero floor should be done in 2 layers. The choice of waterproofing material is influenced by several factors:
- wall material;
- climatic conditions;
- soil type, etc.
Waterproofing should cover the entire vertical and horizontal surface of the building. It is also necessary to cover all the points of contact with the ground.
You can use roofing felt or roofing felt. Such waterproofing will cost you relatively inexpensively. As an option - bitumen mastic. There are no special rules for applying waterproofing. The main thing to carefully protect and cover all areas of the foundation from moisture penetration.
Step-by-step instruction
Below is a detailed instruction of all actions in the construction of the basement with their own hands. It is necessary to highlight the processes that must be performed:
- Foundation laying.
- Fill.
- Waterproofing and insulation.
- Wall covering.
- Floor.
- Overlap.
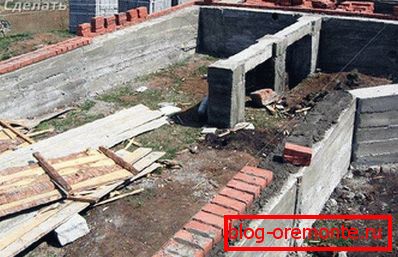
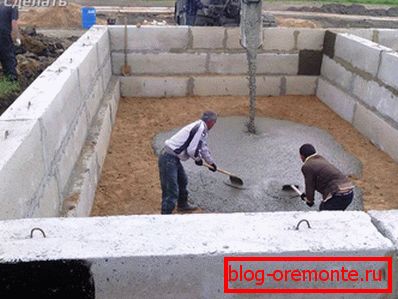
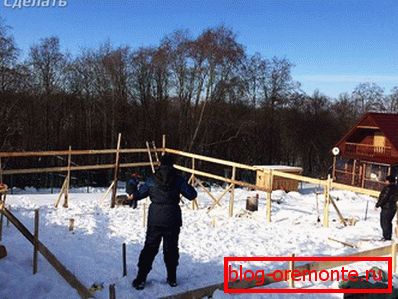
Foundation laying
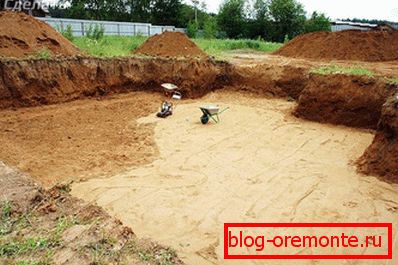
- To begin with, the plot is marked according to the building design
- Dig a pit around the perimeter of the building. The depth is also determined by the project, but it should not be 500-600 mm deeper than the underground part of the foundation.
- From crushed stone and gravel, fraction of 50 mm is produced, as well as a layer of sand. Each of these layers must be at least 100 mm.
- Each layer is rammed. Sand, in turn, is watered. This will provide better compaction.
- After the tamping, the base is made of concrete M100 5 cm thick. This layer is necessary for leveling the base for laying the floor slab of the zero floor. It is also necessary for additional waterproofing.
- When the concrete is completely dry, roll waterproofing material is laid in 2 layers. It connects with bitumen mastic.
- After making the base, you can proceed to the construction of external formwork.
- But first, the floor plate is poured. It will also serve as the basis for the walls of the foundation.
- The formwork can be built from non-removable boards or boards. Formwork necessarily reinforced.
- For reinforcement, buy corrugated reinforcement O10 cm. It is connected to each other with wire.
- In places where walls will be built, reinforcement is additionally mounted in a vertical position.
Fill
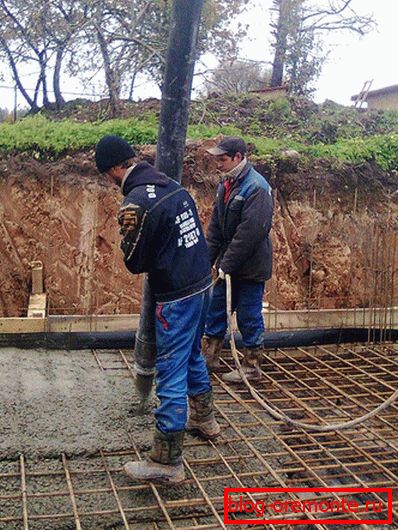
- For pouring it is recommended to use concrete М250 or М300.
- The plate is poured with a thickness of 200 mm, and more.
- Flooded solution must be pierced by vibrating rails and a deep vibrator for air to escape
- The surface must be flat. Flooded concrete must be left for 4 weeks.
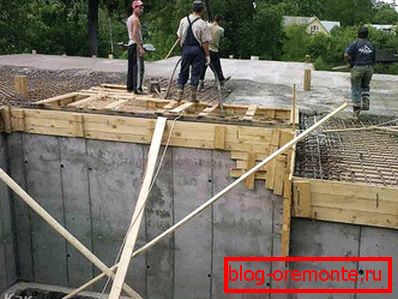
- To speed up the building process, in parallel, you can begin to build a wall formwork.
- Some experts recommend the use of non-removable polypropylene shields, which will simultaneously serve as insulation.
- Reinforcement in the longitudinal direction of the wall is also performed.
- The bars of the reinforcement are tied with the previously installed vertical bars.
- According to the project, leave openings for the doors. And for laying communications, lay the sleeve of a metal pipe.
- You can fill the walls in layers or completely. If you decide to pour in layers, then each subsequent must be filled, without waiting for the full drying of the previous one.
In general, the whole structure gains its strength after 28 days.
Waterproofing and insulation
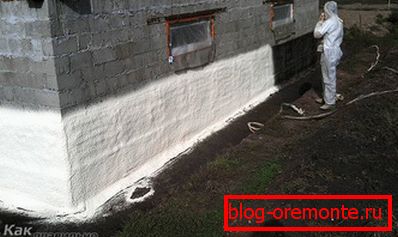
Now it's time to waterproof the basement. You can use a coating or coating material. Inside it is best to use penetrating insulation. It will not violate the steam exchange, as well as increase the strength of the structure.
As for the external insulation, for this you can use polystyrene plates. Their fasteners can be done on glue. Part of the wall, which is located above the ground level, in addition, you can use dowels for quick installation. In conclusion, it remains to fill the ground around the perimeter of the building.
If the soil has large and solid elements, then backfilling is better done with sand. Otherwise, you can easily damage the insulating and waterproofing layer.
Wall covering
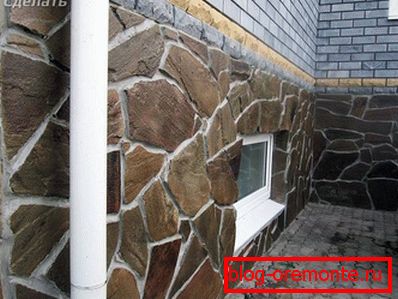
Sheathe exterior walls are best natural stone. This finish is very durable, because this material is different strength. As a result, the wall will be protected from decomposition and sudden changes in temperature. Therefore, you can use marble, limestone or granite.
One of the most modern finishing materials is the basement siding. This plastic is able to cope with the harsh climate, and the sun does not fade. Its installation is carried out on a specially made frame / crate.
As for the interior walls, it is first necessary to decide for what purpose this or that room will be used. Therefore, you will first need to carry out heating and other communications, for example, sewage, water supply and light. Inside the walls are also plastered, insulated with expanded polystyrene, penoplex or foam insulation.
For wall cladding is better to choose moisture-proof materials.
Floor
To begin with, the floor is being heated:
- The first thing is a pillow made of sand.
- Then ruberoid is covered.
- When laying the ruberoid, avoid gaps.
- From above the fittings from an iron lattice are mounted.
- Then the floor is filled with concrete M400 or M300.
Depending on the purpose of the room, floor insulation can be performed in different ways. For example, in the living room or gym can be laid on the floor system "warm floor", it can be electric or water. As for domestic premises, it is enough to lay wood concrete slabs or fill the floor with expanded clay with a thickness of up to 100 mm.
From above warming the finishing coupler from concrete is filled.
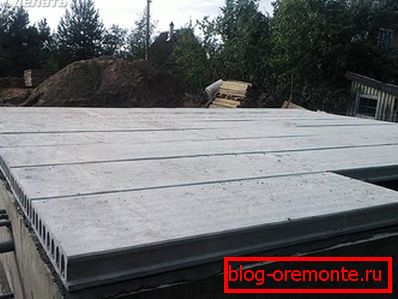
Overlap
One of the last stages of construction is the manufacture of floors. There are several technologies here:
- Monolithic concrete goods stove.
- Precast monolithic slab.
- Hardwood floor.
Consider the installation of monolithic concrete slab steps:
- First you need to build a formwork with mandatory reinforcement.
- The whole structure is fixed racks with a step of 1 m.
- The plate should go on the wall, at 150-200 mm.
- Now you make a reinforcement belt.
- On the wall, he should go to 40-60 mm.
- With an interval of 150 mm is installed fittings.
- The next step will be to fill a monolithic plate with a thickness of up to 200 mm.
After pouring, you must wait about one month for the overlap to dry.
If we speak of a prefabricated monolithic slab, then in this case the installation of the ceiling is carried out using special equipment. It is important to consider that such overlaps have their own standards, so they may not be suitable for each project. So, for its installation it is necessary to carry out the following work:
- Around the perimeter of the basement is constructed masonry to the height of the ceiling.
- After putting waterproofing and pour a small layer of solution.
- At the next stage, steel frames are assembled into which the assembly of the prefabricated monolithic plate will be installed.
- When installed between the plates will remain space. It must be filled with concrete. The result is a solid design.
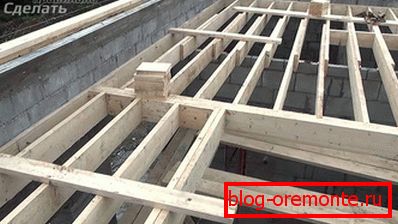
Also consider the technology for the manufacture of wooden floors, mainly it is used for wooden houses:
- Mounted wooden beams.
- The edges of the beams are wrapped with roofing felt, and then they can be put on the base.
- The walls are pre-made openings for beams.
- Insulation should be placed in these openings.
- After installation of the beams from the bottom side, small bars are fastened.
- Roll-up boards are fastened to them.
- On roll forward lay ruberoid and insulation thickness up to 150 mm.
Following simple recommendations, you will be able to do all the work yourself step by step. Although in some cases, without the help of qualified professionals and special equipment can not do.
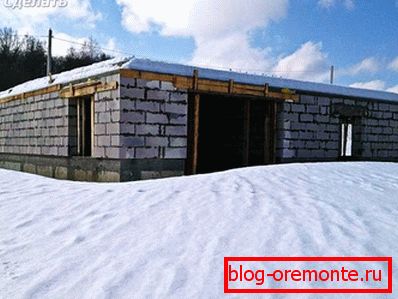
Construction of the basement of concrete blocks

If you are looking for an economical option for arranging the basement, then concrete blocks are better suited for the task. This material is strong enough, well repels moisture, tolerates temperature extremes, resists mold and fungus. If we talk about the shortcomings, then - this is the mandatory use of special equipment for their installation. Manually to cope with them is impossible.
Blocks are installed around the perimeter of the future building. Between themselves fastened with cement. It is imperative to leave indentations between the blocks for carrying out communications: water supply, electricity, sewage, ventilation. As for ventilation, the holes should be above the ground level not lower than 150 mm. To prevent debris from entering the holes, it is better to cover them.
If the basement rises above the ground level, then take care of a place for windows. In this case, the more windows there are, the better. This will provide zero space with natural light.
To avoid having to allocate a lot of money and material for plastering the walls after installing the blocks, it is important to install them as smoothly as possible. Although the blocks are durable materials, the top still need to make armopoyas. It is necessary in order to align the entire tier horizontally, since it is still impossible to install it ideally in terms of level.
From foam blocks
The principle of all the preparatory work on the installation of foam blocks, similar to working with concrete blocks. The foundation is poured with a small thin layer of mortar for laying the first row. To make the material better, it is recommended to wet the cement with water. To start is the laying of corners. After the walls are aligned in height and horizontal. Between the corners the fishing line is stretched and the main walls of the basement are pulled out.
After the first row it is necessary to apply waterproofing in a liquid state. Waterproofing is applied in several layers. Each subsequent layer is applied after drying the previous one. After this, the laying of foam blocks continues on a special glue.
Do not forget, each row and even more so the angle should be checked for evenness. After finishing the laying, a trench with a depth of up to 50 mm is pulled out along the entire perimeter. The fittings are laid into it, which is welded together in the corners. In conclusion, the trench is poured with concrete. This will happen by reinforcing the whole structure of the basement.
Construction on the slope
Strange as it may sound, the slope only simplifies the manufacture of the basement. The ideal slope counts to 9 °. So, there is no need to dig a large pit. Enough of the array cut from the slope. In such cases, the garage in the basement looks original.
If we talk about technology, the first thing is made pillow and waterproofing. Further construction is described above.
So, from this article it was possible to learn how to properly conduct work on the construction of the basement. If you have personal experience in construction, then leave comments at the end of this article. If you have any questions, you can contact an expert for help.
Video
You can find out how to make your own ground floor from the video: