How to make a fence from the profiled sheet
In recent years, in small towns and villages, streets with cottages located comfortably on them began to decorate fences from profiled sheets. At first glance, it seems to be a simple matter - to build a fence near the house, but if you decide to take professional sheets as a facing material, then first you will have to learn how to properly make a fence from a professional sheet. Here it is important to understand the characteristics of the material used and the sequence of operations. First of all, you will have to do the installation of the pillars, to which you will subsequently fix the horizontal logs, and the professional sheets to the lags.
However, the construction of the fence begins long before the listed actions. Pay special attention to the preliminary selection of all necessary materials. Now we will deal with this, since the durability and wear resistance of your fence will depend on the correctness of the choice.
Professional sheets
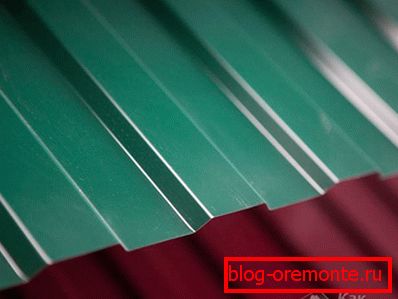
The professional leaf, in fact, is a profiled steel sheet. There are several types of this building material, which differ:
- size (height, width);
- type of coating;
- a layer of primer;
- profile form;
- painting.
The most common are wall sheets of the brand C-8, C-20, C-21. The figure is an indication of the value of the stiffener. For installation of fences, the C-20 profile is well suited - affordable and with sufficient rigidity and, accordingly, resistance to mechanical stress. Another important factor is the profile thickness. Popular are professional sheets with a thickness of 0.4-0.5 mm. The optimum sheet thickness for a normal fence is 0.5mm.
Coating

The following coating options are available:
- polymeric unilateral covering;
- polymeric bilateral covering;
- galvanized.
There is always a zinc under the polymer coating. This protects metal sheets from the damaging effects of corrosion. This galvanization gives the sheets reliable strength. The non-galvanized sheet quickly rot.
Of course, the type of a professional sheet covering strongly influences its cost. The most economical option in this regard is a galvanized sheet (without a polymer coating), and the most expensive is a professional sheet with a double-sided polymer coating.
Poles and logs
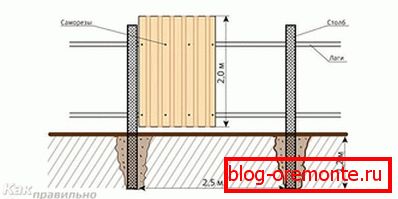
For the columns, profile tubes (60? 60 mm) are quite suitable - it is convenient to weld logs to them, which fit snugly to the installed columns. You can also use round pipes as pillars.
Profile pipes measuring 40 × 20 × 1.5 mm are suitable for making lag - the best combination of material strength with its low cost. For the construction of a massive fence, you should choose more powerful logs, so that the fence was strong. There is no need for savings.
If the height of the fence is 2 m and the distance between the pillars is 2.5 m, then the load on each pillar will be about 20 kg. With this calculation of the load, your fence will not have a lag subsidence, which will ensure high structural strength.
Stages of construction
- Marking territory.
- Installing pillars.
- Attachment lag.
- Fastening of a professional flooring.
Stage 1
 Construction of the fence, begin with the definition and marking of reference points:
- Determine the installation location of the corner and outer pillars.
- Determine the installation location of the pillars for the gate and wicket.
- Install support columns and stretch the rope between them (to quickly and accurately determine the location of the remaining posts).
- Set intermediate pillars at a distance of 2.5 m from each other, secure the rope at a set level.
Stage 2
There are two ways to install pillars: blocking or concreting.
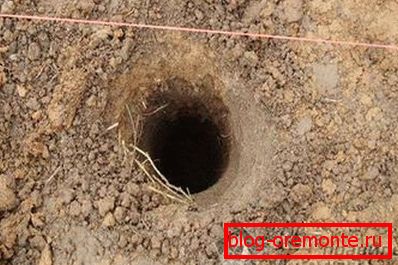
If you decide to use the blocking method, pre-drill a hole in the ground with a depth of approximately 1 m. It will be much easier for you to install the pillar, and even this will help to reduce the deformation of the upper part of the pillar when driving.
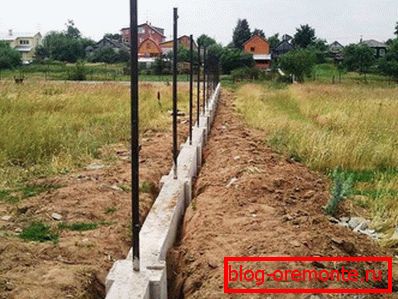
In the case of concreting, you need to drill a hole with a diameter of 150-200 mm for each pillar. In the resulting hole, install the pillar and fill the space formed around it with concrete. All subsequent work should be carried out after the solution hardens.
Install the pillars equidistant from each other (along the line of the rope) at a distance of 2.5 m.
Stage 3
 Lags are fastened by welding to the installed posts with a wide side, which ensures high structural strength and avoids sagging. Fastening lag is performed at a distance of 25-30cm from the upper and lower edges of the fence. This ensures the reliability of the professional sheet fastening.
For a fence with a height of more than 2 m, it will be advisable to install a third lag row.
As a result of the work done, you will get a solid reliable metal construction of the fence, fixed in the ground. To the place of the weld seams are not very distinguished, they should be tinted. If you can not use welding, you can do with bolts or screws.
Stage 4
At the final stage of the work, you need to set up professional sheets by level and fix them on the logs with the help of screws. Your fence is ready!
Video
We bring to your attention a video highlighting the main points in the manufacture of a fence from a professional sheet: