How to make a computer desk with your own hands
A few years ago, the presence of a computer was considered a luxury. Many children dreamed of having such a car at home. If we talk about our time, there is a desktop computer in almost every apartment - this is normal and even necessary. Since one has to sit at a computer often, especially if your work is connected with the Internet, it is important to ensure that it has a suitable place that is comfortable and functional.
Often, a desk for a computer or laptop is a regular desk or even a sofa. But for the convenience of work and preserve your health you need a special table, which will be an excellent addition to the design of the apartment. This article will help you find out., how to make a computer desk with their own hands (at home). We will also show drawings, photos and video instructions.
Organization of the process
First of all, you need to decide what kind of table you need and why it will serve. The list of components of the system, which includes:
- system unit;
- monitor;
- keyboard;
- mouse
In addition to the basic configuration, you should consider the speakers, cords, modem, printer, scanner and other devices that you will use in your work. Consider whether you will make shelves, if yes, how many.
An important point, the material from which the table will be made. The most commonly used sheets of particleboard - it is inexpensive and, at the same time, reliable material.
Choice of place

The selection of places, too, should be given a lot of time. It is clear that the less space is occupied by the table, the freer in the apartment. But do not overdo it, if the table is too small, it will not be able to perform its multifunctional work.
Mandatory terms of the rules of placement are:
- Access to the mains (sockets, preferably with grounding).
- The presence of windows through which natural light will flow. It would be good to arrange the space so that the light comes from the left side of the computer.
- The absence of a number of heating devices (batteries, fireplaces, electric heaters). This is done so that the equipment does not overheat.
- Shelves, paintings and other decorative items will also interfere, but they can be removed.
Select table type
The next step after choosing a specific room and location - the design of the product itself. Before you make a drawing, you need to select the type of table. He might be:
- straight;
- angular;
- combined.
By choosing the most appropriate type of table, you can equip your workplace most comfortably and with minimal cost. Moreover, how fast you collect it depends on it.
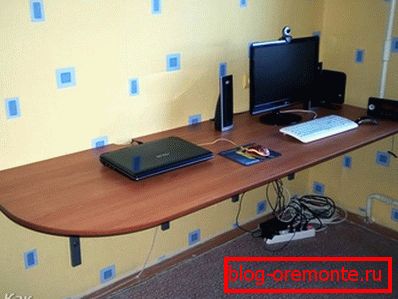
Straight table
Straight table – это классика. Сравнить его можно с простым письменным столом. Такой вариант подойдет, если вы пользуетесь компьютером периодически или же для профессиональных работ, требующих концентрации и внимания. Наличие прямого пространства вдоль стены с окном, позволяет выбрать этот вариант.

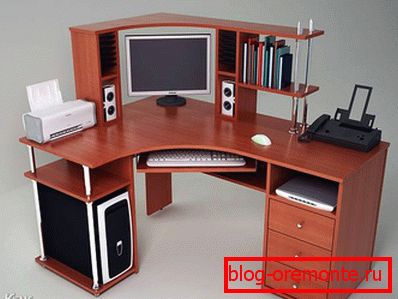
Corner table
Corner - for people who sit for hours near the monitor. The material for such a design will go the least, and it will not take up much space. But for the important work of such a table is not suitable. First, there is little space, which means that papers, office or other personal tools will constantly interfere.
The table in the corner puts pressure on the human psyche. This fact has been proven by psychologists, therefore, corner structures are strictly prohibited in offices.
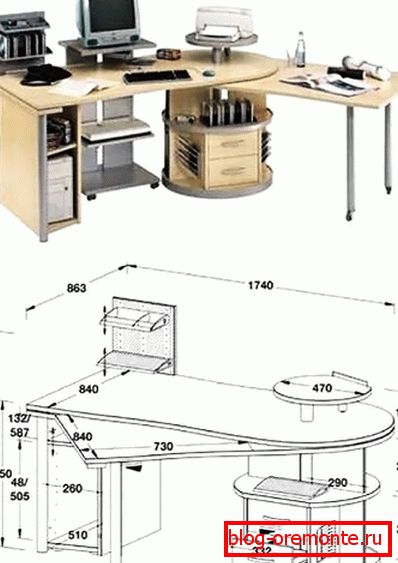
Combined table
The combined table is something between an option 1 and 2. This design is ideal, but takes a lot of space. The presence of shelves and cabinets allows you to store personal belongings, documents and folders so that they do not interfere, but are at hand.
Blueprints и деталировка
So, having dealt with all the theoretical points, you can begin to manufacture the structure at home. The first step is to calculate the height of the table. The height of a standard construction is on average 75 cm. But if your height is above average, there is a formula that allows you to calculate the height correctly:
Growth - 75/175
Suppose your height is 180 cm. If you apply the formula, you get:
180? 75/175 = 77 cm
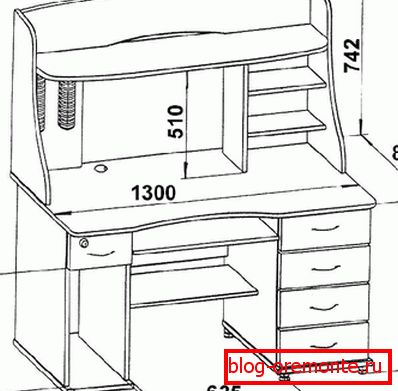
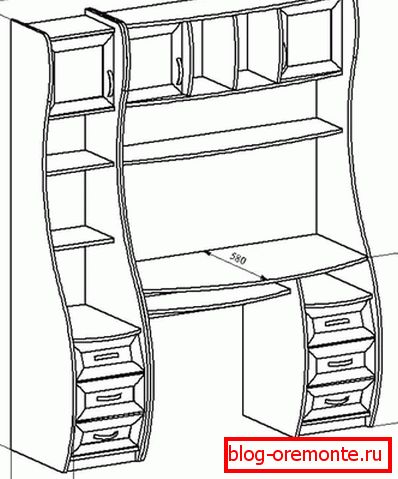
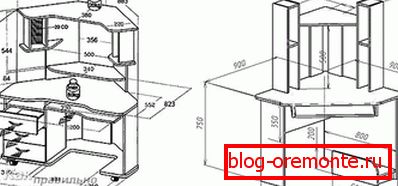
Next should make the drawings. Remember, how accurately and accurately you make a drawing depends on the quality of the finished product and the amount of time and effort expended. Give him enough attention. Here is an example of a simple design that can be easily done at home.
This classic version is easy to manufacture and does not require a lot of material for its construction. The design has the following parts:
- место под monitor;
- sliding shelf under the keyboard;
- a small shelf for storing all small things;
- drawer for papers, personal belongings and other items with drawers;
- two shelves on top, serving for books, vases or speaker system.
As you can see, there is a place for all components of the computer system, the main thing is to place everything correctly.
Instruments

Having collected all the necessary tools, you can get to work. You will need this kit:
- Jigsaw or hacksaw.
- Drill and drill bits.
- Screwdriver or screwdriver.
- Grinding machine. If the place of your work is directly flat, take care to remove carpets and other things. To collect all the garbage you need a vacuum cleaner.
- Stameska.
- A simple pencil (it is better to take a soft one, it is better visible on wood), a ruler and a tape measure. Roulette size more than 1m.
At this preparatory work is over, you can start work.
Cut out the parts and assemble the structure.
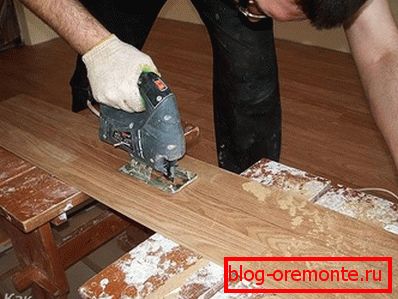
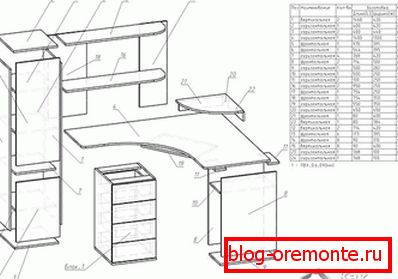
Since you can create uneven edges and chips on self-cutting of laminated chipboard sheets, it is better to take the drawing you like and order the cutting of the material at a furniture factory. There they will be able to perform pasting edge. Below are the drawings and diagrams of complex structures. You just have to collect all the parts yourself.
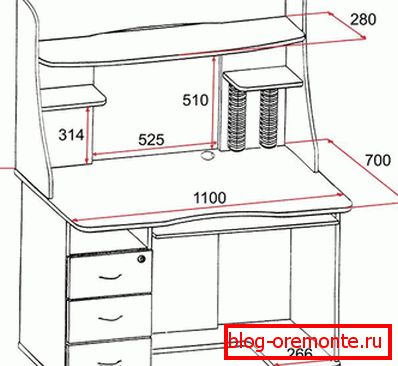
To bring the project to life, you need the following details:
- lateral racks, 735 × 465 mm in size, 2 pcs .;
- central rack, 735 × 380 mm in size, 1 pc .;
- worktop size 1200? 580 mm, 1 pc .;
- back wall, 1090 × 290 mm in size, 1 pc .;
- sliding keyboard stand, 830 × 380 mm in size, 1 pc .;
- internal shelves, size 450 × 250 mm, 2 pcs.
So, when all the details are cut, you can easily assemble such a straight table for the computer. Here are the steps:
- In the side and central walls need to make holes under the bottom shelf. Measure 50–70 mm from below and draw a horizontal line with a pencil. In that place you need to make two parallel holes. There should be 2 holes in the side wall and 2 in the center. Now secure the shelf with confirmats (you can use self-tapping screws).
- The same should be done for the upper shelf, but the distance from the beginning of the board to the shelf should be 100 mm or more, depending on the desired size of the shelf. Measure out, draw a line and make holes. Attach the top shelf.
- After that, you need to fix the back wall. It should be placed flush with the upper end of the side and central walls. Then you need to mark the holes and fasten the wall.
- Then you need to connect the second side wall to the back. To do this, make 2 holes in the rear panel and fasten it to the sidewall with the help of confirmats.
- Now it's time to fasten the rail guide. From the top of the side and central walls it is necessary to measure 50 mm and make smooth lines. After marking fix them.
- Next to the shelf for the keyboard you need to fasten the guides.
- To install the countertop, holes should be made in the side walls. Shkanty will be placed there. Exactly the same holes need to be made in the tabletop itself. They should not be cross-cutting, but not too small. It is important that all the holes coincide and the village table top as it should. To do this, you can attach it to where it should stand, and mark the places of the holes on the table top and side walls.
- Lubricate the dowels with PVA glue and insert into the ends of the frame where the holes are made.
- Place the table top on top so that the dowels fit into the slots.
- If you want to make additional shelves on top of the table, they can also be fixed with dowels.


It remains only to install the finished table in the place that you have chosen.
You can make a computer desk at home. You need patience, perseverance and a little imagination. Then your home will have a “haven” for “smart” equipment and its user.
Video
In the provided video material, you can familiarize yourself with how to make a computer desk at home:
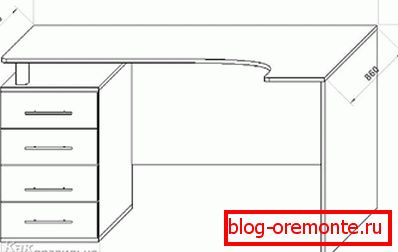
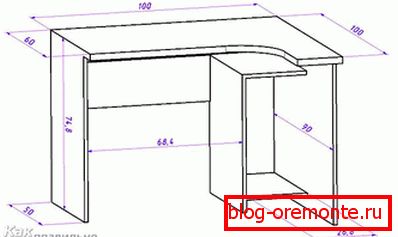
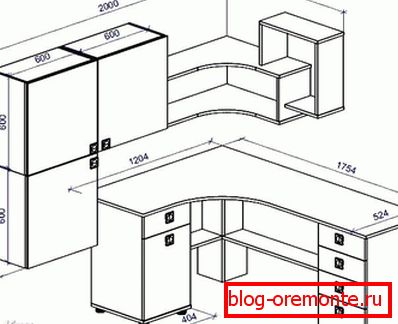
Blueprints
In the drawings, you will be able to consider various designs of the computer desk: