How to make a change house with your own hands
A small house called a small auxiliary structure made of wood, metal or any other building material and equipped with everything necessary for temporary living in it. In addition, in buildings of this type, as a rule, there is a special department like a storage room used for storing work tools and inventory. Before you make a change house with your own hands, You should clearly define the purpose for which it is needed. In the article, we will look at options for change houses (trailers), which can be done independently, give detailed step-by-step instructions, and also show drawings, photos and videos.
Purpose of construction

In this case, there are two options that determine the choice of the structure of the structure itself, as well as the material used in the construction.
First, the cabins can serve as a long-term dwelling place for workers hired to build a main house on a site allotted to you. In this case, it should provide a full set of amenities needed for rest and meals, as well as for protection from the weather and heating in the winter season. In addition, it is often necessary to store building materials and equipment in such a house, under which a special place should be allocated.
Secondly, the change house can be used simply as a storage place for working tools and equipment at your summer cottage. In this situation, the presence of any facilities in it is often not provided.
Naturally, a separate project should be prepared for each of these options, taking into account such factors as:
- the material used in the construction (the frame of the change house can be made of both wood and metal);
- type of foundation, the choice of which is determined by the type of material used, as well as its purpose;
- the size of the building, the conditions of its placement and other nuances.
Choice of size and location
If we proceed from the conditions for using a shed, we have already considered, then in case of using it as a place of temporary stay of workers, it can be installed at any place of your land plot. But at the same time it is necessary to ensure that the place you have chosen is located at a certain distance from the building site, storage areas, as well as transportation routes for building materials and lines for future communications.
In the event that your cab will be used as a storage room for inventory at the dacha, all of the above factors are not at all necessary.
Before you build a shed in a particular place of the garden plot, you should determine its size, the choice of which is also determined by its purpose. So, if several workers have to rest in the bungalow and the materials needing drying will be stored - you will need a building at least 2.5 meters by 6 meters in size. If the trailer will be used as a storage for working clothes and tools, as well as a shelter from the weather - the size of 2 by 4 meters is enough. Such dimensions should suit those summer residents who intend to use the bungalow as a temporary summer kitchen.
When choosing the size and location of the trailer, it should also be possible to transfer it to another place or a potential sale, which is associated with the need to organize the transportation. It should be borne in mind that on the roads of Russia without special permission it is allowed to carry loads of certain dimensions (width - not more than 2.55 meters, height - not more than 4 meters from the level of the roadbed).
It is necessary to take care about the simplification of work related to the loading and unloading of a shed in case of its transportation to another place.
Given all the above limitations, the size of your future construction should be as follows:
- width - about 2.4 meters;
- height - no more than 2.5 meters;
- length - no more than six meters.
In this case, the weight of the shed should not exceed five tons, which will allow you to use an ordinary manipulator for its transportation.
Selection of foundation type
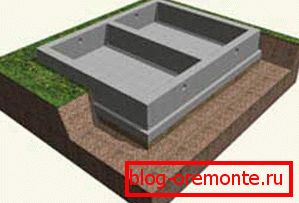
In any of the variants we have considered, there is no need to prepare a strong foundation for a shed carriage using concrete monolith or reinforced concrete piles, for example. In such a situation, the main task of the foundation being constructed is to protect the future structure from moisture spreading from the ground side.
A rather effective and economically viable option for this case is the use of special asbestos-cement glasses, cinder blocks or sleepers that have worked their life as the basis.
Laying the foundation using any of these building products is as follows:
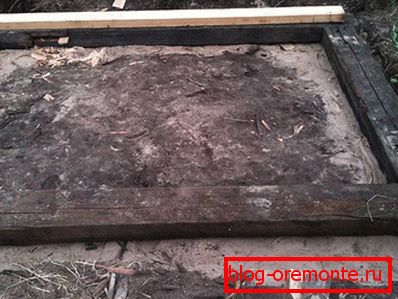
- At first, excavation works are carried out, starting with clearing the area selected for construction from debris and grass.
- Then, at its corners, as well as in the places of the planned placement of supports (6–8 pieces are enough for change houses), the top layer of soil is removed.
- After that, a cushion is made of the mixture of rubble, sifting and sand, which is slightly moistened with water and then thoroughly compacted using a special ramming device.
- When asbestos-cement glasses are used as base racks, paving slabs are allowed to be laid under them, which allows to slightly increase the area of the supporting base.
- Slag blocks or sleepers are placed on the pillow with a mandatory check of their horizontal laying; for this you can use any suitable level.
- For reliable protection of the wooden frame structure from soil moisture on the supports are placed pieces of roofing material (preferably - in several layers).
This foundation is quite simple to manufacture and can be prepared independently literally within a few hours. Well, if there is a need to move the trailer to a new place - its dismantling from such a base will be extremely simplified.
Walling and finishing
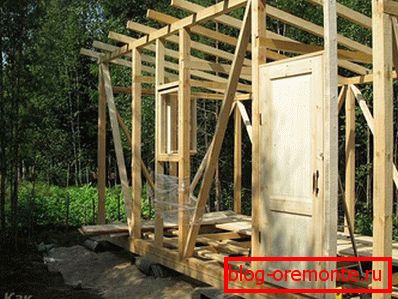
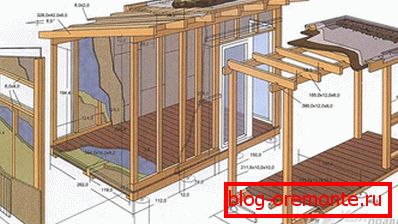
Upon completion of the foundation arrangement, it will be possible to proceed directly to the construction of the shed itself, which we will consider using the example of manufacturing a woodcar trailer frame.
These works begin with laying the supports on the supports and fixing on them the bottom trim bar, which can be used as a board with a section of 100 × 150 mm. This beam is securely fastened to the foundation supports using special anchors, and then the corner and intermediate posts are mounted on it.
After installing all the racks provided by the project, it will be possible to proceed to the installation of the upper trim bars. When conducting all these operations of the same type, it is necessary to adhere to the following recommendations:
- as racks it is most convenient to use boards with a cross section of 50 × 150 mm, for fastening of which simple (or screw) nails or screws are used;
- knotted bundles are preferably performed by cutting the posts into the strapping with the subsequent reinforcement of this place with metal corners;
- for temporary mounting racks after placing them on the level, you can use long boards (booms);
- genital lags slammed directly into the bar of the bottom trim. If you wish to insulate the floor, you will have to prepare its binder for the lower section of the lag, on which plates or mats of insulation material will subsequently be laid;
- when choosing the distance between the racks, one should proceed from the fact that insulation plates are easily placed between them;
- it is desirable to immediately determine the location of the door and windows of the shed.
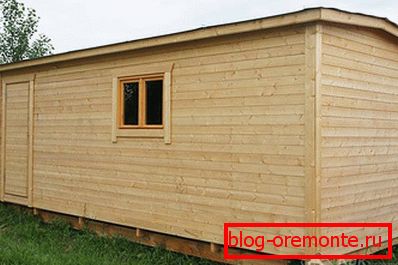
After the carcass frame is ready, you can proceed to the cladding of its outer surface with a facing material suitable for your conditions (OSB sheets, for example).
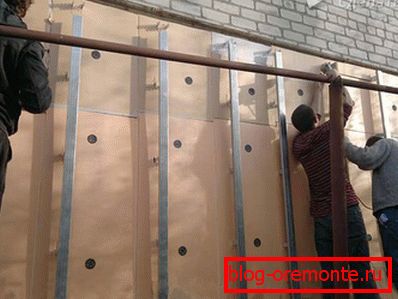
The resulting internal cavities of the frame are filled with pre-prepared insulation plates, which are then covered with a layer of vapor barrier film and sheathed with clapboard. If you wish, you can additionally protect the outer walls of the car from the weather, revealing them with a sheeting of corrugated board, for example.
Roof, windows and doors
After the base of your house has been prepared, you can proceed to the installation of such structural elements of the floor as lags and rafters (for this purpose the same board with a cross section of 50? 150 mm will fit). Upon completion of their installation, the ceiling filing of inch board, sheets of plywood or OSB is made through the bottom cut of the log.
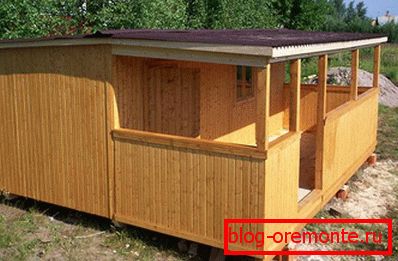
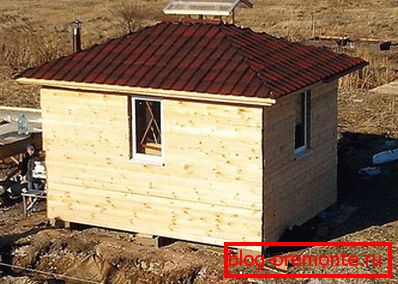
After this, a layer of vapor barrier film is attached on top of the binder, on which, for example, slabs or mats of mineral wool insulation are laid. We will note that in sheds, as a rule, a lean-to roof is used. When making the coating, the battens are fastened across the rafters, after which the sheets of the roofing material of your choice are placed on them (it is most convenient to use slate or galvanized steel sheet for these purposes).
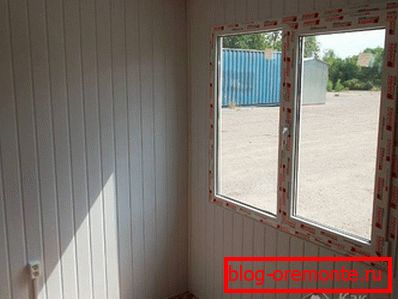
As for the arrangement of the windows in the trailer, then for their manufacture you can use standard wooden frames.
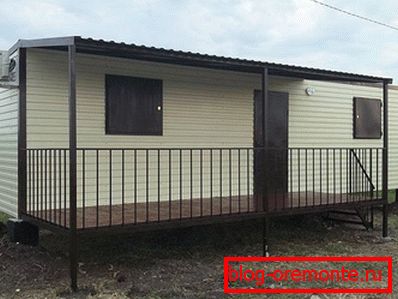
If your trailer will be operated in the winter season, it is better to install plastic windows (preferably with a two-chamber glass unit) in it. The entrance door for such a building can be metal or wooden, and to create additional protection from the cold air in the house you can equip a small vestibule.
Estimated cost estimate

In the event that you intend to make a change house completely from new procurement materials - the approximate amount of expenses may amount to about 20-25 thousand rubles, which is approximately twice as much as buying a finished trailer. In most regions of the country for the specified amount you can buy all the basic materials for construction.
If you want to save on building materials, you can always use the remnants of the still usable old structures that are available at any dacha.
Video
Watch the video about the construction of frame cabins:
A photo