How to make a chaise lounge with your own hands
Chaise lounges are convenient easy chairs with which often equip places for rest. They are set on the beaches and near the outdoor pools. To give this item may be part of the exterior. On it you can relax after a busy, tiring day, swim in the gentle rays of the sun or take a nap in a shaded place away from human eyes. In this article we will look at how to make a chaise longue with your own hands from wood, we will demonstrate the drawings, as well as photo and video instructions.
Kinds

To begin with, you should decide on the look of the lounge chair. It can be made of wood, aluminum, plastic and synthetic fabrics. We will focus on a practical and easy-to-make version - a wooden lounger.
Wood for the product and its design is selected depending on:
- your preferences;
- availability of scrap materials;
- financial opportunities;
- the style of your garden.
When choosing wood for a future chaise longue, the physical and mechanical properties of certain types of wood should be taken into account. For example, beech, ash, larch or oak will last the longest. These are durable and durable materials, and they also have an aesthetic appearance. But this type of wood is quite expensive and surpasses other wood species in weight, which makes it harder to move finished products.
A deck chair made by own hands will not only save you money, but also ennoble the garden and give it exclusivity. There is a diverse array of wooden deck chair designs.
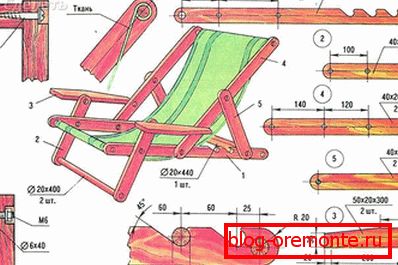
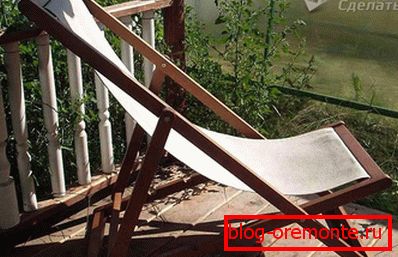
Folding chaise longue with fabric seat
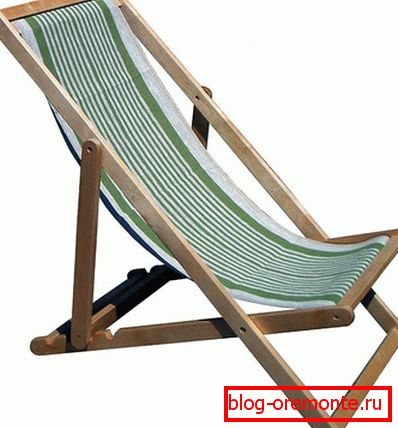
Folding chair is more convenient, since it will not be difficult to move it, and in rainy weather it is easy to fold and hide (which is important for wooden products). With just one movement you can turn a chaise lounge into a comfortable chair.
Materials
So, from the materials we need:
For the legs of the back:
- 2? 4? 122 cm - 2 pcs.
- 2 x 4 x 61 cm - 1 pc.
- 2? 4? 65 cm - 1 pc.
- 2 x 6 x 61 cm - 1 pc.
For seat legs:
- 2 x 4 x 112 cm - 2 pcs.
- 2 x 4 x 60 cm - 4 pcs.
- 2 x 4 x 57 cm - 1 pc.
- 2 x 6 x 57 cm - 1 pc.
Back support:
- 2 x 4 x 38 cm - 2 pcs.
- Wooden rod with a diameter of 1.2 cm, length 65 cm - 1 pc.
Fabric seat:
- Fabric 137 × 116 cm
- Wooden rod with a diameter of 1.2 cm, length 55.9 cm - 2 pcs.
To fasten parts:
- Bolts and nuts - 4 pcs.
- Washers (for the bolt head and nut) - 8 pcs.
- Clay joiner's.
- Screws.
Instruments:
- Drill.
- Sandpaper or sanding machine.
- File of round section.
Preparatory processes
All parts must be pre-processed, namely, sanded and treated with special impregnations to protect the wood from corrosion. Then the product will serve you much longer.
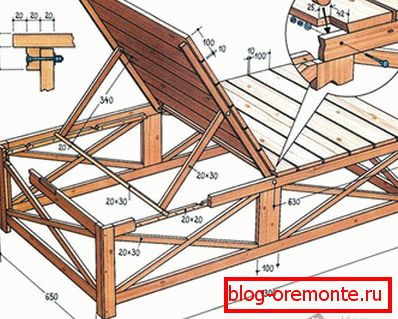
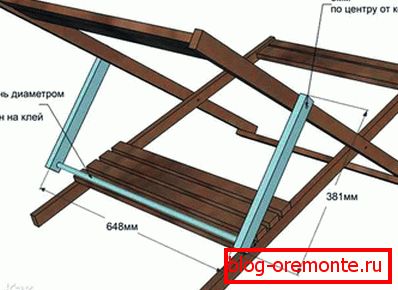
As can be seen in the drawing, in the lower part of the legs of the seat, crossbars are installed, thanks to which the position of the backrest is fixed. If you plan to install only one bar, you should first make cuts on the site of the slats: 20 cm from the edge, then 25, 30 and 35. Also, holes for the bolts need to be made on the backrest frame, retreating 41 cm from each side. retreat 43 cm from the top. And on the support of the back of the chaise lounge, make a hole in the center of the edges.
Frame assembly
The back frame is assembled first. A slat with a size of 2 × 6 × 61 cm will carry the main load, therefore, special attention should be paid to its fastening. Its fixing should be performed as reliably as possible. Be sure to leave a gap of 1 cm between the two slats. It will be necessary to fasten the fabric.

Starting from the above scheme, collect the frame of the seat. After that, fold back frame and seat. Previously, on the frame of the backrest from the upper strap, drill holes on both sides at a distance of 41 cm, and on the seat 43 cm. Fasten them with bolts and a nut. Be sure to place the puck between the frame posts.

During operation, the nuts can be unwound. To prevent this, tighten another locknut. Also nuts can be put on paint or glue Moment. To adjust the free play, first tighten the nut, and then slightly let it go. After that, let the glue / paint dry.
Now you can install back support. Fix the slats to the back with bolts and use washers similarly. The large dowel is pressed into the prepared hole in the slats using glue.
The fabric for the seat should be strong enough. Suitable canvas, tarpaulin, jeans and other wear-resistant types of fabrics.
The fabric should be folded in half and stitched, departing 1.5 cm from the edge. Then we turn it around. Bend the edge of the fabric for the rod, fixing the fabric seat between the slats, and sew. We do the same with the reverse edge.
Then the edge of the fabric should be inserted between the slats and set the rod in the bend. Thus, the seat will be firmly fixed, but at the same time remove it for washing will not be any difficulty.
Final processes
At the final stage of manufacturing a chaise lounge, it is desirable to eliminate the remaining or formed irregularities and roughness with a file or sandpaper. After that, at will, the product can be dug up with paint or varnish.
Of course, using this design, you have a lot of opportunities to improvise. For example, instead of a fabric seat, you can simply install more slats before the connection itself. It depends on your preference.
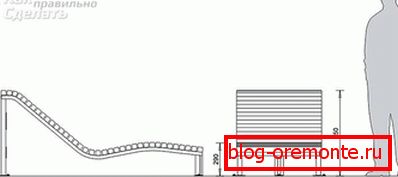
Another interesting solution
This design is completely different from the previous one. But nevertheless, to make it with your own hands is no more difficult. Such a chaise lounge is not very convenient to move, but, with careful execution and careful processing, is quite aesthetic and simple to carry.
From the tools we need:
- drill;
- sandpaper;
- saw;
- roulette;
- marker.
From materials:
- 2.5 x 8 x 60 cm - 13 pcs. (strips for sitting);
- 5 x 10 x 21 cm - 2 pcs. (longitudinal bars for the frame);
- 5 x 10 x 50 cm - 2 pcs. (cross bars for the frame);
- 5 x 10 x 35 cm - 6 pcs. (chaise longue legs);
- 5 x 10 x 88 cm - 2 pcs. (product back);
- 5 x 10 x 39 cm - 3 pcs. (product back);
- 2.5 x 8 x 88 cm - 6 pcs. (strips on the backrest frame);
- 5 x 10 x 60 cm - 1 pc. (bar for fixing the back in the desired position);
- wood screws;
- studs for fixing;
- paint or varnish;
- impregnation for wood.
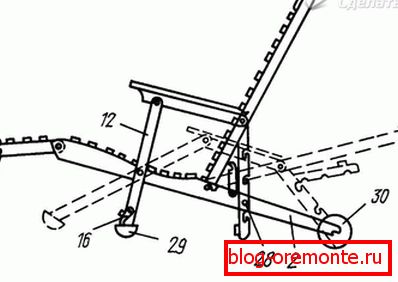
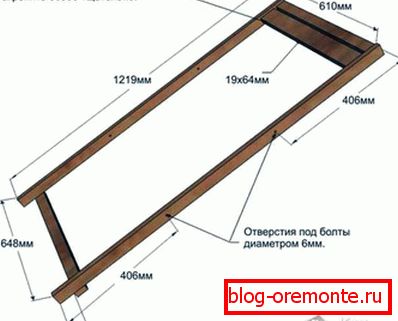
The first step is to process the wood. Then you need to make a frame. To do this, take 2 longitudinal beams of 215 cm and 2 transverse 50 cm each. We connect them with screws.

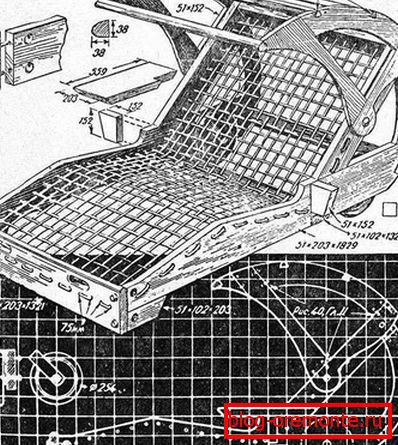
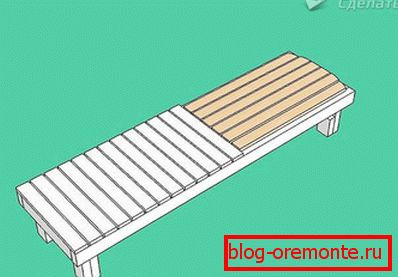
Next, take 13 strips of 60 cm each and fasten them to the frame with self-tapping screws, leaving a gap of 1 cm between them. To make the distance even, you can use centimeter pads in the form of plates. So we got a seat.
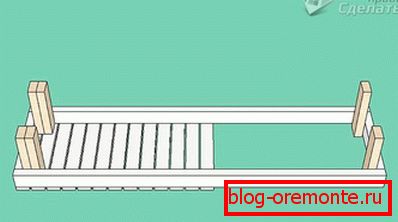
The next step is to install the legs of 35 cm of timber (the length of the legs can be changed as desired). From the side of the seat, in order to strengthen the structure, we make double legs.
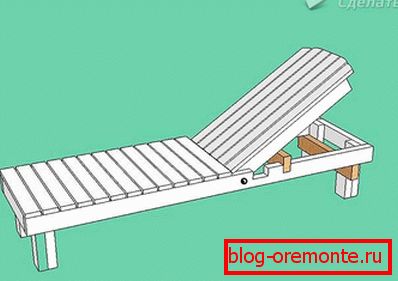
Next, we manufacture the backrest of two bars with a length of 88 cm and three bars of 39 cm. The backrest frame must fit freely into the main structure, it is also necessary to leave a small gap between these blanks.

Now fix the boards back in the longitudinal direction. Extreme planks can be rounded to give them a more aesthetic look.
So that the backrest can easily rise and fall, make through holes at a distance of 9 cm from the edge of the seat through both structures. Fastening is carried out using special studs.

After that, at the base of the chaise lounge, you need to make 2 slots in which the support bars will be placed. Due to this, the back can be fixed in different positions. One groove is made at a distance of 9 cm from a stud, 5 × 10 cm in size. The next groove is made 20 cm 5 × 5 cm from the previous one.
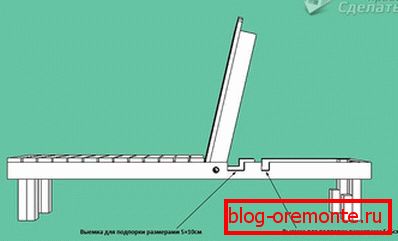
In the first groove fit a bar horizontally 60 cm long, which will hold the back in the desired position. If you want to change the position of the back, then the bar is shifted to the second groove.
Following this scheme, the process of wooden chaise lounge is almost complete. It remains only to polish the structure, varnish it or paint it.
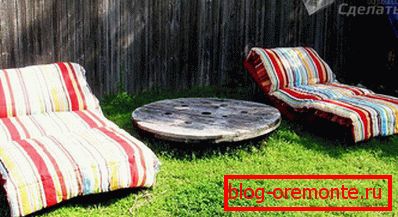
Original ideas
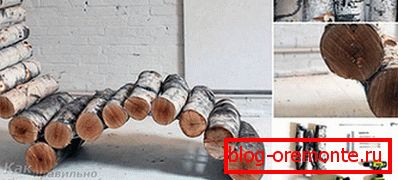
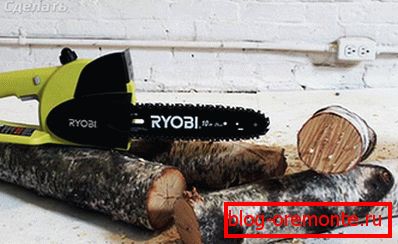
We offer to your attention the consideration of the original design of the manufacture of chaise longue. For its manufacture will require logs O75-120 mm. To do this, you need to prepare the following tool:
- logs;
- power saw;
- drill;
- self-tapping screws;
- staples;
- set of drills.
For the manufacture of such a lounge chair is not recommended to use larger logs. With O120 mm, the chaise will not be heavy.
The manufacturing process is as follows:
- First, cut logs 45 cm long.
- After form the layout of the future design. To do this, take the tape and apply it directly to the circuit on the floor.

- Further in the cut logs make holes.
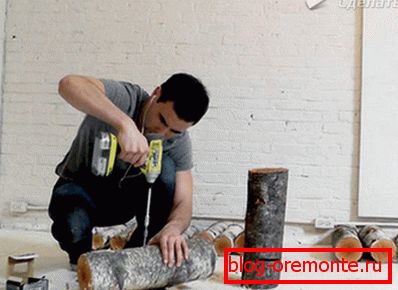
- All elements are interconnected. In each log twists on 4 long screws. You can use a socket wrench to tighten them.

- Now you can turn the resulting structure and test it. If it is unstable, then correct this defect.
- To give the deck chair greater stability, lock the brackets on the back side.
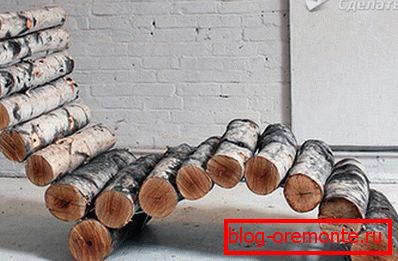
Although this process is quite troublesome and time consuming, the result will please your eye. At the same time such a chaise lounge will be a great addition to the summer cottage.
If you have your own ideas for making a deck chair, then write about them in the comments to this article. If you find it difficult to come up with your own design, then use the drawings presented below. We hope the information provided will help you to make the chaise lounge with your own hands.
Video
In the provided video material, you can get acquainted with the technology in more detail:
Blueprints
The presented drawings will help you to design a chaise lounge with your own hands: