How to make a bathroom floor with their own hands
Bathroom floor plays one of the most important roles. This is due to the fact that in this room is always high humidity. To prevent dampness and moisture from becoming your main enemy, it is important to make the bathroom floor according to all technological requirements. We will take a detailed look at how to make a bathroom floor with your own hands.
What should it be?
We list a number of requirements that apply to the quality of the floor in this room:
- Safety for movement.
- Ecological purity.
- Insulation, which should provide protection from negative noise, heat loss, as well as moisture penetration.
- Beautiful appearance.
- Easy to maintain.
- Durability.
In fact, all these indicators really reach. We can distinguish two components, the observance of which will allow this to be done: the right choice of the floor covering and the observance of the technology of its installation. Before we proceed to the work itself, you should carefully familiarize yourself with the types of flooring that can be put in the bathroom.
Decoration Materials
As for the flooring, it should mainly be practical, reliable and suitable for your chosen interior. Today there is a sufficient amount of building materials that can meet all these and the above requirements.
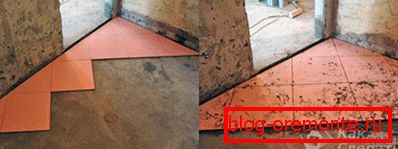
Ceramic floor. Due to its high moisture resistance, it is in high demand. Moreover, the floor, covered with ceramic tiles, will have an attractive appearance. Under the influence of external factors, it will not be deformed. That the surface was not slippery, it is recommended to get a tile with a rough surface.

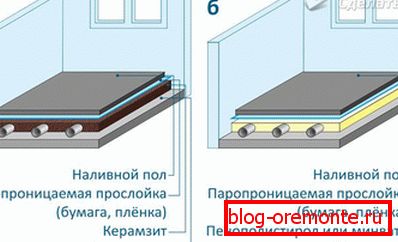
Bulk floor. This floor is one of the most recent and modern developments. The polymer mass is evenly distributed over the floor surface. As for its service life, it can serve for several decades. Bulk floor resistant to moisture and, most importantly, does not slip. It can be perfectly combined with a water heated floor. Staying in the bathroom in this case will be much more comfortable. The main drawback of the self-leveling floor is the high price. But it's worth it!
Linoleum PVC. This is one of the inexpensive, but high-quality coatings. Linoleum PVC is very easy to lay. For a bathroom it is necessary to choose linoleum on a moisture resistant basis. Like tile, it is recommended to choose linoleum with a rough surface.
Waterproof laminate. As you know, the laminate will not last for a long time if there is always water on its surface, so after each bathing all the accumulated moisture from the surface of the laminate must be removed. But it's not a problem. If the laminate is properly maintained, it will last a long time. Today, a wide selection of laminates of various colors and shades is produced, so that you can create coziness and comfort in the bathroom.

Carpet. This material is not too waterproof. Despite the fact that there is moisture-resistant carpet, it will be difficult to find it, but for the price it is very expensive.
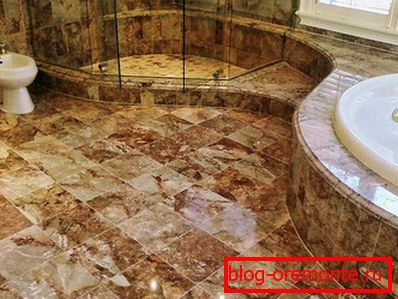
Natural stone. This finishing material is an excellent tool for finishing the floor in the bathroom. However, its significant minus is coldness, so walking barefoot on it will be dangerous to health. Moreover, its surface is very slippery.
Wooden floor. If you want to make a wooden floor in the bathroom, it will take a long time to process the wood to achieve moisture resistance. As practice shows, this floor is not very practical to use, as well as very expensive.
Choosing the method of finishing the floor in the bathroom, strive to create as few joints and seams as possible. The maximum cast surface will create additional protection against moisture penetration, the appearance of dampness, fungus and mold.
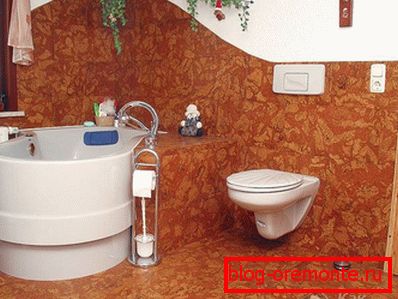
Some give their preference to the cork floor, although in terms of service life it is significantly inferior to the above coatings. In appearance, the cork floor resembles a “layer cake”. These layers are arranged as follows: the main extruded layer is a cork, the decorative layer is a cork layer, and also a protective layer made of PVC. There are two types of cork. They are completely different in the way they are mounted. The first - has the tongue / groove locking technology. Another type involves laying the cork to a perfectly flat surface.
If it is intended to use underfloor heating technology, then the adhesive must be resistant to the effects of heating equipment. Such glue should completely exclude the possibility of expansion due to temperature changes. This condition must be observed regardless of the type of flooring to be laid.
So, now consider the sequence of work performed, ranging from preparation and finishing the finishing of the floor in the bathroom.
Technological processes
The whole process of making the floor in the bathroom can be divided into several activities. Each stage is important in its own way:
- Preparatory work with a draft floor.
- Waterproofing the bathroom floor.
- Fill screed.
- Laying finishing material.
Now, about each stage in more detail.
Preparatory work with a draft floor.
In most cases, the bathroom has an old screed. Therefore, the first step is to clean its surface from the old flooring. At the same time, all greasy stains, old paint and other possible contamination that will prevent good performance should be removed. Places where the screed fits the wall must be carefully processed. Make sure the floor is not breathing, so to speak.
If an empty sound is heard when it is tapped, then you will have to completely remove the rough tie. This is important, because when applying new layers, it can sag. If the base of the floor is reliable, then inspect it for cracks, holes and crevices. If they are, they should be covered with tile adhesive. Do not ignore this process. After all, in such a simple way you can prevent the rapid deterioration of the waterproofing layer. If significant irregularities are found, they are recommended to be fixed with the help of ready leveling mixtures. Before the next stage - waterproofing - it is worth treating the floor surface with a primer, which will increase adhesion.
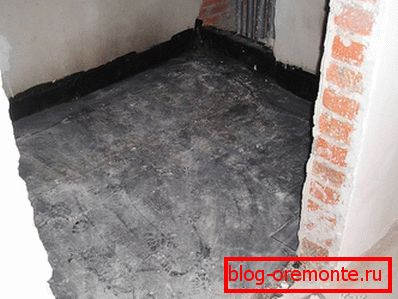
Waterproofing.
To create a waterproofing layer used several types of building materials. Each of them differs according to the method of their application to the floor surface. Therefore, we now consider their main differences.
- Pasting material. This type is relevant in those places where there is a need for waterproofing not only the floor, but also some vertical planes. As a result, the treated surface will resemble a bowl with a height of walls up to 150 mm. For its application there is no need to possess any professional skills.
- Bituminous emulsion. It is applied with a roller or brush. It is impossible to call it practical, since the average period of its operation is no more than five years.
- Coating. It creates an ideal waterproof surface.

Consider the example of applying a coating waterproofing layer, which is more popular. First of all, in places where walls and floors are joined, a waterproofing tape is laid. Next, prepare the coating material. By consistency, it will resemble sour cream. The waterproofing mixture should be applied to the surface with a spatula or roller. You can handle and walls to a height of 100 mm. Sometimes you want to apply a certain number of layers, it depends on the manufacturer. You can find out about this in the instructions on the label.
Before proceeding to the next stage of work, you need to wait until the waterproofing layer is completely dry.
How to prepare and apply coating waterproofing shown in the video:
If you have a wooden house, floor decks are made of wood, it is recommended to use additional protection or a safety layer. To do this, you can buy inexpensive linoleum. It can also be laid on the floor after waterproofing.
Fill screed.
Based on how well this stage of work will be performed, the result of finishing the finishing material depends.
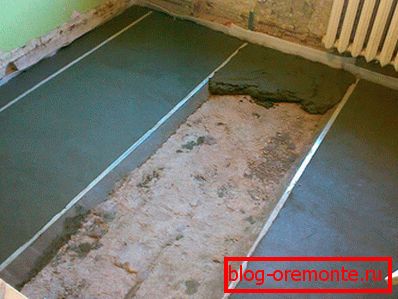
- The first step is to determine the height of the planned screed. For this you need to use measuring devices, for example, a laser level. With it, beat off a flat line around the perimeter of the bath. This procedure can be performed using the water level. The most important thing is accurate measurements that will allow you to create a flat and durable tie.
- When the level is indicated, you should install beacons or rail. At the same time, the rope is stretched from wall to wall all over the plane (you can make a zigzag shape). The rope is fastened to the mark of the indicated floor level. As a result, you can set each lighthouse separately. The beacons themselves are recommended to be installed on cement mortar. Until the solution has dried completely, the position of the lighthouse can be slightly corrected.
- Now the prepared solution is poured between the beacons. It is important to do it carefully, so as not to damage the previously installed beacon. The whole space is filled with a solution, which after is aligned with the rule strictly according to the beacons.
When all the work on the fabrication of the screed is completed, it is necessary to give it enough time for complete drying. Temperature should be natural. If the floor is pre-laid water or electric floor heating, it should be turned off. If you leave it in working condition, the screed will dry out and crack. You will have to completely redo all the work.
When the screed is completely dry, it is time to finish. Consider three options for finishing materials that have differences in installation technology and price - it is linoleum, ceramic tile and self-leveling floor.
Economical option - linoleum!

For those who do not have the opportunity to purchase tiles or make a self-leveling floor there is a great option - linoleum. If you laid a warm water or electric floor, then laying insulation is not necessary. Based on the fact that you have already prepared the coupler, you should purchase multi-layer linoleum. Its basis consists of felt and fabric. Linoleum will serve as a heat insulator. The width of the linoleum should be chosen according to the width of the bathroom. This will completely avoid the need to dock the material. It is previously recommended to let linoleum lie on the floor in a rolled state. This will allow it to level. Some believe that it is not necessary to glue the linoleum, you can press it with a plinth - it is economical and simple. However, in this case there is a risk of waves. For this reason, the most reliable method of laying linoleum is gluing to mastic or glue. On the concrete screed is best to use mastic. For laying linoleum you need:
- Notched trowel.
- Bitumen mastic.
- Powerful roller.
- Scissors.
Roll the linoleum face down inside. Then both linoleum and the floor should be applied evenly mastic. On average, the thickness can be up to 0.5 mm. When the linoleum is glued, you need to immediately thoroughly smooth its surface with a roller. If the bathroom is large and you can’t get by with just one sheet, you can do a small overlap up to 10 centimeters at the joints. And after complete drying of the mastic, after three days, you can glue the joints. So it turns out to do the job neater and better.
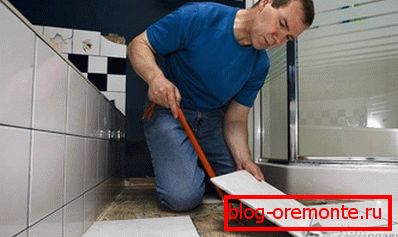
Ceramic tiles - a classic old times!
Ceramic tile was, is and will be the most popular building material for processing floors in the bathroom. The duration of its service will directly depend on the correct installation. For this reason, now consider some aspects of this process.
Before starting work, unpack the tile and lay it on the floor without glue. So, you can decide in which direction and how best to place a possible pattern.
For laying tiles you need the following set of tools:
- bubble level,
- Master OK,
- spatula with tines
- mixer,
- glue mixing container
- plastic crosses,
- rubber spatula.
You may need another tool in the process. As for the technological process of tile laying, regardless of its size, shape and cost, the laying technology has a common sequence. First of all, it is necessary to determine the direction of the rows, and also to decide which side you will start laying the tile, whether it is worth cutting the tile, laying out the first row in order to observe some pattern or symmetry.
As a rule, the tile is placed from the far corner and to the exit. It is also extremely important to carry out the correct mixing of glue. After kneading, it is recommended to let it stand for ten minutes. After the solution is re-mixed with a mixer, and the glue is ready for use. As for the application of glue, there are no special rules. It can be applied directly to the tile, it can be applied directly to the floor. It all depends on how you prefer.
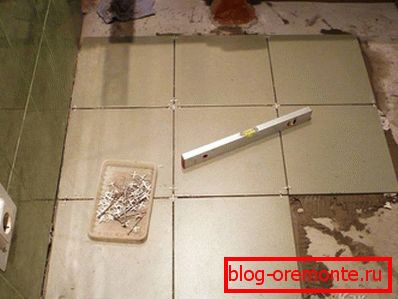
In the process of laying tiles, you must use special plastic crosses. With their help, you can achieve absolute equality of the seams between the tiles. As a rule, there are eight crosses on one tile, but they intersect with adjacent tiles. With a slight indentation of the tile, the glue mortar may come out. It should not be allowed to dry out; use a damp cloth to immediately clean the tile.
The first thing laid out all the whole tiles. In the corners and along the edges of the "trimming" can be reported after the main array is laid out. Try to calculate so that the cutting elements of the tile are located in an inconspicuous place.
When the entire tile is laid out, it remains to wipe the seams. Pre-recommended to clean the seams, removing residual glue. This should be done carefully so as not to damage the edges of the tile. Grouting is best done with a rubber trowel. This will prevent scratching. When the grout is dry, it remains to just wash its surface well from possible stains.
If the floor has a floor heating system, then make sure that it is turned off. Otherwise the glue will dry very quickly and will not hold the tile.
Instructions for laying tiles, see below:
Bulk floor - a technological breakthrough!
Bulk floors in recent years are beginning to crowd out conventional technologies that we have long loved. Moreover, it should be noted and the fact that they can be made by hand. If all the preliminary processes for leveling the floor were done perfectly well, then you should not experience problems in your work. The filling of self-leveling floors can be divided into several steps:
- First, the surface level of the future self-leveling floor is determined. This can be easily done using a laser level.
- After preparing a mixture of self-leveling floor in accordance with all the requirements specified by the manufacturer.
- Fill the floor should be carried out in stages, but not immediately. Do it from the corner to the door.
- After the mixture should be level with a wide spatula. Ideally, it would be to use a squeegee, which is equipped with a special adjustable gap.
- The first layer must polymerize well. For this process it is necessary to allocate two days. The first layer will serve as the base.
- The topcoat must be applied using the same technology as the first coat.

Bulk floor should dry well and harden. During this process, it releases harmful toxins.
It is in this sequence that the floor is treated using the self-leveling method.
It all depends on taste.
So, we have reviewed the main points of how to make the bathroom floor by yourself. To work from beginning to end successfully, you should follow all the recommendations and tips that you could read above. As for the choice of finishing materials, there is a huge selection of building materials. We reviewed with you only the three most common types of finishes. In many ways, everything will depend on you.
If during the work you have difficulties, you can write about it in your comments to this article. And at the same time, if you have enough experience, then you can leave your recommendations for making the floor in the bathroom on your own!
We recommend to read:
- 3D self-leveling floor;
- shower cabin with your own hands in the house.