How to insulate the old floor in a private house
It is no exaggeration to say that the internal flooring is the most used surface in the house. Most of their time on it is spent by children and animals. To prevent diseases, in particular the cold, you need to think about how to warm the old floor in a private house. In addition, it will also help reduce heating costs.
What to consider before
Cold air always accumulates from the bottom, and warm air rises, therefore, how many do not heat the house, if the floor remains cold, it is almost impossible to achieve full comfort. Before doing assembly work, it is necessary to analyze a few points:
- What made the flooring. This may be a concrete screed, on which the tile is laid, perhaps it is a trim board.
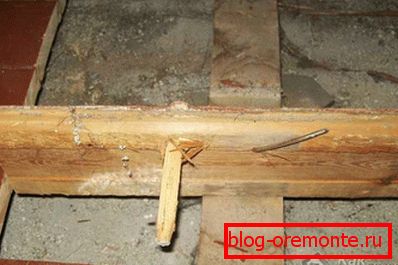
- If the floor is wooden, is there any pests in it?
- Is it visible in the corners of the mold, which spreads from the bottom up.
- Does moisture accumulate under the coating.
- Is there any space under the floor.
- Will it be critical if you even have to raise the level a little?
- Is there a basement downstairs? If not, which floor is located under the floor.
- Does he bend when walking.
The answers to these questions will determine whether the old coating can be used or whether it should be removed with the need for additional measures for decontamination and isolation.
The choice of the method of insulation
Until now, developed a large number of varieties of material for insulation. To apply them best in specific conditions, it is important to get to know their weak and strong points.
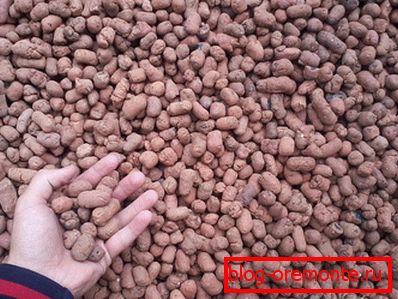
One of the methods of insulation, which has been used for quite a long time and does not lose its popularity, is the use of expanded clay. It is made from natural components, and the manufacturing process consists in burning the basis of clay. This material wins by the following parameters:
- small weight;
- possibility to choose the size of the granules;
- relatively low price;
- resistance to moisture (does not collapse under its influence);
- long service life;
- resistance to temperature extremes;
- resistance to fire.
Among the shortcomings can be identified:
- in some cases it is necessary to make a recess to provide an adequate layer;
- fragility;
- can draw in moisture, which leads to its accumulation in the granules.

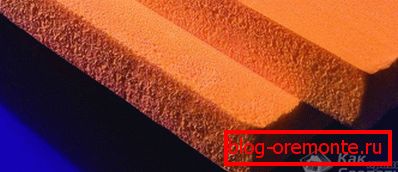
The next item on the list of materials that can be used for insulation purposes is foam. Its strengths include:
- high level of thermal insulation (with the same thickness in comparison with other material, except for penoplex, it will always surpass in performance);
- small weight;
- ease of fitting and styling;
- inedible for parasites (although mice and rats do an excellent job with it);
- does not absorb moisture;
- resistant to high temperatures (without direct exposure);
- lack of thermal expansion.
If you stop the choice on polyfoam, then it is necessary to consider:
- unwanted use with wood pavement due to fire hazard;
- instability to chemical and physical effects;
- toxic when burned;
- during foam insulation, it is important to correctly calculate everything so that the dew point does not remain under the floor.

Many often have a choice between this material and mineral wool. For its manufacture can use the battle of glass, quartz, rock or slag. If we talk about the positive qualities, it is:
- excellent sound and heat insulation;
- resistance to fire (especially stone wool);
- chemical resistance;
- good vapor permeability;
- high tensile strength (for some brands);
Of the sad moments can be noted:
- inconvenience of mounting glass wool (it is necessary to use clothes that will prevent it from getting on the body, as well as glasses, gloves and a respirator);
- possibility of compaction with time, which leads to the appearance of cold bridges;
- the appearance of unpleasant dust;
- Some types of this material absorb moisture well.
Penoplex - very similar in its characteristics with foam. It has even greater thermal insulation. It can be applied in any weather conditions. We also love rodents and are afraid of heat (with direct exposure). In some cases, the insulation can be made using gypsum fiber. It is used in conjunction with a dry screed. As a method, you can consider filling the cavities with foamed polyurethane. Under certain conditions, this can be done without removing the old floor.
Vermiculite is a beautiful, durable material, resistant to moisture, but its cost is quite high, so not everyone will afford to buy it for floor insulation.
The ideal solution would be a combination of passive insulation with an active warm floor. For the latter, a large number of species are available today, which include water and electric versions.
Planning

In addition to calculating the amount of basic material and the necessary work, the questions at the beginning helped determine whether additional components would be needed:
- If mold or fungus grows, it will be necessary to additionally purchase an antiseptic composition.
- If you find a shashel, the best option is to replace the boards, since there is no one hundred percent guarantee that you will remove it, and it will be very unpleasant to disassemble the entire floor after all the work has been completed.
- If there is a creaking and sagging, you will need to assess well the state of the lag. May require replacement. For this you have to purchase additional lumber. Final determination of their actual condition is possible only after dismantling the top layer of the cladding material.
 In case of proximity of groundwater or another reason for a large accumulation of moisture, it is important to purchase waterproofing, in some cases it is better to have several layers.
- For high-quality insulation will require excavation at a certain depth. Either it will be necessary to simply replace sand or expanded clay, which has already exhausted its service life (it usually ranges from 10 to 15 years). To accomplish this, garbage bags are required.
- If you plan installation of a heat-insulated floor, then it will be necessary to get components depending on what option you chose. For water, you will need metal-plastic or cross-linked polyethylene pipe, manifolds, stop valves, and fixing materials. For electric you can buy ready-made mats.
- For the screed, reinforcement and knitting wire are required.
To purchase the right amount of material, you first need to calculate the area of the room. For this, the length is multiplied by the width. The resulting number will be our foundation. For insulation thickness of the beams can be neglected, because all the same, it must be taken with a small margin. The area of hydro- and vapor barrier will also be equal to the area; an overlap must be added to the final value, which should be 10–15 cm.
When purchasing components for a warm floor, you can subtract the place that will be occupied by furniture.
Performance of work

In the event that you are sure that the state of the underground space is close to good. For example, under a wooden base there is a concrete screed, which can serve for many years, and the logs themselves lie on a cement base, then the work can be carried out without large-scale dismantling.
- All furniture is taken out of the room and thorough cleaning is done.
- Places that need to be protected are covered with building tape.
- Removed one board between each of the lag.
- The space is filled with polyurethane foam. It is necessary to move the hose so that all voids are filled.
- Additional hydro or vapor barrier is not required, because after solidification, the base will perform all these functions.
- When the foam took its shape and dried out completely, the boards were mounted back.
![]()
Another option with the presence of a good base under the floor - to break all the boards, cover the entire area with a vapor barrier and put insulation in niches from above. If the wooden flooring is in perfect condition and it is possible to raise the floor by 10 cm, then you can use the dry screed method. To implement it, the entire area is covered with a vapor barrier. The crate is made of wooden beams, expanded clay or other filler is poured into the space. The foundation for the finishing floor is laid on top and the final finish is performed.
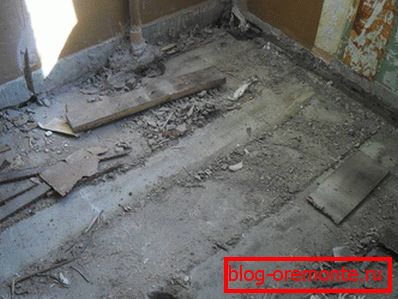
In all other cases, which will be described below, the first two steps are repeated, after which you will need to remove the entire flooring. If you have a dry floor under your floor, then the scenarios for the development of events may be as follows:
- The sand, which could have already turned to stone, must be removed. This will require construction bags. They are filled and taken out of the house.
- When you know for sure that the groundwater does not come close, and you do not plan to fill the screed, the foundation, which was under the sand, is well compacted.
- The surface is covered with a membrane or a thick polyethylene film. Separate parts are stacked with an overlap of 50 cm. The seams are glued with scotch tape. It is necessary to provide turns on the walls that will reach the level of the future floor.
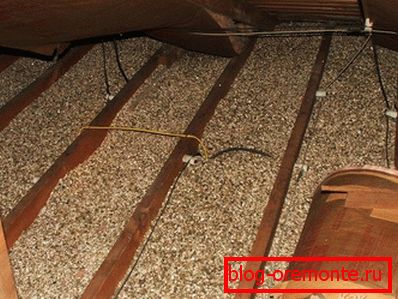
- The resulting space is filled with expanded clay to the lag, well leveled and compacted into all cavities.
- On the logs, a vapor barrier is attached so that there are recesses between the boards.
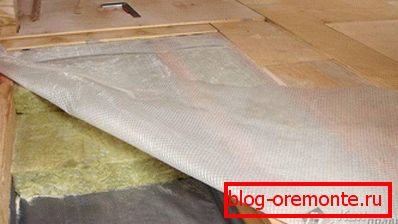
- In between the lags fit insulation. In this case, basalt wool is perfect.
- From above, the whole space is again tightened with the help of a vapor barrier. It is necessary to do this so that the particles of the insulation fiber do not scatter with time.
- The basis from plywood or OSB of a plate keeps within.
- It is covered with a clean floor.
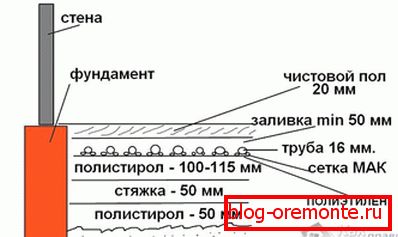
If you plan to make a warm floor, then (this option from step 8 is also suitable when there is a concrete base under the floor):
- A recess is made on the size of the future screed plus insulation.
- The base is well rammed and leveled.
- The territory is covered with a hydro-barrier, as in the previous case (in this case it is possible to use bikrost or ruberoid).
- The lathing is made of reinforcement with a diameter of 8 mm. It is laid on the prepared surface.
- Next is the pouring of concrete. At this stage, it is advisable to try to bring everything under the level so that this happens, you must first mount the beacons.
- It is compacted with a vibrator so that the concrete fills all the gaps.
- After 3–4 weeks, when the plate becomes a monolith, you can proceed.
- The hydrobarrier is covered, the heater is laid on it. You can use foam or foam plastics. It is fastened through to the concrete.
- Grille or pipe guides are mounted, pipes are laid. If this is an electrical option, then mats are placed on the insulation.
- The finishing screed is poured in and after 3 weeks it can be tiled.
When you take out the ground, and you may see a need to strengthen the foundation. In this case, formwork is mounted around the perimeter. The width between the shields should be 30? 40 cm. A metal crate is placed inside and filled with mortar. Further work can continue after the full setting and dismantling of the support system.
If you are lucky enough to be the owner of the basement under the house, then the task is much simpler.
- The first thing to do is to go down to the basement. First, the condition of the ceiling is evaluated.
- All gaps are covered with plaster.
- Next, the plate is sheathed with foam or foam. Fastening is carried out by special umbrellas. The sheet is applied through it, a hole is made in the punch, and the mounting material is inserted.
- Top adhesive is applied. Reinforcing mesh can not be used, because no one will beat elbows or knees here.
- From the side of the room floor is insulated by one of the above methods.
In some old houses a concrete screed is poured and linoleum is laid on it. If in this case there is an opportunity to raise the floor, then the cover is simply removed, lags are installed, a hydraulic barrier is laid, then a heater, everything is sewn on top with sheet material, and the finish is a matter of taste of the owner.
As you can see, floor insulation can be done by hand. This requires careful consideration of the case. It is impossible to consider all the options within one article, so you are free to combine methods or, based on principles, to do something different.
Video
Thus, as in this video, you can warm the floor below:
See how to insulate the floor in the attic with sawdust, below: