How to install the door with your own hands
Swing doors differ in both their design and the materials from which they are made. Before embarking on self-installation of doors, it is necessary to acquire a certain theoretical base - learn the design features, technological sequence and the rules for installing doors. In the article we will explain how to install the interior door with your own hands, show photos and video instructions.
Classification
 Block swing doors are:
- door frame, fixed in the doorway;
- one or two door leaves hung on this box.
By their contour doors can be arched or rectangular. In addition, left and right swing doors are distinguished. This is reflected on the side of the hinge mounting. In addition, models are available with swinging door leafs that open in both directions.
Design

 Door leafs can be designed from prefabricated elements of the same wood species, and from different. In the production of such a canvas, all elements are carefully selected in full compliance with the technical characteristics and performance of each breed. Often the canvases are veneered with veneer made of valuable wood, which is then treated with special enamel and nitro lacquer.
The door leaf can be filled with slats, wooden bars or solid fillers (plywood, spiral chips, polyurethane, hard wood fiber structure, etc.). Most often for residential interior use framed swing doors. Their cloths are made by the continuous or issued glass inserts.
Glass panels can be reinforced, patterned or transparent, as well as stained glass. The exceptions are swinging swing door models. They are usually supplied only with transparent glass - these are the safety rules for the use of hinged interior doors.
Installation steps
Installation of interior doors is made in compliance with the following sequence:
- preparation of the wall opening;
- door box assembly;
- sidebar lock and hinges;
- installation of the door frame in the opening;
- web attachment;
- installation of platbands.
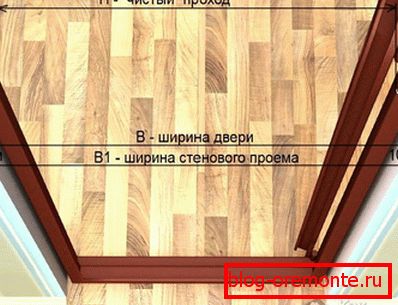
Installation should begin with the preparation of the wall opening. The dimensions of the opening are always slightly larger than the standard dimensions of the door, so for its fixation wooden blocks-wedges are used. They provide the necessary clearance for pouring foam. It is possible to make a narrowing on each side a maximum of 40 mm, otherwise the line of junction of the wall with the attached element will not overlap the casing. If the difference in the dimensions of the opening and the door unit is more than 40 mm, then a door frame with a greater width should be chosen.

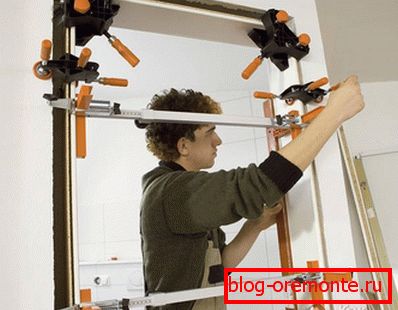
It is necessary to assemble the door frame on a flat surface (preferably on the floor). Many boxes are sold prepared for assembly, they already have an end cut. Parts of the universal kit must be trimmed independently. The angle of the end slice should be 45 °. After trimming, the vertical elements of the structure are tightened with self-tapping screws with the horizontal components of the door frame; here it is important not to allow the components to move.
For further installation requires a hinge insert.
When performing a hinge tie-in operation, it is important to remember that the distance between the edge of the hinges and the edge of the door leaf should be 20 cm.
Having attached a loop and having outlined it with a pencil, it is possible to make a sample with a chisel or an electric milling tool, which is much faster and more convenient, especially if there are no skills to work with a chisel. This selects a layer of wood corresponding to the thickness of the loop.
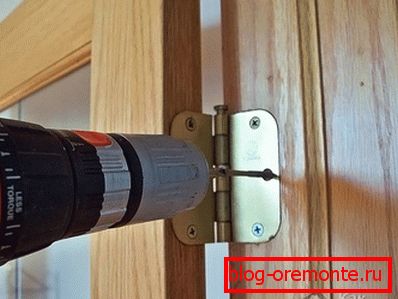
Now you can begin to install the loop - by attaching a loop, you need to mark the place of the holes. Then drill the holes for the screws, while the diameter of the drill should not exceed 3/4 of the diameter of the screw. Only after that the loops are attached.

 The next operation is a lock inset. Approximately 1 m is measured from the floor - it is at this height that the lock should be located according to the technological rules. Installing a lock requires special care and attention, since composite materials of varying degrees of hardness and density are often used in the box and door leaf designs.
After performing all the operations, you can proceed to the installation of the door frame. In the wall opening it is fastened with self-tapping screws. To do this, drill holes in the vertical elements of the door unit. For reliable fastening, it is necessary to drill three holes at an equal distance from each other. Then the holes should be bored under the head of the screw-screw. After that, the holes for the plugs are marked and drilled. Then corks get clogged and screws tighten. Next, you should remove the box with wooden wedges, leaving it some mobility for subsequent adjustment and adjustment to the size of the door leaf.
The correct installation of the entire door unit is checked as follows: the door should be secured with wedges and left in a half-open position. If it is not spontaneous closing or opening, then the door is installed correctly, and you can proceed to the next phase of work - filling the opening with mounting foam.
Before pouring it is necessary to firmly fasten the box in the wall opening. To do this, wedges are driven in evenly, and the bearing bar of the structure is tightened with self-tapping screws, which is adjusted to the plumb line. At this stage of the work it is important to ensure that there is no distortion of the elements of the door unit. Then the door leaf is hung on the hinges and the carrier bar is rigidly fastened along the porch.
The presence of spacers is a necessary and very important point, without them, the mounting foam can deform the box when dry.
 As a result, an integral structure is formed, having a uniform gap along the perimeter between the wall and the door frame. Next, the canvas is removed again, and spacers are installed in the opening.
Далее следует заливка пеной пространства между стеной и рамой двери. Когда пена высохнет (время высыхания указано на упаковке), ее остатки тщательно срезаются. Остается последний штрих – installation of platbands.
Having attached the platband to the installation site, it should be noted the cut line along which the excess part is sawed off at an angle of 45 °. The technology requires first to install the left platband, and then - right. Platbands are fixed with screws. When all the door installation operations have been completed, if necessary, all structural elements can be protected from moisture. For this purpose, silicone sealing compound is used. At this installation of swing doors is completed.
Video
The installation process of interior doors in the video format:
Additional video about the installation of interior doors you can find in our video section: Video about the installation of interior doors.