How to install a toilet with their own hands
Installing the toilet yourself is not very difficult, if you understand some of the details of the functioning of the system. Before you put the new unit, the master will have to do the work of dismantling the old one. It is also necessary to pick up a new toilet with a cistern so that the kit will successfully go to the bathroom. In this article we will talk about how to install the toilet with your own hands on the tile (tile), as well as demonstrate the video tutorial on installation.
Toilet Selection

Before installation, you must select the desired kit. Today, all the leading brands in the plumbing market produce a lot of lines of various toilet bowls and bidets. In order not to get confused in such a variety of models, it is necessary to approach the purchase intelligently.
- Material. First of all, you need to pay attention to the material from which the toilet is made. In stores in stock you can find models of sanitary ware, porcelain, cast iron and other materials. It is noted that porcelain differs in the best characteristics. It is easy to clean and does not absorb odors, which is important for an object such as a toilet. Many people get cheap sanitary ware. This material is still very popular, but it is not the best. Sanitary ware is porous, it perfectly absorbs odors, from which it is not so easy to get rid of.
- Price. The cost of toilet bowls today varies widely. It is not recommended to buy very cheap units, because they can then deliver a lot of trouble. Poor ceramics and components will force the owner to overpay in the future master for the repair of the system. It is not necessary to buy and too expensive units. It hardly makes sense to buy a luxurious toilet on a golden leg in a regular city apartment.
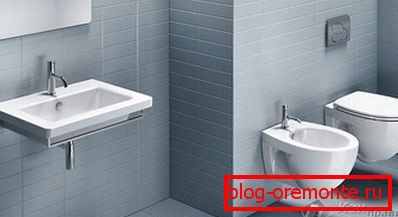
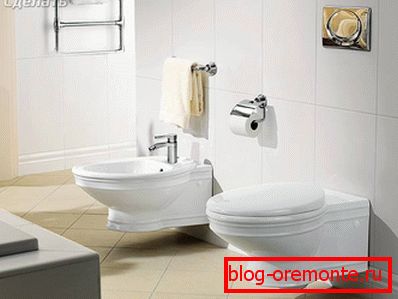
- Model. The model range of toilet bowls is very wide. Buying a unit, you must be guided by the size of the bathroom. If it is quite small, you can purchase a wall-mounted toilet with an integrated flush system. This will save extra space. These toilets are very compact and look great. The large bathrooms will look good toilets with a bidet.
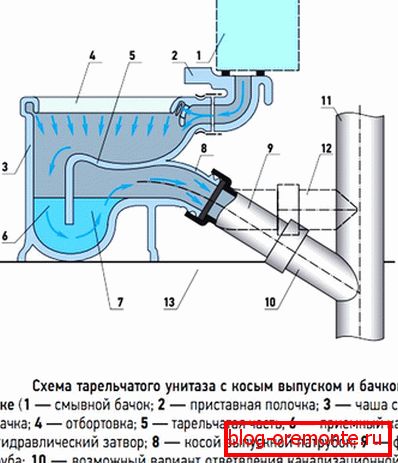
- Tank design. Tanks may have a horizontal, vertical and inclined flushing system. Choosing a kit, it is necessary to pay attention to this item. The choice of the flushing system depends on which of them is operated by the owner in the house.
Dismantling the old toilet
 Dismantling of the old unit occurs in several stages.
If the toilet is very old, then it literally "rooted" to the base. In this case, dismantling it will create some difficulties.
- First you need to disinfect the toilet with bleach.
- Further it is necessary to be equipped well for work. It is necessary to protect hands and eyes from ingress of water and fragments of ceramics.
- It is necessary to block the water.
- The remaining water is drained from the tank.
- When everything is prepared, it is necessary to proceed with the dismantling. First of all, the bolts that secure the toilet to the floor are disconnected. If the system is relatively new, you just need to unfold the bolts, remove them, and then disconnect the plastic tube from the sewer system. Then the pipe is disconnected, which serves for the flow of water. After that, the toilet can be disconnected from the base.
Site preparation

Many wonder how to install a toilet. First you need to properly prepare a place for a new unit.
- The floor in the toilet is cleared of various debris and residues of materials.
- The sewer hole and the water intake system are covered.
- In that place where there was an old toilet bowl, it is necessary to carry out a marking under expansion bolt shields.
- Holes must be drilled with a diamond drill.
- In the store you need to buy a set of screws and dowels for mounting the toilet bowl.
Mounting a new one
 Basically, all the toilets are mounted the same way. Differences can only be in various additional options. Installation of the simplest toilet and the most complex is still built on one principle.
- First, the toilet is connected to the sewer. Removing the temporary cap from the system, you need to put the unit in place and screw it to the floor.
- It is better to pre-fix the screwing points with silicone sealant.
- Now you need to strengthen the bolts on the heel of the unit.
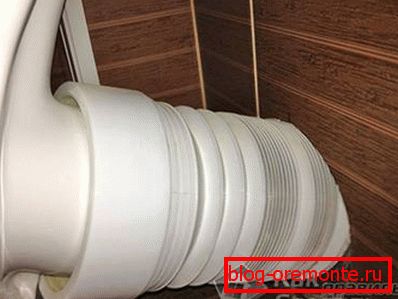
- After that, a corrugated sleeve is installed. Before installation, it must be properly treated with silicone sealant.
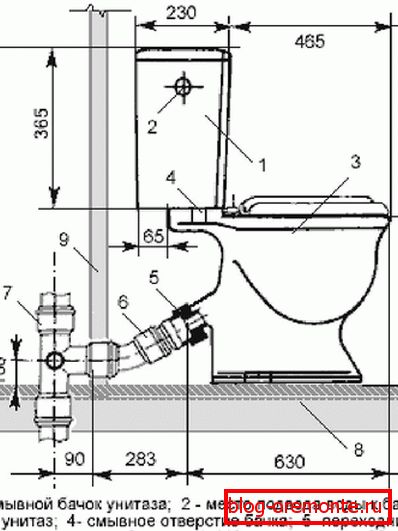
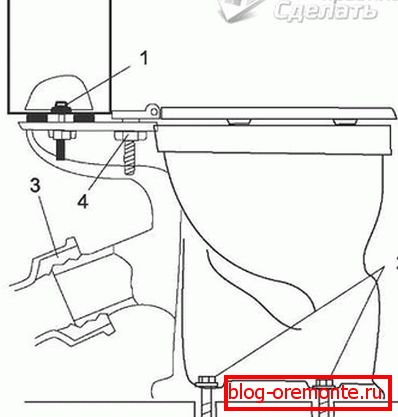
- The final stage - installation of the tank. Correct installation of the toilet bowl is a guarantee that the system will work without failures. The tank is bolted. After this, a water supply hose is installed.
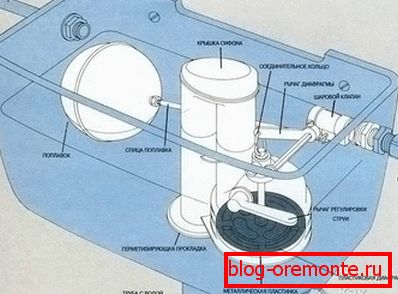
Installation of the tank - not the most difficult thing. The main problem most often happens when adjusting the float. Installing a float valve requires care. When choosing a tank, you must check which valve is included.
The float valve is responsible for adjusting the water pressure.
The lower the valve is installed, the less water consumption. It must be ensured that during installation the water level does not reach the drain hole by 5 mm.
Video
The process of installing the toilet is described in detail in the following video:
Additional video about the installation of a toilet bowl can be found in our video section:
- Video об установке унитаза
- Video on the installation of a suspended toilet with installation
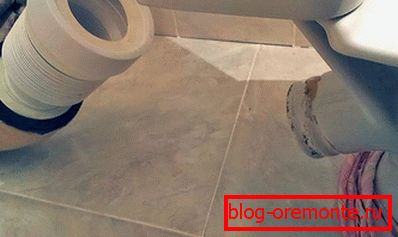
On the tile

Above, we have already discussed the general principle of installation of the toilet. Now we suggest that you familiarize yourself with the subtleties of installing a toilet bowl on a tile. Immediately it should be noted that there are 2 methods:
- Open.
- Closed.
But before you start work, you should prepare the necessary tools and material:
- perforator;
- set of screwdrivers;
- adjustable wrench;
- level;
- drill;
- drill:
- rubber spatula;
- core;
- hammer;
- silicone.
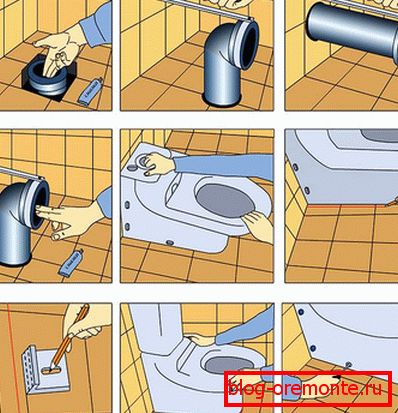
Open way
This method of attachment will require less time and effort. However, with regard to the aesthetic side, they are significantly inferior to the closed method of installation. So, the first thing you need to determine the installation site.
Installed toilet should not interfere with other plumbing. It should be easily accessible.
On the selected place on the tile are marked. Holes will be installed in these places. You should also draw the contour of the sole of the toilet. Next, carefully set aside the toilet to the side and in the marked places drill holes, the diameter of which should be equal to the mounting element.

The drilling process is quite laborious. It is necessary to be careful that the glaze of the tile does not fall off much. Therefore, first drill with a drill without impact and at low revs. Also, as an option, you can use the core. Due to this, the drill will not slide on the tile and scratch its surface.
Then take the drill bit on the tile and drill a hole. After that you will need a drill for concrete. The depth of the hole must match the length of the plug. Now clean the hole of dust and fill it with sealant. In this case, the sealant will prevent dust and moisture from entering the toilet. After that, insert the dowel.
Immediately before installing the toilet on the contour carried out also apply a sealant wide strip. Due to this, moisture will be completely prevented from getting under the base of the toilet bowl. Then came the turn of the last stage of installation:
- Toilet bowl gently installed on the tile.
- Insert the screw into the holes and twist it into the dowel.
- Special caps are put on the mount, which will give a general appearance of a more aesthetic look. Moreover, the plugs will protect the mount from moisture.
- Further, under the weight of its weight, excess silicone will perform.
- Until the silicone is frozen, it must be removed with a rubber trowel.
Closed way

Just as in the first case, you outline the contour of the toilet bowl on the floor, as well as mark the places of the holes. Before you install the toilet bowl, you must complete the outlets. The toilet itself is connected in a water and sewer pipe.
Then you can make a direct installation. Hidden attachment set on the tile. After making holes. Mounts are installed on the floor and securely fastened with bolts.
It is not recommended to tighten the bolts strongly, as additional adjustment may be required by connecting the toilet to the sewer and water supply.
If under a tile in a bathroom / toilet the technology of a heat-insulated floor is installed, then to use such fastenings is prohibited. The toilet is installed on silicone, liquid nails, epoxy resin with hardeners. But in this case, you must first degrease the tile and the sole of the toilet bowl. Also, the surface should be sandpaper, giving a slightly rough surface. This will provide better grip.
Toilet bowl
Another design toilet bowl - suspended. For installation requires more work. As in the previous case, there are two methods for installing a suspended toilet bowl:
- On a concrete base.
- On the installation.
Therefore, it would be wise to consider these two technologies separately.
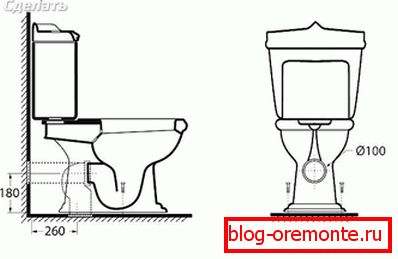
Installation on a concrete base
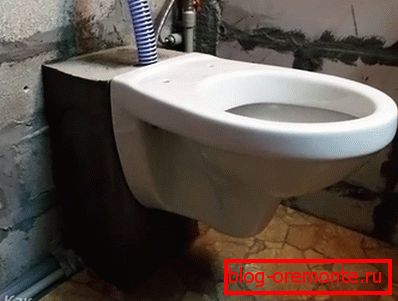
Some refuse to buy a steel frame for installing a toilet. In this case, the concrete monolithic base will be no worse, and the strength will also exceed. With this installation of the base produced rods, which is mounted on the toilet. In addition to the retention of the toilet, concrete structure has another role. It houses a coupling for draining water.

The installation process has the following sequence:
- Installation of the coupling for discharge.
- Determination of the installation height of the toilet.
- Preparation of shields for formwork. Their size should be large by 50 mm from the overall size of the structure.
- Accurate measurements between mounting holes. Usually, it is 200 mm. But depending on the model, the distance may be different.
- For formwork, you can use chipboard, OSB or board.
- Installation and measurement of the length of the rod. Here it is very important to consider the following dimensions: the depth of the burial + the distance from the toilet to the main wall (meaning the thickness of the concrete structure cast) + the thickness of the toilet at the attachment point + the length of the free end for tightening the nut.
Before making a hole, make a preliminary fitting. While holding the toilet bowl, bring it to the attachment point. If the holes coincide with the marks, and the bowl itself will be installed in the middle, you can continue the installation work. If you notice some deviations or holes are not outlined, then re-measure.
Step-by-step instruction
Now we offer you step by step to follow the installation of the toilet on a monolithic concrete base:
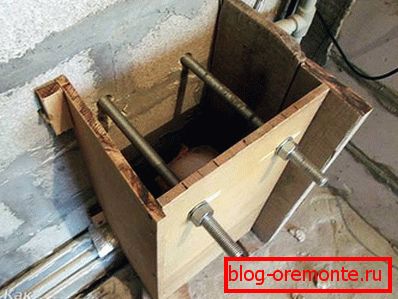
- First, the installation of formwork.
- But first two holes are drilled in the wall to install rods, which will later hold the toilet. In the wall it is enough to make a recess with a depth of up to 150 mm.
- After cleaning the hole from dust, pour glue into it and insert threaded rods into it.
- Next you need to set 3 shields. 2 lateral and one central in which it is necessary to make 2 openings under fixing cores.
- Shields are installed strictly vertically. Also, make sure that the rods go through the horizontal level through the shield.
- Shields are interconnected by screws. And for greater strength, you can screw the nuts on the rods and press the shield against the wall. To do this, it is recommended to put a puck.
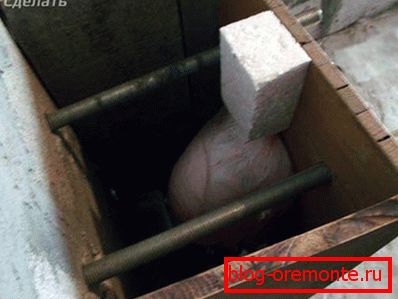
- In the place where there should be a water discharge from the tank, fix the foam.
- Also install a sewer drain pipe O110 mm. This pipe will be filled with concrete as a result. Therefore, check the quality of its connections on sealing rubber bands.
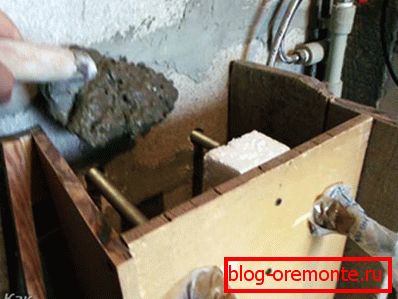
- The next stage is the concreting of cement, sand and rubble, mixed with water.
- In this process, the ends of the rod are recommended to be protected from contact with concrete. To do this, put a bag on them or wrap them with a rag.
- When pouring concrete, it is necessary to achieve sufficient density. Especially in the corners of the design. To do this, pierce the poured concrete with a stick until the “cement milk” flows from the slots of the formwork.
- When the concrete has stiffened, carefully dismantle the formwork.
- After that, a drain barrel connection is made. Take PVC corrugation O40 mm. Insert one end into the recess of the toilet. Corrugation is recommended to fix the silicone sealant. Be sure to let it dry and then continue to work.
- Next on the mounting rods put on the toilet with a fixed corrugation. Use a plastic washer and nut for fixing.
- At the end, connect the tank to the toilet bowl with the help of corrugations and feel drained.
- Installing the toilet lid, you can operate the toilet.
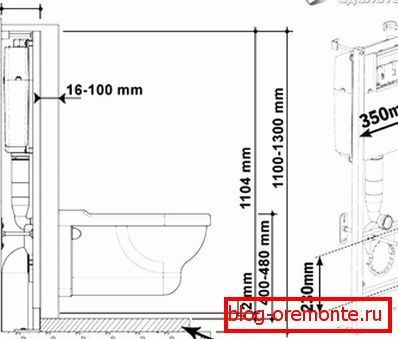
Installation Installation
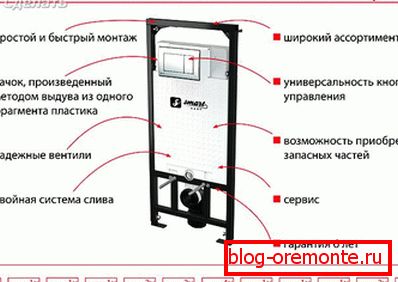
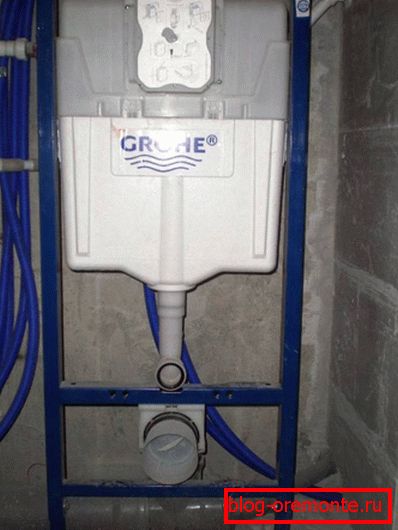
Now we invite you to familiarize yourself with the installation of the toilet on the installation. To do this, you should buy a toilet with a special metal frame. It will be necessary to install it into the wall, and the toilet bowl will be fixed to it.
- Steel frame is installed strictly vertically. It can be fixed to the wall and floor through special holes. Before you carry out capital fasteners, check it for evenness.
- To this place it is necessary to carry out the supply of sewage pipes and plumbing.
- You should also set the height of the toilet. It will depend on the growth of the owner of the apartment. Usually, the height of the bowl is fixed within 400-430 mm.
- As for the supply of water to the tank, it is better to make it hard. During installation, the valve in the tank on the water supply should be closed.

- Next is the connection of the toilet to the sewer. The connection takes place with the help of corrugations. At this stage, the drainage system should be tested. Therefore, the toilet is securely fastened to the frame, previously connecting it to the sewer pipe. Continue to drain the water. If everything is tight, then turn off the water in the tank and unplug the toilet.
- Now you can trim the installation. For this you can use drywall. Fix the profile to the wall and screw the drywall to it. At the same time make holes for sewage, mounting rods, and holes for the tank.
- At the next stage, make facing with ceramic tiles or other finishing materials.
- After all these manipulations, the installation of the toilet bowl is carried out.
The quality of the installation of the suspended toilet bowl on the installation is completely dependent on the correct installation of the frame. Therefore, make this stage of work extremely carefully.
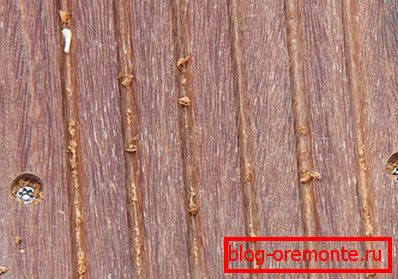
Some problems
Sometimes after a couple of years of service, the toilet loses its original appearance. There are signs of rust on it. This is due to low-quality components of the tank. Eliminate the inveterate phenomenon of this type is almost impossible, especially if the unit is made of sanitary ware. When purchasing toilets, you must carefully monitor the quality of all components.
Water can damage the machine. The quality of water, as a rule, does not meet the standards for which Western grade aggregates are developed.

Sometimes do not stand plastic elements in the design of the tank. They can be distorted by temperature or mechanical stress. If the tank fails prematurely, it means that the quality of the kit was not very high initially.
Problems with water flow often signal that the float valve is installed incorrectly. It is necessary to adjust it, and water consumption will be reduced.
Toilet care
To the toilet has retained its original appearance for many years, it is necessary to constantly maintain it in a clean state. To care for him you can use a variety of tools. For example, in order not to constantly wash and clean the inner surface, today various gels and tablets are used.
 Without thorough cleaning, of course, can not do. This will help cleaning fluid.
Some substances can not be poured into the toilet. These include acetone and solvents that can damage the sewer. Also, do not pour boiling water into the toilet, because the sanitary ware may crack. If there is a need to flush the unit, then it is better to use two buckets of hot water.
In the care of the toilet indispensable tools will be soda and vinegar. If red stripes began to appear on the surface of the unit, they can be removed with a solution of vinegar in hot water. Soda gently and gently clean the surface from contamination.
In case of heavy pollution, special solutions are used. They usually contain hydrochloric acid. There are various types of pollution, therefore the range of cleaning products is also very large. When buying, you need to specify whether the specific composition is suitable for the product. They differ not only in the nature of the impact, but are also available for toilet bowls from certain materials.
We recommend to read:
- Clogged toilet, water does not go away, what to do
- How to install an acrylic bath
Scheme