How to hide the pipes in the toilet
Is it necessary to close the pipes located in the toilet? Of course, the premise itself is not presentable, and here also the communications running along the walls in different directions make the view even worse. Since there is no way to get rid of the pipes - water supply and sewage systems are still necessary - they can simply be hidden.
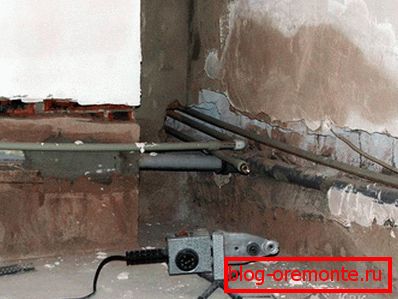
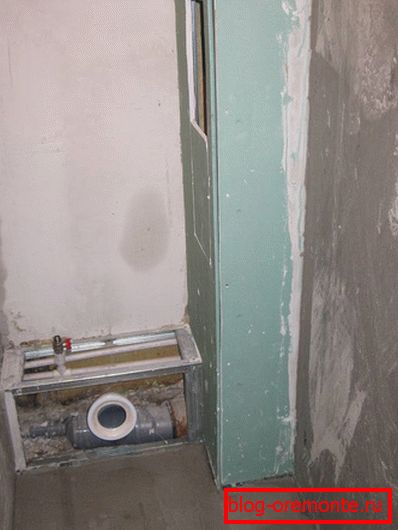
Usually, going to the toilet, you can observe the following picture. In the corner, or even worse, a sewer riser runs right behind the toilet in the center of the wall. A water supply pipe is connected to the cistern. And, perhaps, in some situations you can even see the heating going on. To get rid of this unsightly sight, you can use certain options boxes.
How to improve the look of the toilet

It should be remembered that enough space should be left for the pipes of the water supply system. This is necessary in case of an accident of any kind, and the pipe will leak.
As practice shows, and the bitter experience of some people, in this case, the pipes bricked up in the wall had to be opened up by breaking the plaster, thereby making a lot of unnecessary effort and breaking repair. In order not to repeat their mistakes, we advise you to make a box that can be easily disassembled in case of need.
To make such a construction, it is necessary to have the following building materials with you:
- metal profile for the device frame;
- plasterboard;
- metal tapping screws for mounting gypsum plasterboards and dowels for fastening the profile to the floor and walls;
- putty and tile (perhaps also paint, emulsion, wallpaper).
From the tools will need such items:
- roulette at least three meters;
- level about a meter long;
- drill or punch for holes in the walls under the dowel;
- screwdriver (but a good power screwdriver with a cross head for self-tapping screws will also work);
- gypsum cardboard knife;
- spatula for surface finishing;
- emery cloth.
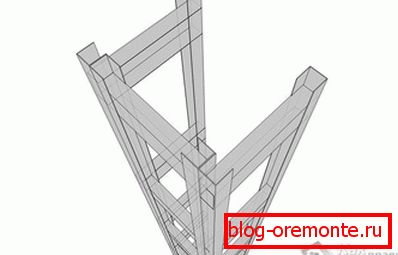
Box device
 We proceed to the device box. Always start from the bottom, that is, from the floor. We take a roulette and we measure out which piece of the profile we need. Cut off its length, then put it to the floor. To make it stand exactly, the size between the profile and the wall on its two sides is measured. Then through the metal profile we make holes in the floor with a drill or a perforator, take several dowels and hammer them in, and screw the screws into them. Although, as an option, they can also score.
The profile on the side walls is fixed with a level. We put it on the edge of the lower profile, and the top leveling level. Mark the pencil line, then again not to put it. We also install the profile with dowels, as well as the lower one.
In case the frame is solid, it is necessary to install longitudinal between the side profiles, to which we will fix the sheets of drywall.
If the walls are even, the length of the longitudinal profile will be the same as that of the lowest one. But it is still better to re-measure it, you never know - the walls may be uneven or unevenly plastered
You can advance a little on the wall outside the box slightly with a pencil where the cross-section is laid, so that you can know where to turn the screws.

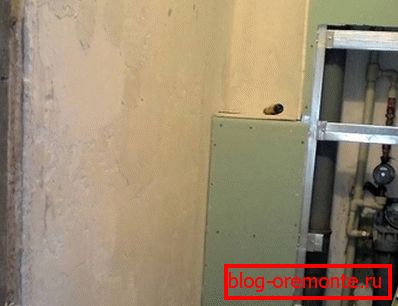
Having attached profiles in all necessary places, we can continue the device of a framework, being engaged in gypsum cardboard fixture. We measure out the necessary piece, cut out with a knife for drywall and stick it to the place that we want to close. In no case should not try to break the sheet - this can lead to the appearance of cracks, which then will be extremely difficult to repair. If the sheet lays well, you can brush it with sandpaper. When all this is done, take the sheet, re-attach it to the profiles and begin to fasten with screws. We twist them not too often, approximately at a distance of 20 cm. You can fasten a whole sheet, or pieces can be used, the main thing is that they should be conveniently fixed. Completed installation can be considered after the reinforcing mesh is fixed to the seams with the help of putty, which will prevent cracks from appearing on the seams.
Finishing on the box
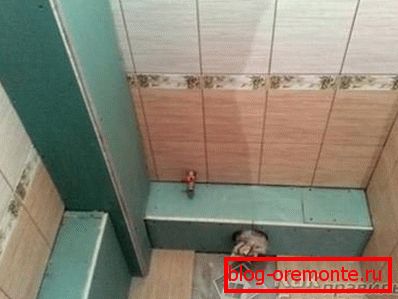
It is possible to finish the drywall box in several ways. One of them, the most common and most durable - is to put ceramic tiles, of the same type or with patterns. To choose a reliable tile, you need to consult with reliable friends or ask to consult a specialist.
Another option is to putty the finished box and, when the putty dries, paint it the color of the walls in the toilet with oil or water-based paint. This option is cheaper, but will need periodic cosmetic repairs. And finally, you can just stick the paper wallpaper.
Video
A box can be made, for example, like this: