How to fix the bath to the wall: different ways
One of the most important elements in bathrooms is a bath, and this despite the fact that relatively inexpensive shower cubicles are considered more popular today. Many are interested in how to mount to the wall in such a way that the water does not flow under it, and the bath itself is not loose. Special mounts are used for this purpose, but they may differ markedly.
Cast iron, steel and acrylic - what's the difference
Cast iron baths. During installation, you will feel that they weigh well, so they must be installed on a solid and stable base.
Steel baths are fixed on the podium, the walls of which are made of bricks. Installed inside the podium, it will never swing and will be very firmly at its base. However, if it is fixed in this way, then noise during its filling with water cannot be avoided.
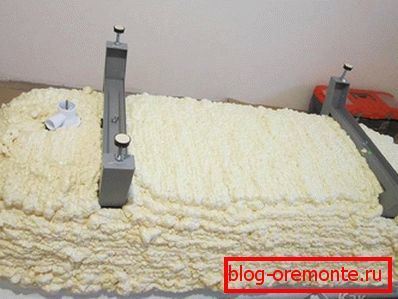
To reduce the sound while filling the bath, you can use the processing of its outer part with mounting foam or putty. Then you will not hear the sound of water, except that the heat will last longer.
Those who install an acrylic bath, know that it holds the heat much better than its cast iron counterparts, besides their surface is non-slip. Acrylic products are known for their pleasant appearance, although, however, the degree of their strength is not so high. Considering that acrylic products have a flexible bottom, a metal frame should be made, otherwise the bottom will bend under the weight of a person. It is also necessary to use special legs, which are part of the acrylic and steel bath frame.
Mounting and communication
Regardless of which bath will be installed, you need to learn a few basic principles that will help to carry out the installation correctly:
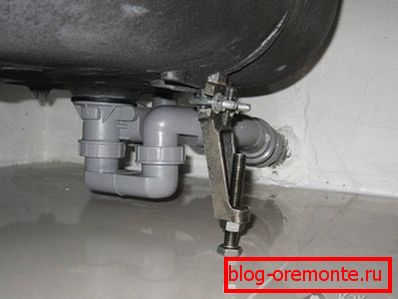
- It is more convenient to fix the drain pipes when the bath is on its side. Carefully turn it to the side, otherwise there is a risk of damaging the coating. After that, it is mounted overflow and drain pipes.
- The next step is to connect the siphon with pipes (usually plastic and flexible).
- In the inverted position, the legs are attached, and it is mounted on them so that you can easily connect the siphon pipes to the sewage system.
- On the legs the bath is placed only after installing the drain.
- After installation at the proper place, horizontal alignment is performed using a level (to do this, adjust the height of the legs).
- After the installation of the drain system is completed, it must be checked for tightness. To do this, you need to draw water, and then check whether it has not leaked to the floor. If there is a leak, the shortcomings must be eliminated - seal the seams with silicone, or simply fit the pipes at the joints more tightly.
- Then, if necessary, a drywall cage or a special foam block podium will be arranged, which will hide the bottom of the bath.

How to install a bath of different materials? Now we analyze it in detail.
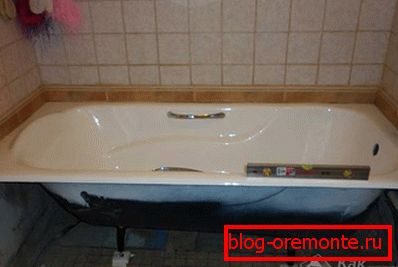
Cast iron often set on four legs. These legs are connected to the body with wedges that come in the kit, or the supports can be tightened with bolts. If the cast iron bath needs to be installed on an insufficiently strong loose surface, then metal plates should be used, which are placed under the legs and allow the weight to be distributed correctly over the surface of the base.

The diameter of such a lining should be at least 5 cm, and the thickness - 5 mm or more.
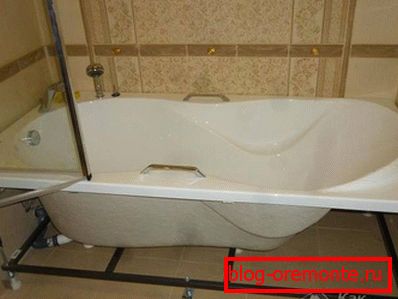
Steel baths do not weigh as much as cast iron, so making them somewhat more difficult to sustain. It is better to install them on bricks to increase the area of support. Acrylic products attached exclusively to the wall, otherwise you can not avoid a small backlash or reel. In addition, it is going to frame, with which the whole structure will increase slightly. In the video below you can see how the installation of the frame of the acrylic bath in the bathroom:
Attachment options to the wall
There are several ways to mount.
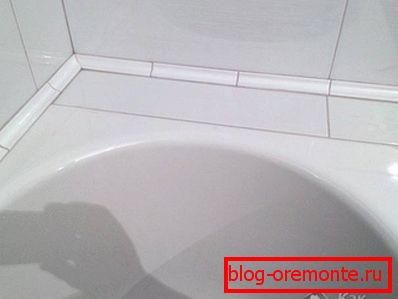
Insertion in a niche. If the installation is carried out in a room where there is not even a rough finish, then the niche can not be done, if given the size of this is not necessary. The bath is simply installed, the walls are plastered, they are trimmed to a finishing one and the joint is sealed with a sealant so that there is no leakage. If you are going to install in a room where there is already a rough finish on the walls, you must purchase a bath of the appropriate size and prepare a niche for it. The diagram shows how to install correctly in this way.
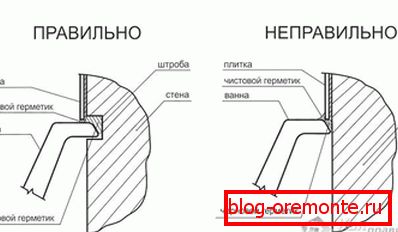
In principle, the first method is also possible, but it is not as reliable as the installation in case the tile is already lying. In this case, the fastening occurs only due to the sealant and decorative plinth.
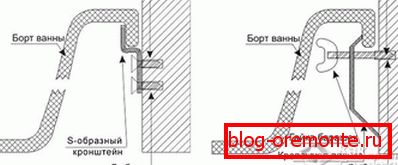
Installation on a metal corner. Cast iron and steel baths can be installed on a metal corner, it is mounted along all the walls, and the sides are installed on it. Further, on request, a plinth is installed, the joints are treated with sanitary sealant. Why it is impossible to fix an acrylic bath on a corner? Because the side can be deformed, since from the inside it is not supported by anything, as a result, the sealant will move away from the wall and water will seep onto the floor.

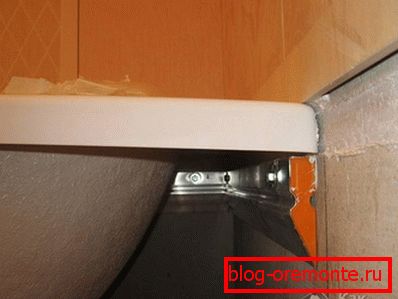
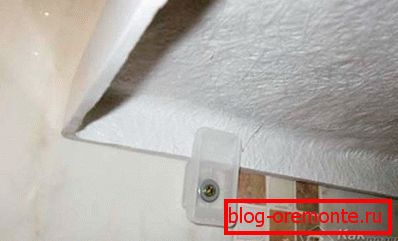
Installation on hooks or brackets. This is the best way to fasten products from acrylic. To install on hooks or brackets, you must align the installed bath level and, departing 20 cm from its corners, make marks. Then they move it away, measure the thickness of the boards, measure this distance down from the marks on the wall and make holes for one or two dowels. Install fasteners, then just put on hooks or brackets sides. All - the bath is rigidly fixed. A plastic or ceramic plinth is glued on top of the seam, and the joint is sealed with a sealant.

Big slot - what to do
It often happens that after the bath is already installed, there is a decent distance between it and the wall. Since in this case there is no three-sided attachment, it will stagger. To fix it tightly, you need to create a frame that can be used at the same time as a shelf for shampoos and different jars.
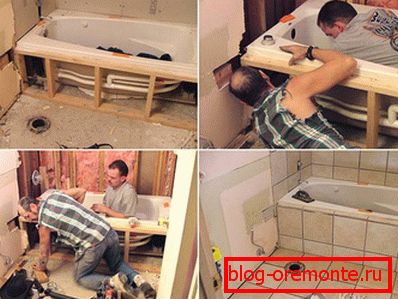
What is needed? First of all, the frame is assembled with the help of metal profiles. Then it is sheathed with plasterboard. For this purpose, a special moisture-resistant drywall. Be sure to make a niche with a door so that you can get to the plumbing system.
Alternatively, instead of the frame, you can attach a bar to the wall so that its top is slightly higher than the level of the bath. On the bar is a shelf, which will lie on the bath. At the same time it should have a slight slope inwards so as not to accumulate water.

Video
This video shows how to use special clamps for mounting acrylic baths:
See also:
- How to make a screen under the bath.
- The choice of sealant for the bath.
- How to restore the bath.
- Bathroom fittings.
- How to make redevelopment in the bathroom.