How to fill the floor screed
In connection with the appearance on the market of new materials for flooring, the requirements for the base have also increased. If earlier it was easy to do with lags and lay boards on them, now for laying some types of floor coverings an extremely smooth and durable surface is needed.
Floor screed serves as the basis for floor covering. This approach to the manufacture of the base is used most often. It is performed to level the surface or stiffen it for the purpose of further laying down complex flooring systems that need an even and solid foundation. Such coatings include, for example, parquet, laminate, cork flooring, etc. In order not to make mistakes, it is necessary to consider in detail how to fill the floor screed technically correctly. To begin, consider the types of screeds, so that you can figure out which one is right for you.
Practical screeds
According to the method of pouring and the type of mixture used, there are several types of floor screed:
- Cement sandy.
- Concrete.
- Leveling.
- Combined.
Each of these screeds has a different cost, but you need to know not only how much the building material costs, but also take into account the cost of delivery, the time it takes to complete the work, when the floor can be used for its intended purpose. For example, many people like the concrete screed, as it is durable, but after learning that they have to wait a whole month until it dries completely and becomes as strong as possible, they refuse it in favor of other more high-speed methods.
Cement-sand screed

Each type of screed has its own characteristics. Before undertaking the manufacture of cement-sand screed, it is important to take into account the fact that it is not only durable and reliable, but also heavy coating. It is not recommended for use in the apartment of the house of the old building, since the floor may simply not withstand such a load. If there are no restrictions on use, then we will consider in more detail the process of making such a screed. It can be poured by removing the old one, or mounted on top of the existing solid base.
Dismantling the old coating
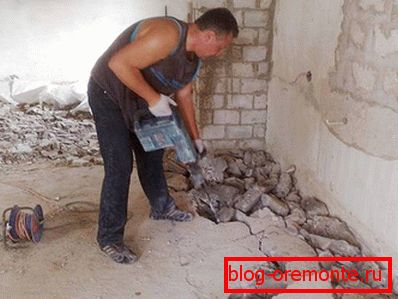
When it comes to pouring a new base, you first need to dismantle the old, which has become unusable. In rare cases, it is so worn out that only a shovel and a bucket is needed to remove it, but more often you have to work a little more, having destroyed the screed with a jackhammer.
With the help of a sledgehammer you can quickly break the old foundation, but the consequences can be very unpredictable. At best, you have to do the repair of the ceiling from the neighbors below.
Construction waste must be removed from the premises and the base should be well cleaned.
Execution of works without dismantling the old screed
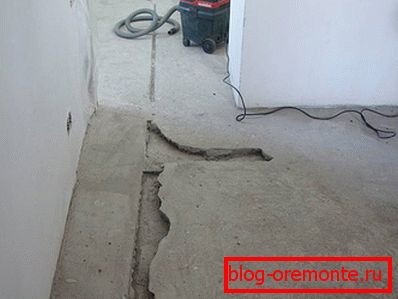
If the old screed is strong enough and it is possible to raise the level of the floor, then a new layer of mortar can be poured without removing it. In order for the completed screed to come into contact with the concrete base, it will need to be prepared.
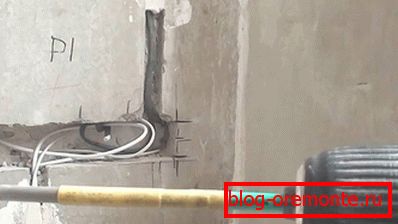
If potholes with a depth of more than 2 cm are found in the base, they must first be sealed with mortar. As for the hillocks, they are simply knocked down. Dirt, oil stains, etc. are removed from the base surface. Then a thorough primer with deep penetration will follow. The required number of its layers is applied according to the instructions written on the package. To prevent contact between the doorposts and the mortar, it is necessary to cover them with plastic wrap and secure with tape. All drain holes (for example, in the bathroom or in the kitchen) must be closed.
Wall marking and installation of beacons
A damper tape is fastened along the perimeter of the room on the walls.

To mark the walls under the required level of the floor is recommended to use a laser level.

Having a clear guideline, you can screw the screws into the floor.
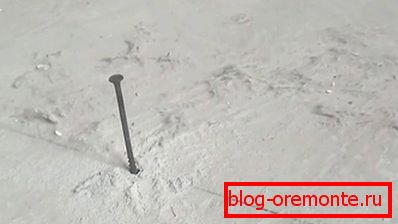
To do this, a line is drawn on the floor at a distance of 20 cm from the wall, and every 50 cm a hole is drilled for the dowel, into which the dowel is then inserted, and a self-tapping screw into it.
Now we need a long bit. Since the laser beam passes above the required level, then we wound the masking tape (or white electrical tape) on the bit at such a distance from its end as the laser mark turned out higher.
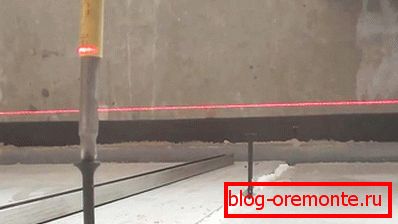
Screws need to be screwed in until the laser beam is equal to the mark on the bit.

It will be useful to check how accurately the work was done. Similarly, we mount the next row of screws, departing from the first by 20? 25 cm less than the width of the rule.

Instead of beacons, we will use 2 UD profiles. They are superimposed on the screws, then the coupler is poured, and the solution is leveled using the rule. Bay and aligning a piece of the floor, you can move the profile below, and then again repeat the process of filling and alignment.
Another method
Unfortunately, not everyone has a laser level or level, so consider another method of marking and installing beacons without a level, which people still often use.
The required height of the beacon must necessarily be equal to the selected height of the tie. To facilitate the installation of the lighthouse, it will be necessary to retreat from the wall by 15? 20 cm, drill 2 holes at a distance not exceeding the length of the lighthouse. In the floor you need to drill 2 holes O6 mm, insert the dowels and screw in the screws. Their position should be adjusted using the building level, taking into account the height of the installed beacon (usually 1 cm).
Under the second and subsequent beacons, the installation of self-tapping screws is repeated. It is imperative to check that all the beacons are located in the same plane. It is also worth remembering that the lighthouses are located at a distance of at least 20 cm shorter than the length of the rule used. After placing the lighthouse, it must be fixed with a cement-sand mortar.
Video: various ways of placing beacons
Filling and care screed

For the preparation of the solution we will use cement brand M 400. We also need sifted sand, if possible with a minimum amount of clay. Taking 1 part of the cement and 3 parts of the sand mix everything dry. In another container we pour water at the rate of 1/3 of the mass of cement, and then add a plasticizer - approximately 190 g per 50 kg of cement. After mixing the mixture with water, a ready-for-use solution is obtained.
The voids under the lighthouses should be filled with the solution in advance. The solution should be as much as you can manage to spend it for these purposes.
It is necessary to start pouring mortar from the corner farthest from the door, leveling the mixture with the rule. In the event that pits are formed, they are laid with a solution and re-aligned. It is better to perform a floor screed indoors for 1 day in order to obtain a uniform surface. After setting the solution, it can be trimmed with a float, making easy circular movements on the surface of the screed.

It seems that they poured the floor and everything, but it is not, because in the early days it requires care. If this requirement is ignored, the screed may shrink and crack. During the day after pouring the room should be shaded and protected from drafts. This is necessary to create a microclimate and uniform evaporation of moisture. At the end of the day, the entire screed must be covered with a film of polyethylene and wait for the solution to dry.
Works on the installation of flooring can be started only after two weeks, and this is only if the materials are not afraid of moisture. It is better to start working with materials that do not like moisture 30 days after pouring. It is also worth remembering that more than half of this time the screed must be covered with a film.
Video: cement floor screed
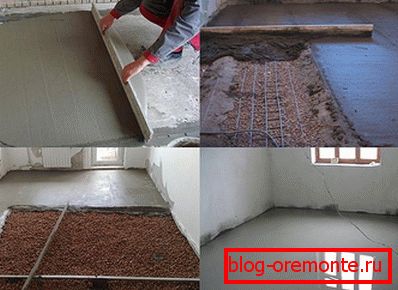
If you need to fill the floor after removing the old screed, then for this purpose concrete is used, to which crushed stone of medium fraction is added, or a mixture with expanded clay.
Video: concrete floors on the ground
Leveling screed

Only a professional will be able to make the roughing screed perfectly flat, but this is useless, since it is much easier to pour a self-leveling screed over it. This method is good because it does not require special skills of leveling the floor, and it can be done without beacons. All you need to do is pour a layer of self-leveling liquid on the primary screed, roll it with a needle roller and wait until it is completely dry. By the way, such floors dry much faster than cement ones, and they are not at all inferior in strength. The result is a perfectly smooth, polished floor.
On top of this screed can be put different floor coverings. A screed floor is not something very difficult, on the contrary, it can be done in a short time and alone, the main thing is to follow the instructions and take the task responsibly.
Наливные полы нередко используют как финишное покрытие. Reason тому – их эстетичность, легкость монтажа, долговечность и стойкость к различным факторам даже без дополнительной защиты. Очень часто можно увидеть наливные полы с рисунками, в некоторых случаях даже с 3D. У таких покрытий есть один существенный минус – это высокая цена.
Video: self-leveling self-leveling floor
Combined
There is also a combined screed, which is most often used in a private home. This approach to leveling the surface is relevant in rooms with very curved floors. It is suitable even where an ordinary cement screed cannot fix all the irregularities, and the concrete one does not allow to fulfill the existing restrictions on the load on the floor. The coupler, made by the combined technology, has a smaller mass, so there is a chance not to overload the floor. In addition, it is this type of screed is often poured on the warm floor.
Works on the manufacture of a combined screed includes several steps that can take place in this scenario:
- First, the base is prepared. For example, the floor is very uneven, and the layer of concrete cannot be poured because of its large mass. In this case, it can be made with expanded clay.
- On top of the expanded clay, a rough tie is poured, inside which there will be a reinforcing mesh.
- After drying, the draft screed fills the leveling.
The essence of the method lies in the application of several technologies for the sake of obtaining a flat and durable surface.
To avoid trouble when working, consider the possible mistakes that inexperienced builders often make when leveling the existing foundation.
Possible mistakes
Good floor that is smooth and reliable. It is pleasant to walk on it, and it is also a suitable basis for laying any covering. Now self-leveling mixtures are quite popular. They are easy to prepare and quickly fill the space of the room, forming a flat surface. It seems to be simple, but many people make serious mistakes that negate all the work.
| Reason | Effects |
| Incorrectly selected material. | Since each repair has its own conditions, the materials used must be selected on the basis of these aspects. There are no absolutely universal mixes, therefore each manufacturer has a whole range of products for leveling the floor, which differ in composition, quality, mechanical characteristics, etc. For example, it is better to use mixes with cement base for parquet, because you will have to glue the parquet for this is not suitable. |
| Discarding the use of primer. | Many refuse to primer surfaces, because it takes time and increases repair costs. But is a primer not just a liquid? This is a special compound that protects the base from excessive moisture. In addition, impregnation increases adhesion and contains anti-fungal additives that prevent the appearance of mold. |
| Independent work. | Here it is meant that it is impossible to fill a qualitative floor alone, performing work for the first time. After all, there are a lot of processes that need to be done almost simultaneously: filling the floor and preparing the next portion of the mixture, for example. When a significant amount of time passes between the fillings of portions, the old portions already lose their plasticity, and such a floor will never be sufficiently level. Preparing the right solution? it is also a job for two: one person stirs the water, and the second gradually pours in the mixture, and no other way. |
| Unreasoned coverage. | Many, starting repair, want to fill the floor of the same height, and only then choose and lay the finish. But this is also the wrong decision, because for each coating there are different requirements and parameters: material height, substrate, insulation, etc. There is a difference even in the same type materials from different manufacturers, so you need to choose a finishing coating for each room in advance, and then, having decided on the height of the floor, produce leveling and raising the floor level. |
| Technological break. | Repair takes a lot of time and everyone tries to speed it up. Here lies the next mistake people make. They forget that any solution needs time for drying and hardening, and this time can take more than one week. Only after this time has elapsed should the topcoat be laid, because during this time the solution does not just dry out, it hardens over the entire volume. Otherwise there will be a displacement of the inner layers and, as a result,? deformation of the floor surface. |
| Airing and direct sunlight. | When the fill is complete and the floor surface is flattened, many people think about how to speed up the process. Some open windows so that excess moisture is quickly removed, and the sun's rays evaporate moisture. This is all wrong, on the contrary, before filling the floor, you must make sure that there is no draft in the room and there is no direct sunlight. Because of such a small oversight or oversight, cracks will start to appear on the surface, the screed will begin to flake off. This also applies to the use of heat guns, which must be directed to the ceiling, and not to the floor. It is also important that there is no excessive overheating of the room. At what temperature can you do work? Quite enough 25 degrees of heat. |
| Poor base preparation. | Need to know how to properly prepare the basis for future work? remove dirt, dust, in general, anything that can lead to a deterioration in the adhesion of the rover and the base. Bad adhesion can lead to flaking of the material and the formation of cracks. Most often, all this can be repaired, but why extra work, if you can do everything qualitatively? If the screed is poured on a wooden floor, then we can safely say that this is not the best idea. This base is very mobile, which will lead to cracking of the filled layer of the screed. True, there are such circumstances when there is no other way. In this case, the wooden base must be prepared accordingly, and it is better to entrust the floor screed to the specialists in this field. |
Video: screed on wooden beams
As you can see, it is quite possible to do the work on pouring the floor screed on your own, but the coating will be of high quality only if all requirements are strictly followed.