How to cut a ceiling plinth
It is known that in order to obtain the perfect articulation of two corner blanks of the ceiling plinth, it is necessary to correctly draw the cutting line of each of them. In this article you can learn how to properly cut the ceiling plinth, as well as familiarize yourself with those devices that are necessary for this.
Ways of cutting plinth
There are the following methods of cutting ceiling plinth:
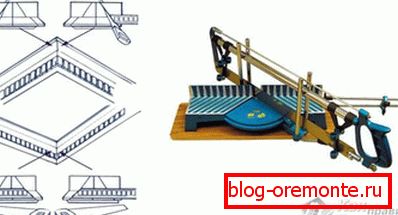
- Cutting with stusla.
- Cutting with the use of a special stencil.
- Cutting by drawing a pencil marking.
A gooseneck is a special fixture with which it is possible to form an arbitrary angle from those contained in its set of cuts.

When working with this device, the baseboard should be inserted into it in exactly the same way as it will be placed on the ceiling. Holding the upper part of the workpiece, its lower edge should be pressed against the wall of the device and a cut should be made according to the shape you choose.
For the preparation of plastic skirtings, you can use a regular hacksaw. But in its application should not make significant efforts, since this may lead to the formation of chips.
Preparation of joints with an arbitrary angle
 Since the walls in the rooms do not always adjoin one another at 90 degrees - it is worth getting acquainted with the technique of preparing an arbitrary cut angle.
Such a technique is implemented, as a rule, in the following two ways:
- Using a cardboard stencil, the halves of which are obtained by cutting it at the angle you need. Using such a stencil as a template, according to which cuts of the plinth blanks are formed, you can get a perfect corner joint.
- The second method involves the preparation of the cut by means of pencil marking and is as follows:
 both jointed blanks are sawn at an angle of 90 degrees;
- one of them is applied to the corner, and then a line of joining the plinth to the ceiling is marked on it;
- the same actions are carried out with the second blank (on the adjacent wall);
- the point of intersection of the two lines obtained should be carefully transferred to both blanks;
- from the marks obtained on the blanks after transferring them from the ceiling, draw an oblique line to the opposite corner of the plinth and get a cutting line.
 Pay special attention to the fact that with this method of marking it is necessary to observe maximum accuracy. The quality of the resulting joint will depend entirely on how accurately you will carry out this procedure (and of course, on how accurately you make the cut on the blanks).
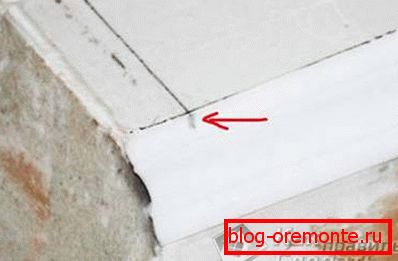
In the same sequence, cutting lines are prepared for the outer corner. But at the same time, the point of intersection of the marking lines is not necessary to transfer to the plinth, since in this situation it is the top interface point of the corner parts of the blanks. In this case, you have to transfer the point of junction to the wall.
The final stage of work

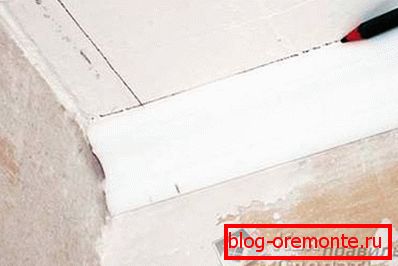
Upon completion of the operations on the design of the joints, a check check of the fit of the blanks at the cut should be carried out.
In the event that there are gaps in the joint, you will have to make an exact fit by slightly cutting the plinth or processing the cuts using emery paper.
In conclusion, we will acquaint you with how to properly cut the ceiling plinth more accurately. Adjusting the line of joining adjacent areas of the plinth should be done before you start marking and trimming its length. In the reverse order of operations (first - the length, and then - the angle) and if the attempt to complete the joint has failed, you risk completely ruining the workpiece.
Video
For more information about the technique of cutting ceiling moldings for corners, see the following video: