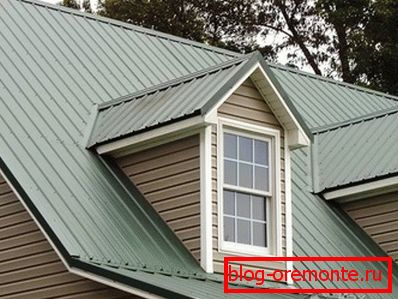
How to cover the roof with a metal profile yourself
The technique of mounting a special profiled sheet used to cover roofs is relatively simple. To master it, it is quite sufficient to familiarize yourself with some features of the material used, as well as with the basic rules for handling it.
Before you cover the roof with a metal profile yourself, you need to carry out a number of preparatory operations of the following nature:
- decide on the angle of inclination of the future roof;
- correctly choose the brand of profile sheet blanks for the selected angle of inclination;
- prepare the appropriate fixture for the selected material.
The complexity of installation work increases significantly in the case of erection of roofs of complex configuration.
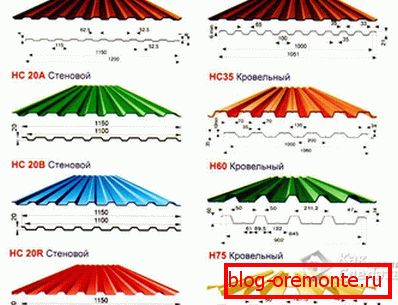
Types and brands of sheet material
At the initial stage of preparatory work, it is necessary to choose the type of profile sheet that is suitable for your conditions, which can have the following versions:
- Material brand "C", representing a sheet of sinusoidal (trapezoidal) profile with a wave height of 8 to 44 mm, which is usually used for the construction of light roofs or as a decorative wall covering.
- Sheets brand "NS" with a fixed wavelength of 35 or 44 mm, used for the arrangement of typical roofing.
- Sheet material of the “H” grade with a wavy profile height from 57 to 114 mm, reinforced with stiffening ribs, which makes it possible to use it for closing roof roofs.
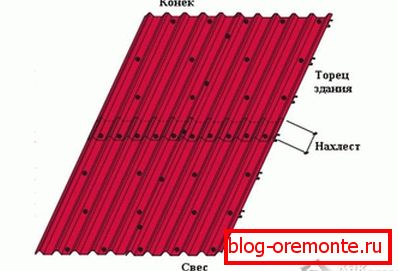
Before installing the roofing should be familiar with how to choose the amount of overlap between adjacent sheets, which depends on the angle of the roof itself. The following relations are true:
- when the angle of inclination is within 12–15 degrees, the overlap must be at least 20 cm;
- when the base of the roof is inclined at 15–30 degrees, this indicator can be reduced to values of 15–20 cm;
- in the case of an inclination angle of more than 30 degrees, the overlap is selected in the range from 10 to 15 cm;
- when the angles of inclination of the base is less than 12 degrees, sealing of horizontal and vertical seams forming in the areas of overlap is mandatory. As a rule, for these purposes, conventional silicone sealant is used.
Preparatory activities
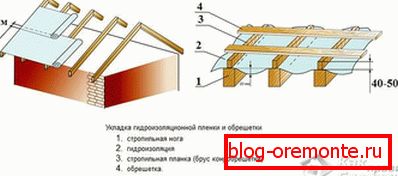
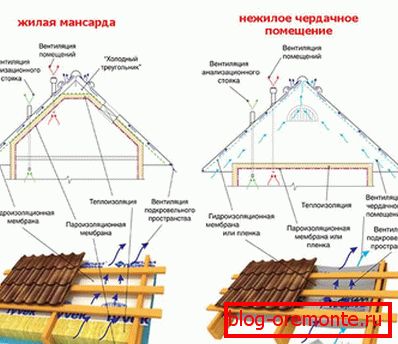
Before closing the roof with a metal profile, it will be necessary to worry about arranging waterproofing that protects wooden structural elements and insulation from the damaging effects of moisture. Waterproofing, which is usually used as a thick polyethylene film, is attached directly between the rafters with small building clips. A small overlap (about 15 cm) is made at the junction points of adjacent strips of film.
Particular attention should be paid to the fact that the protective waterproofing film should be stretched with a slight sagging (about 2 cm), and between it and the insulating material there should be a small gap of about 2-3 mm.
Special ventilation slats are mounted on top of the waterproofing layer, creating conditions for air circulation in free spaces under the crate and excluding the possibility of accumulation of unwanted moist fumes in this place.
Preparation of crates
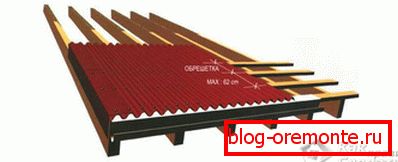
For installation of metal profile blanks, a special lathing should be used to ensure the required strength of the roof structure and to withstand its fracture or deflection under the influence of wind loads or under the weight of fallen snow.
Manufacturers of roofing metal products indicate the basic parameters and the procedure for arranging crates for them in the instructions attached to the product. That is why before starting work it is recommended to carefully read all the instructions on how to use the purchased material.
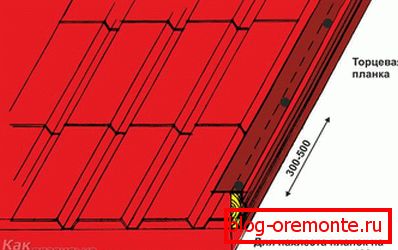
Upon completion of the installation of the lathing, a special end plate is nailed on its pitched cut, the width of which should correspond to the height of the selected roofing profile.
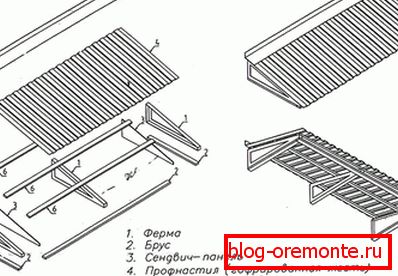
Thus, the overall composition of the roof covering, the final layer of which is the metal profile itself, usually looks as follows:
- inner facing layer, for example, made of gypsum board;
- ceiling slats used as internal lathing;
- steam insulation protective film;
- slabs of insulation material placed in the niches between the truss legs;
- waterproofing protective coating, eliminating the possibility of moisture accumulation in the area of the insulation;
- special ventilation gap;
- outer crate;
- the coating itself (metal profile).
Installation procedure
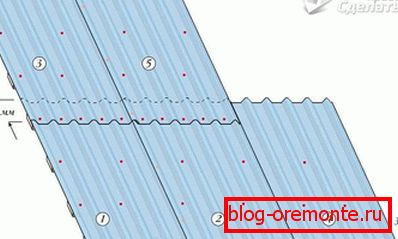
Laying roof sheets with an appropriate angle of overlap should be carried out starting from the bottom corner of the blood. It is necessary to observe the following sequence of installation:
- the first sheet is located on the roof so that its lower cut protrudes 3–4 cm beyond the overhang;
- then this sheet is baited with special screws with rubber seals, screwed into pre-prepared holes located at the bottom of the wave;
- while each subsequent sheet, stacked overlap, aligned with the edge of the previous one, and then also baited;
- after the formation of a series of 3-4 sheet blanks, the latter are fixed on the crate finally;
- the second and all subsequent rows of the coating are mounted in the same way (taking into account the overlap with the previous row specified in the instruction).
Sheets are attached to the crate through every second wave.
In the course of work, one should always remember that it is allowed to move only along finally fixed workpieces. In this case, the feet should be placed in the deepening of the waves, based on the elements of the sheathing.
Video
About features of installation of a professional flooring you watch video below: