How to connect the bath to the sewer
When the bath is installed in its place, you need to perform the last stage of work, after which you can put it into operation. An important step is to connect the bath to the sewer and water supply. In this article you will learn how to connect the bath to the sewage with your own hands.
Preparatory work
First of all, a number of preparatory work should be done. Also consider what material you will use to connect the bath to the sewer. Bath is recommended to connect only with the use of a siphon. It has a special system and components that allow you to connect into one whole hole overflow and drain. It is not recommended to use only corrugated pipes. Why?
- corrugated hose is poorly cleaned from possible contamination;
- they are quickly filled with all sorts of pollution.
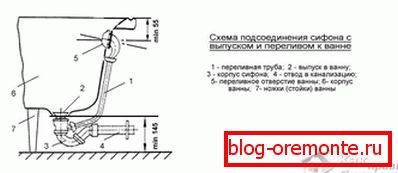
Before direct connection, it is important to achieve an appropriate height difference between the connection point and the drain pipe. The siphon outlet must be high enough to ensure good water outflow.
It is equally important to ensure free access to the already installed siphon. From time to time it will need to be cleaned from internal contamination. If he is in an inaccessible place, it will be difficult to do this work.
What pipes to use?

A flexible / rigid smooth plastic pipe can be used to connect the bath to the sewer. If the option with a rigid pipe is chosen, then additionally you will need to use 2 or 3 elbows. If this is not possible, use a flexible pipe. When choosing pipes for connecting the bath, it is necessary to consider several of the following factors:
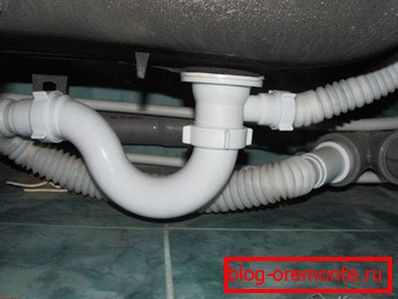
If your sewage system is made of plastic pipes, then the siphon can be connected using a flexible tube O40 mm.
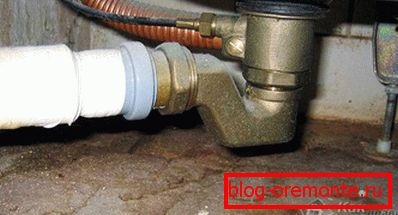
To connect to the sewer is important to use a rubber transition. If the sewer has an O50 mm, then a transition of 50 to 40 mm is needed.
If you have cast iron pipes, then you will need to purchase an O73 rubber coupling at 40.
Plastic siphon device

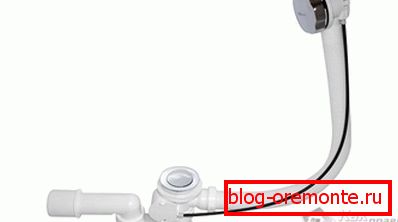
There are several types of siphons that differ in the material from which they are made. Plastic siphons are more popular. To properly perform their installation, it is important to understand their device. The siphon kit looks like this:
- Drain plug. In some cases, its production is made of rubber or plastic. The top of the tube is covered with stainless steel. Some siphon kits may have a chain that is attached to the overflow and to the cork. Thanks to her, you will be able to raise the cork without putting your hands in the dirty water.
- Metal overflow and drain grille. Thanks to this element, no object will fall into the sink. In expensive models of siphons, this element is made of stainless steel, and in cheap - from plastic.
- Rubber gasket. The color of the gasket, which is installed on the reverse side, does not matter. It prevents water from entering between the outlet and the bathtub drain.
- Nozzle release. Used to drain water.
- Nut exhaust pipe. It is made of both plastic and metal.
- Removable knee. It is necessary to clean the siphon from possible blockages. Thanks to the removable knee, you can clean without complete disassembly.
- Cone gaskets.
- Tightening nuts.
- Sewer drainage.
- Overflow for overflow.

Some siphons are equipped with automatic systems for opening the drain hole. Three types of siphons can be found:
- Mechanical system. It uses a simple rubber or plastic stopper. Drain the water by hand. The system is simple and at the same time reliable.
- Semi-automatic system. The drain mechanism is controlled by a special cable / lever element. This mechanism is set above the water level, which is usually typed in the bath.
- Automatic system. Siphon in this case with the filling equipment is combined into one design. Management is carried out thanks to the built-in / remote microprocessor.

Connection technology
The siphon installation technology is very simple. If you follow the manufacturer's instructions, then you will be able to do everything yourself.
Step-by-step instruction:
- If you need to replace the old siphon, then after dismantling it, you should clean the junction of the siphon well.
- After that, a gasket is inserted into the lower overflow and is attached to the lower drain hole. Parallel with the other hand, the upper pad is applied and screwed to the drain hole. Holding the bottom, tighten the screw on top. When tightening the screw, it is important not to overdo it. If the case is plastic, then it can easily burst.
- The same principle is set upper overflow.
- Now the corrugated hose connects the overflow with the drain. If the hose is longer than the set, then do not cut it. Just give it a smooth shape. If in your siphon model a nut is used for sealing, then install with a thin end to the overflow pipe and drain. At the corrugation, first put the nut on, and after the rubber seal.
- Further the water lock is connected. For connection, a cap nut with a tapered or flat gasket is used.
- To connect the siphon, connect the nozzle to the water seal.
- At this stage, the siphon is connected to the sewer system. Depending on the diameter of the nozzle, you may need a rubber cuff.
- At the very end, you should check all the work for leaks. With good throat assembly, water will not leak. After that, flush the bathtub and also check the entire assembly for tightness.
A leak can occur for two reasons: a nut is loose or a misaligned joint.
Tips and tricks
- It is better to start siphon assembly after studying the attached instructions.
- If there are rough edges in the drain or overflow holes, they should be sanded.
- Shim gaskets are not allowed. In some cases, you have to use silicone sealant.
- It is necessary to control the drop height of the drain in relation to the drain into the sewer.
- The slope of the pipe must be at least 1 cm by 1 m.
So, apparently it is not necessary to be an expert to understand the scheme of connecting the bath to the sewer. Before you connect the bath, consider each step of the work. If you already have experience in this work, be sure to write about it in the comments.
Video
See also:
Distributing pipes in the bathroom with their own hands
How to make a pipe box in the bathroom
How to install an acrylic bath