How to build a house on canadian technology
As they say, everything new is a long forgotten old. This statement can be applied to the technology of building houses using Canadian technology. In fact, this method, which has recently attracted the attention of many of our developers, has been used here for a long time. And in Canada, from where the name of this technology has gone, even longer. The essence of technology is to create a wood frame house. Moreover, everybody is able to do this construction with his own hands, the main thing is to figure out what's what, buy material and get to work. This is because the construction is fairly light, and you can do all the work with a friend or family member, without hiring special heavy equipment. Every self-respecting man wants to build a house for himself and his family. Let's take a closer look at how to build a house using Canadian technology, what it is, and what stages of construction you need to go through. This information will help you realize your dream. And having done most of the work yourself, you can save a lot.
Canadian technology - what a beast

To begin with, I would like to talk about why we started building such frame houses as Canadian technology. After all, the truth is, this method of building low-rise buildings (up to 4 floors) is mostly used in North America, Europe, Australia and even Japan. Why is it called Canadian in Russia? The fact is that it got its name during the cooperation of the State Construction Committee of Russia with the Canadian Mortgage and Housing Corporation. It was then that the rules were created for the construction and design of single-family houses with enhanced thermal characteristics. These were the timber frame houses that we now know. Such designs today are in great demand, as the cost of construction is very profitable.
The reason for the construction of these structures was the fact that it was necessary to keep the heat in the room. The climate of the northern countries dictated the importance of providing a higher heat capacity, which would become an alternative to the technology of heating the room. After all, whatever was used for home heating, during the heating season, all the same, it was necessary to incur substantial heat losses. To motivate the promotion of such technology was the fact that new technological materials appeared on the market, the main properties of which were to preserve heat indoors and to withstand low temperatures.
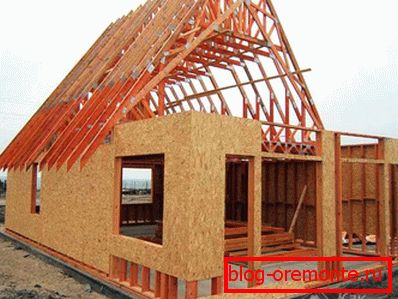
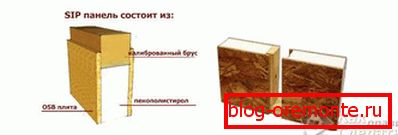
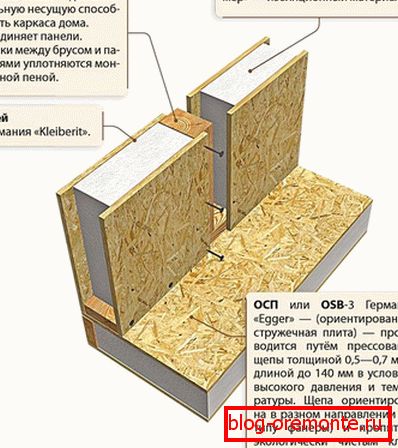
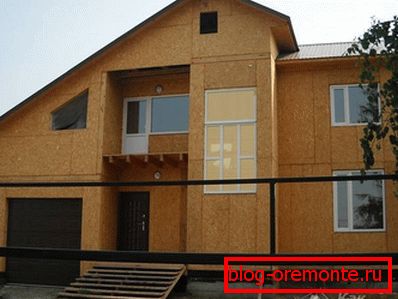
And the last thing that played a decisive role in the application of Canadian technology is the building material used for this. In those regions where there is a great need for such heat-saving buildings, there is more than enough building material. After all, the main material for the construction of such buildings is wood. It turns out that such houses not only save heat, but also are cheap. To summarize, the whole technology of Canadian house building is to make a house frame of wood and sheathe it with OSB panels or CIP panels (OSB panels, inside which there is insulation). Thanks to him, the heat remains in the house, and extraneous noises and sounds do not penetrate it.
Advantages and disadvantages
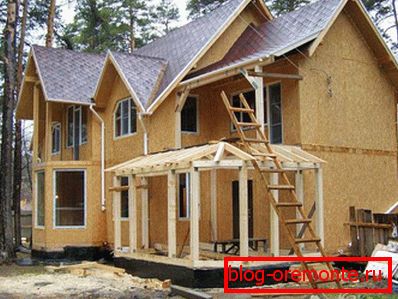
The main difference and advantage of this technology is that even without additional equipment in the room you can easily maintain and maintain a stable temperature. Given that living in such a house is quite comfortable in winter. And if you already have a heating system, then the living conditions are just perfect. As a result, you get an economical housing, for which heating requires much less resources than for houses from the usual materials, built using standard technologies.
It was then that we came to the second advantage of such a house - its cost and maintenance. Wood is not the most expensive building material. In our area it is enough, moreover, it is natural and has a number of positive characteristics. To heat such a wooden house, you do not need a powerful boiler and the amount of resources for heating it is minimal. This will allow you to save money not only on the purchase and installation of a heating system, but also on the use of fuel for heating. After all, the heat in the room of the house, built on Canadian technology, will be maintained at a stable level and long enough.
Along with such important positive qualities, the following advantages can also be noted:
- construction speed;
- work can be done in any season;
- low labor costs and ease of work;
- the ability to construct various projects of complexity, shape and configuration of the building;
- to build such a structure can be on almost any type of soil;
- no need to hire professionals and special equipment;
- simplicity and availability of finishing works;
- good sound insulation properties;
- the ability to hide communications systems under the skin of the frame, which will contribute to high design indicators;
- A feature of all materials used in construction is their ability to retain and retain heat.
But, as you know, nothing can be perfect, and our case is no exception. The disadvantages of Canadian technology can be understood by a teenager as a teenager - if everything is made of wood, then there is a high probability that everything will flare up like a match, at the slightest opportunity! And indeed it is. And even all kinds of tools that give the tree fire resistance, not much save. Moreover, inside the CIP panels there is a heater that serves as bait for various rodents.
Judging by the reviews of those who have already built such a house and lives in it, it is not recommended to perform work in wet weather, so that CIP panels do not accumulate moisture inside.
As you can see, the advantages of this technology are much greater than the disadvantages. And if you decide to build your dream house that way, you will only stay in the black.
What materials is the construction
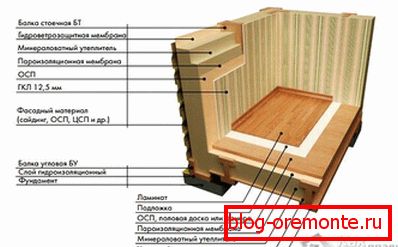
As noted, the main difference of this building is that the whole frame is made of wood. The main materials for him are:
- Wooden bars, which act as racks for the frame. Basically for this choose bars, the cross section of which is 50 mm and more. Their length depends on the size of the future structure. The most important requirement for this category of material is sufficient strength. And it is no coincidence, since these supports act as load-bearing walls, so they account for most of the load of the whole structure. When you choose material for such uprights, pay attention to solid and durable woods that have greater density and durability.
- Cross beams. They must also be made of dense, reliable and solid wood. They occupy the second place in terms of transferable load; therefore, one should not save on material either. Cross beams must withstand the weight of wood panels, window and door frame designs.
- Wooden sheathing panels. They are shields that are firmly interconnected. Please note that it is for these structural elements that there is a specific requirement regarding the wood species. It is important that they are made of coniferous wood. It's all about the characteristics and properties of conifers. Wood has a resin that gives the material increased resistance to moisture, and also prevents rapid decay. In the role of material for walls, CIP panels can serve - an innovative material that most often sheathes not only walls, but also the floor and roof.
- To successfully complete the construction of the house on the frame technology, you need the boards to make the house flooring. In rare cases, the foundation for the floor is concrete, on top of which parquet or laminate is laid. Among other things, in order to complete the construction work you will need materials for the roofing and cladding materials - plasterboard, wallpaper, ceramic tile, etc.
So, what is needed to build a house with your own hands, you have learned. But where to start work and how to build your house quickly and correctly? Let's see.
Design and preparatory work
Any construction begins with the design, and our case is no different. The first thing you need to make a plan or project of the house. It’s impossible to do this without certain skills, because in such a business there are many of its own nuances that determine the strength, durability and safety of the building. Therefore, it is better to entrust such work to a qualified architect who will make all the necessary drawings, having listened to your desires, and will also be able to make an estimate, having calculated how much material you need and how much it will cost. Of course, the price of such a service is rather big, but it is worth it, especially if you want to build a large house with various design features.
When you do not have additional funds for hiring a specialist, you can search for ready-made projects on the Internet. Only now you have to be content with what is. And here one must be extremely careful, since the origin of one or another plan is not clear. For reliability, do not use free resources, having protected yourself from low-quality material. Better yet, pay and be calm. Remember, a lot depends on the correctness of the draft.
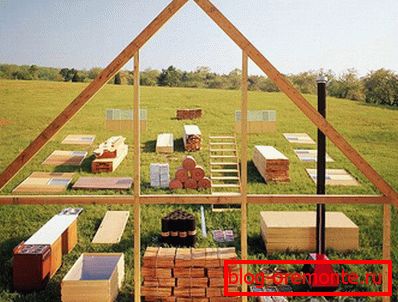
Once the project is ready, you need to purchase all the necessary materials. Provide a special room or place under a canopy where the wood will be properly stored. You need to protect it from moisture. Now you should decide on the construction site and prepare it: remove all unnecessary, guide the light to the site, provide it with water and prepare all the necessary materials. Once everything is ready, you can start building the foundation of your future home.
The foundation for the frame house
The process of building a frame house according to Canadian technology, as in principle all others, begins with the construction of the foundation and the floor for the house, which are the basic platform for the entire building. It is very important to do everything correctly, as the reliability of the whole structure depends on the foundation. Since the house of wood does not have great weight, do not have to make a massive foundation. However, in order for the structure to be reliably located on the ground and stable, the foundation must be made columnar or tape-like and provide good waterproofing.
How to make a column foundation? You need to buy asbestos pipes, which will be buried in the ground.
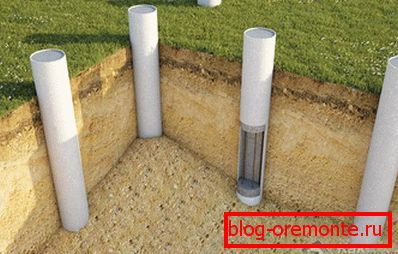
So, the work process is as follows:
- Preparatory work. You need to make the minimum calculations, taking into account the type of soil, the depth of freezing and the number of floors of your house. Then prepare the surface, removing the upper fertile layer. Make the markup and mark the places where the pillars will be installed. The strength of the foundation depends on the distance between the supports. Recommended distance - 80 or 100 cm.
When you make the markup, you need to pay special attention to the most exposed areas: corners, walls, stoves. - At the designated locations, make holes with a diameter of 20 cm and a depth of 100 cm. For convenience, it is better to use a special hand auger. The supports should sink 30 cm lower than the ground in your area freezes, consider this. Depending on frost, the depth may vary.
- The bottom of the wells is rammed and a sand pillow is made. Asbestos pipes, which are approximately 140 cm in height, must be inserted into these openings. Remember that the supports must extend no more than 30 cm from the ground.
- Put all the pipes strictly on a level, cover the outside with earth and tamp. After that, prepare the concrete mix and fill it with pipes by a third. Dip two pipes of reinforcement into the pipe, which should protrude 20–30 cm. Now it remains to fill everything up to the end.
- The final stage will be the installation of the grillage (lower piping). After the concrete has dried, lay a layer of roofing material on the pillars for waterproofing. On the supports you need to put the boards using the spike connection method in the groove. To the foundation of the board are attached anchor bolts. Fix all elements with screws.
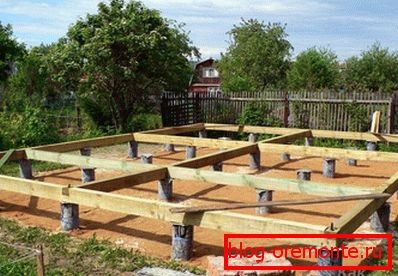
Your base is ready, but you still need to make sure that the bottom trim is flat. Use the building level. Now you can start building the floor
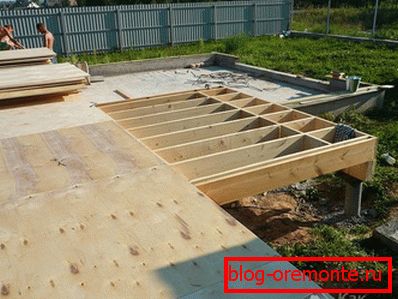
The device of a floor in the frame house
To make the base in a frame house, you need to install logs. Therefore, in advance in the grillage it is necessary to make grooves in the places where they will be installed. Next, install the logs in their places, making a kind of crate for the base. You can use either boards, or a wooden bar, the size of which is 100? 50 mm or 150? 50 mm. You can choose products of other sizes, it all depends on the particular operation of the room and the level of load. You can fix logs with any fasteners: screws, nails, angles, screws or dowels.

In order that the wooden structure does not rotten over time, before installing it, process it with a special compound. Thanks to this, your home will last much longer.
On such a basis, you can lay a SIP panel or plywood, which is 20 mm thick. It is important to fasten the plywood or panel well to each support lag so that your floor does not creak when you walk on it. Please note that this work is best done on a sunny day, when nothing foreshadows precipitation. Otherwise, the plywood may swell from rain. Even after you have covered the entire floor, it is better to cover it with a film of polyethylene, if there is a possibility that it will rain.
If you want your floor to be insulated, it is better to sheathe it with SIP panels, inside of which there is insulation. This is done very simply: you need to install panels on the prepared logs. The feature of the panels is that they have grooves around the perimeter, due to the fact that the insulation in them is not flush. Therefore, you need to connect them with the spike method into the groove. To begin with, the outer surface of the plates must be covered with molten bitumen mastic. After that, each slab is placed in its place around the perimeter of the house. To connect all the elements together, you need to use a bar that will serve as a tenon. It will be the connecting element between the two plates. Before joining the panels, an installation foam must be applied to the grooves of the panels. On both sides of the connection must be fixed with screws. All the work you can do in a few hours. At the end of the perimeter, the ends of the panels should be closed with a strap, which will give rigidity to the whole structure. For this, the void is blown out with mounting foam and a board of the required width is installed in it. For reliability, it is also fixed by screws.

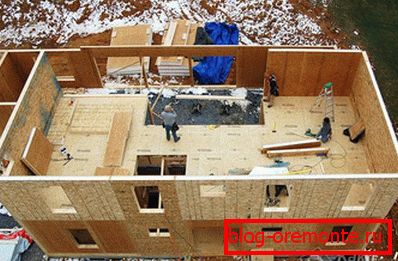
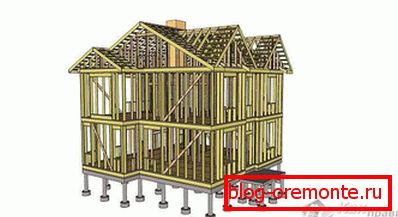
The construction of the walls of the frame house
First you need to make sure that the base you made is perfectly flat. After all, all the irregularities will affect the structure of the building as a whole, causing distortions. Only then can you start building the walls of your house.

As walls, adhering to Canadian technology, it is better to use CIP panels, the installation of which is simple, and the future home will be quite warm. To make such walls, for a start, you need to make a bottom strapping on which the panels will later be “slid”. The binding is done in accordance with the drawings of your home. The binding boards need to be fixed around the perimeter and throughout the house so that they repeat the construction of the walls of the ceiling. Boards should have a width that would allow the CIP panel to enter it. After all, the construction of the walls will also occur using the spike method in the groove.
The binding needs to be attached to the basis by screws. To measure the correct placement of the strapping, use a template from the CIP panel. After that, for reliability in the strapping and base, a hole is made to the foundation and everything is fixed with anchor bolts. It is better to build walls from the corners of the house. The first panel is set on the level and attached to the binding beam with foam and self-tapping screws. Now seal the connection and install the second panel to form the corner of the building. Connect the panels to each other on the corner with 220 mm self-tapping screws. Now, according to the drawings, continue to build the structure in the same way as the floor. The plates are interconnected by means of a bar, which acts as a spike between the grooves of the plates. Do not forget about the window and door openings. After the skeleton is ready, the upper grooves of the panels need to be zapped and put there a tying board.
Now it is time to make the overlap, which can be done both from ordinary boards, and from the same CIP panels. If you are building a two or three-story house, then after mounting the ceiling continue to build walls on the same principle as the first floor. And when you build a one-story house, then it's time to start building the roof.
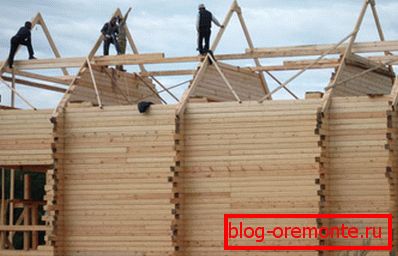
The construction of the roof frame house
As you know, the roofs for houses are different:
- single-skinned;
- gable;
- flat;
- dome
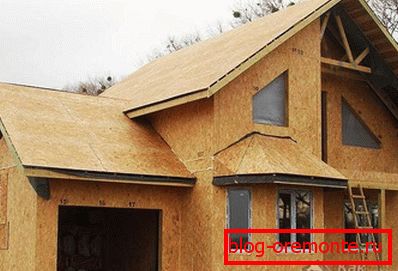
This is not all types. But traditionally in our area do a gable roof.

First of all, it is necessary to install a ceiling on the ceiling, to which the whole truss system will be attached. As rafters, you can use boards with a thickness of 50 mm, and a width of 100 mm. To make a crate, take a board with a thickness of 25 mm and a width of 100 mm. Rafters are installed at an angle of 45-50 ?. They can be made immediately on the ground or directly on the roof, so as not to lift them there.
So, on top of the rafters are interconnected end connection with nails. To give them stiffness, from the top of the connection should be retreated 500-600 mm and nail the bolt to get the rafters in the shape of the letter "A". Bottom ends need to lay on the mauerlat and securely fix them. Do not forget to make a release of 200-250 mm.
First you need to install the extreme rafters, in front of the house and behind. To securely fix and stiffen them, additionally make stitching and running in the middle. Now place the rafters in the center of the house and nail the ridge board on top. It remains to install the remaining rafters. Please note that the rafter must be installed in increments of 500 mm. Sheath gables can be the same CIP panels.
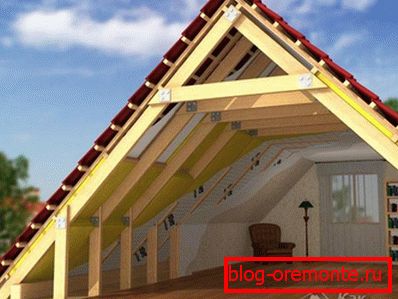
Now you need to make the crate. To fix the boards you need to the rafters in increments of 50 mm. Do not forget to make a release for the extreme rafter 200-250 mm. The crate boards are fixed with nails whose length is 60 mm. After the crate is made, lay one or two layers of roofing material on it to ensure waterproofing. At the same time, it spreads vertically with an overlap of 100–150 mm. It also needs to be fixed to the crate with small nails with a wide cap. To insulate the roof, from below, you can lay a layer of insulation, as well as protect it with vapor barrier tape.
The roof of a house made using Canadian technology can also be made with CIP panels.

Now you just have to lay the roofing material and sheathed overhangs of the roof. As a roofing material can serve:
- slate;
- metal tile;
- shingles;
- professional flooring;
- ceramic tile.
What to choose - decide for yourself. Start from your finances and desires.
Let's sum up
Now the foundation of your home on Canadian technology is ready. As you can see, it is rather quick and simple to make such a house, the main thing is the desire and following the instructions. But on this construction of the house is not finished, you still have a lot to do. But all this is already according to the standard scheme, which is suitable for the construction of any home. You will have to carry out all communications, install windows, doors, perform internal and external cladding, etc. Nevertheless, the main work is done, and you just have to be proud of how much you have already done. Such a house, made by Canadian technology, will stand for a long time!