House of claydite concrete do it yourself
Cheap and warm - with these two words you can describe a home made of expanded clay concrete with your own hands. The method of such construction may be to the liking of those who wish to have their own housing with minimal material costs. In addition, such a project takes less time and effort to implement as compared to brick buildings.
Advantages and disadvantages of technology
Some are skeptical of claydite, talking about its instability or instability. But even if we do not fully know something, this does not mean that it is bad. To fully appreciate this building material, you need to know about its strengths and weaknesses.
Strong:
- Versatility. Material (speaking of the monolith) can be used in the construction of walls, pouring screed and even partitions.
- Low weight. Component of the final product, except for bulk additives, is expanded clay - this is a natural clay material that has air pores.
- Good thermal insulation properties. In many respects it will surpass some types of aerated concrete and foam blocks.
- The possibility of self-production. Subject to technology, the material can be prepared at home.
- Expanded clay has long been used in construction. In many apartments they poured a concrete screed on the basis of expanded clay, which has been successfully used to this day, so we can talk about durability.
- High environmental friendliness.
Weak sides:
- Low density compared to other types of dense concrete. This may create some difficulties in arranging furniture and equipment after construction.
- The need to provide insulation from moisture on the outside of the building.
- The need for a rigorous approach when performing calculations.
- Relative fragility compared to dense types of concrete.
- Unpresentable appearance, so the mandatory finish is important.
The disadvantages, in principle, can be considered insignificant, if we compare how much the cost goes to the purchase and delivery of finished products. The advantages overlap with all the shortcomings. The full picture is needed only to take into account certain nuances in the design and procurement.
Construction methods
There are two main methods of construction of expanded clay concrete:
- block;
- monolithic.
In the first option, you can purchase ready-made blocks or make them yourself. It is important to remember that when making such a decision, it will be necessary to use a solution that will necessarily create cold bridges, which will reduce the thermal characteristics by a certain percentage.
Monolithic casting is that a special composition is being prepared, from which walls are erected. There are difficulties, but the design is very durable and resistant to various influences. In this case, you can easily do the work yourself. The time goes a little longer than the block masonry, but the result is definitely worth it.
Manufacturing blocks
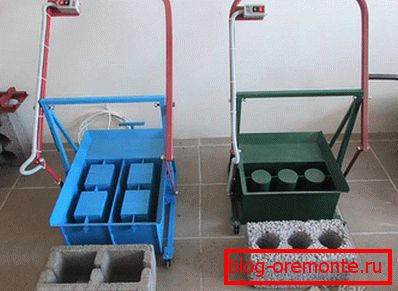
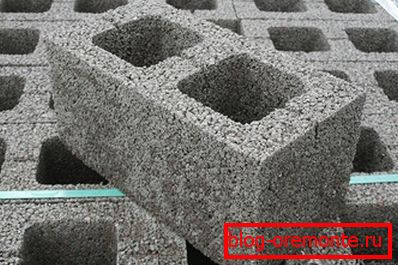
To start work, you need a machine that will be used to make blocks. You can buy it at an affordable price or make it yourself. If you own elementary skills with a grinder and welding machine, then this will not be a big problem. Forms do not have to be metal, wooden can also last long enough. The dimensions of the final product can be the same as that of the cinder block - 20? 20? 40 cm. As an alternative, you can use 39? 19? 14 cm or 21? 51? 25 cm. For internal walls, the width can be reduced by half.


- From metal with a thickness of 3 mm, sheets of metal are prepared according to the chosen dimensions, and the wall thickness must be taken into account by adding this value to the length and height.
- With the help of a welding machine a box is made, which will be the form for the blocks.
- Two small parts are made of the same metal, which will ensure the formation of voids inside. The dimensions will be 3 cm smaller than each of the sides, and it is also necessary to take into account that the internal partition in the block should be about 5 cm.
- A frame is made of a 3 × 3 cm square tube, which should be placed right inside the welded box, compacting the blocks with its weight. Limiters are welded to the frame, which will not allow it to fall below a certain level - so the blocks will have the same height.
- A 5 cm wide partition is welded in the middle of the frame.
- Handles are attached to the body for more convenient lifting of the whole structure.
- On the long side you need to fix the electric motor with a weight attached to its rotor with an offset center of gravity, due to which the machine will vibrate, compacting the solution.
- To simultaneously produce several elements of a building material, you can make a shape into several blocks.

For the preparation of raw materials, which will be put into production, you will need:
- keramzit;
- cement;
- water;
- plasticizer;
- sand that does not have clay impurities.
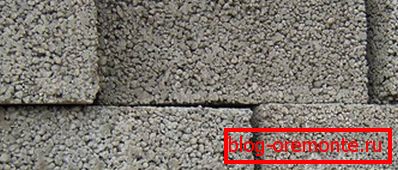
The whole process can be accelerated thanks to the concrete mixer. First, water is poured into it and, according to the instructions, a plasticizer is added in proportions, everything is well mixed. Separately, sand, cement and expanded clay are mixed in dry ratios in ratios of 3: 1: 8. It should be a homogeneous mass. After that, the mixture is placed in a concrete mixer and combined with water. If a vibrator is present in the form, then less water is needed to make the solution dryish.
The blocks made in the machine without the vibrator will have low strength.
Molding will occur as follows:
- It is advisable to choose dry and warm weather. Well, if the air temperature is above + 18 ° C.
- The surface on which the building material will be folded must be flat. You can organize such a solution by knocking down the edged board cut into shields or using moisture-resistant plywood. You can simply lay a concreted area with oilcloth.
- The inner walls of the machine should be well polished, in addition they can be lubricated with used oil.
- First, the hollowers are inserted (if the design of the machine does not provide for their presence).
- Poured the solution and well rammed with vibration or frame.
- When the composition is grabbed, the mold can be removed to start the drying process.
- Full readiness comes in a month.
- After a few days, the building material can be safely carried and folded for storage.
- It is necessary to cover the finished blocks while they are on the street so that rainwater does not soak them. For these purposes, suitable plastic film, slate or roofing material. It is important to maintain a gap between the elements so that the air can circulate freely.

Before you start casting, it is advisable to calculate how many blocks you need for a future project. To do this, calculate the area of all walls. This is done by multiplying the length by the width. All results are summarized. Further, the area of the block itself is recognized. After that, the total area of the building is divided into the block area. Knowing the total number of building units, you can decide what amount of source material you need to buy. The weight of a standard unit is 15 kg, if the calculation is made according to proportions, then it turns out that the cement leaves 1.5 kg, expanded clay - 12 kg, the rest is sand. This data must be multiplied by the number of all elements. Based on the number of components it will be possible to calculate the amount of money that will be used to purchase these materials.
The casting of a monolithic construction is an integral part of the construction of a monolithic wall, therefore it will be described in the appropriate subtitle.
What is the foundation
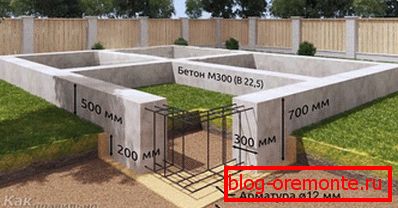
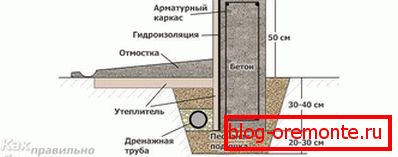
It is desirable for a house made of expanded clay concrete that the base has a strip foundation. It can be shallow or standard. The first option is suitable if you know that the soil in your area has a rocky base and is stationary. In all other situations it is better to make it below the freezing level. Components for pouring it will be river or washed sand, cement and crushed stone.

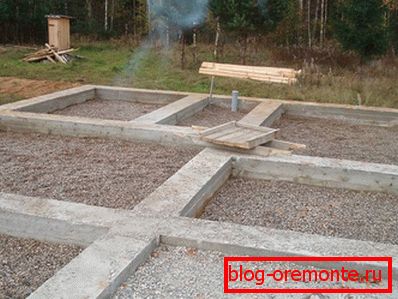
- Estimated area. We need to carefully look where the slope goes. This will allow you to make the deepening to the required level and ensure that the foundation subsequently turned out to be smooth, and not with surges.
- A string is pulled along the perimeter. It should be located on the outer edge of the planned structure. The width of the foundation must necessarily be greater than the width of the walls. The minimum value for this is 10–15 cm. For more convenience, another thread is pulled along the inner edge, which will also serve as a stop.
- Dig a trench. Its depth should be lower than the layer on which frost penetration occurs during the winter period.
- Coarse sifted sand is laid on the bottom. Its layer should be 15? 20 cm. It is important to tamp it well, for additional shrinkage it is poured over with water.
- The same layer is filled with rubble. It is also important to tamp it well.
- The next step is to install the formwork. You can make it from improvised means. For this purpose, a solid board is used, which is knitted into shields, a polystyrene foam base or plywood, which is covered with plastic wrap, which prevents it from sodding.
- Inside fit metal crate. Its manufacture from fiberglass reinforcement is allowed. It must be ribbed, and its diameter must be 12 mm.
- It is important to remember that the height above the surface should be at least 70 cm. This will prevent wetting due to the incoming moisture. If a large amount of funds is needed to fill this level, then you can lay out the remainder as a block base.
- Crate fits inside the prepared trench. It is important to remember that its dimensions should be 10 cm smaller to ensure that it is immersed in the solution at least 5 cm, only in this case a monolithic structure will be obtained, and metal rods will be protected from corrosion.
- At this stage, liners are laid for plumbing, sewage and other utilities.
- All voids during pouring must be eliminated with a vibrator. From this will depend on the maximum strength.
- To facilitate further work, you need to try to bring the top edge to the level. It will be much easier to lay.
- With a strong rush in two weeks, you can move on to the next stage, but it is advisable to give a month for the concrete to gain full force.
- Simultaneously with the foundation, a blind area can be made. She should be leaning away from the house. Its purpose is to provide rapid outflow of rainwater from the basement, as well as giving additional strength to the base.
In hot weather, it is important to provide good moisture to prevent drying and cracking of the base. To do this, you can cover the plane with a ruberoid or plastic film. Periodical wetting with water will be useful.
Monolithic walls
This option with the right approach will be of sufficient strength. You should start with the preparation of formwork. It is on how well it will be made that the final result will depend. At this stage you should not spare money. It is necessary to purchase waterproof or laminated plywood.
- It will be easier to work if large sheets of material dissolve into squares. You can choose any size, for example, it can be with a side of 1 m.
- For the next step you will need construction clamps. Sheets must be marked in pairs. Two must be bonded to each other. At a distance of 5 cm from the top and bottom edges with a gap of 20? 25 cm, 10 mm holes are drilled for fittings. They are fixed so that the holes coincide exactly with each other.
- In the case when plywood is not covered with laminate, then for a better lag from the solution and protection from moisture, it is covered with plastic wrap.

To prepare the solution will need:
- cement;
- keramzit;
- water;
- plasticizer.
The ratio for these components in the order of their location will be - 0.7: 4: 0.45: 0.015. This means that for slightly less than 1 bucket (with a capacity of 10 l) of cement, 4 buckets of expanded clay, 5 liters of water and 150 ml of plasticizer are needed (ordinary liquid soap or shampoo can play its role). Kneading is better to do in the concrete mixer — This will be the key to a good mix of ingredients.
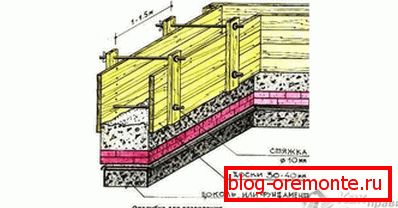
If a base was erected, then the waterproofing should be laid in two places - on concrete and on top, on the base itself. In the case when the foundation was poured immediately to the desired height, then the ruberoid or bikrost is laid in two layers, and the seams are coated with bitumen mastic. The main difficulty will be in setting the first level. The sequence of work will be as follows:
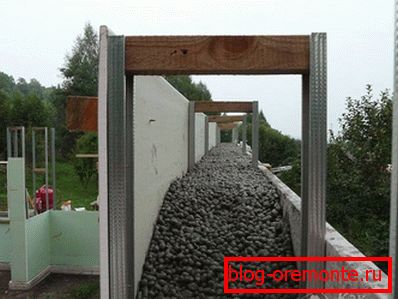 The fill should start at the corners. This will not only ensure the evenness of the wall, but also facilitate the subsequent fastening of the formwork.
- Two sheets are fixed at an angle of 90 °. This can be done with metal corners on the side that remains outside. Here it is worth considering that the elements for fastening from the outside of the wall should be slightly longer than the internal ones so that they coincide on the ends.
- On the lining of granite, on top of waterproofing, fit several rods of reinforcement.
- Glass reinforcement or other tubular material is cut into segments whose size will be such as to enter the formwork plywood walls.
- Formwork sheets are installed. This will require studs whose diameter will be such that they fit inside the prepared tubes. The threaded element is threaded into the hole of the wooden sheet, then the nozzle is put on it and discharged through the second sheet of plywood. Fixing is carried out with the help of washers and nuts.
- The ends are closed flat board, the width of which will be equal to the width of the wall.
- Vertical and horizontal level is checked.
- The prepared solution is poured into the cavity formed and well rammed.
- In this state, it is left for several days until solidified.
 After that, the formwork is dismantled.
- To fill the next level, several bars of reinforcement are laid again along the wall. Holes that remain from the previous fill will serve to fix the bottom of the formwork. All actions are repeated to the full pasture of the planned height.
- Lintels are filled with concrete. However, they must at least 15 cm on each side to go beyond the limit of the opening.
- Holes that remain from the time the formwork was installed can be repaired with foam.
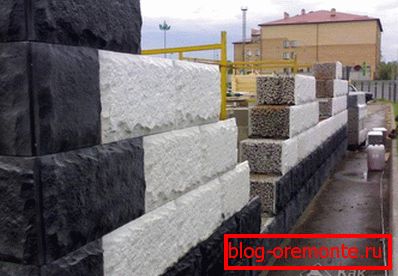
There is also the option of permanent formwork. To do this, lay in the half brick of two walls with a gap. Inside between them will be filled with expanded clay. The reinforcing element in this case will serve as a pin brick, which staggered inwards in a checkerboard pattern. The advantage of this solution will be a large thickness of the plane, as well as the absence of the need for external decoration, if the external row falls under the jointing.
See how you can make a removable formwork and pour monolithic walls:
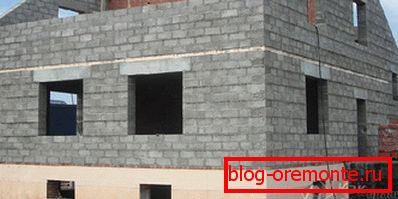
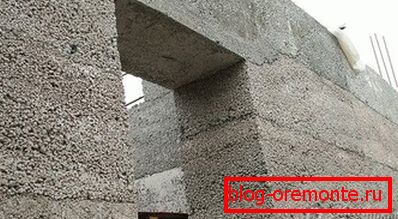
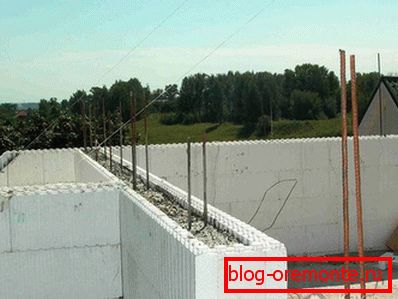
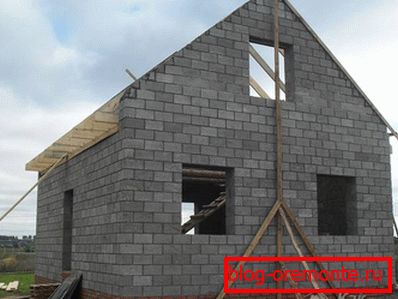
Block walls

The technology of laying lightweight aggregate blocks slightly differs from the laying of ordinary bricks. Here are just some of the nuances that must be observed:
- Need to start from the highest angle. It is determined using the water level or laser plotter planes. Using the second tool is much faster and easier. A line is projected just above the foundation level. With the help of a tape measure it is measured from it to each corner, where the distance is less - there is the highest point.
- The first block is set at the selected point. It must be maintained in all planes. From this reference element, all others are laid out.
- Between the two stones, on the outside, the fishing line or twine is pulled. Its height should be the height of the row plus a layer of mortar. It is rearranged as necessary to a higher level.
- Verticality is maintained with a plumb or bubble level.
- The thickness of the seam should be 1 cm or less. This will reduce the cold bridges, because the solution has poor thermal insulation.
- If you are doing this for the first time or do not have much experience, add a plasticizer to the masonry mix. It is intended to ensure that the solution does not sit down and harden longer. So there will be more time to fit each item.
- For greater reliability, every few rows can be laid reinforcing mesh.
- Jumpers are made in the same way as in the previous version. For greater stability, the reinforcement is bent and tied with masonry.

Factory units can be with or without air cavities inside. The base is better to lay out the second option - monolithic blocks. Also, their use is relevant if you plan to use concrete floor slabs. Additionally, they will need to make armopoyas. Wooden formwork is installed, crate is laid and concrete is poured. The minimum height is 20 cm.
Roof
For the project of expanded clay, you can use as a metal construction truss system, and wood. The first has its undeniable advantages:
- resistance to fire;
- longer service life;
- not subject to rotting and fungus effects;
- possibility of installation in any weather;
- strict compliance with the details stated in the project;
- minimum assortment of tools for installation;
- For a lightweight system, there is no need for special lifting equipment.
The main disadvantage that can stop when choosing this design is low energy efficiency. Metal can freeze to low temperatures, which will contribute to the rapid cooling of the attic space.

For private houses it is better to use a triangular design. Much will depend on what angle of the roof is specified in the drawings. It is selected taking into account precipitation and wind strength in a particular area. Also on the specific project will depend on the thickness of the materials used. Farms are made in the same way as wood. If the span width is up to 10 m, then jumpers are installed like crossbars. When the size exceeds the specified figure, then the installation of bracings that are directed downwards will be mandatory. Both sides must have the same number of racks for balance and proper load distribution. For this design it is better not to use hanging rafters, which are simply welded onto the mauerlat, it is absolutely necessary to provide a base. A channel of sufficient height and thickness of the metal acts as a mauerlat. In case of choosing such a solution, it will be necessary to take care of high-quality insulation of both the attic space in general and the roof in particular. A good way would be to use stone wool. It is quite simple to lay in the gaps between the rafter legs. At the same time at the stage of construction it is necessary to consider the observance of this size.
Wooden structures are the most common. For the mauerlat, the timber is usually used with dimensions of 15? 15 cm or 20? 20 cm. Its attachment, as for the metal construction, is carried out to the studs, which are laid when the armored belt is poured or with the help of anchor dowels. In the second case, a punch is needed, with which holes will be drilled in the concrete. For basic elements you can use a trim board of 15? 10 cm or 5? 10 cm.
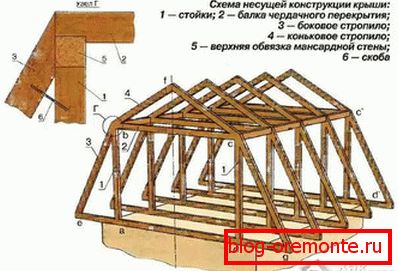
It is important to remember that installation begins with two extreme trusses, which must be set up in all planes and securely fixed. Connecting elements are mounted between them. These may be additional beams on pedestals that enter the sub-ridge space or strained threads that will allow them to withstand the level of other elements.
All spacers must be mounted in accordance with the planned use of the attic space. If it is an attic, then they need to be shifted as much as possible to the edges in order to make more space. Another option would be to divide the entire territory into two rooms, then you can hide the racks in the alterations.
Internal and external decoration
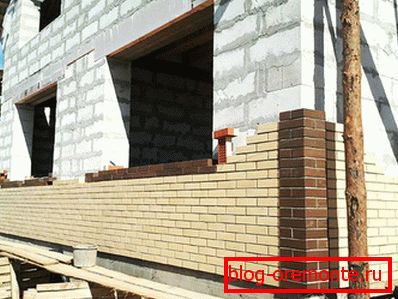
In order to achieve maximum savings on the means of heating, it is important to take care of additional insulation. Run it in two ways. Each of them will depend on what type of exterior decoration is chosen. If you want to cover the walls with bark beetle, then you can use foam or foam plastics as an insulator. The sequence of actions will be as follows:
- Calculated the total area for all walls. To do this, you need to know the value for each separately (multiply the length by the height), and then add the results.
- In accordance with the result, the insulation is purchased. Its thickness can be 10 cm.
- It is attached to the wall with special plastic dowels with wide caps (umbrellas). In the case of expanded clay concrete, it is better to take care that their diameter is larger. This is due to the porous structure of the building material.
- In the basis the starting level fastens. As its quality can serve as a metal profile for plasterboard of sufficient width to go inside a sheet of insulation. The guide is set on the level and secured with dowels and screws.
- The foam must be fixed, observing the vertical level in order to maintain a flat surface of the wall.
- The reinforcing mesh is fastened on top and tightened with special glue.
- After complete drying, it is finished with decorative plaster.

In another case, you can use not decorative plaster, and facing stone, which is placed on top of insulation. In this embodiment, the whole structure is more resistant to shocks.
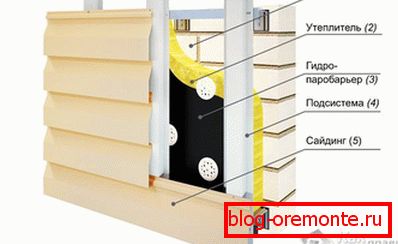
In the case when facing is planned with the help of siding, the procedure will be as follows:
- As in the previous case, the amount of material required is calculated.
- The entire wall is covered with waterproofing.
- The obreshetka from a metalprofile is mounted.
- Mineral wool is laid between the posts of the batten and fixed with umbrellas.
- The final step is to install siding.
Read more about how to install siding, read here.
The porous structure of lightweight aggregate allows you to easily apply ordinary plaster for interior decoration. This facilitates the task, in contrast to the finishing processing of cinder block. First of all, all walls are covered with primer or concrete contact. They allow not only to remove excess dust, but also to increase the degree of adhesion of materials. Next, the metal mesh is mounted, which will serve as a reinforcing component. After this begins the application of plaster. The final step is to install a drywall construction or putty.
As you have seen, such a project at home can be implemented independently, starting from the drawing and manufacturing of building blocks. Do not neglect the advice of professionals and do not consider below his dignity several times to consult on the same issue. Successes in your endeavors!
Video
An example of building a claydite house:
On the advantages of expanded clay blocks and features of their installation in the following video: