House from twinblok do it yourself
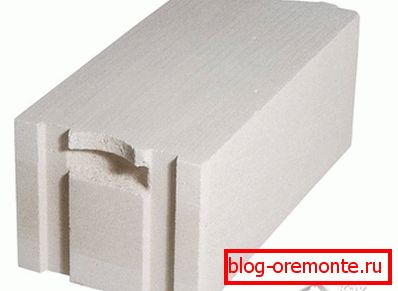
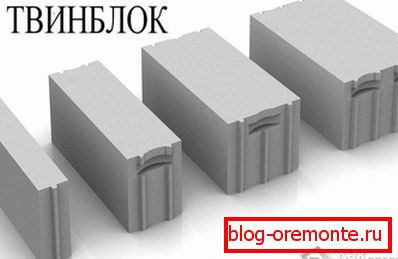
Cellular concrete is gaining popularity more and more. Choosing from which to build their home, many developers prefer it cellular or aerated concrete. There are many reasons for this, the main of which is material properties. One of the types of aerated concrete is a twin block. It is made in an autoclave at a temperature of 180? C under a pressure of 12 atmospheres. This high-tech material meets all standards and modern requirements and is used in the construction of various buildings. To make a twin-block house with your own hands, you do not need deep professional knowledge and skills in construction. One of the advantages of this building material is its ease of operation. After reviewing the technology and studying the details of construction, you can build such a house yourself.
The advantages of building material
When building a house, everyone wants to make it quickly, efficiently, so that it is durable, warm, and has stood for many years. All this can be achieved using twin block. Let's consider its main qualities and advantages:
- Strength. This material has a high structural density, so the twin block can be safely used for the construction of load-bearing walls. They will even withstand the load of a house in 2 or 3 floors, and the floor can be made of heavy concrete slabs. And when the plans for the construction of a frame-monolithic option, the walls can be built much higher.
- Thermal insulation. Twin-block has a porous structure that allows you to retain heat in the house and pass air. And the materials that are included in the composition, significantly increase the characteristics of the building. For example, in the winter, you can save on heating, because the twin block has high thermal insulation properties, and in the summer there will be coolness in your house, because the direct rays of the sun will not warm the house much, creating a good microclimate.
- Ideal geometric shapes. Thanks to this indicator, it will be much easier to build even walls.
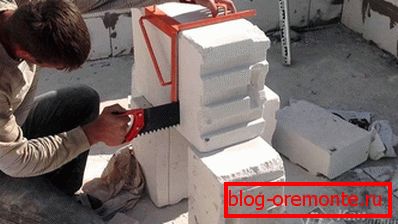 Easy to process. The blocks are easy to shape and handle, and this can be done with a regular hacksaw. They are easy to cut and drill by hand. If during construction you plan to make complex architectural structures, it will not be difficult. It should be noted that this property is useful not only when building a house, but also when internal work is carried out. After all, if you want to make channels for electrical wiring or piping, use a grinding machine with a cutting wheel.
- Fire resistance and frost resistance. In the composition of the twin block materials that do not burn, have the first degree of resistance to fire. And thanks to its resistance to sub-zero temperatures, it can be used in areas with harsh climates.
- Sound insulation and environmental friendliness. If you live in a bustling city or near a market, road or train station, the walls of the twin block will protect you from extraneous noise. And even better is that there are no chemicals and heavy metals in their composition that can have a negative impact on your health.
- Low weight. With its size, which is much larger than a brick, the weight of a twin block is not so great. This is due to the porous structure, so it will be easy to work with the material, and for the foundation device it is not necessary to strengthen and deepen it by several meters. It is much faster and easier to erect walls than from bricks, especially since it is easier to move and deliver blocks to the site. It is necessary to connect such blocks in the manner of a groove comb, due to the shape of the blocks.
- The blocks have a high absorbing surface, due to which the finishing materials are well set and firmly held on the walls.

All these advantages made twinblocks one of the most popular materials for construction. The buildings are built from it quickly, they are warm and can stand for more than 30 years, while you spend less on building such a house than building a house of bricks.
Necessary measures before construction
After seeing all the advantages of the material, you can proceed to the preparatory work. It all starts with the project of the future house, which must be done in accordance with the rules. What for? First of all, to legalize your house and decorate the house as your property, because without a project it will not work. Moreover, you will need it at the stage of applying for a construction permit. Secondly, you will have accurate information on what and how to do, how much material you need, money and what work to do, without a project a house can be built incorrectly and will not last long.
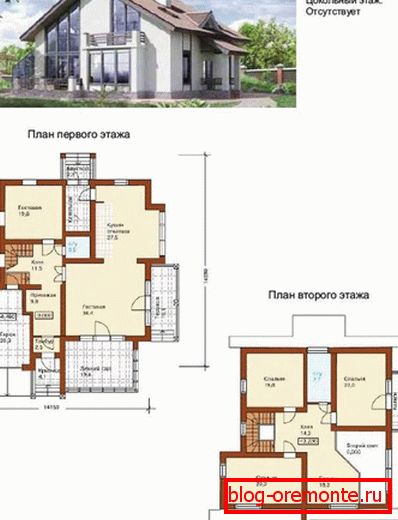
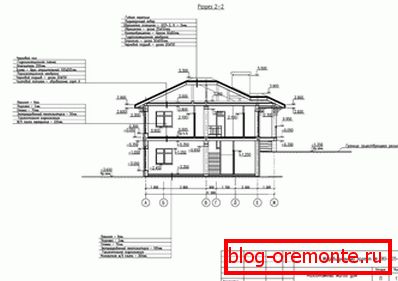
Such a project should include an architectural section, where there are detailed drawings and plans for the future house: rooms, floors, basement, attic, roof. Constructive section, which provides general data, the layout of the foundation, stairs, floors, truss construction, features of materials and products, as well as detailed drawings of individual nodes. Another plan should include sections on communication: electricity, water, sewage, heating and gas equipment.
It immediately becomes clear that it is very difficult to competently make such a project independently, without experience and knowledge. If you are a layman in architecture, it is better to entrust this work to professionals who can make a quality project based on your wishes. All you have to do is pay for the work done. There is another option - a detailed plan can be found on the Internet. It can also be bought or downloaded for free. The first option is more reliable, since we all know that free cheese lies only in a mousetrap. Such projects can be both good and illiterately executed, then you cannot avoid problems.
Preparatory work

When your plan is ready, you can start preparing the construction. The first thing you need to take care of the place to store material and tools. After all, for construction you need twin blocks, sand, cement, which must remain dry. You also need to properly equip the construction site and comply with all safety measures. It is important to conduct electricity in advance.
For the construction will need blocks, so they need to prepare. If the plan does not calculate the number of blocks needed for construction, then you can do it yourself, because you don’t want to overpay for extra blocks or go for new ones. So, based on the dimensions that are in the project, you need to know the area of the walls. For this, the perimeter of all walls must be multiplied by the height. For example, the walls of your house have a length of 13 and 10 m, and their height is 6 m. It turns out:
13 + 13 + 10 + 10 = 46 m
6? 46 = 276 m2
The area of the walls of the house is 276 m2. To determine how many blocks you need, this number must be multiplied by the thickness of the blocks. Then you will know the number of cubes of blocks. It is clear that the box of the house will not be solid, since there will be unencumbered windows and doors in the house, but it is better to take several blocks more in case of an emergency.
It should be noted that it is necessary to transport the blocks very carefully so that they do not lose their geometric shapes and do not get damaged. All units must be well packaged. After delivery, the material must be moved to a dry prepared place, where it will wait in the wings. After all the preparatory work, let's take a look at how to build a twin-block house.
Front of works
To have an idea of what you need to do to build a house, you need to briefly consider all the work ahead. The technology of building a house from twinblok is quite simple, you just need to follow certain rules and sequence. After everything is prepared, there is a project, the material is purchased and placed, you need:
- To equip the foundation. As you know, no building can do without a solid foundation that provides it with strength and durability. For the construction of a house of light gazoblokov, the foundation is often made tape or columnar. Its depth and width depend on the type of soil, groundwater and the number of floors of the house.
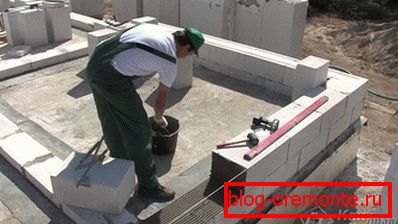 Build walls. The peculiarity of the construction of walls from twinblock is that instead of the usual cement mortar, you can use a special glue that is applied to the blocks with a notched trowel. This glue dries quickly, and the gap between the blocks will be the same everywhere, making it easy to build even walls.
- Make jumpers over windows and doorways. There are no special features in this work, the jumper can either be bought or made on its own from a bar.
- Provide reinforced belt. For the reliability of the entire construction before installing the ceiling and the roof must be made armopoyas. Moreover, during the laying on 3 or 4 rows of blocks, reinforcement should be made.
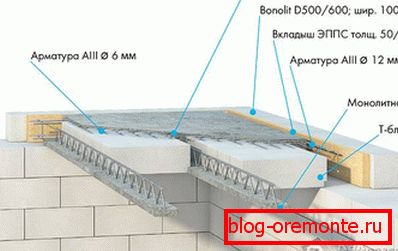
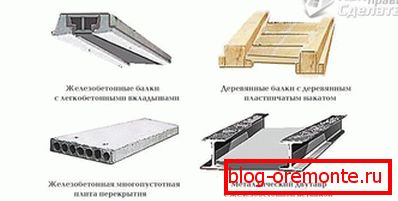
- Install the floor slabs. If you plan a house with several floors, you need to make a ceiling between the floors. They can be made from a wooden frame, metal or from concrete floor slabs. Also, the overlap is required before the construction of the roof.
- Build the roof. The last stage of the construction of the box at home is the roof device. Here you need to decide on its type and material for overlapping.
This is all the basic work that must be done to build a house. Now we consider in detail each of the stages of construction.
The basis of the house - strip foundation
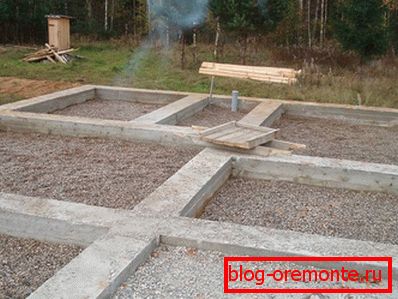
As already mentioned, a tape or column foundation will be suitable for building a house from a twin block. Let's take a closer look at how to do each of them. Depending on your desire, you will choose the one that you consider the best. Let's start with the strip foundation, which repeats all the bearing walls of the building.
The first thing you need is to clear the place: remove everything that will interfere in order to get a clean pad. After that, you need to mark it. Use stakes or fittings and rope. Based on the size, insert the reinforcement or stakes around the perimeter of the building. The markup should follow the drawings of the house on the ground. Stretch a rope between them and check with a square wrench to see if you did everything smoothly. To make sure everything is straight, measure the diagonals and compare them - they must be equal. In the same way, you need to tighten the internal layout for the base. 400-500 mm (average distance for a strip foundation) should be removed from the external marking and the rope should be pulled.
Now you can dig a trench. First, determine the lowest point of the plot. From it you need to measure the depth of the trench. She, in turn, depends on the weight of the house, the depth of freezing and the type of soil. If the house is small - enough 500-700 mm deep. If the house is large, and the soil is loose - from 1 to 2 m. You can dig a trench manually or using special equipment. To dig it yourself, you will need a shovel, a tape measure and a plumb. It is important that the walls and bottom of the pit are smooth. Check it can be a plumb and level.
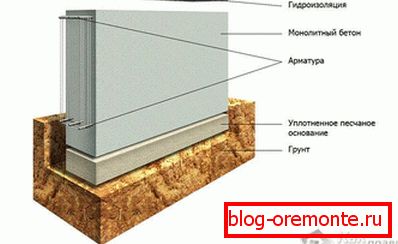
To give stability to the foundation, at the bottom of the trench you need to make a pillow of sand and rubble. Pour a layer of sand 100 mm on the bottom and tamp it well. Do the same with rubble. For waterproofing lay a layer of roofing material around the perimeter, then the moisture will not penetrate from the ground into the concrete. It's time to make the formwork. Its height above the ground is selected depending on climatic conditions. If the winters are cold and there is a lot of snow, the base can be made 400–500 mm high, when the climate is warmer, 300–400 mm is enough. The formwork is made of planks, plywood and similar materials interconnected by screws or nails. To know what level to pour concrete, pull the line on the inner perimeter.
In order not to drill holes for sewer pipes after pouring concrete, they can be laid at this stage. Install them in the right place and fill with sand so that they do not deform or use sleeves - pipes of larger diameter.

Reinforcement must be done before pouring concrete. To do this, take the rods of reinforcement O12–14 mm and tie them into a grid using knitting wire. The size of the cells may be different - the larger the mass of the house, the smaller the sides of the squares. On average, they can be 200? 200 mm. It remains only to install the reinforcing mesh at some distance from the bottom and pour concrete.
To make concrete, it is better to have a concrete mixer, which will speed up the process of mixing the solution consisting of sand, gravel and cement. To save time, concrete can be ordered, but it is important to know how much mortar is needed. To find out its quantity, you just need to multiply the height, width and length of the foundation between each other.
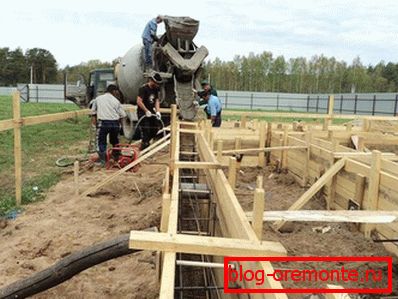
It is necessary to pour the foundation immediately, without waiting for the drying of certain parts of it. Therefore, you need to fill the foundation with layers of 200 mm, ramming concrete and expelling air. When the mortar has filled everything up to the stretched line, level the surface with a trowel and wait 3-5 days, cover it with polyethylene so that it will not spoil the sediments, and wait a month until it is completely dry. If the weather is hot, moisten the foundation so that it does not crack. The formwork can be removed on the tenth day.
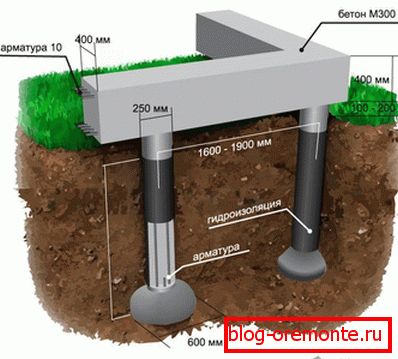
The foundation of the house is a pillar foundation
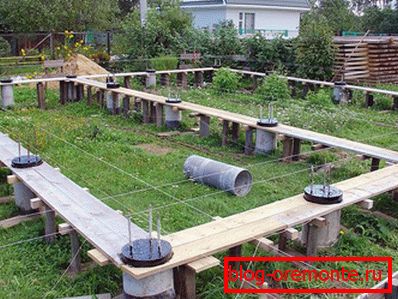
Making a columnar foundation is also not difficult. First you need to prepare the surface. Mark where the pillars will be installed. Be sure to place them at the corners of the building, in the place where there is a large load and, if the walls are long, every 2-3 m. The main thing is that the weight is distributed evenly on all the pillars.
- Depart from the perimeter of the future building 2 m from all sides and remove from this part the fertile part of the soil, which can be 100–300 mm. This is done to ensure that various plants do not germinate under the house. Everything should be smooth, the grooves need to fall asleep and smash the bumps. From above, everything is covered with gravel or sand.
- Further, the order of work is similar to the creation of strip footing:
- It is necessary to dig holes for the foundation pillars of the desired depth. If the pillars are round, you can use a drill. Depending on the width of the material from which the foundation is made, the width of the pit should be slightly larger.
 Tamper the finished pits and put a 100–150 mm layer of sand cushion into them, tamping it again. Then pour the second layer to 100 mm of gravel and sand, and also tamp it.
- Install ready-made pillars in the pits and check with a level whether they are flat. If necessary, they all need to be aligned. For convenience, you can pre-pull the line at the desired level and equate the columns on it.
- To fix them, from the outside, the pit must be filled with soil, compacted and poured with concrete.
- Now make the frame of the reinforcement and place it in the pipe. The armature should rise 100–200 mm above the pipe.
- Pour the concrete inside the pipe and wait for it to dry completely. In order for the concrete to be poured without bubbles and voids, it must be sealed when casting with a bayonet.
- Install the formwork for the grillage around the perimeter and fill it with concrete.
It will take about a month to wait for the solution to dry. And only after complete drying, you can start laying walls.
Wall construction of twinblock
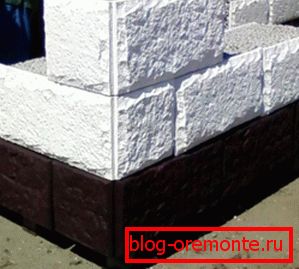
Before you start laying, lay a 1-2 layer of waterproofing material on the foundation. Now you can lay the first row of blocks. This is the most important work, since the correctness of the first row depends on how correctly and exactly the first row is built.
Any laying begins with corners. Please note that the first row must be laid on the cement-sand mortar. Even if it dries longer, it will allow you to easily fit the blocks and align them.
For the work you need these tools:
- building level;
- rubber kyivanka;
- cord or fishing line;
- manual or electric wall chaser;
- a brush to remove dust from the strobe;
- Master OK;
- corner;
- hacksaw;
- notched trowel or trowel;
- fittings O8 or 10 mm;
- plane for aerated concrete.

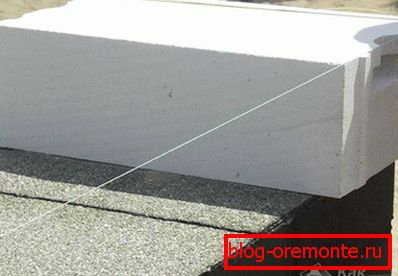
Apply a 10–15 mm solution to the waterproofing layer and place the blocks on all corners. They should be perfectly aligned. To do this, use a rubber mallet and level. Between the blocks, pull the cord or fishing line, which will serve as a guide. It should not sag, so tighten it well and check the level. If the length of the wall is more than 10 m, put an additional block in the middle. Focusing on the fishing line, lay out the first row of blocks. Kayakoy tap on them to even lay. All masonry must control level. Since the wall is often not equal to the number of blocks, some of them need to fit the size. Use the hacksaw and angle: to control the cutting. After the first row is ready, you need to wait until the mortar sets (2–3 hours).
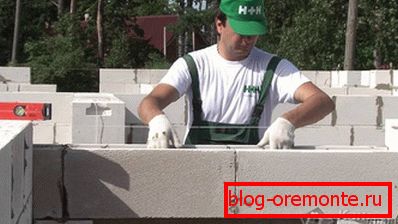
The second and third rows are made in a similar way, only already with a bunch, the blocks are shifted by at least 80 mm or half. Now you can apply glue instead of mortar. But before that, treat the surface of the first row with a plane to give it a roughness. Now the glue will bond better and lie flat. Apply glue to the blocks with a notched trowel. The thickness of the adhesive layer that is applied to the entire surface and the end must be 20–40 mm. Do not forget in places where there will be doors and windows, do not lay blocks. As soon as you have made 2 and 3 rows, 4 you need to further strengthen the reinforcement. Lay this row on the same principle. Then using the wall chaser make two parallel grooves in the blocks. Brush them and install O8 or 10 mm fittings there. Remember that the ends of the reinforcement should not end at the corners or joints. It remains to fill the entire solution or glue. After that, the laying continues, as before, up to the 8th row, which will also have to be reinforced. And so every 4 row.
Arrangement of windows, window sills and installation of jumpers

Places where window openings will be made need to be reinforced. To do this, test on the blocks 2 lines under the future window frame and place the armature there. The length of the strobe must be greater than the length of the frame 300 mm on each side. Grooves with fittings need to be filled with glue and continue laying. Then you can strengthen the space under the windows.
When the windows and doors are laid out to the top, jumpers must be made so that the structure does not collapse. To do this, you can buy special U-shaped blocks or make a formwork yourself. Above the window, install the board on which the blocks will rest. Install U-shaped blocks on it, lay reinforcement and fill all with concrete. But you can do without them. Just on the same board from the outside along the edge, lay the blocks, the thickness of which is 150 mm (cut the usual block). Inside along the edge, lay blocks of 100 mm thickness. So you made a semblance of U-shaped blocks. Then everything is the same: install the frame of reinforcement and fill the space with concrete.
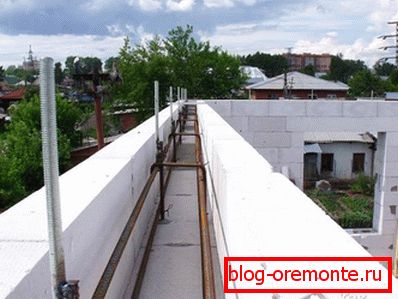
Armored belt
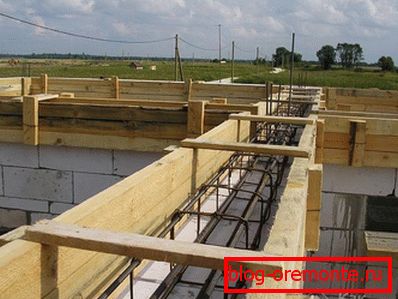
Arm-belts are similar to lintels that were made above windows and doors, only blocks are installed along the entire perimeter. It must be done before constructing the ceiling and the roof. On the finished row of blocks, install the blocks cut in half so that they form something like a formwork. In it, put the frame of the bars of reinforcement and fill all with concrete.
Ceiling installation
Overlap should be done in cases where the house is built with several floors and before the arrangement of the roof. There are several ways how to make the ceiling: from wooden beams, metal frame or from ready-made concrete slabs that are installed on the armored belt. It is clear that such plates cannot be lifted manually, so you cannot do without the help of a crane. If you make the overlap of the beams, their ends should be cut at an angle of 60–80 ?, walk with an antiseptic, wrap in roofing material and place in a niche, to a depth of 150 mm. Install the beams in 1–1.5 m increments. Then the crate is knocked out of the boards and the flooring is laid.
Overlaps can be divided into the following types:
- ground floor dividing the basement and the first floor;
- interfloor overlap that separates the floors;
- attic floor separating the floor and the attic;
- attic floor separating the floor from the attic.
Roof structure
In your plan, the type of roof should already be selected. She may be:
- single-skinned;
- gable;
- flat;
- mansard;
- dome or conical.
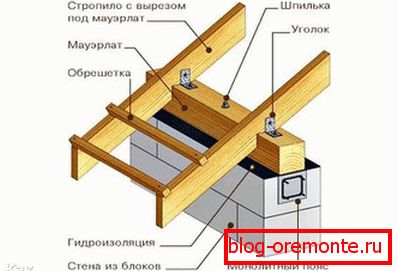
The most common option - the usual gable roof. Make it will be relatively easy. On the reinforced belt you need to lay a layer of waterproofing material. Mauerlat - bar is installed on top, which will account for the main load of the truss system. To fasten it, even when pouring concrete into the armored belt, you need to weld metal studs with a 12 mm thread to the reinforcement in increments of 500–600 mm. They should rise above the reinforced belt at 450 mm on the same level. Holes are cut in the right places in the mauerlate, it sits on the studs and is clamped with two nuts through the washer. For better fastening, you can additionally secure the bar with anchors.
The outer rafters, rear end and front are attached to the mauerlat. So that they are held tight during installation, install the racks with braces in the center, which are fixed to the reinforced corner from below. Racks will support the rafters at the time of installation, after which they need to be removed. Strengthen rafters will help two crossbars and additional vertical racks on the sides.
Then set the horse and the remaining rafters with crossbars, which are connected to the power plate. To lay all the rafters in the same plane, you can stretch the thread along which you will be oriented, securing the rafter legs. What will be the overhang of the roof outside the walls you decide, it is usually done at least 500-600 mm.
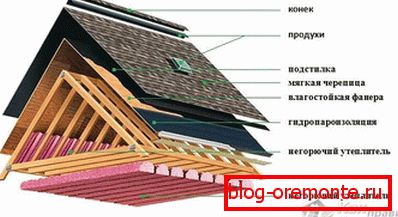
Now it is time to lay a layer of vapor barrier overlap 150 mm with the release out, then the moisture will roll down from the roof down, not inwards. Do not forget to lay also insulation. Now it remains to make a crate, gables and cover the roof with roofing material.
Before you finish the roof, you need to bring all the pipes: the chimney and ventilation pipes.
The crate is made of planks, bars or tesa. If the role of the roofing material is rolled soft coating, the crate should be made with a minimum gap or better solid. When the roof needs to be made of tile or slate, the step can be made in 250-400 mm, depending on the pitch of the metal tile.
Both soft and hard coatings can serve as roofing material. Among them:
- metal tile;
- ceramic tiles;
- professional flooring;
- shingles;
- slate;
- composite tile.

After you lay the roofing material, the main work will be done. House of twinbloka ready. But do not rush to relax, because more is waiting for you no less work that needs to be done to live in a fully finished home. Nevertheless, if you, without having special building skills, can make a foundation, build walls and build a roof, you can be proud of yourself and take up the rest of the work with enthusiasm.
Video
The technology of laying twinblock can be seen in this video: