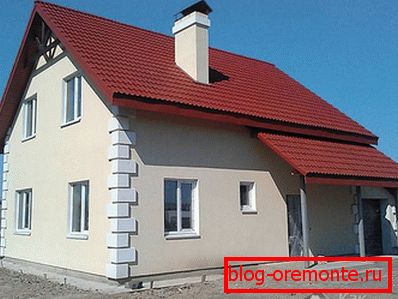
House from the gas block with his own hands
Each person dreams of his own dwelling in which his family will live. Over time, construction technologies have made great strides, therefore, it is not necessary to be limited to materials such as brick and wood. Today, there are new materials for construction, one of which is aerated concrete. A house of such material will serve you for many years without losing its original characteristics during operation. After reading this article, you will learn how to build a house from a gas block with your own hands.
The value of the gas block

Aerated concrete is an excellent alternative to brick, as it is distinguished by its good thermal insulation properties, reliability, durability and durability. This material has already won respect from the majority of builders and developers, as it has many advantages. What are they?
For these characteristics, aerocrete gaining more and more popularity:
- Aerated concrete has a low thermal conductivity, so buildings from it have much better thermal and physical indicators than houses made of brick, concrete or wood.
- The porous structure of aerated concrete gives the walls high air and vapor permeability. Houses built of gas blocks have a constant adjustment of air humidity and circulation of air, which creates a good microclimate, the same as in natural wooden houses.
- Gas blocks are made to exact dimensions with minimum tolerances and a smooth surface, so when laying walls you can use special glue that will speed up the construction process and prevent the formation of cold bridges during operation. Also, the process is accelerated due to the large size of the blocks.
- Aerated fire-resistant and environmental material.
- The material has a porous structure, due to which the weight of the blocks and, accordingly, the load on the foundation is not the same as that of other building materials. This allows you to reduce the cost of building the foundation.
- Due to its high strength, the aerated concrete does not break, does not crumble, and retains its original appearance.
- According to many experts, the building of aerated concrete can last more than 30 years.
- Aerated concrete has a high absorbent surface that allows you to set well with plaster and other materials.
Such advantages allow you to use the material for the construction of your own home.
Because of the porous structure, aerated concrete easily accumulates moisture and is able to store it for a long time, and this will lead to freezing of walls and the formation of mold on them. Therefore, during work and during further exploitation, the material should be protected from external factors.
What you need to know before construction

If you are building your home for the first time, you need to know that the first thing you need to do is paperwork. After all, just to build a house on the site no one will give you. First you need to get a building permit to be approved by the authorities in your area. Therefore, you need to prepare the necessary documents, among which is the plan for future construction.
Not everyone can make drawings at home, because for this you need a special education. Therefore, you can contact the specialists who, for a certain amount, will be able to transfer your dream home to paper. Another option is to surf the Internet in search of a project at home. In this case, be careful, because you do not know who made them and whether it is right.
Such a plan must have:
- foundation;
- floors with cuts;
- roof truss structure and calculation of the surface of the roof;
- door and window openings.
It is necessary to determine in advance the design of the building. Aerated concrete can be cut, so you can make a variety of arches, columns and beautiful openings. There are many options, the design may be different, depending on your desire.
Another important point before the start of construction is to purchase material. To avoid additional financial costs, you need to buy as many blocks as you need. But how to calculate the aerocrete on the house so as to avoid the shortage and excess material? Here you need to take into account the size of the house and aerated concrete blocks. The first thing you need to know the area of the walls.
All dimensions must be in the house plan. For example, one wall has a length of 12 m, and the other - 10 m. There will be two such walls. All they need to add:
12 + 12 + 10 + 10 = 44 m
It turns out that along the perimeter we have a length of 44 m. But, the house also has a height, so it needs to be multiplied by the perimeter. Suppose the height of the house is 4 m. Then it turns out:
44? 4 = 176 m2
Total, your house walls area 176 m2. Based on this data, you need to calculate the number of blocks that are sold in cubic meters. To do this, the thickness of the block (0.3) must be multiplied by the area:
176? 0.3 = 52.8 m3
So, to lay out the outer box at home, you will need 53 m3 gas blocks. For interior walls, the calculation is the same. Consider that it is undesirable to take a material back to back; it is better to drop 10% above so that you have enough blocks during construction.
When transporting the blocks should be covered with a hermetic film so that moisture does not destroy the material during transportation. Moreover, gazobloki need to be strengthened, so that after delivery they are not damaged, given what kind of roads there are.
It is necessary to store aerated concrete in a dry place where it will not get wet. Cover it under a canopy to avoid precipitation. It is important to provide a flat surface to lay the blocks. Then the material will be stored correctly, without losing their qualities.
How to fasten aerated concrete blocks - with a solution or glue?

As mentioned earlier, one of the advantages of a gas block is that it can be fixed either with a conventional solution or with a special glue. What material to choose for work? It should be borne in mind that each of them has both certain advantages and disadvantages.
The use of glue has the following advantages:
- perfect joints;
- very smooth masonry;
- no cold bridges;
- it’s easier and easier to work with.
But it is important to consider that:
- during operation, the glue will release various toxins;
- its price is much higher than that of the solution.
The usual solution consists of water, cement and sand. Of the minuses it should be noted that laying is somewhat more difficult than with the use of glue, as it is constantly necessary to monitor the evenness of the laying. But to correct these irregularities using the solution is much easier.
There are no certain rules and laws when choosing. Based on the foregoing, you can determine which material to use.
Preparatory work

To build a house of aerated concrete, the first thing you need to do some preparatory work, without which the construction will not start:
- First of all, you need to provide electricity at the construction site so that both the light and the instrument can be connected;
- organize a place to store aerated concrete;
- prepare a place that will serve as a warehouse for consumables;
- deliver the necessary equipment, tools and equipment to the object;
- bring the material necessary for work (aerated concrete, cement, sand, crushed stone) for at least a week of work;
- make geodetic training;
- study the building plan, techniques and ways of doing work, and organize workplace safety.
It is necessary to carry out laying at a temperature of 5 to 25? C. If the temperature of the medium is above 25? C, then during the performance of work, aerated concrete must be constantly moistened with water.
Construction technology

The technology of building houses from aerated concrete blocks began to be used in Europe, from where it came to us. For many years, aerated concrete is a popular material that has proven itself due to its properties. For many decades such houses have been located in most countries of Canada, Asia and Europe.
Many people without construction experience know the technological order of work in general. Let's take a closer look at what needs to be done to build a building:
- Foundation arrangement. Due to the fact that aerated concrete is relatively lightweight, it is not necessary to make a reinforced foundation, it all depends on the number of floors, the location of groundwater and the type of soil at the construction site. Basically for the house from the gas block choose a tape or monolithic foundation. Work on his device can last 3 weeks or more. Please note that the porosity of the material contributes to increased water absorption, so be sure to carry out waterproofing work, paying special attention to them.
- Masonry walls. It is much easier to build walls from a gas block than from a brick. Since the blocks are large and smooth, it can be done very quickly. The main thing is to choose a clutch and strictly adhere to the scheme. If the house will be with two floors and more, it is important to strengthen the walls, making the construction reliable and durable. Reinforced belts are used for this, then the perimeter of the house will be further strengthened.
- To carry out the laying of the walls, use a solution or special glue, which is applied with a special tool or comb blade. Thanks to it, you can achieve a smooth millimeter layer of technology. To align the blocks by level, a rubber mallet is used, which is tapped on top of the block. This will not damage the unit and will ensure uniform laying. It should be noted that the walls of the gas block after construction practically do not shrink. It turns out that it is possible to carry out finishing work immediately, due to which the juice of construction will decrease significantly.
- House overlap is an important part of construction. For a gas concrete house they can be monolithic, made of wood, concrete slabs or combined.
- Another important stage is the construction of the roof. You immediately need to calculate the roofing surface, purchase the material and make the roof truss system, and also sheathe it with roofing material.
- Glazing windows finished boxes. Double-glazed windows should be selected to provide sound and heat insulation.
- After that, it is necessary to carry out internal finishing: to lay engineering communications, such as sewage, water supply, heating, electricity, to equip the foundation of the floor, to erect internal partitions, to prepare the surface of the walls for finishing and to carry it out.
- Finishing the facade. At this stage, the eaves of the eaves are hemmed to the roof, and a water drainage system is installed. Well, there is a wall finish. Thanks to it, it is possible to achieve the following goals: to level the surface, hiding unevenness, protect the material from mechanical damage and moisture ingress, give the house a beautiful aesthetic look.
- The last stage is landscape design. You can decorate the plot, plant it, build a fence and make a decor.
If you stick to these technologies, your home will stand for a long time without losing its qualities, it will be cozy and warm, and fungus and mold will not disturb you.
So, theoretically, you are already prepared, you can proceed to practice to learn how to build a house with your own hands.
Start of work - preparation of the foundation for the foundation
The first thing to do is to mark the site on which the house will be built. This is done for orientation, to dig a trench under the foundation. For this you need a rope, a hammer and stakes. Further under the scheme:
- clear the site for construction: remove debris and interfering objects, if the place is overgrown with large weeds, they must also be removed;
- now make the markup. To do this, starting from the drawings, drive the stakes in the corners of the building. It should be noted that the strip foundation is erected under each wall, repeating the contour of the building. That is what you need to do on earth. By this marking, you will dig a trench, so everything must be done smoothly, respecting the dimensions and width of the foundation;
- after the stakes are packed flat, you need to measure the diagonals. When they coincide with the drawings, feel free to stretch the rope between them.
Tighten the rope should be tough to avoid sagging.
Now you can proceed to the next stage - digging a trench. Digging the trench begins with finding the lowest point of the plot. It is necessary to calculate the depth of the foundation from it. Note that the size of the finished pit should be identical to the size of the house on the basis of the project.
You will need shovels and labor to work, as it will be not only hard but also long to do all the work. In extreme cases, if circumstances permit, you can hire a special technique. The walls of the trench must be made vertical and the bottom flat. To check this, in the process of digging, use a plumb, as to fix something after completion will be more difficult. The depth of the foundation depends on the soil and the height of the building. It can be low-buried - from 50 to 70 cm for small houses, and recessed - from 1 to 2 m.
Be sure to make a cushion for the foundation at the bottom of the trench. Put sand or crushed stone there in a layer from 10 to 20 cm. Tamp everything down well and place a layer of roofing material on top. This will provide good waterproofing, not allowing the foundation to absorb moisture.
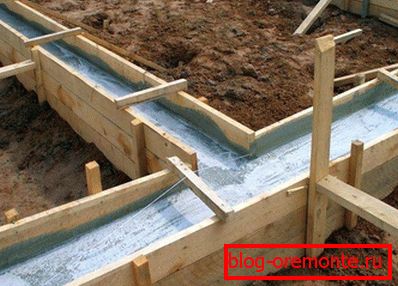
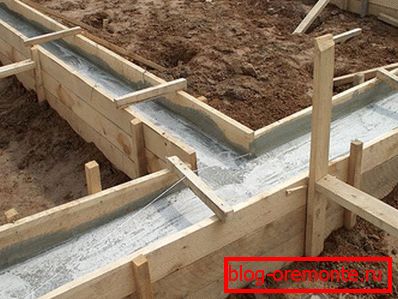
Formwork and rebar installation

Shields should be assembled from boards, plywood or other wooden materials. It is possible to connect elements among themselves with self-tapping screws or nails. If you live in areas with a harsh climate, raise the formwork 40-50 cm above the ground level so that the walls under the thick layer of snow do not freeze. And when the climate is not so severe, the base can be made 30 cm. Then stretch the line along the perimeter so that it corresponds to the level of concrete pouring into the foundation.
This stage includes not only the formwork device, but also carrying out the necessary communications. After all, if you do not do it in advance, holes for sewer or water supply will need to be done in the finished foundation.
To reinforce the foundation, it is necessary to place a reinforcing mesh in it. She will be placed in the formwork. To make such a frame, you will need bars of O14 mm reinforcement and steel flexible wire. Bars need to be tied in a grid with wire. When making cells, sticking to certain sizes is optional. On average, these cells are 20 × 20 cm in size equal to the size of the trench.
In order for the concrete to completely cover the reinforcement mesh, it should not be installed flush with the top of the trench, but lower by 5–10 cm.
Now everything is ready for pouring concrete.
Foundation casting
This stage of work can be divided into several steps:
- Determination of the desired amount of concrete. To calculate how much the mixture will go to fill, there is a formula: V = S? L, where:
V is the desired volume of concrete
L is the length of the foundation
S is the cross-sectional area.
And to find out the value of the area, it is enough to multiply the height of the tape by its width. For example, the length of the base strip is 44 m, height is 1.3 m, and width is 0.5 m. To determine the cross-section, multiply the height by the width: S = 1.3? 0.5 = 0.65 m2. After which: V = 44? 0.65 = 28.6 m3. It turns out that 28.6 m is required to fill your foundation3 concrete solution. - Now you need to decide whether to order concrete from a construction company or to make it yourself. The easiest way is to order a solution - it will be quick, without any extra effort, only now the service costs more. If you want to save money, you can make concrete yourself, this process is more labor intensive. It is better to have a concrete mixer, because manually mixing such a large volume is unrealistic. To make concrete quality, strictly follow the proportions: 1: 1: 3 - cement, crushed stone, sand. Water must be added until the mixture becomes the necessary consistency.
- If you have never cast concrete, you should know that it is wrong to dump all concrete into a trench. It is important to pour concrete in an even layer of 20–30 cm so that the concrete comes out monolithic. Haste in this matter is not needed, since the foundation is the foundation and support of the house, which allows it to stand for a long time.
- It is important to expel the air from the concrete, ramming each layer. To do this, use the vibrator. If this is not available, simply compact the concrete with a stick or reinforcement. Fill hold until you reach the line level. To better tamp concrete, tap a mallet on the formwork from the outside.
- After the completion of pouring, the surface of the foundation must be leveled with a trowel.

The foundation is poured. Cement will dry in 3-5 days, but it will be able to reach the necessary “condition” and gain strength only in a month. To prevent precipitation from reaching the surface and not washing out the concrete, the entire surface should be covered with something, you can use plastic wrap. If you build in the summer and the yard is hot, the composition needs to be moistened from time to time so that the concrete does not crack. After 10 days you can remove the formwork.
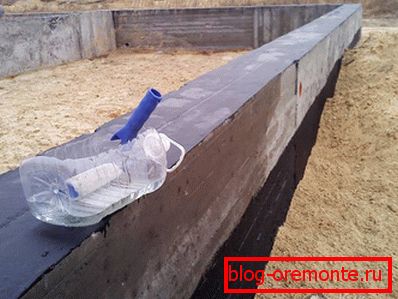
Before embarking on the construction of walls, you need to make waterproofing work. The base can be coated with bitumen and lay several layers of roofing material.
Masonry walls of aerated concrete blocks

After the concrete has dried, you can start building the walls of the building. In this article we will look at the process of laying walls, the method of thorn-groove. So, on the prepared surface you need to lay out the first row of blocks. Any builder knows that the first row is the most important, since others will be happy to be guided by him. When the first row is exposed unevenly, the whole building will be crooked.
For the work you will need:
- building level;
- rope or cord;
- electric or manual wall chaser;
- rubber kyivanka;
- brush to remove dust from the grooves;
- hacksaw with large teeth;
- Master OK;
- fittings O8 or 10 mm;
- trowel or notched trowel;
- plane for aerated concrete.
To lay the first row, experts recommend the use of cement mortar. Let it be longer to dry, but you can pave the first row strictly on the level. The thickness of the layer of the solution should be at least 1 cm. To level the differences this is sufficient.
The first thing you need to prepare a solution. There is an uncomplicated recipe for cooking. You will need:
- shovel;
- buckets;
- trough;
- Pine sand;
- cement;
- soap solution;
- water.
So, prepare the trough and pour into it 1 cement spade, 3 sand spade and mix them thoroughly. Pour water into the bucket and add 1 drop of dish detergent to it. Such soapy water will help not to settle to the bottom of the cement mixture and it will be easier to knead the solution.
Now add water to the mixture of sand and cement. There is no certain measure, you need to look at the consistency, so that the solution is not too liquid and not too thick. Stir the solution with a spade. It is important to ensure good quality and viscosity so that it fits well. Since this amount is not enough, you can do more servings. The main thing is to stick to the 1: 3 ratio.
After preparation, you can start laying. The technology is simple - you need to start building a wall from the corners. On the mortar layer, install the corner blocks on both sides of the wall. Use the mallet and level to expose them perfectly evenly. Then pull the line or cord from one corner to another. The following blocks will be laid out on it. When the wall is more than 10 m in length, a block is also placed in the middle of the row so that the cord does not sag, since it must be well stretched. After that, the first row of blocks is laid along the entire perimeter and partitions. To fit them, use a rubber mallet that needs to be tapped on the blocks. It is clear that not always the length of the wall will be a multiple of the blocks, so some of them will need to be customized in size. This is where you need a hacksaw.

During laying do not get carried away, so as not to lay the doorways.
Once the first row is ready, wait 2–3 hours for the mortar to set. After it dries, the surface of the blocks should be treated with a plane to give it roughness, then the next row will lie much smoother. Now, instead of a solution, you can use a special glue. Apply it with a notched trowel. The second and third rows are made in the same way as the first. Only now happy to need to dress with the previous one, moving the blocks in half. You can move the block by at least 8 cm. After that, the laying process is repeated.
To dry the glue will be much faster than the mortar, so it’s not necessary to wait long, the work should be done at a fast pace.
If you are building a big house, the walls need to be strengthened. To do this, in each 3 or 4 row you need to do the reinforcement masonry. Take a wall chaser and make 2 parallel channels in blocks. Their width should be 4 cm, and the distance from the edge of the block should be 5–6 cm. With a brush, remove dust from them and place 1–2 reinforcing bars there. Then fill all the cement mortar or glue. There is no need to wait for drying.
Sills and windows

Where there will be a window opening, you need to build two parallel lines. Their size should be 30 cm larger than the window frame, 15 each side. Clean the brush strokes of dust and insert O8 or 10 mm fittings in them and coat the whole with a solution. When laying not worth laying openings. They are best done immediately. There is an option to cut them later, but this is a waste of material and strength.
Jumper Installation

When it is moving, you will need to install a jumper above the door and window opening. To do it right, you need:
- Above the window to lay the board.
- Outside pave blocks, 15 cm thick.
- Inside blocks, 10 cm thick.
- In the center of the block is 15 cm thick, sawed in half.
- Make a frame of reinforcement O12 mm.
- Install the finished structure between the blocks.
- It remains to fill all the concrete.
You can make doorways in the same way, although there are other options for the construction of lintels. It can be made of reinforced concrete, metal corners and poured concrete, making formwork.
You can buy ready-made jumpers that are easy to install.
Armopoyas

When the laying of the walls comes to an end, the last row should be strengthened by organizing the armopoyas. Thanks to him, you can ensure the integrity of the structure. In order to fill in the armored belt, a formwork should be formed from blocks with a thickness of 10 cm along the perimeter of all walls, laying them parallel to each other. In the resulting groove you need to lay reinforcement. After that, prepare the concrete and pour all around the perimeter.
To simplify the task of installing a roof plate, you can insert threaded metal studs into the armored belt. They can be welded to the fixture. It is important to adhere to exact dimensions so that they rise to the same level. By doing this, installing a power plate will be much easier.
Installation of floor slabs

When building a multi-storey building, you need to make a ceiling dividing the floors. It can be made of wood, metal, concrete and reinforced concrete slabs. The overlap must necessarily rely on armopoyas. If the walls of the house are separated from each other by less than 6 meters, you can use aerated concrete slabs, which have the same properties as the walls of the gas block. Plates are installed on the reinforced belt, the joints between the plates are filled with mortar. The ends of the plates outside you need to close the clumsy blocks.
It is clear that you yourself will not be able to raise concrete slabs, so for work you will need heavy equipment - namely, a crane that will lift the plates to the desired height. You need to guide the slab to properly install it.

Another option is to use wooden beams. Their height can be 150–300 mm, and the width - 100–250. Their ends should be cut at an angle of 60–80 ?, treated with antiseptic and resin. After that, these ends are wrapped in roofing felt and placed in niches to a depth of 150 mm. In this case, the gap between the beam and the wall remains 30-50 mm. They must be installed in increments of 600–1500 mm. Then the crate is made and the floor is laid.
Such overlappings are of different types:
- basement - the overlap between the basement and the first floor;
- interfloor - separating floors;
- mansard - floors between the floor and the mansard;
- attic - separates the floor of the house from the attic.
Before you make the roof, you need to make an attic or attic floor, depending on the type of roof.
Roofing device

The last stage of the construction of the house box is the construction of the roof. The first thing you need to decide on what kind of roof to do, as they become on these types:
- lean-to roof;
- gable roof;
- mansard roof.
What roof do you choose yourself. The main thing that needs to be done in any type of roof is to perform waterproofing, heat-insulating and vapor barrier works.
If you cost a mansard roof, then be sure to take care of noise insulation.
Consider the device common gable roof. So, on the prepared studs made of metal along the perimeter, you need to install a mauerlat - timber, which will serve as a support for the rafters. At this stage, you need to lay under the beam 1 or 2 layers of roofing material for waterproofing. Now you need to attach the rafters to the mauerlat, a section of 7? 15 cm. You can attach rafters to the beam in different ways, which are shown below.

The upper part of the rafters overlap is attracted to each other so that the edge of one rafter overlaps the edge of the other. Then they need to be fastened with nails or bolts. To strengthen the design, parallel rafters are interconnected by means of a board.
To distribute the load and strengthen the rafters, you need to fasten them together with a crossbar. These are beams with a section of 5? 15 cm which need to be nailed to rafters. They need to fix a little above the middle of the roof. And in order to give additional strength to the roof and avoid sagging of the truss system, you must also install vertical racks.
After that, you need to fix the waterproofing layer on top of the rafters. Under a waterproofing the heater, mineral wool or polyfoam is fixed. And in the end you need to lay a vapor barrier, attaching it with slats to the rafters. It remains to make the crate, gable and lay the roofing material.
To date, roofing materials a great variety, slate - already the last century. Now your roof can be not only reliable, but also beautiful. As the material you can choose:
- metal tile;
- ceramic tiles;
- shingles;
- professional flooring;
- composite shingles;
- cement and sand tiles.

After the roof is completely sheathed with roofing material, the construction of your house is completed. But this is far from the end, because you still have a lot to do: making the floor, partitions, interior work, covering the walls outside, carrying out communications, installing doors and windows and much more. But you have already done the main work - the finished box of the house from the gas block has already been erected. And most importantly - you built this house yourself!
Video
Watch an animated video showing how to build a house of aerated concrete:
The author of this video tells about how he built a house of aerated concrete:
A photo