Garage from foam blocks with their own hands
Garage construction is a responsible business. It is very important that as a result it becomes a reliable protection for your car. You can use different materials for such works, for example, brick, wood, aerated concrete and foam concrete. Next will be considered the construction technology of the garage of foam blocks. You will learn about the distinctive features of this material from this article.
Design - step one
First of all, you need to pick up a piece of paper and a pencil in order to plan the future construction. The presence of the project will allow you to make an approximate analysis of the consumption of building material and, accordingly, financial resources. Moreover, it is necessary to analyze the soil, namely at what depth are the groundwater. Also determine the feature of the soil structure. Already building on the information received, it will be possible to decide what type of foundation to be erected.
The project of the garage of foam blocks can be performed using special computer programs. However, you can make it yourself. So, you can take into account the peculiarities of your area in the project and make the planning at your discretion.
Among other things, it is worth deciding whether the garage will perform other functions besides car storage. For example, think about this:
- whether the inspection pit will be equipped;
- whether a basement is needed to store conservation and other products in the winter;
- whether tool racks will be installed;
- Do you need an additional work area, such as a desk, workbench, etc.?
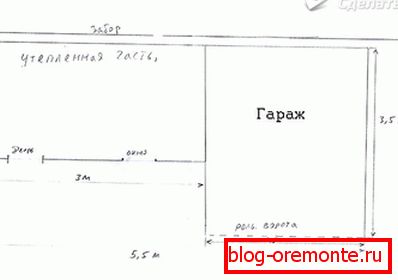
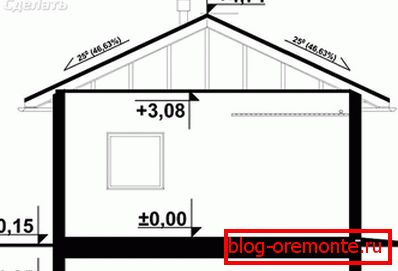
Based on this, you should perform a project that will meet the purpose of the garage. Accordingly, determine the type of foundation, its length and width, as well as the height of the walls and ceiling. If we take for example the standard dimensions of such a structure, they are within the following limits:
- Width 3–3.5 m.
- Height 3 m.
- Length 4.5–6 m.
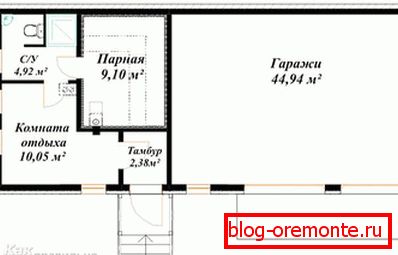
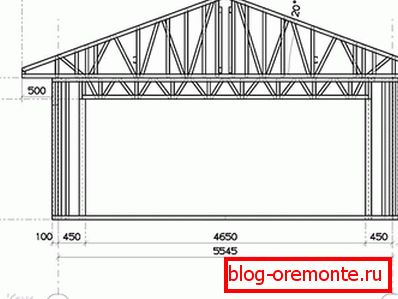
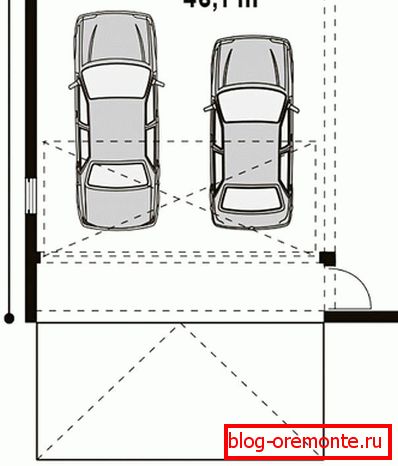
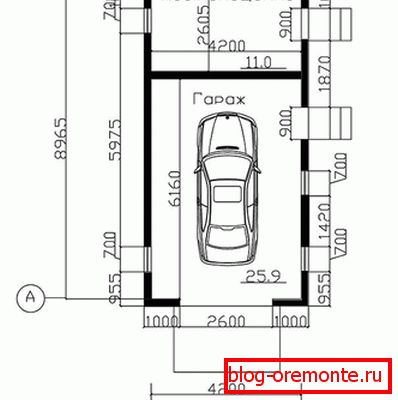
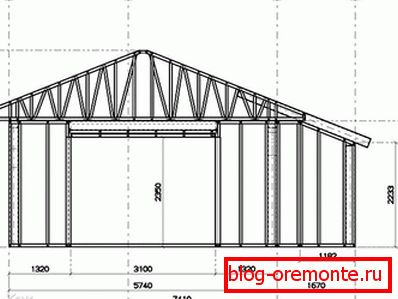
At the end of this article a number of projects and drawings for building a garage are provided. If you are satisfied with one or another project, you can use it. But at the same time be sure to consider the features of your area: the level of groundwater and the structure of the soil.
The calculation of the dimensions of foam blocks
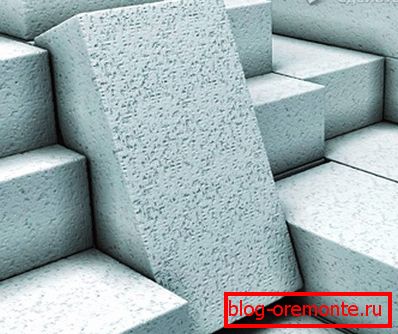
Typically, blocks of 600 × 300 × 200 mm are used for construction. The thickness of the walls at the same time can be made as 200 mm, and 300 mm simply by turning the block. As for the unheated garage, the thickness of the wall is enough to 200 mm. To determine the thickness of the walls of the heated building, it is necessary to take into account local climatic conditions. If the project is already ready, then it is realistic to calculate the required number of units. To do this, follow these steps:
- For example, let's take the garage dimensions 5 × 6 × 3 m. Now we calculate the length of the perimeter of the walls and, accordingly, the number of blocks in one row: (5 + 6) × 2 and divide the block length 0.6 m. As a result, we get the following action: (5 + 6) × 2 ÷ 0.6 = 36.6 (37 pieces).
- Next, determine the number of rows. In our case, the height of the garage will have 3 m. So it should be divided by the height of the block 0.3 m. It turns out like this: 3 ÷ 0.3 = 10 rows.
- Based on this, you can easily determine how many blocks are required for the entire construction: 37 pcs. × 10 row. = 370 pcs.
- But it is important to take into account the size of the gate, doors and windows, if any. If the laying of the walls is carried out with a thickness of 200 mm, then an average of 1 m2 gate and windows include 6 foam blocks. Based on the size of your gates and windows, you determine the total area of the openings and multiply the resulting amount by 6. With standard sizes, the average is 40 to 50 blocks. In the end, you need to buy 300 - 320 foam blocks.
According to this scheme, you can calculate the number of blocks for a garage of any size.
Be sure to consider the following nuances: during transportation there may be material damage, and in such calculations we did not take into account the thickness of the seam. For this reason, add 5% to the amount obtained. Otherwise, you may not have enough a few blocks to complete the laying of walls.
Marking territory

Upon completion of the preparatory work, as well as after the purchase of all the necessary material, you can proceed to marking the garage. In the corners of the future structure, hammer in the pegs. Along the entire perimeter between them, stretch the string. Be sure to check the angle between the threads. It should be equal to 90 °. Or you can draw axial markings - it's much easier and more accurate. If the length of the thread is the same, it will definitely be 90º. When marking, strictly follow the dimensions specified in the project.
When the marking is done, stand near the future garage door and make sure that nothing will stop them from opening. It can be a tree, a building, a fence or something else. If there is no serious interference, you can begin to manufacture the foundation.
The foundation is the foundation
The foam block is a relatively lightweight material, so there is no need for the construction of a deep and heavy foundation. But not only the weight of the material affects the choice of one or another type of foundation. A more important criterion is the type and properties of the soil at the construction site. For example, if the groundwater level in your area is below 2–2.5 m, and the soil is not uniform and dense, then you can build a light strip foundation with a depth of up to 0.5 m. Quite a different situation occurs with heaving soil. , because you have to build a monolithic foundation. This is due to the peculiarity of blocks that do not tolerate bending stress. As a result, the foam block bursts, and the building itself collapses. In order to avoid this, the walls are laid out on a monolithic slab that “floats” in the ground along with the entire structure.
If the project provides for the construction of a viewing pit, then the variant of the foundation with a monolithic slab disappears. In such a case, it will be necessary to construct a submerged belt or a combined belt pile foundation.
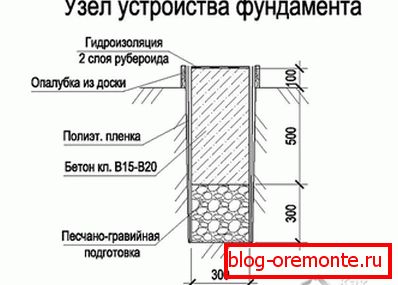
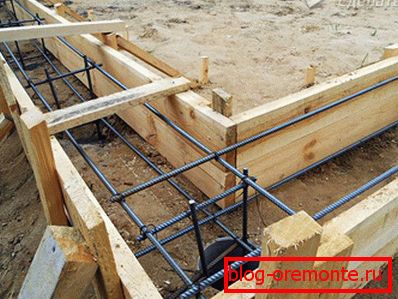
For example, consider the construction of strip foundations, with a depth of 0.8 m. Works are performed in the following order:
- A trench with a depth of 0.8 m is dug. The width is equal to the foam block (200 mm) and add 150 mm, in the end, the foundation thickness is 350 mm.
- The bottom of the trench should be carefully tamped.
- After that, a sand cushion consisting of 100–150 mm of sand and 70–100 mm of crushed stone is filled up. Each layer is also rammed.
- For the foundation install formwork.
- In the trench, you must place welded or bonded with a frame of reinforcement. As a result, you will make a frame for strip foundations.
- Next, you need to fill the foundation with concrete, at a time and thoroughly vibrate.
While the concrete is drying, you can proceed to the manufacture of a viewing pit, if this is provided for by the project.
Inspection pit

Recall that in the construction of the inspection pit, it is necessary to take into account the depth of the groundwater. If the depth is more than 2.5 m, then drainage is not necessary. If less, then drainage, respectively, is necessary. We invite you to familiarize yourself with the manufacturing process of the inspection pit in which it is necessary to make a drainage. You should also make calculations for its size. The length is chosen taking into account the size of the car, usually 2 m is enough. As for the depth, it should be such that it is comfortable to move in it. So, you take into account the growth of the car owner, adding to it 30 cm and the clearance of the car, which is equal to from 120 to 175 mm. As a result, the approximate depth will reach up to 1800 mm. (30 cm is a lot - you will not get to the car. The clearance of the cars is different and this must be taken into account in advance, taking into account the performance of the existing car.
Work on the production of inspection pit as follows:
- First, land works are done. In doing so, consider the thickness of the finishing screed floor, cushion, waterproofing layer and drainage.
- The bottom of the pit should be filled with gravel, a layer of 100 mm, and then sand with a layer of 50 mm. All this is alternately rammed.
- Along the perimeter of the excavation, trenches are dug for the organization of drainage up to a depth of 500 mm.
- The bottom of the trench is covered with geotextile. It is necessary to wrap 80 cm trenches on the wall.
- Next, a layer of gravel of 50 mm is filled up, and a drainage pipe is mounted on top. Perforated plastic, asbestos cement or ceramic pipes can be used. When laying the pipe, make a slight bias for their functionality. At 1 m will be enough 1 cm slope.
- After that, fill the pipe with a layer of gravel in 20 cm and wrap the geotextiles. So, the drainage is ready.
- The future floor of the pit is filled with a small layer of clay, which must be tamped.
- The next layer is spread roll waterproofing, for example, roofing material or plastic film.
- After the formwork for the floor is made, the reinforcement frame is laid out of reinforcement and poured with concrete. It is recommended to add “Dehydrol” or “Concrete Mixer” for making waterproof concrete in the concrete mix.
- When the screed has dried, re-waterproofing is carried out.
- If the groundwater is high to the ground level, the walls of the observation pit are also plastered / tamped with clay.
- For the construction of walls, you can use a brick or make a monolithic concrete, after making a waterproofing and building a formwork with reinforcement. The latter option is most relevant for high groundwater levels.
- A waterproofing layer is laid on the walls, which is connected to the waterproofing of the floor. All joints, slots and edges carefully handle. After that, pouring concrete.
- When the walls are dry, you can finish the walls and floor of the observation pit.
- Walls can be plastered and lined with tiles or fiberglass plates.
- Above the pit, you must install a safety rail. It is needed for the purpose of not accidentally dropping the car into a hole. For its manufacture uses a metal corner of 60 mm. The size of the pit is welded frame. Laying on the pit, the frame is concreted. Upon completion of construction, it will be possible to lay boards on the corner (40 mm thickness is enough) to close the pit.
This stage of work can be carried out both immediately after the foundation has been poured in for the walls of the garage, and after their construction.
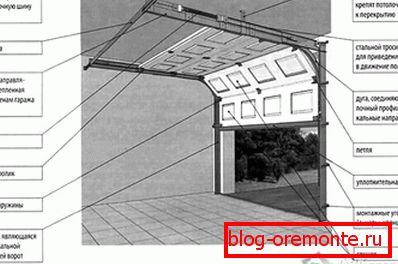
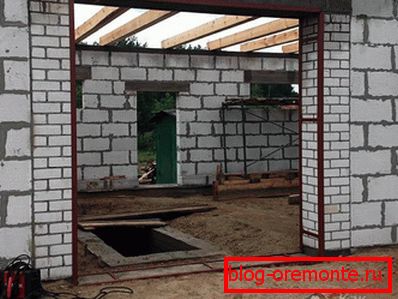
Gate installation
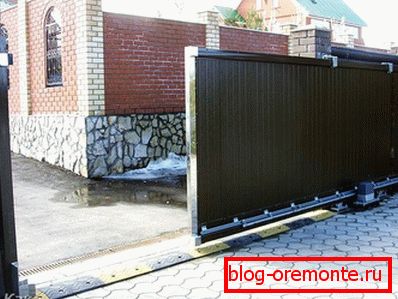
Перед началом строительства стен, важно установить ворота. Они будут частично вмурованы в стену. Перед их установкой на фундамент необходимо уложить слой гидроизоляции из рубероида в 2–3 слоя. К каркасу ворот привариваете куски арматуры 40 см Ø12 мм. С каждой из стороны необходимо приварить по 4 отрезка. Расположение прутков должно быть выполнено так, чтобы они попадали на шов пеноблоков. А перед тем как установить раму ворота, их следует покрасить с предварительной грунтовкой. Gate installation должна осуществляться строго по уровню. Поэтому в этом процессе необходимо использовать уровень и отвес. Зафиксировать ворота можно при помощи деревянных брусков, устанавливая их по диагонали.
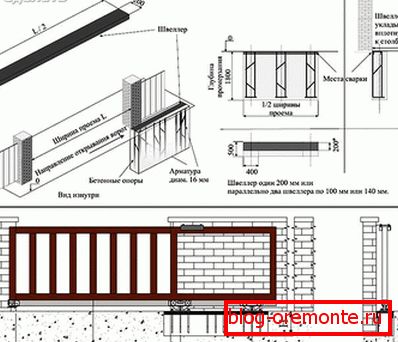
Beam over the gate opening
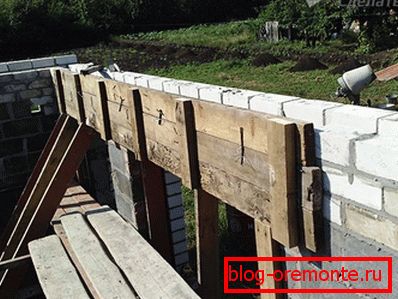
To ensure that the gate has a solid base, a beam is made above it. To do this, you can make a metal frame and pour it with concrete. But remember, the length of the beam must be greater than the length of the opening at least 0.2 m on each side. As an option, you can install the finished beam by the form of an I-beam. In this case, from a metal corner of 50 × 50 mm weld the frame to the size of the gate. Install it should be so that from the inside of the garage it was right against the wall. The corner is fixed with cement. Next, from above, install the I-beam on the frame and the gate.
If it is planned to build a second floor, then an armopoyas is being built around the perimeter to hold the floor slab. For the garage of foam blocks, it is necessary, as it will hold the whole structure together and will be a reliable support for the roof.
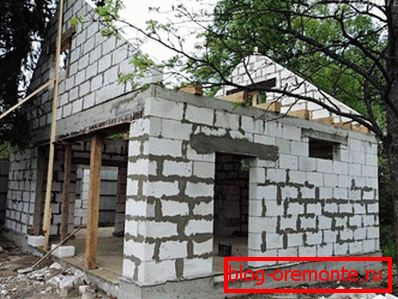
Walling

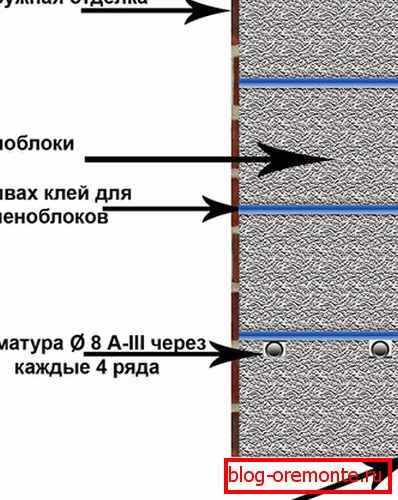
Start building walls better from the corner. Installation of blocks is carried out by the long side along the wall. Foam blocks are stacked on a special glue or cement-sand mortar. If we talk about glue, it provides better thermal insulation. Therefore, its use is more efficient. Moreover, the consumption of glue is relatively small.
So, putting angles, stretch the rope between them. On it will be masonry walls. Every two rows should be reinforced. To this end, a special mesh or masonry reinforcement is laid in the seam. The bars that you previously welded to the gate are embedded in the masonry between the blocks. When you have reached the ceiling beam, you are laying without displacement of the block. If necessary, trim the block so that the bundle of sutures is not broken.
If the project will be made single-pitch roof, the laying of the walls immediately performed at an angle to the rear wall of the garage. At 1 m linear enough 5 cm slope.
For the manufacture of slope, foam blocks are simply trimmed with a special hacksaw. Quite another thing is if the roof is gable. Then it is important to consider how the gables of the roof will close. As an option, you can continue laying out or use another lightweight material, such as clapboard.
Armopoyas for foam concrete
You construct a formwork with a height of 0.3 m along the perimeter of the walls. A reinforcing metal frame of reinforcement is placed in it. All this is concreted. If a beam overlap is used to overlap the roof, then the need for building such a powerful armor belt disappears and, as a result, formwork is also not needed. It will be enough to lay a layer of thick cement on the wall above the rebar and then re-layer the cement. If necessary, remove the remaining solution with a trowel. It is important to control the thickness of the solution. It should not be in such a condition that it would run down the walls or it should not be too thick, which will crumble in an instant.
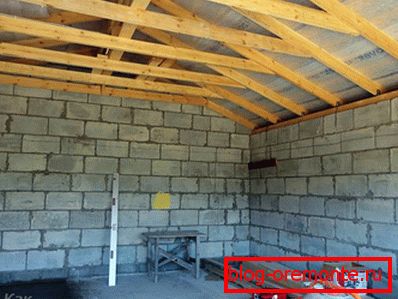
Roof erection
The most common variant of the arrangement of the roof - the installation of a concrete slab, which must be covered with several layers of roofing material. But when building walls of foam blocks, this technique is not suitable, since this material itself is relatively fragile and can be sold under the weight of the plate. Consider an example of making a single-pitch roof using an I-beam:
- Across the roof with a step of 800 mm install beams. The length of the beam should be 200–250 mm greater than the wall, i.e. so much from two sides the roof will hang down. This will protect the structure from precipitation. The beams are embedded in the wall.
- On the lower shelf lay the boards of 40 mm as tightly as possible.
- On top of them spread a ruberoid. At the edges of the ruberoid, bend 10 cm.
- After that, you fall asleep on top of the ruberoid with slag, expanded clay or other loose dry heat-insulating material.
- From above a heater you make a thin cement and sand coupler to 3 cm.
- When the screed has dried, treat it with a liquid bitumen mastic, for example, Primer.
- After this method of fusing spread the roofing material across the garage in the direction from the bottom of the roof up. Each canvas stacked overlap, which will provide a stack of rainwater and melt water without trickling it into the roofing “pie”.
In conclusion, it remains to make a visor above the gate. It can be made independently, having welded from a corner and fastening it with polycarbonate or other roofing material or to get ready.
Floor arrangement
When the walls have already been erected, the roof has been installed and an inspection pit has been made, you can proceed to making the garage floor. There should be a solid floor, as the car will have a large load on the screed. Therefore, the ideal solution would be to manufacture a concrete base. Wooden flooring can be performed directly in the pedestrian area, especially if you are planning a working area and setting up tables. It will be more comfortable to be on a wooden floor than on a concrete one.
So, the soil is leveled and compacted. Each subsequent layer is also compacted, consisting of:
- crushed stone 100–150 mm;
- sand 50–100 mm;
- gravel 50–100 mm.
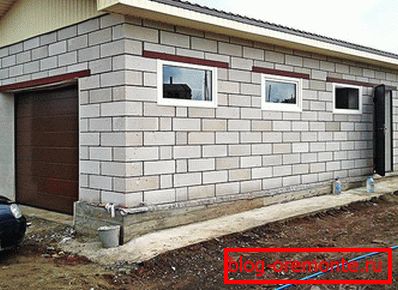
Finally, a concrete screed is poured with a layer of at least 200 mm. After that, you will need to finish the walls, carry out the necessary communications and start your car in its new, reliable and dry "house".
It is worth noting that the purchase of foam blocks of the total cost of the entire project is about 30%. Most of the money goes to the arrangement of the base and roof. However, despite this, a foam block garage is considered one of the cheapest. If you already have experience with this building material, then write comments at the end of this article. Your experience can help beginners.
Video
Want to get more information about building a foam block garage? Watch the video:
Blueprints