Gabled roof do it yourself
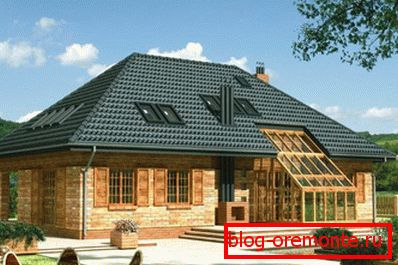
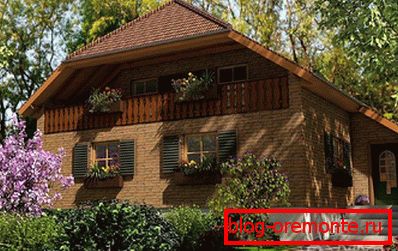
Roofs of complex shape attract particular attention to the architecture of the building. Four-pitched roofs are popular in the construction of country houses. Four slopes, located in different planes, give the house a respectable appearance. Most often, the slopes are made of different shapes: two of them are triangular and act as gables, two are trapezoidal.
Design advantages
The installation of hip or hip roof, in addition to an aesthetic appearance, has practical advantages:
- in the attic, surrounded by a roof on all sides, a comfortable temperature is maintained;
- the construction of the rafters is strong and durable;
- high resistance to winds and precipitation;
- the space under the roof can be used for the attic.
Types of hipped roofs
Having a common basis, the subspecies of such coatings are somewhat different in performance:
- Hip - a classic version with two triangular hips and two slopes in the form of a trapezoid.
- Half-hinged - triangular slopes have a shortened shape, this design is carried out for the attic equipment.
- Tent - has the shape of a pyramid with triangular slopes. Suitable for square building.
Design

The angle of slope for the slopes is selected based on the recommendations of the manufacturers of the roofing material and natural features. For a soft roll roof, an angle of up to 18 degrees is sufficient, an angle of 15-60 degrees is suitable for slate, and under a tile it is necessary to lay a slope from 30 to 60 degrees.
The amount of precipitation in winter is of great importance; if a significant amount of snow falls, it is better to choose steep slopes, on which rainfall is less delayed.
By choosing the angle of inclination, you can calculate the height of the ridge and the other parameters necessary for the construction of the four-sided roof. Geometric formulas for the triangle and trapezium are used to calculate the area.
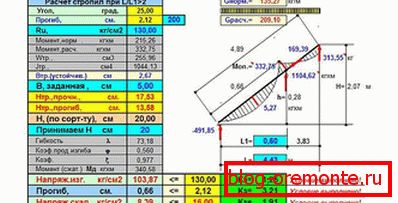
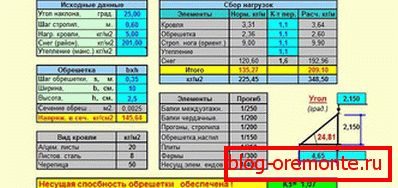
When designing a truss system, much needs to be taken into account: the cross section of the beam, the length of the rafters, the amount of run, the installation step of the elements. All possible loads on the roof are found out at the design stage, they include:
- the weight of the selected roofing;
- annual precipitation;
- insulation weight and waterproofing;
- a device on the roof of various equipment (antennas, lights, windows, etc.);
- snow and wind load.
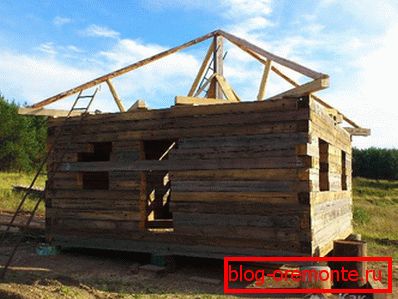
In addition to pledged loads, the roof of the house should have a safety margin that guarantees the stability of the structure in an unexpected situation. For the construction of the truss system used timber and planks. If there is a need to strengthen the elements, the boards are doubled.
Before starting work, all sawn timber is treated with antiseptic.
Work sequence
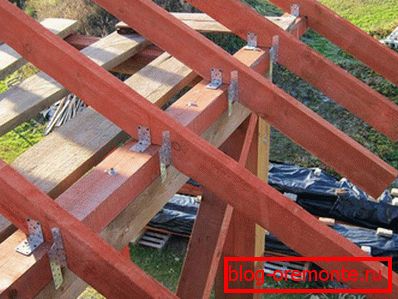
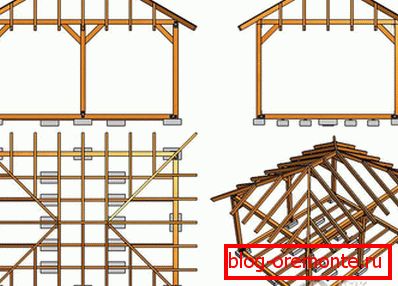
The installation of the roof begins with the fastening of the supporting base - the power plate. This is a timber section of 150 × 150 mm, which is laid around the perimeter of the walls. Its placement is horizontally controlled by level. The beam should not be located on the edge of the wall, it is necessary to leave a distance of 5–7 cm. The mounting of the mauerlat is carried out on studs immured into the masonry, which are tightened with nuts. This beam allows you to link the truss system and the walls of the house in a common structure.
For the installation of racks are necessary or beam beams. These elements are made of 100 × 200 mm bars or double boards. All supports are mounted strictly vertically and attached to the bench with a metal angle or plate. For hip roof racks are installed in one line, mounted on the ridge girder. When erecting a hip type roof, the supports are placed diagonally, equal distances from the corner are laid. As a result, they form a rectangle on which the runs are stacked. Fastening is carried out by corners.
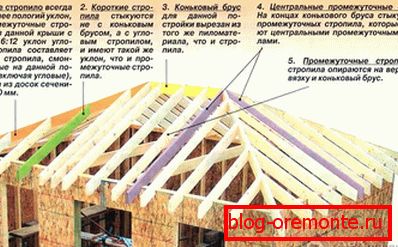
Side rafters are installed after processing on a pattern. A thin board is taken as a blank, applied to the girder and marked with gash. The second end rests on the mauerlat and the lower gash is planned. The required amount of rafters is prepared according to the template and installed with the chosen fastening step, it can be from 60 cm to 1 meter. With the run and the basis of the connection occurs with staples or screws.
Sloping rafters with a ridge girder form the angle of inclination of the slopes. These rafters are located diagonally and carry additional load, so they use double boards. He washed down the rafters according to a template, their length takes into account the overhang from 50 cm. When constructing a hip roof, mow rafters are connected in the ridge knot with the help of puffs. The rafters are installed at an angle of 90 degrees and are sure to connect to the walls with wire clamps.
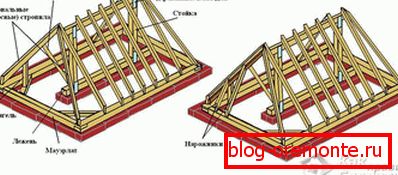
To the diagonal rafters are attached short rafters or ladders. They are performed in different lengths, but must be parallel to each other. Narodniki along with ordinary rafters form the side slopes. For the tent model, the installation of scammers and the fixing of pillars, struts and trunnions is also the final stage of construction.
To remove the load from the diagonal rafters, under them are sprengeli. These are vertical supports that rest on the rods. Side rafters are fixed with struts. One of the horses on the board rests on the bed, and the second is cut at 45 degrees and attached to the truss leg.
Lathing and insulation
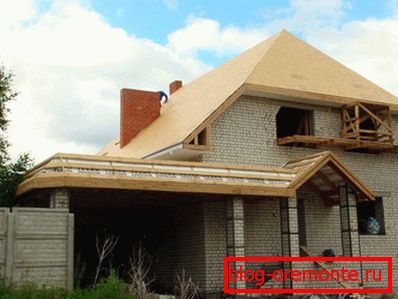
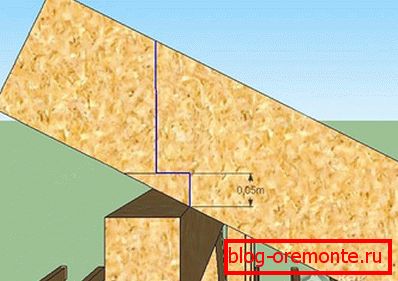
To complete the construction of the roof will allow its insulation with basalt wool or polystyrene foam. The material fits between the rafters. Protection of the roof from moisture will provide a waterproofing layer. The dimensions of the lathing depend on the type of roofing, on the hip type the soft tile looks attractive, it needs a solid lathing.
Proper construction will help to view a video explaining the nuances of installing rafters.
Video
See how the installation of the truss system: