Finishing the facade of the house with thermopanels
Among the abundance of building material it is difficult to quickly select the ideal, weighing all the pros and cons of any of them. Technologies are developing so fast that building materials, which today were the pinnacle of perfection, will become obsolete tomorrow. Until recently, the builder had to perform a certain sequence of actions. After the walls were laid, the warming was carried out, and then the decoration was done. Finishing the facade of the house with thermopanels allows you to save time and perform two operations in one pass. In addition, the appearance will not be realized by reducing heat loss. Whether the game is worth the candle will allow to find out the material of this article.
What is this stuff
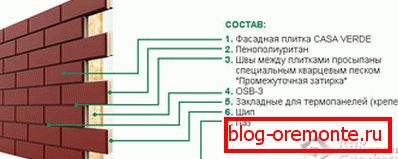
From the name it becomes clear that the main emphasis is placed not only on the appearance, but also on the provision of thermal insulation of the treated surface. This is achieved at the expense of the material used. Foamed polystyrene foam or polyurethane can act as a sealing layer. The second in its quality and strength characteristics ahead of the foam. But it is worth considering that the cost of such a product will be somewhat higher.
The thickness of the reservoir is chosen so that the dew point is shifted approximately in the middle line of the insulation. Thus, the question of the emergence and development of mold is solved, and the service life of the finish is significantly extended. The organization of ventilation gaps is not required. In addition, diffusion processes proceed freely. The substrate for the panels in some types is a moisture-resistant OSB sheet. It acts as a stabilizer and a basis for the whole structure. It is also quite simple to process and fix it on a concrete or brick plane.
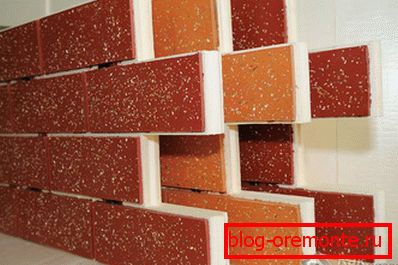
Pleasant appearance is provided by beautiful facing. Its color can be chosen according to the wishes or instructions of the customer. The decorative layer is resistant to physical stress, so it is difficult to damage. It is made by the method of single or multiple firing. Pigments and additives have already been added to the mixture. Because of this, it is simply impossible to wash the color with rainwater or other effects. The front part is molded by pressing or extrusion, so by its appearance the plane can be not only flat, but also with a certain pattern, which, for example, imitates natural stone.
The structure of some species also includes a layer of foil. Its main task is to provide a vapor barrier, as well as a reflection of the heat that is directed from the room to the street.
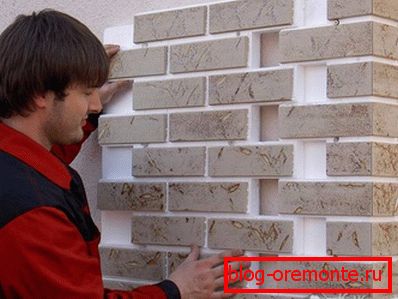
The key point that facilitates installation is the locking mechanism. He is so well thought out, verified and fitted that everything is going as a designer. Separate elements go not just end-to-end, but fasten with a small overlap (if a thorn-groove connection is provided). With this approach, it is possible to eliminate cold bridges, which inevitably arise in the first variant. Even oblique rain is not able to force water to leak into the middle.
Do not worry that at this stage will require some investment. The fact is that the heat loss during the heating season can be reduced almost by half, and this will affect the amount of bills. In addition, in the summer, insulation works on the principle of a thermos. If in the evening to run cool air, it will persist for almost the entire day. This means that it will be necessary to turn on the air conditioner much less frequently. Payback does not take long.
Varieties and Benefits
The user is not limited in the choice of the available subspecies. In addition to the insulating layer, the differences relate to the lining used.
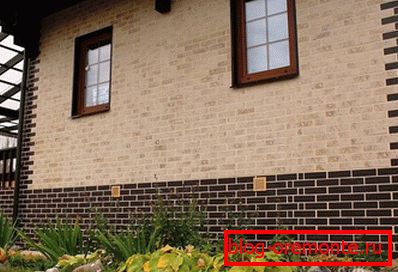
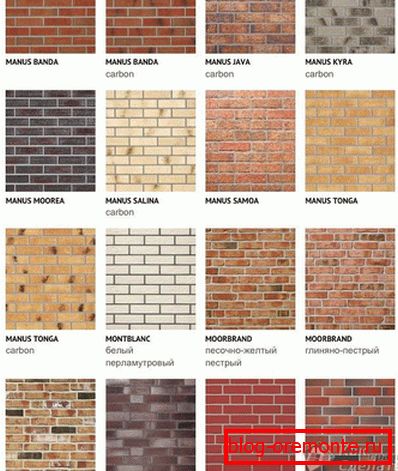
Glazed ceramics. It is a continuation of fashion, which dates back to the second half of the XX century, when houses and other buildings began to be tiled. The advantages of this solution is a smooth surface that has a glossy finish. In addition, it is very easy to clean, so if the building is close to the road, it can always be washed under the pressure of water from a hose. The service life is very long and with proper care can reach more than 50 years.

Porcelain tile. According to its characteristics, it is many times greater than the usual ceramic. This is due to the method of its manufacture. Although the constituent materials are all the same components (feldspar, clay, kaolin, quartz sand), but they burn it at a temperature of up to 1300 ° C. At the same time, it is exposed to a press of up to 500 kg. This approach makes it possible to carry out the process of diffusion so much that the powders fuse together. All voids are eliminated and a quality monolith is obtained. Due to this, moisture is simply not able to seep inside. And this means that even in winter time, the tile will not burst when the temperature drops. The strength is so high that it surpasses some types of natural stone in performance.
In appearance, it is not necessarily made in the form of facing bricks. It can be much larger, which simplifies the installation of such panels. Care is almost not required. Even ultraviolet will not interfere, so the tile on the sunny side will not differ shade. A large number of different variations of colors and shapes are available for selection.
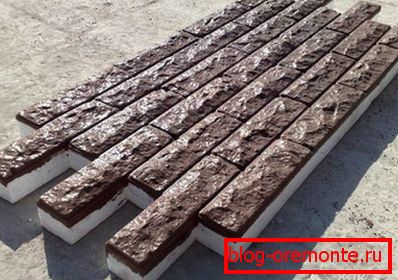
Clinker tiles. According to its characteristics it is in many ways similar to the previous one. It is absolutely eco-friendly, because made from natural clay. Do not apply any artificial chemical impurities or additives. Initially it was used not only for building houses, but also for paving roads. This suggests that it has sufficient strength and resistance to high weight. The production method includes single firing at high temperatures. Quartz, which is part of it, melts and closes all the pores through which water could leak. The surface is very smooth.
The product imitates the facing brick so well that it is quite difficult for an ordinary person to distinguish it. Scratch resistance is a huge plus. Do not have to fear that, hitting the surface with any object, you can harm it. Tiles of this kind withstand more than 300 cycles of complete freezing and thawing. This indicator is very important for those regions where in winter the temperature can reach large negative values. In addition, clinker is an additional layer of noise insulation, plus insulation.
In addition to the cladding material, both the substrate used and the insulation itself can differ.
Allocate:
- Metallic. They are a sheath made of sheet material, it can be aluminum or galvanized sheet, inside of which there is a mineral wool or polymers insulation. Appearance may resemble brickwork, tile or other options.
- Isosiding In appearance it can resemble a block house, wooden paneling or ordinary siding. The difference lies in the fact that the individual elements are made with internal cavities, which are filled with foamed polyurethane.
- Heat siding. Simply put, these are all the same sheets of polystyrene foam or polyurethane foam. But the front side of the material is made with an imitation of a pattern and reinforced with stone chips, which prevents damage from touch and impact.

Summing up, it is possible to identify the positive aspects of the use of thermopanels when performing finishing and insulating works:
- high speed of work performed;
- nice appearance;
- no need for finishing painting or other finishing;
- UV resistance;
- small weight of an individual element;
- application where there is no opportunity to use a facing brick;
- long service life;
- excellent waterproofing properties;
- large number of freeze / thaw cycles;
- ease of care;
- resistance to the formation of fungus;
- resistance to physical stress;
- the ability to compensate for surface irregularities;
- environmental friendliness of some species.
Of the inherent flaws are the following:
- the fragility of some materials;
- relatively high price;
- certain limitation in choice.
As you can see, there are very few minuses. The panels have occupied their niche and the direction continues to evolve towards the improvement of the components and the final result.
How to choose
Among the described abundance is easy to get lost. But there are basic nuances that will allow you to choose the option that would be ideal for a particular project.
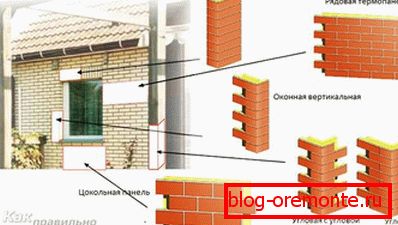
First of all, you need to decide on the type of panels that you would like to see on the facade of your own house. This includes the type of substrate, the option of insulation, as well as the lining material.
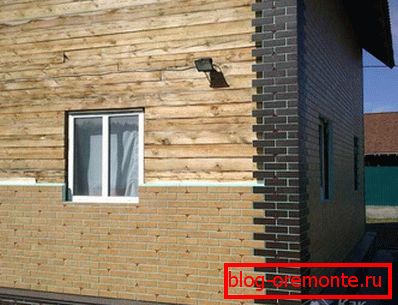
- The texture and shape. Perhaps the choice will be stopped on the classic version, which simulates a brick. But in most cases the house will simply merge with a mass of the same ones that are close by. If you want to realize your individuality, you can stay on the shape of a natural stone, intricate patterns or mosaic. Everything will depend on what products the manufacturer can offer.
- Colour. It is important to take into account the general idea of the exterior. If you want to organize an atmosphere that will contribute to rest, it is better to stop at neutral colors. Such differs a brick tile or porcelain tile. It will emphasize the solidity and high cost of decoration. Lining of glazed products or blanks for self-painting will allow to get away from everyday dullness and boredom.
- Insulation thickness. This factor plays a very important role. Everything will depend on how harsh the climate is in a particular region. Then the rule is, the thicker the better. In a situation when the desired texture does not have the required insulator layer, then additional modules of foam or mineral wool are separately mounted on the wall.
- Manufacturer. Not the last nuance that is worth considering. The fact is that a self-respecting company gives an official guarantee, subject to compliance with all the required installation technologies. Plates that are made in the artisanal way may last for several years, after which they will require extensive repair or complete replacement. In such cases, it is better, as they say, to overpay for the brand, than to later purchase a whole new batch.
- Budget. Everything can be limited by the amount that is planned for purchase. But do not approach the issue from the point of view, the cheaper it is, the faster it is acquired and installed. Better some time to dig into the middle version. He usually combines quality and beauty. All that relates to the elite subspecies created to underline the status.
In appearance, pick what you personally like. After all, it is you who will look at the final result every day.
Independent production
If you set a goal, you can make your own thermopanels. This is true in the case when all the options were considered, but none of the proposed ones did not fit. For the whole process, we need the following components:
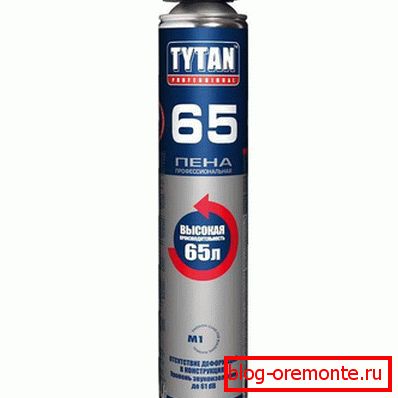
- polyurethane foam (it is better to use the Titan brand);
- liked exterior tile or stone;
- sheets of foam or foamed polyurethane;
- a device that can act as a press;
- roulette;
- hacksaw or special cutter for polymers.
The first step is to build a press. Its dimensions should be such that one or more sheets of insulation can be freely placed in it. In its role can act a workbench or table. Followed by:
- Well align the plane. You can use for this purpose the usual construction level. The surface itself should also be flat. To do this, take the OSB, particleboard or metal sheet.
- The same size requires another element that will serve as a clamp. To make it harder, metal weights are evenly attached to it. Another way would be the construction of a metal frame. For this you need a rectangular or square shaped tube. By the size of the top sheet is made figure with jumpers. On its big sides loops are made under the studs. Just below them, the hinges are welded to the table.
- The material that will be used as a base is laid on the working surface. This may be, for example, moisture resistant OSB stove. But its lateral ends should be cut in advance in the form of a lock for binding. Its configuration will depend on the selected lining.
- The base is coated with an adhesive.
- Top placed sheets of insulation.
- Covers the entire structure of the prepared part with loops.
- Holes are combined, they are inserted into the studs and is clamped.
- The dwell time is equal to the hardening time of the adhesive, it is usually indicated on the package.
- After that, it is necessary to trim the foam according to the format of the cut ends.
- The next stage is the installation of blanks for fasteners. Conventional umbrellas are perfect for this purpose. They must be placed in several rows so that later the hole falls into the seam between the tiles. Under the cap is made a small recess. Then they will lie flush. The protruding end is clipped.
- The tile or stone is fixed in the same way as the factory panels, but the pressing force will be less than in the first case. This is necessary in order not to damage the lining and not to push through the foam.
In the case of this approach will be able to partially save on the total final amount, as well as create a unique design. The strength of the products is high. The fact is that the glue penetrates into the insulator to a depth of almost 1 cm, so it can only be torn off with a part of the foam. In addition, to repair homemade slabs at times easier than the factory. Among the shortcomings can highlight the need for a large amount of time that will go on preparation.
Assembly process
The installation process will not cause difficulties even for beginners in the construction business. For successful completion of all stages, it is important to have minimal skills in working with punch and level. In total, there are two ways in which installation can be carried out:
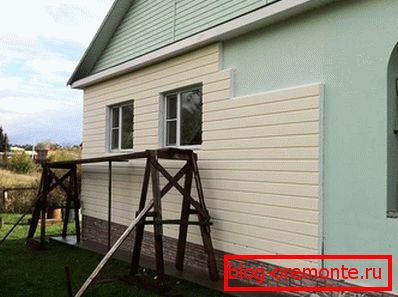
- Directly to the wall plane. This option is most easily implemented in the case when the surface is extruded in compliance with the vertical plane. It may already be plastered, with certain shortcomings being eliminated.
- Using metal or wooden crates. It will be a salvation in a situation where significant errors were made at the stage of construction, and they must be hidden. Costs in this situation increase slightly. First, you will need funds for strips under the frame. Secondly, the space between the wall and the panels cannot be left empty. If this is done, then the effect of them will be only visual. Gaps will need to close another layer of insulator.

To solve the first problem, we need the following tools:
- perforator;
- level;
- roulette;
- screws and dowels (length depends on the thickness of the panel);
- joint filler;
- tool for jointing;
- grout gun;
- metallic profile;
- screwdriver;
- hacksaw or grinder with a nozzle for concrete;
- construction adhesive.
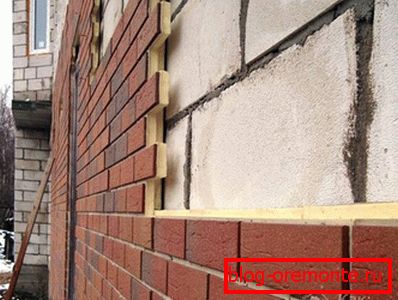
The whole process begins with the insulation of the basement. If it is left without isolation, then the entire wall will freeze because of the cold bridge.
- Mounted metal profile UD for drywall. Every 50 cm it should be fixed with a dowel and screw. It will be located at a height of 5 cm from the surface of the blind area. The gap is made in order to leave space to compensate for thermal expansion. It is necessary to set it in level. Also, it should not be close to the wall. The distance of 0.5–1 cm is observed. For this, linings are made of insulation or polyethylene, but not wood.
- The space between the profile and the wall is filled with polyurethane foam. This is done in order to eliminate the possibility of air circulation between the plane and the panels.
- Before mounting the first element, the profile cavity is filled with foam.
- For greater convenience, the laying of cladding is better to start from the left corner of the building.
- You can arrange individual sheets in a checkerboard pattern or in horizontal rows.
- Each element before fixing is exposed on level. If the wall is uneven, then under it you can make the lining of dense polyurethane foam.
- A layer of foam is applied on the vertical and horizontal joint. There is no need to cover the entire back side with an adhesive. At expansion it will lead to a structure deformation.
- A wall is drilled through the holes in the factory. The depth should be 3 cm larger than the dowel.
- A small amount of foam is fed into the hole. After that, the dowel is inserted and the screw is screwed. The latter should be slightly drowned. A small amount of polyurethane foam is added to the gap again. This is done to eliminate the cold bridge, which can be formed through metal fasteners.
- To ensure a good junction at the corners, it will be necessary to cut the ends of two joined panels at 45 °. In addition, in the resulting plane, it is also necessary to cut a chute, which will subsequently be sealed.
- The slopes of the windows and doors are decorated with special polyurethane linings.
- The final stage will be grouting. The most convenient way to do this is to use a sealant gun. His nose is cut off at an angle of 45 °. It is filled with grout and it is evenly distributed throughout the entire plane so as to fill the space between the tiles. After a few minutes, you can go through the jointing tool while removing the excess solution.
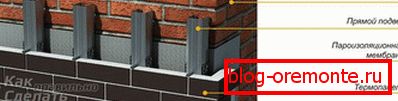
Installation with the installation of the frame has many common points, but there are some nuances. Tools will need the same as in the previous case.
- All walls are sheathed by vapor barrier. This is done to prevent possible accumulation of moisture and the formation of fungus and mold.
- Check the distribution in the plane of the wall. To accomplish this task, you can use a plumb line or laser level. In the first case, you will need to screw the screw into the upper part and tie a thread to it. After that, it is measured from it to the wall along the entire length. Relevant notes are made. This is done like a laser plotter of planes: a beam is projected parallel to the wall and the distance from it is checked with a tape measure.
- In 40 cm steps, hangers are attached. Already they screwed metal straps. At the same time, the distance from the plane is observed according to the marked marks. At the corners should be two elements. One is designed directly for fixing the panel, and the second for the corner element.
- To give rigidity in the upper and lower parts are mounted perpendicular bridges.
- A heater is placed in the formed cavities. You can use mineral wool or foamed polymer. It is fixed to the wall with umbrellas. In the second case, the seams are filled with foam to eliminate the cold bridges.
- Installation of the main panels is made from the left corner, as in the previous case.
- They are attached directly to the mounted frame. The screw at the same time must go through the insulation and rest against a wooden backing.
- Joints between parts are coated with foam. This serves as both an additional fixative and an insulator.
- The corner elements are sewn up last. Thus it is possible to eliminate as much as possible the breakdowns that arose during the docking.
- For windows and doors there are special slopes, which are cut to fit and mounted. It should be remembered that the junction with the main elements are foamed.
Try to experiment a bit by adding a certain zest to the overall exterior. For example, one strip in the middle of the wall can be decorated with basement panels. It always looks very impressive. Keeping in mind the basic principles that are applied to thermal insulation of the facade with thermopanels, one can achieve the desired result.
Video
The video shows the installation of thermopanels therm-Avers with clinker tiles:
And below - installation of Termosit thermopanels:
See also:
- How to finish the facade with siding.
- How to finish the facade planken.
- How to decorate the basement of the house.
- How to paint the facade.
- Installation of metal cassettes on the facade.