Do-it-yourself shower cabin: assembly and installation
In modern showers there are many different functions, so many people prefer to entrust the installation work to professionals. However, subject to the rules of installation, you can easily install it yourself.
Accessories
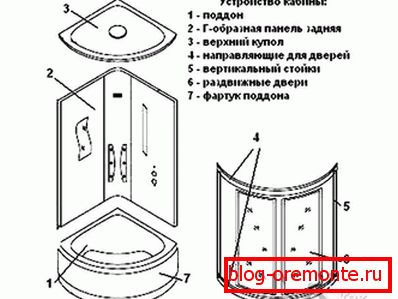
As a rule, many of the elements that are included in the shower cabin kit are assembled directly at the factory, since they have a complex structure. To assemble the remaining blocks into a single structure, you do not need to have professional skills, it is enough to skillfully handle tools.
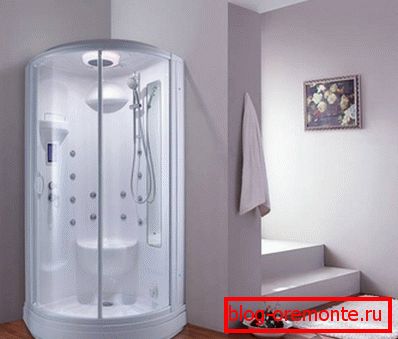
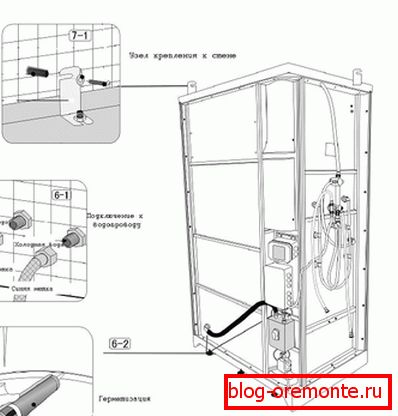
The external equipment of the cabin includes a pallet with a special frame, equipped with a regulator, and doors with guides for fixing to the roof.
In the case when the complete set of a shower is limited to these components, for its installation an angle with two adjacent walls is required. In it the pallet to which door guides fasten is established. They are additionally fixed on the walls with anchor bolts. For the manufacture of holes for anchors need a punch. Fastening parts to each other is done with screws or bolts.
There are certain requirements to the walls: their surface must be perfectly flat and finished with a moisture resistant material. As the finish, you can use plastic panels or ceramic tiles.
Basic and advanced features

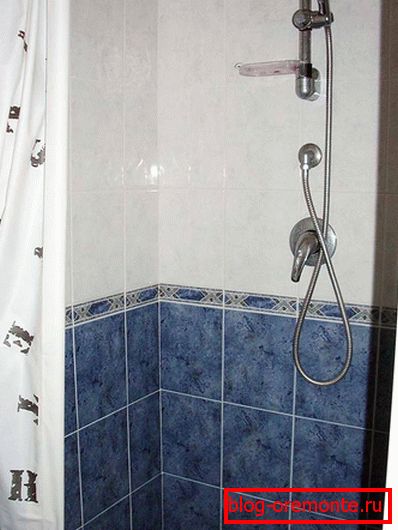
The shower cabin includes a panel equipped with nozzles that regulate the water jet. With a minimum configuration, it is mounted directly on the wall using stainless anchors.
To increase comfort and functionality, additional elements may be included in the package, for example, the back wall, in which there is no need to install the device in the corner, at the same time it serves as a shower panel.
Manufacturers make a variety of design by adding a hydromassage, sauna, jacuzzi. Despite the fact that it significantly increases the cost of the booth, your expenses will be justified.
Assembly before installation
Before proceeding with the installation, the structure should be assembled in a lighted, spacious room. This is necessary to check the configuration.
If a defect is detected during the trial assembly, it will significantly simplify the purchase return procedure.
Silicone seal and most fasteners are not required for the initial assembly. For this fit simple bolts. Do not neglect this stage. Carefully read the instructions, and in low-cost models and the quality of its translation. The description translated automatically is attached to cheap designs, so the essence is not always possible to make out.
Having dealt with the instructions, if necessary by purchasing the missing fasteners, making sure that all the seams match, you can begin the installation according to the diagram.
Installation work

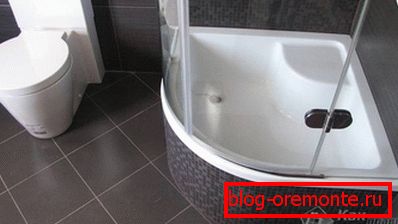
- Initially, you will need to secure the drain pan and connect it to the sewer drain system. After installation, check the joints for tightness. This is done as follows: a large amount of water is poured into the pan, and the connection point of the drain is examined for leaks. This stage is quite simple, the main thing is to set the top edge of the pallet strictly along the horizontal line, adjusting it with the help of special nuts.
- Having completed the installation of the pallet, proceed to the installation of the back wall or the shower panel with its subsequent connection to the electrical network and the water supply system.
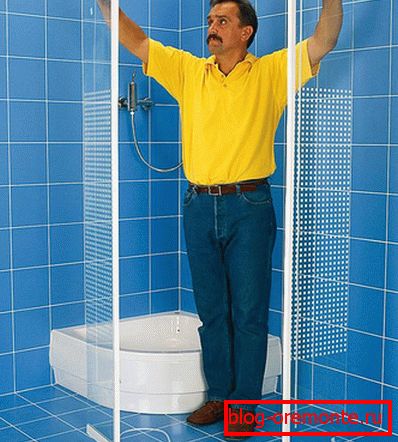
- Having finished with the previous stage and checking the quality of the work performed, proceed to fixing the doors and guides. This process requires accuracy, since a small imbalance would entail unpleasant consequences and the need for rework.
- After installing and checking the doors, it is the turn of installation of the ceiling panel. With proper implementation of all previous stages, this work does not take much time and effort.
- Installation can greatly simplify and reduce the chances of possible damage using a large amount of sealant. As a rule, a colorless sealant is used, but to improve the aesthetic appearance in visible places, you can use white silicone or another desired color.
- The final step will be the installation of a decorative screen on a pallet, decorative overlays and the adjustment of all structural elements.
When the structure is connected to electricity, a separate line is necessarily diverted and the RCD is installed.
Installation without pallet

Equipment without a shower tray - a simple and cost-effective option. Also, there will be no difficulties during cleaning.
Installation should be carried out according to a number of rules:
- First, you need to prepare the site for construction. It is important to note that waterproofing of the floor is necessary.
- Secondly, it is necessary to consider the materials from which the pallet will be made. The best fit brick and concrete. The advantage of the latter is the shape and size of your choice. In addition, a high-quality finished brick or concrete base is practically not inferior in its appearance to an expensive shower.
It is necessary:
- to foresee a slope for drainage;
- in case the drain gets clogged, make a threshold that prevents water from entering the room;
- make a good waterproofing;
- perform floor insulation;
- surface of the floor covered with ceramic tiles.
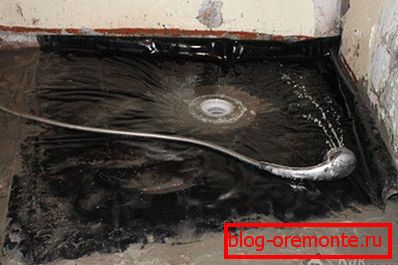
It is very important to produce high-quality waterproofing of the floor, since a large accumulation of moisture contributes to the appearance of mold and fungus.
In order to perform work on waterproofing, you need:
- completely remove the old screed to concrete;
- apply waterproofing in 2-3 layers;
- cover walls with bitumen mastic;
- equip inclined drain;
- apply screed on the floor of the entire premises;
- lay ceramic walls and floor;
- secure a flexible shower;
- install glass doors or curtains.
On the walls, the level of waterproofing must be raised to 15-20 cm in case of emergency flooding.
Water head adjustment
Quite a significant point affecting the operation of the shower, is the adjustment of water pressure. Unfortunately, in many localities, water supply is intermittent, so installing a booster pump to create the optimum working pressure and a spare water tank is simply necessary.
This is especially true for structures equipped with a hydromassage function. To do this, you need a certain water pressure, the exact numbers are indicated in the instructions (mainly 1.5-4). The displacement of the spare water tank should be at least 200-250 liters.
To date, manufacturers offer a variety of models of shower cubicles with various built-in functions, the installation of which even an experienced professional can stump. To solve this problem, you can contact the manufacturer, whose masters will perform all installation work. However, for you it will be a very expensive thing. But if you are completely confident in your abilities, carefully approach the study of technology, instructions and proceed to the installation work.
Pallet manufacturing
What materials and tools are suitable for the manufacture of a pallet? Brick, cement, waterproofing mix, sand, self-leveling mix - with regard to materials. And from the tools for the work will be needed:
- level;
- trowel;
- plaster beacon;
- drill;
- mixer head;
- metal grid;
- roulette;
- paint brush;
- putty knife;
- drain for pallet.

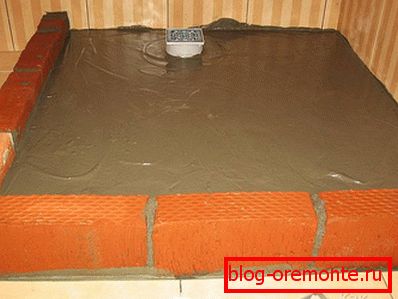
When installing the pallet, the foundation plays an important role. First of all, you should completely complete the plastering of the walls, make a floor screed and only then proceed to the manufacture of the pallet. To avoid mold, the wall adjacent to the pallet is treated with waterproofing. First, waterproofing with a paint brush is applied on the subfloor, then on top of the screed and then under the tile.
For comfort, you can arrange a system of electric floor heating. It is advisable to install the system as under the pallet itself, and around it.
When the first waterproofing layer dries well, the marking of the future brick pallet is applied. It does not matter which brick the pallet is made of.
For this purpose, you need a red or silicate brick. A mortar made of sand and cement or a special mix purchased from a hardware store are used as a brick base. For strength, a metal mesh is laid on the base.
The next step is to determine the location of the drain and the location of the water drainage system. Then you need to fix the building beacons and make a concrete tie, carefully aligning it with beacons as a rule.
The water drain system should be of the best quality, as its replacement is more complex.
After a while, the surface of the screed is leveled with a trowel or trowel. When the screed is dry enough, it is necessary to impregnate it with a waterproofing mixture to prevent moisture from entering the concrete, as well as the formation of mold and mildew, both in the bathroom itself and in neighboring rooms.
Self-leveling mixture is distributed at the end on an already dry surface. After it is completely dry, waterproofing is applied, but more carefully to ensure protection of the joint between the wall and the floor, as well as drainage for the water. Now the construction is ready for facing with ceramic tiles.
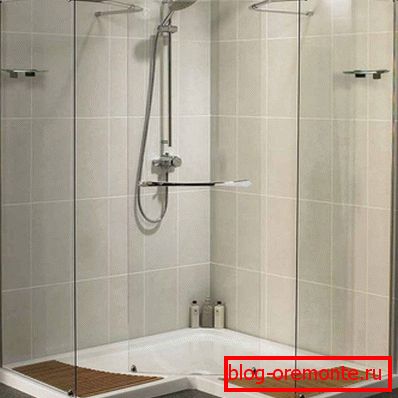
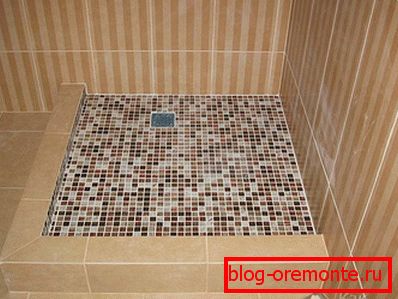
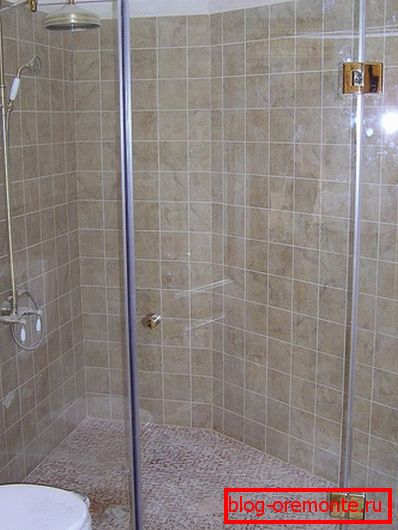
Tile shower

When facing the shower cabin, simple ceramic tiles are used, but it is important to pay attention to the fact that it is better to choose non-slip for facing the pan.
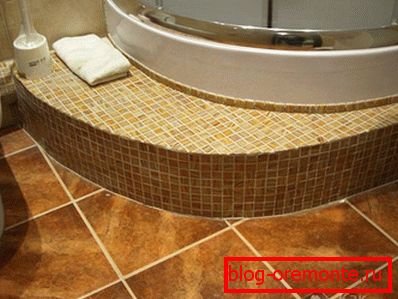
You can revet the pallet and the walls with mosaics - it will be much more beautiful.
Tiling materials and tools:
- directly tile or mosaic for the floor;
- tile adhesive (preferably water-repellent);
- level;
- rubber spatula;
- comb (notched trowel);
- roulette;
- tile cutter or grinder;
- rubber mallet;
- construction knife;
- crosses for seams;
- grout for joints (matched to the color of the tile, and it is better if it is water-repellent);
- drill with nozzle "mixer".
After tiling all surfaces with tiles, it is necessary to thoroughly rub all the joints with a grout, and after drying it should be treated with anti-fungal treatment.
Selection and installation of the door
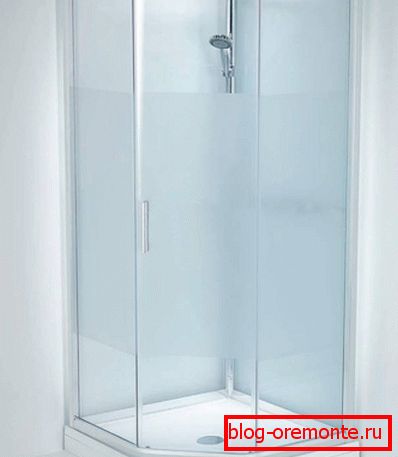
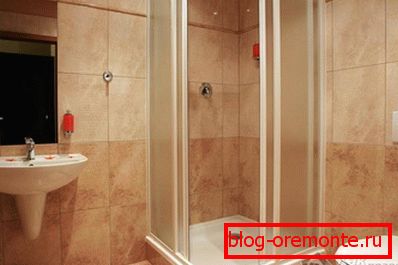
It is possible to use a plastic or glass door acquired in a hardware store. As an alternative, a transparent door is suitable:
- corrugated glass;
- frosted glass;
- colored glass;
- with sandblast or volumetric image.
Glass for the door is best to choose from the thick red-hot glass. Glazier will process the end of the door. When the thickness of the glass is already known, it is possible to purchase a fastener for the door — a movement limiter, canopies, hinges, latches, door handles — for convenience on both sides of the door. Glass can be pasted over with a special film with a decor. When using a mirror film there is a big advantage - from the outside of the door it serves as a mirror, and this is significantly cheaper than buying a separate mirror in the bathroom.
With blinds
If you decide not to install the door, then you need to install a special ceiling cornice, followed by fixing the curtain of washable material. This option is the easiest, but not the most practical, as the curtains quickly get dirty, and it is very inconvenient to wash them. If the ceilings are high, then you can fix the eaves on the walls.
Polycarbonate
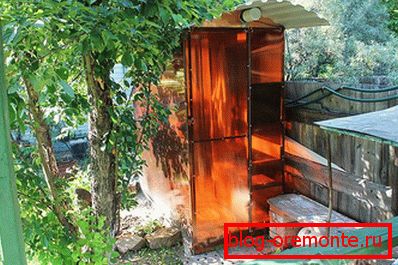
Recently, polycarbonate shower has become very popular. What is polycarbonate? This is a new generation material made from synthetic polymers. Ready sheets of polycarbonate are monolithic and cellular.
Benefits:
- durable shockproof building material;
- bends well, and this allows you to give the desired shape;
- polycarbonate sheets are light - much lighter than hot glass. For this reason, there is no need to strengthen the base and provide for additional fastening;
- it is not afraid of changes in temperature, does not darken, does not deform (if the thermal gap is left during installation).
For the manufacture of such a cabin, you first need to weld a rigid metal frame of their square pipe, to which polycarbonate sheets will then be attached.
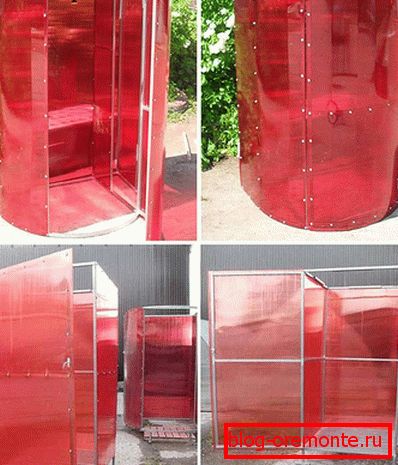
Make it easy. The rectangular design is welded from straight sections of a square pipe (it can also be made from a simple pipe, but then it will be hard to fasten sheets to it, since the drill will slide off the round surface).
You can make a wooden frame, but it will quickly rot.
If the cabin will have a rounded shape, then first bend the workpiece and only then the structure is welded. Then the door is fastened, everything is painted, and the frame is sheathed with corrugated flooring. If a large water tank is placed on top, a more powerful frame is made.
A photo