Do-it-yourself kitchen suite
If you look at the market of kitchen units, you can find a huge number of original design solutions that conquer the hearts of many housewives. However, prices for such works of design ideas are exorbitant. Under such circumstances, willy-nilly, one has to think about alternatives. Some decide to make a kitchen set with their own hands. To do this, today there are kitchen fittings, and building material, and tools - in short, everything. And, as practice shows, home-made kitchen set is not inferior to the purchased one, especially in quality. And this is not even taking into account the price, because to make the set to the kitchen on their own in any case more profitable. If you decide to accomplish such a feat, you will have to work hard not only with your hands, but also with your head.
Headset manufacturing methods
There are several directions, following which you can realize your plans. For example, to prepare all the necessary details, you can contact a specialized company that provides cutting and hemming services. This is a good option, since you choose the size of the kitchen unit.
Another option is to purchase ready-made parts. We can say that this is the easiest option. But in this case, your kitchen will be standard. There is another solution that consists in the complete manufacture of a kitchen headset with your own hands, ranging from measurements, cutting and finishing to assembly.
Simplicity and functionality of the design
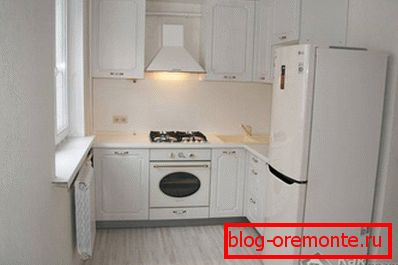
If you prefer the latest version and you want to do all the work yourself, then in this case you should think over the headset design. As a rule, it is best to choose a simple, functional and convenient design. This category fits the classic kitchen, the cabinets of which have drawers and hinged doors. This design has a lot of advantages. Here are some of them:
- Modular assembly possible. In this case, each element is designed and assembled separately.
- Such a set would be a suitable solution for both large and small kitchens.
- There are a large number of building materials that allow you to implement such a project.
- This furniture is durable, practical, roomy and comfortable.
- Even a non-professional carpenter can create such a design.
- In the classic kitchen you do not have to work with curved lines, which facilitates the work.
- Simple mechanisms are used.
- You can easily choose the appropriate fittings, facades and countertops.
In addition, such a kitchen set, if necessary, can be altered or upgraded, since you personally will know the location of each bolt!
What to do?

The next preparatory stage is the selection of the appropriate material. In general, kitchen sets are made from different materials, here everything will depend only on your financial capabilities and wishes.
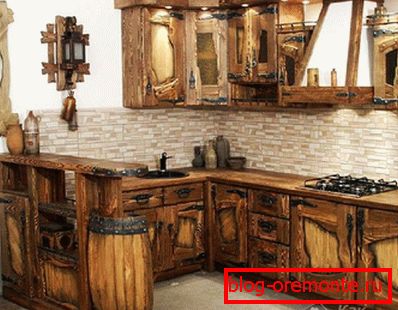
- Solid wood. This material is the most expensive, but also the most durable and durable.
- Painted MDF. Availability in the price. Possesses excellent operational qualities.
- Laminated chipboard. One of the cheapest materials that is most in demand, even among Italian masters!
- Postforming. Postforming plates are a durable and practical material. What is most interesting, you can choose any color and texture of the surface.
- Chipboard without coating. It is used for the manufacture of individual elements of the kitchen set, for example, for the side and rear wall.
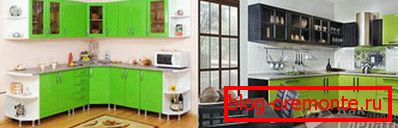
When choosing a material, it is worth looking at the ready-made kitchen sets in furniture stores. This will allow one to imagine what kind of furniture will be made of this or that material.
Eyes are afraid, and hands do: we start measurements
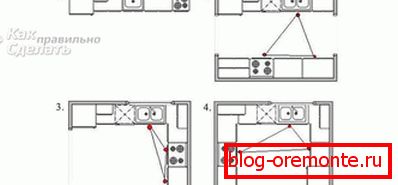
The manufacture of a kitchen set begins with measurements. First you need to decide what type of headset will be. In fact, a kitchen set can be divided into two types: angular and straight. As for direct kitchens, here is a little easier. Along one wall there will be several bedside tables and hanging cabinets. In some cases, the headset is placed parallel to each other on two walls. Here the measurements are quite simple. It is necessary to measure the length of the wall.
When measuring, it is important to measure the tape in several places, for example, at a height of 200 mm from the floor, at chest level and under the ceiling. This is due to the fact that there may be slight deviations due to the curvature of the walls.
As practice shows, the difference between such measurements can be up to three or four centimeters. Using modern building materials these differences can be leveled. Start measuring when the old furniture has already been dismantled, then you will have free access to the wall.

When measurements are often faced with difficulties. For example, gas or water pipes can be placed on the walls - all this will need to be taken into account when installing the kitchen, cutting the corresponding holes. The easiest way to do this is with an electric jigsaw. As for washing, usually for her stand is without back wall, as in this place is the junction of sewer and water pipes. The basic rigidity of a curbstone is reached thanks to metal corners.
Among other things, it is important to consider the presence of a gas stove in the measurements. Based on the measurements, you will need to make the appropriate amendments in the configuration of the design of the lockers and cabinets. After all, gas pipes will fit the gas stove. Especially it concerns those cases when you want to make a uniform table-top.

The hood is closed by a specially made cabinet. To do this, you need to make a special cutout in the back of the cabinet. As for the measurements of the corner kitchen, the whole process takes place on the same principle.
Small production of large parts
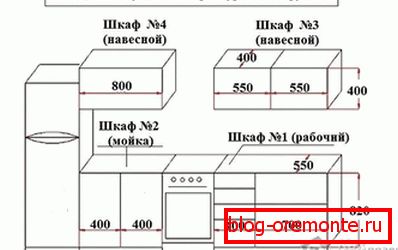
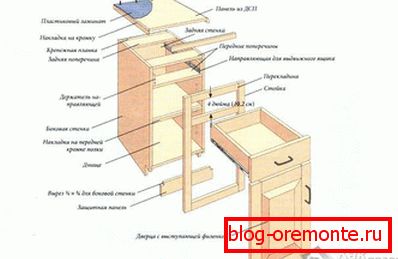
Where you can feel complete freedom is in choosing the colors and design of the kitchen unit. It is necessary to think over and make a figurative “cutting map” according to the finished drawing. In order to avoid mistakes and carry out the correct order of individual elements or cut them yourself, it is important to know about several nuances of cutting according to the drawing. This will help the following scheme:
This is how a standard wall cabinet will look like:
- Horizontal.
- Side wall or side.
- Shelf.
- Back wall.
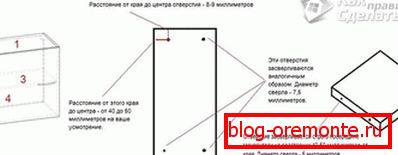
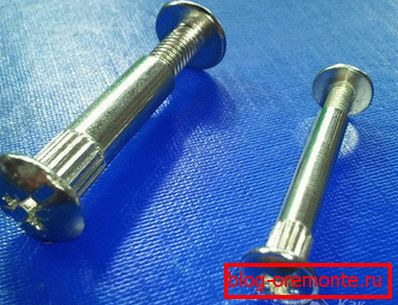
One of the features of the horizontal is its size. Based on the scheme, the horizontal is located between the side walls and is connected with the help of screws-confirmators. Accordingly, in details it is required to make suitable openings. Here, for example, the holes in the side billet:
When measuring every detail, it is important to take into account any nuance, otherwise the cutting process will be carried out incorrectly. In most cases, cabinets are made in standard sizes. The width is a multiple of 100 or 50. Therefore, the width can be:
- 250 mm.
- 300 mm.
- 400 mm.
- 800 mm, etc.
It is important to take into account the thickness of the chipboard, for the case material is used with a thickness of 16 mm. Accordingly, the horizontal of the cabinet with a width of 800 mm inside will be 768 mm. This is due to the fact that from two sides by 16 mm will occupy the side wall, goes like this:
768 mm + 32 mm = 800 mm
But these measurements are for cases when you make a standard kitchen. Today, you can not adhere to the standards and make the size of the cabinets at its discretion.
As an exception, we should mention the cabinet for dishes. It is made according to one standard. Although today it is possible to make this element under the order.
If we talk about shelves, there are also some subtleties that are important to consider when measuring. The shelf can be mounted in two ways: tightly or laid on special shelf supports. In the first case, the size of the shelf will be identical to the width of the horizontal. In the second case, the size of the shelf should be 3 mm smaller for free installation.
Well, the back wall also needs special attention. It is made from fiberboard. The area of the back wall should be slightly smaller than the entire body. For example, if the dimensions are 700 × 600 mm, the back wall will be 695 × 595 mm. Why? There are two reasons for this:
- If the back wall protrudes beyond the dimensions of the case, it will interfere with the tight connection of the modules.
- When sawing, the hardboard will “play” on the machine, so an error in a large direction may occur by a few millimeters.
The principle of measuring tables and pedestals is almost the same. There is one nuance that concerns fittings when it is complex or the design of the finished module is also complex. In this case, you most likely need the help of specialists. The thumbs scheme can be such a plan:

We give the finished form
When all the blanks are cut, there is not yet time to assemble. It is important to carry out a number of preparatory works, in which the edging is included. What it is? This is one of the key elements of the finishing of each billet, which reliably protects the edges from the ingress of moisture, chemistry and other liquids. Also, kromkovanie protects against chips and other mechanical damage.

Thus, each end on the kitchen set should be treated with a special edge. There are several varieties of them. But when it comes to practicality and durability, it is best to use a plastic edge ..
If this stage of work for you is difficult, then ask for help from professionals!
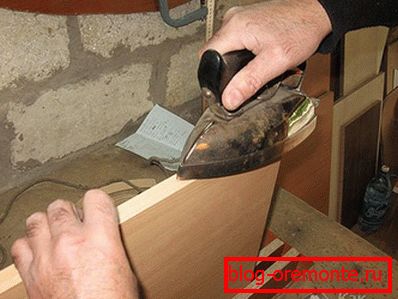
When buying an edge, select the appropriate color for the case. Until the installation, the edge should be stored in a dry place, since on the reverse side it is treated with a special glue that melts under the influence of temperature. Its gluing is done using a domestic iron. In no case can not use a hairdryer, due to the unstable temperature supply. And in general, the dryer will not sustain the length of the period of gluing the edge.
Now we will consistently consider how to glue the edge with an iron with your own hands.
So, for work you will need:
- Iron.
- Two pieces of cloth.
- Small file.
- Stationery knife.
- Edge.
- First, set the thermostat on the iron to medium mode.
- The workpiece can be put on the table horizontally, face up or stand with one end against the wall. Further, with a margin of two to three centimeters, cut the edge and attach it to the end.
- Roll the first piece of fabric several times. Through it, you should heat the edge. This technique will prevent overheating of the edge and prevent its damage. Accordingly, the iron will be protected from accidental glue on its sole.
- It takes a few seconds to heat up. After heating, the edge is pressed against another piece of fabric, it remains only to wait for it to cool.
- As mentioned above, chipboard thickness is 16 mm, and the edge has an average of 20–23 mm. For this reason, after gluing, protruding residues should be cut off with a clerical knife.
- At the final stage, cut the part and edges with a file. Thanks to such a simple operation, the angle will not turn out too sharp.
It is in this sequence that the edge is glued.
Furniture assembly tool

For work you will need:
- hacksaw,
- hammer,
- electric plane,
- jigsaw,
- plumb,
- level,
- ruler,
- roulette,
- Structin,
- workbench or reliable table,
- screwdriver
- screwdriver,
- vice,
- conductor for making holes for dowels,
- a forum,
- sandpaper,
- file and file set,
- construction and office knife,
- drill set and electric drill,
- pliers,
- safety glasses and gloves
- bathrobe.
If possible, use a laser level to measure. It will save you from errors that are found, usually at the end of the work!
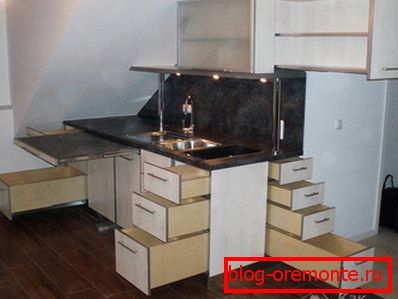
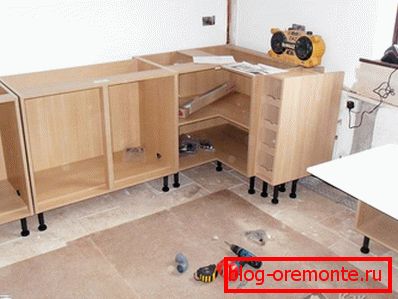
Assembling the bottom of the kitchen set
Before assembly, all parts must be sorted. Next, set aside those parts that will be required first. If you decide first to assemble the cabinet, then you will need the following details: side wall - 2 pieces, stand - 2 pieces, back wall - 1 piece and bottom - 1 piece. Other elements of furniture are sorted according to this principle.
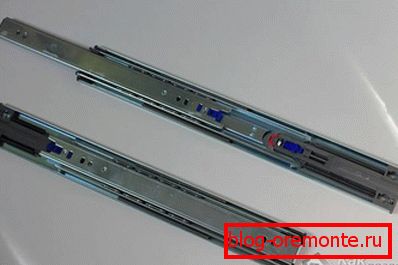
Every part must be mounted step by step. For example, mounting holes can be made in advance or directly at the time of assembly. There are no conventions and rules. In this work, accuracy is important, otherwise it is very easy to damage the particle board. In every detail must match exactly all the holes. You can start the assembly from the box. It is equipped with roller guides, which are fixed on two external sides of the box on the sides. Then the whole box is assembled. The holes from the edge should be at a distance of 7 cm. After, holes are made for the shelf holders. Connect the two racks and the bottom, and then screw the upper ribs, which will subsequently be attached to the tabletop.
At this stage, check the box diagonal box. It must be equal on both sides.
Now it's time to mount the back wall. As already mentioned, its size will be less than the width and height of the box, respectively, by five millimeters. For a start DVP is nailed to a long wall. Checked diagonal. Adjusted if necessary. Finally fixed with a few nails. Nail pitch can be 100 mm. If you want to make a stronger fixation, then use screws. If the pedestal will stand on its legs, turn the pedestal upside down and fasten them. Set the drawer in place, and the dresser is completely ready! According to this system, all other elements of the bottom part of the kitchen unit are assembled.
Collect bedside tables gradually so as not to clutter up the kitchen.
At the final stage it remains to mount the tabletop. It can be whole or consist of several parts. In the latter case, special connections should be used to dock it.
According to this principle, the upper part is assembled, which consists of cabinets and canisters. The only difference is that it will be necessary to fasten fastenings to the cabinets for hanging.
Installation of top cabinets
When the entire assembly is completed, it remains to set everything in its place. To install the top of the kitchen, you will need:
- drill / hammer drill,
- длинный level,
- roulette,
- ruler,
- screwdriver
- hammer,
- Structin,
- wrench.
There are several options for hanging cabinets. For example, you can mount a mounting plate on a wall. Similar - screwed on the cabinet. Immediately before securing the strap, it must be checked for evenness. It will also be necessary to use intersection ties. They are used to connect the modules together.
So, the installation process will occur in the following order:
- On hooks mounted hook in the middle position.
- To hook hooked onto the mounting rail, on the inside of the side walls of the cabinet a few millimeters should go beyond the back wall of the cabinet.
- After, measurements are made under the holes on the wall for the hinged tire. When calculating the height, decide whether the cabinet will be butted or overlapped with a kitchen apron.
- The mounting rail in all cases will be below the top edge of the cabinet.
- In order not to miss, you can pre-attach the cabinet to the wall at its future location. Assistant can put the appropriate mark on the wall.
- Using a level on the wall, draw a flat horizontal strip that points to the top edge of the cabinet. It is not recommended to take measurements from the floor. There is a chance of irregularities.
- At this stage, mark the place of drilling.
- Insert the dowel into the hole.
- Using fasteners, fix the mounting rail.
- Now you can hang a closet.
- Using a level, check the evenness of the cabinets between them; if necessary, use screws on the hinges and adjust them to level.
- Clamp all cabinets with each other, starting from the corner. Insert wooden or cardboard linings between the clamp and the cabinet.
- Next, drill holes through the cabinets for intersection ties.
- To avoid chipping, hold the wooden bar at the point of the drill exit.
- Intersection ties tightened together all cabinets.
- Finally, reinstall the facades using special screws and hinges.

In the process of performing this work, observe the safety rules. This will allow you to not get hurt!

A simple method of making a new kitchen
There is the most simple way to make new kitchen furniture. If you are satisfied with your old furniture, then it can be taken as a basis for a new kitchen. It's very easy to do this:
- To begin with, take the old furniture apart. Remember which parts were used in what designs.
- Clean the old surface with sandpaper. Rinse off the dust well and “revive” each element.
- Now remove all measurements from doors, facades, sidewalls and shelves. These dimensions should be transferred to new blanks.
- As a result, you can cut a chipboard sheet into the necessary details of the future kitchen.
- Then you just have to mount all the parts according to the above instructions, install a new hardware, and you can start using the new kitchen.

In order to finally give preference to such an option, it is advisable to think several times: whether you like the current design, whether you need to change something in height or width, and so on. During the transfer of sizes you will have the opportunity to correct something.
As you can see, this is the easiest and most primitive method of making a kitchen set with your own hands. In fact, the kitchen will have the same format and size, only in the foreground and inside there will be absolutely new facades and fittings. This option is preferable for those who have limited resources and will not be able to buy a new headset if there is no time or desire to develop a project from scratch.
So, to make a kitchen set is quite capable of everyone. Most importantly, do not stop half way. Leave your comments at the end of this article and share your personal experience!
Video
Here is the process of assembling a kitchen set, performed by professional craftsmen:
A photo