Do-it-yourself installation of sliding gates
Retractable gate can be called the most popular type of gate today. Previously, not everyone could acquire such a design due to the high cost of both fittings and other elements of such gates. Today, their price is much more affordable. The advantages of such gates - practicality and durability. But since this is a complicated technical design, it is better to provide installation of the gate to professionals. If you are confident in your abilities, have some construction skills and tools, then installing a sliding gate with your own hands will not be fraught with many difficulties. Moreover, you can save on hiring specialists. The main thing you need is to take into account technical requirements, selection of components, compliance with regulatory loads and following the instructions. Let's take a closer look at the installation process.
Elements and components of the gate

In fact, having everything you need to do the work, it will be easy for you to install the gate. Especially deep knowledge in construction you do not need enough basic knowledge, material and follow the recommendations of experts.
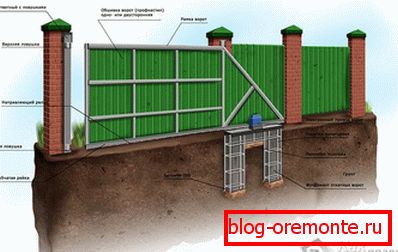
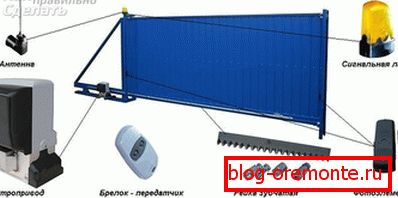
For the work you will need supplies, but the main and important part of the elements - accessories, responsible for the movement of the gate. It consists of:
- roller carriage or carriage (2 pcs.);
- lower and upper catcher;
- guide of the U-shaped beam;
- gear rack;
- removable end roller;
- upper retainer with rollers;
- plate for fixing roller carts.

When choosing quality fittings, pay attention to proven manufacturers, given the price and quality of products. You can also ask for help from professionals who will help you choose the best option.
It is much easier to buy a ready-made set of gates with all the necessary elements that you only need to assemble and install into place. It has a special installation instructions, thanks to which you can easily do all the necessary work.
Work plan
Then you can learn all the nuances of the installation of sliding gates in order. The first thing you need to determine the scope of work, including:
- Trenching and foundation construction. Sliding type gates are quite heavy, so you need to make a foundation for smooth and proper operation.
- Wiring if you want your gates to open independently of the drive, or if you plan to install a video camera on them.
- Installation of roller elements.
- Installation of the gate on the rolling mechanism. At this stage, you need to hang the gate without adjustment.
- Fastening hardware that catches the gate.
- Final gate adjustment.
- Connecting automation, if it is provided.
If you want your gate to serve for a long time and without interruption, you need to strictly adhere to the plan and follow the instructions carefully following each step.
Trenching and foundation preparation
The first thing you need to do the preparatory work for the device foundation. Start with trench planning. To do this, follow these tips:
- From the border of the gateway, retreat a distance that is half the width of the entire passage. For example, the width of your passage is 4 m, then the length of the foundation will be 2 m from the border.
- The trench width depends on the width of the structure of the gate itself. For example, the width of your gate is 20 cm, then you need to dig a trench 10–15 cm wide more in two directions, that is 40–50 cm.
- Depth is the subject of controversy for professionals. Some say that it is important to deepen the trench below the level of freezing, others - that this factor does not affect the future foundation at all. According to the first, the foundation should go deep into 1–1.5 m, according to the second, 0.5–0.7 m will be enough. What depth you choose, especially your decision. We recommend doing it no more than 1 m.
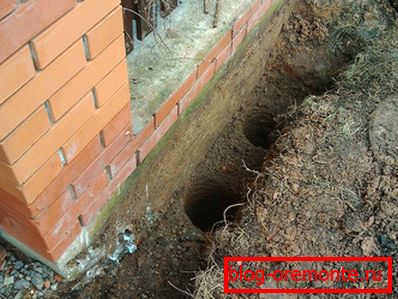
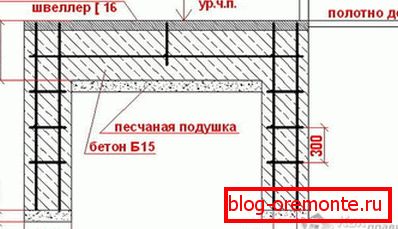
Once you have decided on the size, with a shovel dig a trench in the right place. You should get the same as in the picture below.
Prepare a mortgage item
In order to make a mortgage item, you will need:
- channel width 18–20 cm (it can be replaced with a corner of the same dimensions);
- fittings O 12-15 mm;
- welding machine.

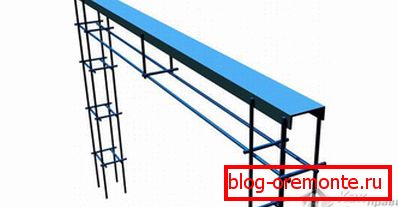
The laying element is a construction from a channel and fittings which in the future is established in a trench and will be concreted. Take a metal channel and cut it to the length of the entire trench. If it is 2 m, then the channel should be 2 m long. After that, reinforcement should be welded to it in order to form a metal frame. The length of the bars of the reinforcement should be greater than the depth of the trench by 5–10 cm so that it can be drowned in the ground. It depends on you exactly how you will weld the reinforcement, there are no restrictions here, it can be boiled in 15 cm steps. The main thing is that the frame is strong, has a vertical base, which is connected by bridges.
Instead of fittings, you can take another kind of metal products, for example, corners.
Once the frame is ready, it can be installed in a trench. But before that, the bottom of the trench should be covered with sand or fine gravel and tamped down by making foundation cushion 5 cm high. Flush the reinforcement so that the channel surface is flush with the road surface. With the help of the construction level, set the frame perfectly smooth. If there is a strong bias on either side, remove the frame and fill the sand in that place. If the mortgage is placed unevenly, this will prevent the gate from moving correctly.
The foundation must be on par with the road. Ground clearance can be no more than 5 cm, so that in the winter, you do not have problems with use.
Electricity wiring

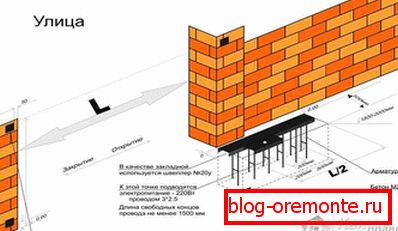
If your gate will be equipped with an automatic opening and closing system of the gate, or you need to install them. video surveillance, you need to take care of laying electrical cables. They must be carried out immediately before pouring the foundation. The cable is placed in a special corrugated hose and laid in the foundation structure. You need to decide in advance on the place where the drive will be installed and lead the wires there. The free ends of the wires need to be brought out above the basement level by 1–1.5 m. In order to do everything yourself, look at the diagrams and drawings of electrical wiring for sliding gates.
Foundation casting

As soon as you have laid the wiring, the mortgage element can be poured with concrete mix. For this you will need cement марки М400, песок и щебень. Пропорции следующие: на 1 кг cementа нужно 3 кг песка и 4–5 кг щебня. Вода должна составлять половину веса всех компонентов. Получается:
1+3+4=8
8/2=4
Итого получается 4 л воды на 1 кг cementа, 3 кг песка и 4 кг щебня. Замесите необходимое количество раствора и залейте траншею. Важно, чтобы поверхность швеллера не была забетонирована полностью, бетон должен быть на его уровне. Теперь фундамент нужно оставить до высыхания. На это уйдет 3–5 дней, за которые он окрепнет и будет достаточно надежным для дальнейших работ.
Door leaf assembly
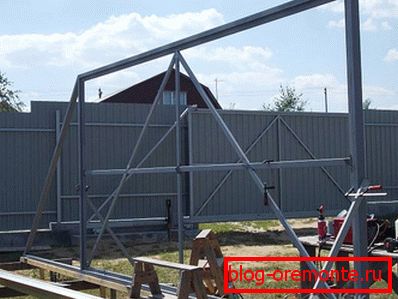
To make a frame for the gate, you need to have the skills to work with welding machineas all elements need to be welded together. If you do not have experience in welding, you can ask for help from a friend or in a special workshop, where according to your drawings you will make a frame of the gate.
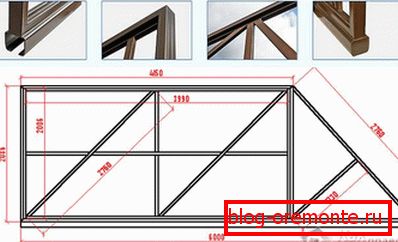
To make a door frame, you need to purchase profile tubes. Their size will correspond to the desired size of the gate. There are many variations of designs that you can do. The main thing is to choose the right one for you, cut the pipes of the required size and perform welding works. Professionals are advised to cook the frame so that the horizontal cross member was on top of the vertical pipes. Due to this, you will prevent corrosion, you only need to silence the horizontal pipes. When the structure is ready, the joints must be cleaned and the frame covered with protective paint.
If your gate is larger than 1.5 m in size, in order to strengthen the structure and prevent sagging, you need to weld cross-pieces in 50 cm steps.
At the same stage, a guide U-shaped beam should be welded to the bottom pipe, due to which the gate will be moved. After that, the frame is sheathed with a profile sheet.
One of the options how to make the portal frame is presented below.
Installation of roller carts to the channel

Roller carts can be called the most important mechanism, since they must withstand the load of the whole structure, therefore, they should be fastened to the channel as reliably as possible. Plate for mounting rollers must be welded to the channel. They do everything as smoothly as possible and in the same plane so that the gate can move freely. To set them straight, you can use a laser pointer or a tensioned cord. Another option is to draw a parallel line on the foundation, which will be a tangent line to the edge of the plate. Weld the plate should be in the middle of the channel. To do this, retreat 15 cm from the edge, closer to the opening and fix the first plate. The second plate is mounted on 10 cm from the opposite edge.

Now you need to fix the roller carts on the plate. Usually they are connected with bolts and nuts. Tighten them to securely and install the gate. Check the smoothness of the course, take control measurements and adjust the position of the roller bearings to set the gate perfectly smooth. To do this, you can use the cord, which must be pulled along the opening line of the gate, at a distance of 20 cm from the surface and 3 cm from the second pillar. The cord will serve as a guide that will help to set the gate perfectly smooth.
Install Top Lock
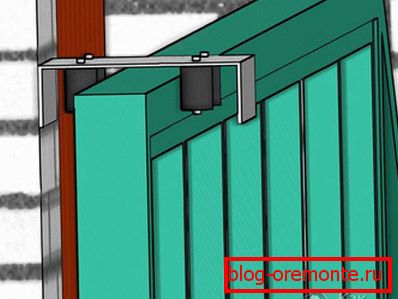
So that when the gate moves, they do not move out, a lock or guide is installed on top of the pole. He will stop the gate and not let them sway in strong winds. To do this, on the support pole should note the holes for mounting. Measure everything correctly so that the upper frame without obstacles can enter the retainer.
On the pole you need to install the bracket for mounting the guide. If you fix it in concrete or brick, use an anchor with a stud diameter of 10 mm. If you attach it to the metal, then fit the special screws. In a case when welding is applied, rollers need to be removed.
After fixing the lock, check it. The gates should walk smoothly, keep upright, and the rollers should hold them tightly.
Clamps are different, roller or in the form of a conventional bracket. Which device to choose - your decision.
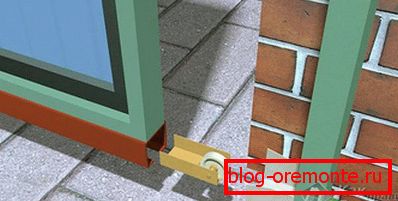
End roller and plugs

Bottom on the end of the guide U-shaped beam, in its front part, you need to fix the removable end roller, which is inserted inside the profile. It is fastened easily, by means of a bolted joint. On the opposite side you need to install a cork (plug) or the same clip.
Such a roller is needed so that when the gate is closed, the guide rolls onto the catcher located on the bottom, which will be installed on the pole on the other side. Thus, you can reduce the load on the support plates that hold the rollers on the foundation. Plugs or plugs are an obstacle to snow, rain, dirt and debris that can penetrate the guide rail. If not, then the roller carts can quickly fail, and the gate will not open smoothly and easily.
Top and bottom trap mount
To secure the lower and upper trap, you need to close the gate until it stops. At the pillar, mark the places where the frame of your gate ends. In this place, above and below, you need to secure the mortgages, to which the catchers will be attached. Depending on the mortgages, they can be fixed by welding or bolting.
The traps will soften the contact of the door frame with the support rollers, as well as minimize the loosening of the structure in strong winds. The lower catcher is also used to reduce the frame sagging, which may appear after a long operation of the gate. At the end, check the installation of your gate. Open and close them several times, make sure that the course is smooth and even.
Installation and connection of automation
If you want your gate to automatically close and open, you need to purchase special equipment and install it.
First of all, the installation plate to which the drive will be connected must be welded to the channel bar. Usually such a plate is included. For welding, you can use the profile pipes, which are welded to the channel, and then the plate is welded to them. After that, the engine itself is installed on the base and fixed with the help of bolts, which are also included. There are adjusting screws on it, thanks to which the engine can be adjusted up and down, left and right.
It remains only to weld the gear racks to the U-shaped frame. There will need patience and accuracy, as the slats should be welded so that they are as one. Then, when driving, you will not hear any other knocks of the gate. Then adjust the drive so that it can easily actuate the gate. It remains only to configure the mechanism according to the manufacturer's instructions.
That's all, after all the manipulations your gate is ready for operation. You can be proud of yourself, because they themselves were able to do such a great job. Properly installed gates will be quite reliable, and their lifespan will please you.
Video
Watch the detailed video instruction on installing sliding gates:
Another video instruction: