Canopy for the pool do it yourself
Nowadays, many can afford to have a pool in the courtyard of a private house or cottage. But it should be noted that building a reservoir in one's yard is one thing, but taking care of it is another. You need to install filters, constantly clean and clean up trash that accumulates on the surface of the water and on the bottom. To simplify the task of the owner, you can make a shed over the pool, which will protect it from pollution. You can buy them ready-made, but you can do it yourself, saving a decent amount on it. So, this article will discuss what types of sheds are, what they serve and how to make them. Let's analyze all these questions in detail.
What serves as a canopy over the pool
Protection against garbage is not the only goal that this design serves. It is multifunctional and allows you to solve many problems.
Having built a shed or pavilion for the pool, you can get the following "bonuses":
- Water will evaporate less, which will reduce the cost of water supply.
- The ability to significantly reduce heat loss, and, accordingly, the funds that will be needed for heating water. Moreover, the period of the swimming season will increase significantly.
- It will not fall precipitation, debris, dust and leaves that can cause the wind. This will allow the owner to save on the filtration of water and its purification by chemical means (only in the case when the canopy is of a pavilion type).
- Ultraviolet, which will affect both the pool and the people bathing in it, will already flow in refracted form, as it will encounter an obstacle. Because of this, its impact on the bottom and walls will no longer be so destructive, which will help to preserve your tank and the materials from which it is made. And not least, people will also be saved from its destructive influence.
- It can be used even when it rains or a strong wind blows.
- During the winter, the air temperature in the pavilion is slightly higher than outside, so the pool will not be subjected to the test at very low temperatures. This contributes to the fact that the entire system and materials will not become unusable too quickly.
As you can see, by spending a little money on such a simple shelter, you can significantly save money, keep your health and your loved ones healthy, and extend the lifespan.
What should be the roof

In order for the shed above the pool not to be built in vain and to fully fulfill all its tasks for which it was erected, certain requirements must be observed during the construction of such a building. First you need to determine for what purpose it will be intended. After all, both the choice of the material itself and the strategy and technology of the work depends on it. One thing is for sure - the future roof has a construction familiar to us and practically will not differ from other similar ones.

The following are the basic requirements that must be followed when choosing and installing a structure:
- Reliability and durability of the structure. It is clear that such a building will be subject to various external factors, as it will stand all year round. The coating must be strong enough to withstand both the gusts of strong wind and the thickness of snow that will settle on the roof. In this regard, the frame for a canopy should be rigid and reinforced.
- Moisture resistant. This is an important requirement, since it is about a place with high humidity, where water directly falls on the frame. This suggests that the stationary structures based on the wooden frame are not suitable at all, since they will have a short life span. The best option for the construction of the frame will be painted profile tube.
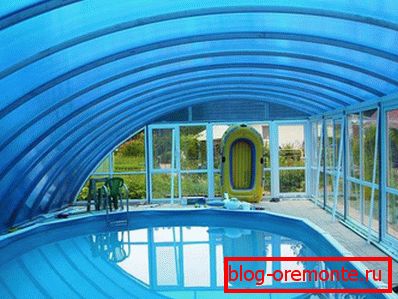
- If we talk about the pavilion, then an important requirement is its tightness. In no case should dust, insects, rain and melt water get into the pool. For this purpose, you need to use a material that will not get wet, it must be solid or with tight joints. Apply polyethylene or fabric in our case is inappropriate. Ideally the professional flooring or polycarbonate will cope with such task.
- Convenience of operation. It is important that the future shed meets your needs and performs the main tasks.
Depending on the size and other features of the pool, there are several types of structures installed above the tank, which are intended for various purposes. Among them:
- fixed visor, which resembles a roof for an ordinary arbor;
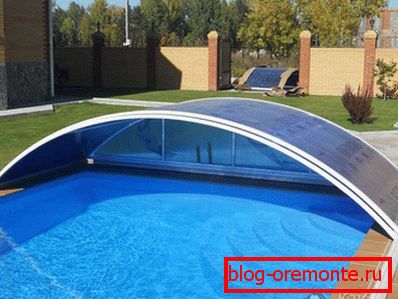
- removable canopy, the frame of which is equipped with a rigid, durable coating material that can be removed and installed manually depending on the need;
- telescopic or retractable design that is easy to clean and put in place. It is constructed only when there is room for rollback;
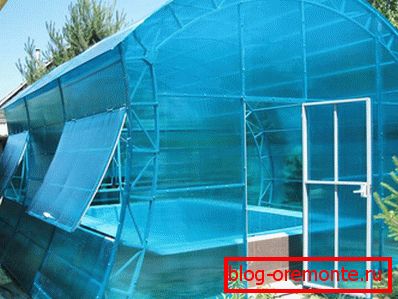
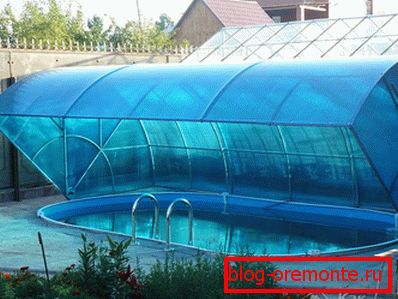
- Pavilion, which completely closes the pool. It visually resembles a greenhouse. This design completely protects against external factors.
Based on these design features, the structures can be divided into the following types:
- closed;
- open;
- low;
- high.
In addition, they all differ in form. Some are made rectangular or round, others are trapezoidal, others are cylindrical or asymmetrical. It all depends on what you expect from a canopy, what is the size of your pool and what is the area near it.

Planning and preparation for construction
The first thing you need to do if you want to build a similar shelter: the type, shape, height, design and purpose of the building - all this must be thought out in advance. For small pools fit stationary canopy, which will cover him in bad weather and protect the swimmers from the scorching sun. If the size is large, and the area allows you to place a pavilion, then you can build it. It all depends on your choice and needs.
It is advisable to design a future shed, specifying the dimensions and all the features to navigate during construction. This can be done both on paper, drawing a detailed scheme, and creating a project with the help of a building program on a computer. Then you can calculate the approximate consumption of materials. If you are not particularly good at this, look for detailed plans on the world wide web and choose the one that best suits you.
Now it is time to realize all that is written on paper. For example, we consider how to build a stationary canopy for the pool. To do this you need the following tools and materials:
- the material to be coated;
- square tube with square or rectangular section;
- concrete solution;
- bolts and screws;
- shovel;
- sand and crushed stone;
- rope and stakes;
- welding machine;
- concrete mixer;
- roulette and level;
- perforator;
- screwdriver;
- hacksaw and jigsaw;
- ceramic tile.

It is better to use polycarbonate sheets as a coating material. It is becoming more popular and is often used for the manufacture of visors for the pool. And this is no accident, as it has several advantages:
- Low weight and durability.
- Simplicity of care and durability of the material.
- Resistance to corrosion, to various weather conditions.
- Fireproof.
- The ability to transmit sunlight, dispelling it.
- Democratic value.
When you have prepared the material and all the necessary tools, you can start work on the construction of your polycarbonate coating.
Base for a canopy

Despite the fact that polycarbonate is light enough material, the whole structure will have a decent weight. Therefore, it is better to install such a canopy on a solid concrete foundation, the depth of which is 50 cm and the thickness is 20 cm. A framework will be installed on such a blind area. Then you can trim the sides with tiles to make everything more attractive and protect the base from moisture.
You will need a shovel, tape measure, level, rope and pegs. To begin, mark the area with pegs and a rope. Stick to exact sizes. Along the perimeter, focusing on the markup, you need to dig a trench 60 cm deep. Watch for the evenness of the bottom of the trench and the walls. After that, cover the sand with a layer of 5–10 cm at the bottom, tamp it down and re-fill the layer of rubble and sand at 5–10 cm. Make a formwork that is a multiple of one or two ceramic tiles (depending on their size) to be covered with blind area. Now mix the concrete solution and fill the foundation. It remains only to wait until the concrete has gained strength, namely 1 month.
Another variant of the base - when the supporting pillars simply dig into the ground, then there is no need to make a foundation. This type is suitable in such a case, when the ground is quite dense. Deepen the pillars need not less than 60 cm.
Manufacturing frame
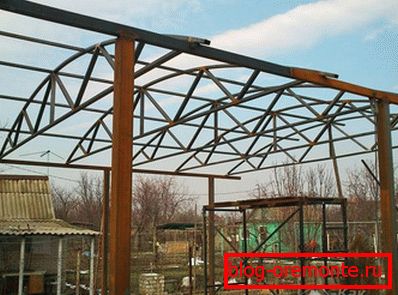
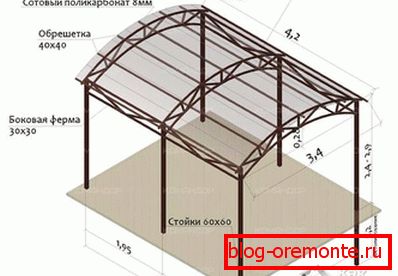
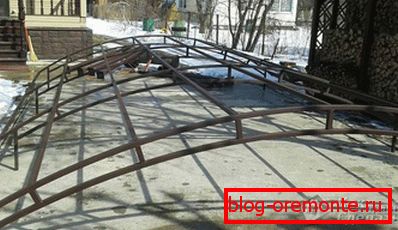
After that, it's time to make a frame that will eventually be sheathed with polycarbonate. It will be made of a shaped pipe, which must be treated with an anti-corrosion agent before use. The roof can be made flat or arched. In this case, the profile should be cut in three places, bend and brew with a welding machine. If you are not confident in your abilities, it is better to entrust such work to a professional.
- First you need to install support columns with a pitch of about 1 m. They either go deep into the ground, or join the foundation with anchor bolts. Top is strapping.
- Now you need to weld or bolt the transverse profiles, flat or arched, and mount stiffeners between them.
What design you will have depends on your choice. Its size and design is chosen by you personally. It is important to adhere to exact dimensions and check the evenness of your design.
Polycarbonate frame casing
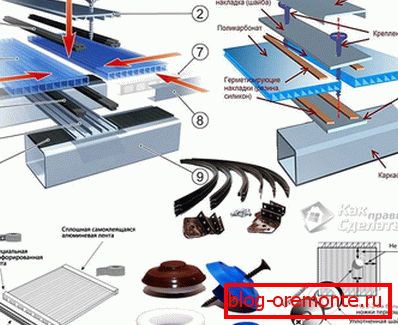
The last, final stage of the canopy construction is its covering. To perform it, you must:
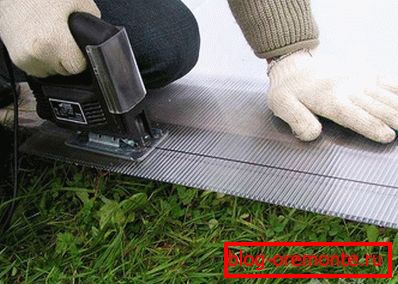
- Mark the polycarbonate sheets by marking where it will connect to the frame itself. In those places you need to drill holes for screws. Do not remove the film from the material so as not to damage it. The hole for the screw should be slightly larger than the screw itself. This is done because polycarbonate can expand under the influence of heat, if you make a hole of the same diameter as the screw, the material can crack when expanding into the sun.
- Now it is necessary to sheathe the frame (roof) with the butt-to-butt sheets. Using a screwdriver, connect the sheets with self-tapping screws. Be sure to under their caps need to substitute galvanized washers that cover the holes.
- Handle the joints between the sheets and the place of attachment with silicone sealant.
Now your pool and you are protected from the effects of rain and sun. But what if you need to cover your tank completely so that garbage does not get there, the wind and it is protected from all sides? Need to make a pavilion. The manufacturing principle is similar. The only difference is that the material needs more, since the frame must be sheathed completely. It can be of any height and shape, depending on your desire.
To build such a canopy under the force of everyone, the main thing is to show imagination, make a detailed drawing, purchase material and follow the recommendations for construction. To summarize, all work can be divided into the following stages:
- The choice of design and preparation of the plan.
- Procurement of materials and tools.
- Preparation of the base.
- The construction of the frame.
- Sheathing frame chosen material.
Video
How is the installation of sliding structures, see below:
See also:
- How to make a canopy.
- How to make a concrete pool.
- How to build a frame pool.