Bath from foam blocks with their own hands
Bath is a structure, by its definition, forced to be environmentally friendly, warm and comfortable. For a long time, steam rooms were made of wood, and it is just such a bath that today represents the majority of people. But a frame bath or a bath of wooden logs in the present conditions is too expensive, because the prices for natural materials have “incredibly soared” lately. And the quality of sold materials leaves much to be desired. Therefore, a bath of foam blocks made of cellular concrete has become a worthy alternative to timber. And cellular concrete (foam concrete) does not contain hazardous chemical compounds in its composition and is distinguished by high operational performance.
In this article we will talk about how to build a foam-block bathhouse with your own hands, give step-by-step instructions, as well as photo and video materials.
Characteristics of the foam block
The foam block is similar in its properties to wood, but is fireproof and has a lower level of radioactivity. It also has a small mass, which with relatively large sizes of foam blocks is especially convenient for transportation, masonry and mounting.

To build a bath of foam blocks without any extra effort, due to the fact that this material is perfectly sawn, cut and even scraped with a traditional hacksaw or with an ax (economic / tourist). The fasteners are also well driven into the foam concrete.
The only flaw in this loose material is poor resistance to moisture. Therefore, for the construction of the bath is better to choose high-quality foam with high strength, containing a waterproof primer. Such foam block walls will practically not absorb moisture. The popular brand of the manufacturer and high-quality material of foam concrete should come first, because any fake will absorb moisture like a sponge.
The foundation for a bath
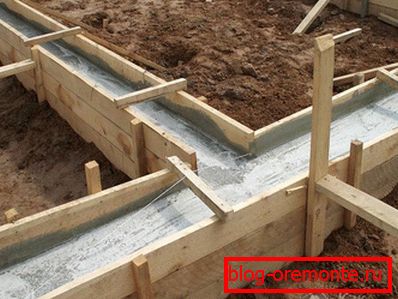
During the construction of the bath of concrete-containing foam should be competently to lay the foundation. For this purpose, a ditch is pulled out with a depth of 60 cm and a width of 30 cm. Then, using the laser level, you need to drive four pins along the edges of the dug pit, stretch the rope and hammer in additional, intermediate rods along the entire length of the base every 1.9 meters. This is necessary so that later there will be no difficulties during the verification of the foundation for evenness according to the two-meter rule.
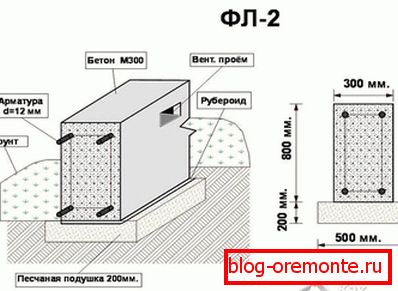
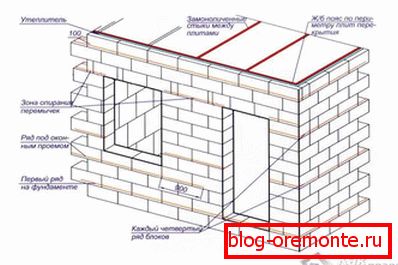
At the end of the above described reinforcement (with an iron thickness of not less than 12 mm), a framework is performed. Formwork is assembled from boards, the approximate width of which should be 20–30 mm. Then the foundation is evenly poured with concrete, preferably grade 200. The resulting base height of 70–75 cm is enough if a compact foam concrete bath is being built. In addition, in the thickness of the basement, a sewage system with a ten-centimeter spillway receiver (ladder) should be installed. On top of all put steel mesh. After a couple of days, you can resume activity on fully frozen cement.
Walling
After laying waterproofing (polymer films or layers of fiberglass) on top of the base of the bath comes the construction of walls. General recognition among the builders of the baths earned foam block brand M25 with a density of D700. Its dimensions are best for any construction work - 10? 30? 60 cm.
By means of the construction level, the highest angle of the structure is determined and the subsequent construction of the foam concrete walls is carried out from it.
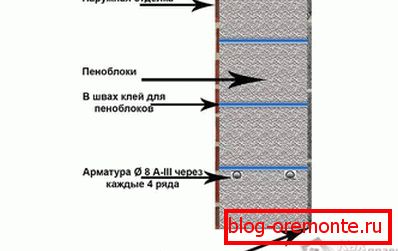
Foam blocks should be laid on the edge, and the seams should be made minimal - it is required that the building does not lose its heat through them. Indeed, despite the fact that foam concrete is one of the most heat-saving materials, the invaluable heat of the steam room can “leave” along the so-called “cold bridge”.

Laying the first row is the most significant and decisive step. In this series, the fixing of the blocks among themselves is carried out using a conventional cement-sand mortar. After completion of the row layout, the surface is required to carefully level and compensate for all differences in the height of the foundation and irregularities with bumps. And it is this stage that determines how convenient the subsequent work will be. Therefore, the laser level should be applied regularly, and all blocks should be installed in its place using a mallet with a rubber head. To build more comfortable, you can stretch the line between the corners of the future bath.
Laying the second and subsequent rows requires mounting on a special glue - it can be diluted with water directly at the construction site. Buy this glue is most often possible in bags in the form of a dry mix. It usually takes about 5–10 minutes to prepare. The use of this glue is minimal, and its thickness during laying is never more than half a centimeter.

Bath of foam concrete, built with the use of such glue, has dense walls, almost no joints and "bridges of the transition."
Masters-professionals advise to put foam blocks in three rows, placing between them a reinforcing layer of steel mesh. This must be done to fully strengthen the integrity of the structure. And to block the door and window openings in the foam block walls is not at all difficult if you fill the formwork with concrete or use typesetting elements of factory production.
For laying the initial row of walls from the foam block it is necessary to select the blocks of maximum density, adjusting them by cementing. The following rows will require specific glue. It is prepared from bulk mixtures containing glue. For cooking you need a small-diameter tank and a drill with a whisk.
Do not expect perfect hardening of the adhesive. It is quickly spread around the entire perimeter of the block, foam blocks are laid on top, they immediately level off with a mallet.
It is important to adhere to the horizontal and vertical levels. They can be verified by building or laser level.
Roof
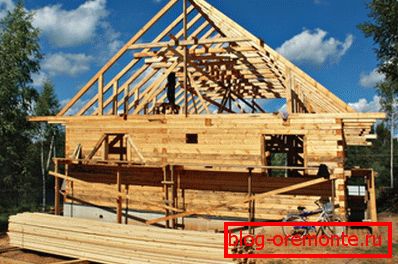
After the construction of the walls, the rafters are installed under the shed (which are boards of 10–40 cm) and the uterus (transverse logs for roofing) from a board of 15–50 cm. The batten should be fixed with a gap of half a meter. The ideal gap between the rafters is 10.2 cm. A 2.5 cm wide preliminary canopy is placed between the queens, and a foam layer 19 cm thick is placed on the next layer. Then an attic plank floor 2.5 cm thick is laid on the uterus.
In the ceiling of the foam block bath, you definitely need to make a couple of holes for ventilation. It is desirable to cover the roof from the outside with a professional flooring, and to glue the pediment with roofing felt.
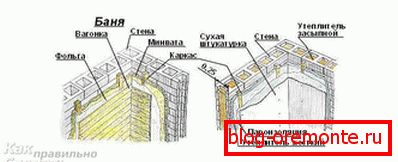
Bath decoration
Any concrete containing foam to create a bath is vulnerable to moisture - even the most expensive. From this it follows that waterproofing (protection against water penetration) is paramount.
The waterproof insulation of the surface of the foam block walls of the bath is made by impregnating them with water-repellent compounds, supplemented from the inside by laying a special protective film.
The creation of a foam concrete bath often implies exterior finishing for aesthetic purposes. The best method of external veneering for foam concrete is the newest ventilated facades of the mounted type, which give excess moisture from the thickness of the blocks to the atmosphere. The most suitable for this are such types of siding (non-combustible materials for wall cladding), fixed to the frameworks:
- socle siding;
- vinyl siding.
In order for the air movement to be free, the skin should be protected from the wall surface by at least 5–7 cm. In the bath room, steam insulating is arranged by means of synthetic vapor-proof membranes embedded in the space between the facing and the wall.
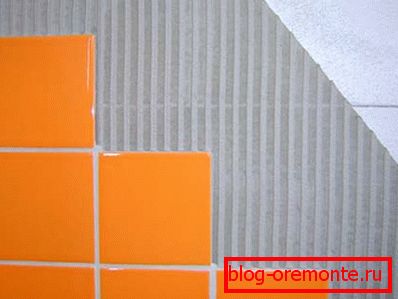
Inside, the bath is sewn with wood, covered with synthetic paints on top of the plaster or laid with ceramics. It is pleasant to many people if there is a woody smell in the bath. Therefore, the lining of wood foam walls from the inside is quite popular. But not any tree is suitable for a bath because of its specific wet-temperature structure. The best for this purpose - conifers, pine or spruce (except steam). But in rare cases, they can cause allergies.
Aspen or linden should be used for sheathing steam rooms, which are excellent thermal insulators and do not heat up at high temperatures. It is important that the selected timber is of high quality, and there are no subsequent distortions due to increased dampness. Also, before lining the wood must be treated by removing the outer layers, most susceptible to undesirable effects of water. They are cut and covered with an already prepared tree with a specialized waterproof insulating compound.
So, for a fairly short time and without extra effort, a durable, light, warm and environmentally friendly bath is being constructed from foam blocks, which can be called a worthy successor to traditional timbered steam rooms.
Video
Pay attention to the possibility of warming the bath outside: